Create webhook
Learn how to create a webhook in NocoDB.
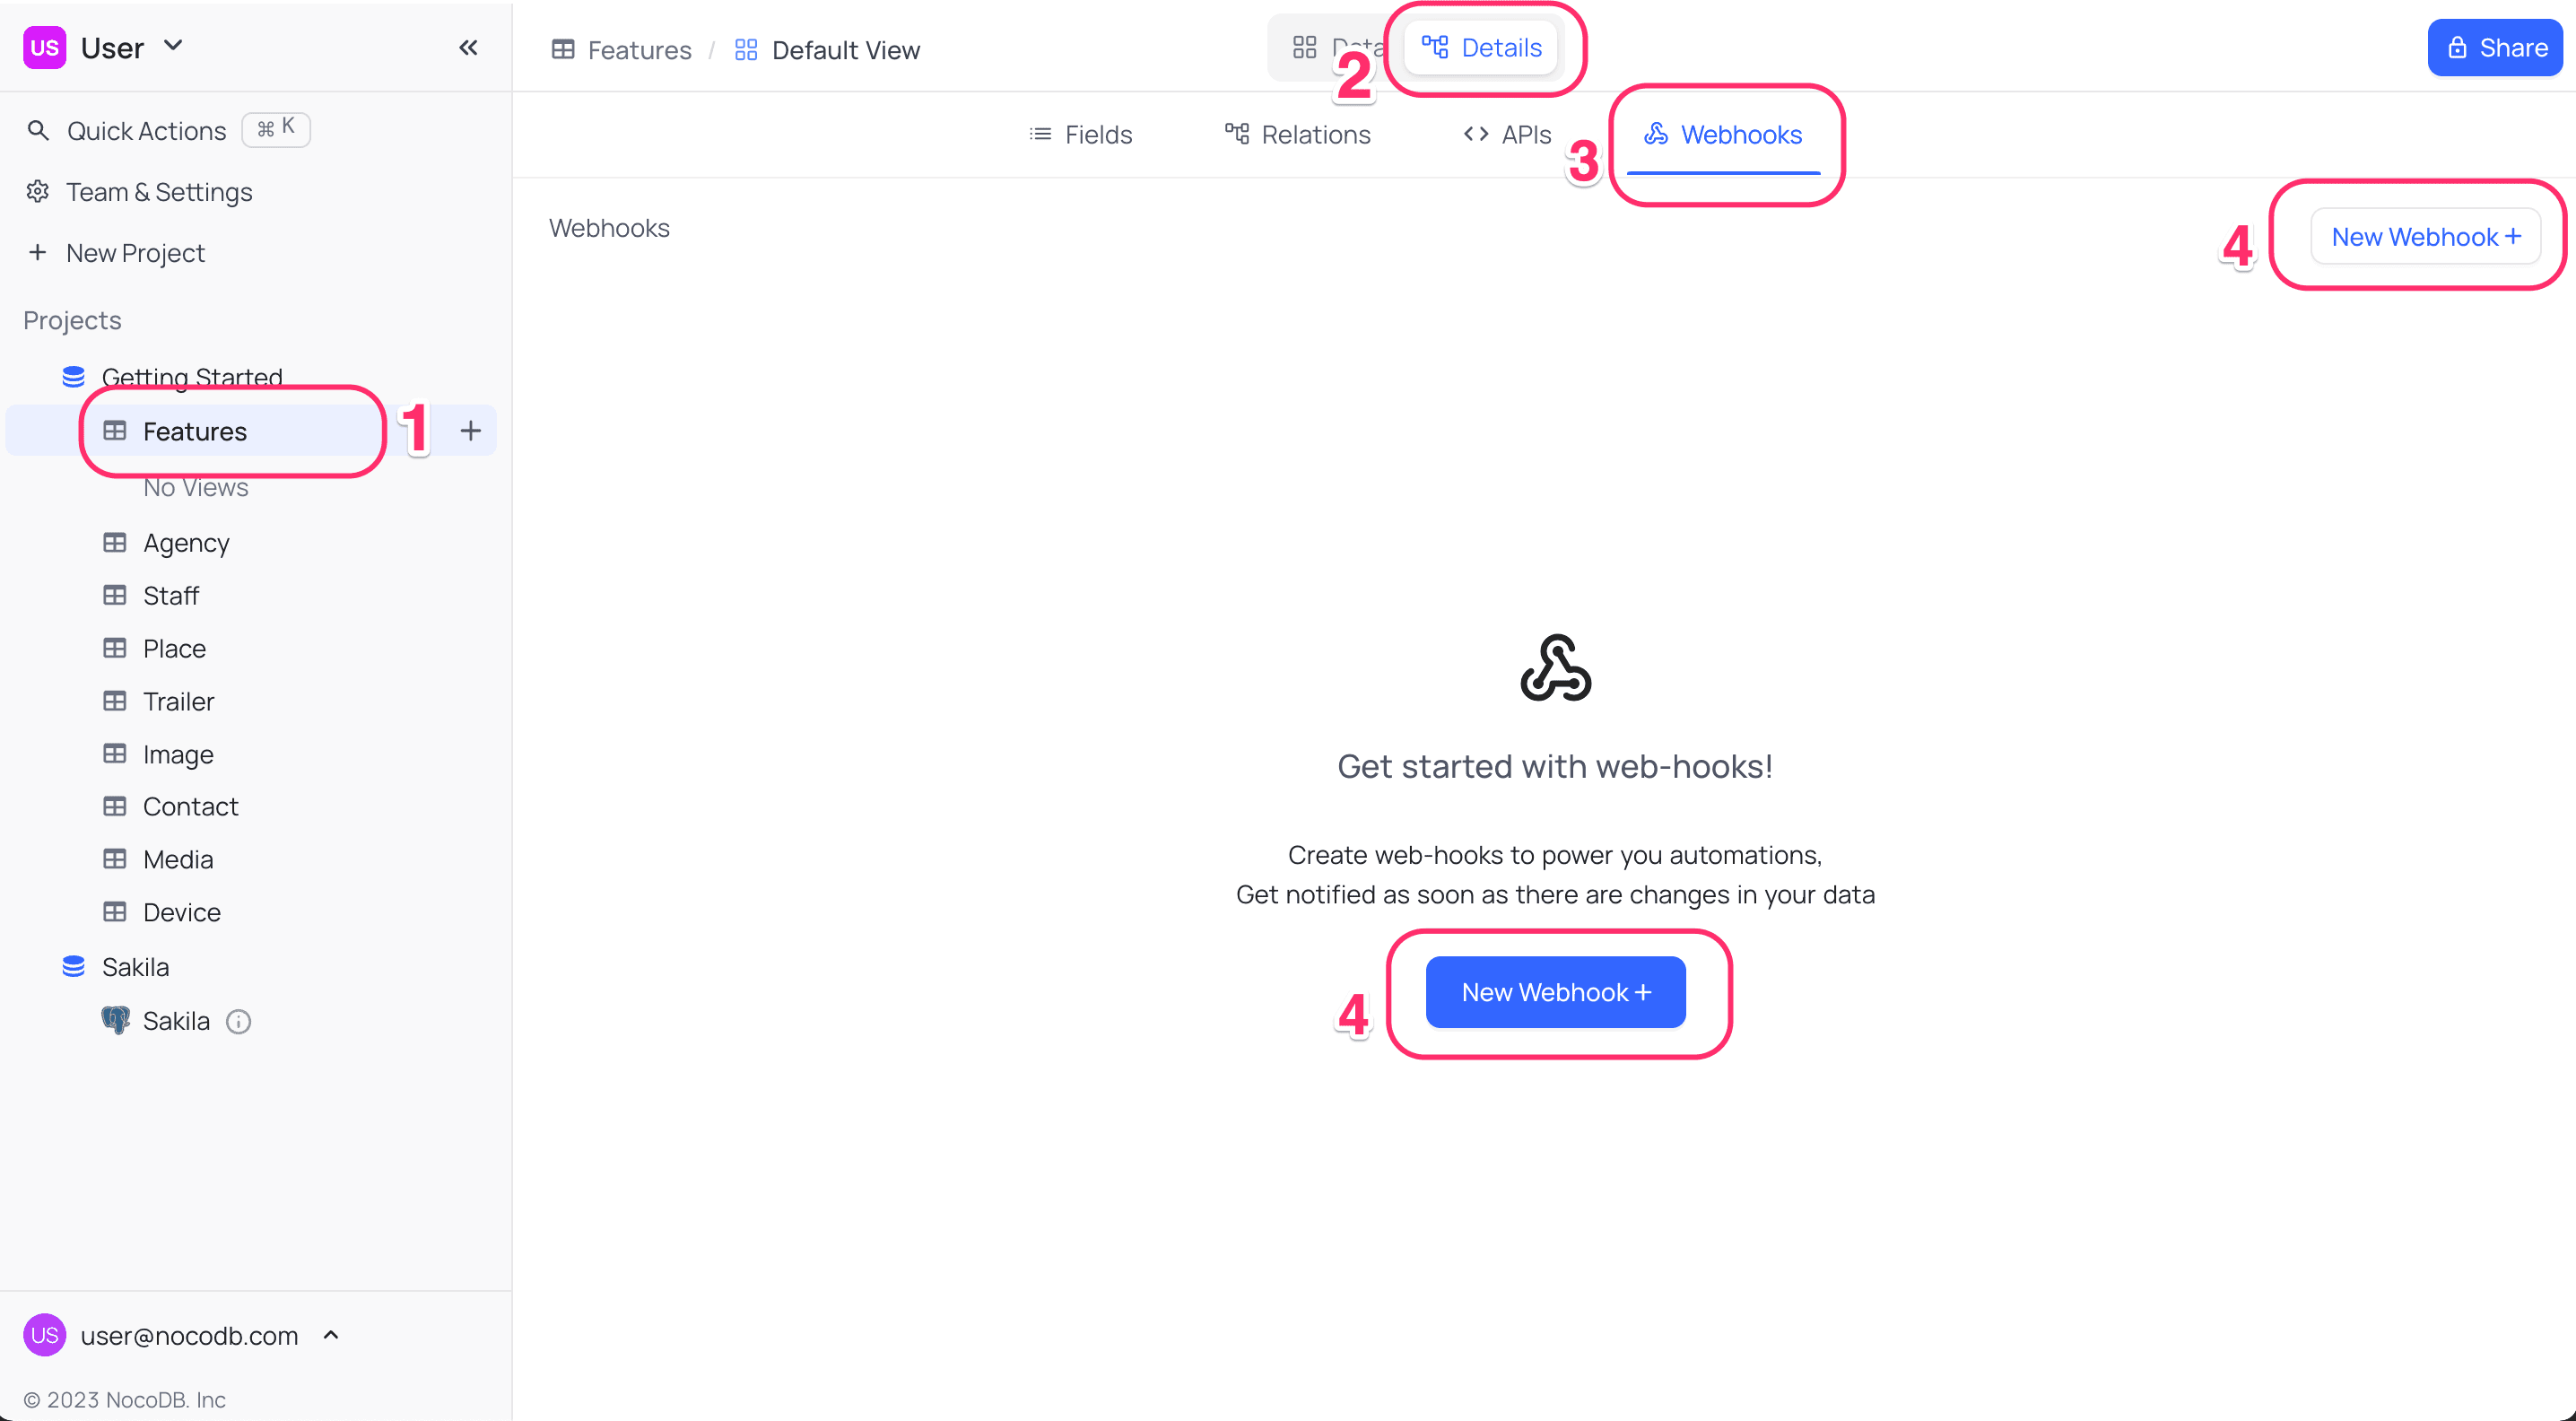
Accessing webhook page
- Click on table for which webhook needs to be configured on the left sidebar
- Open
Detailstab in topbar, - Click on
Webhookstab - Click
Add New Webhook
Configuring webhook
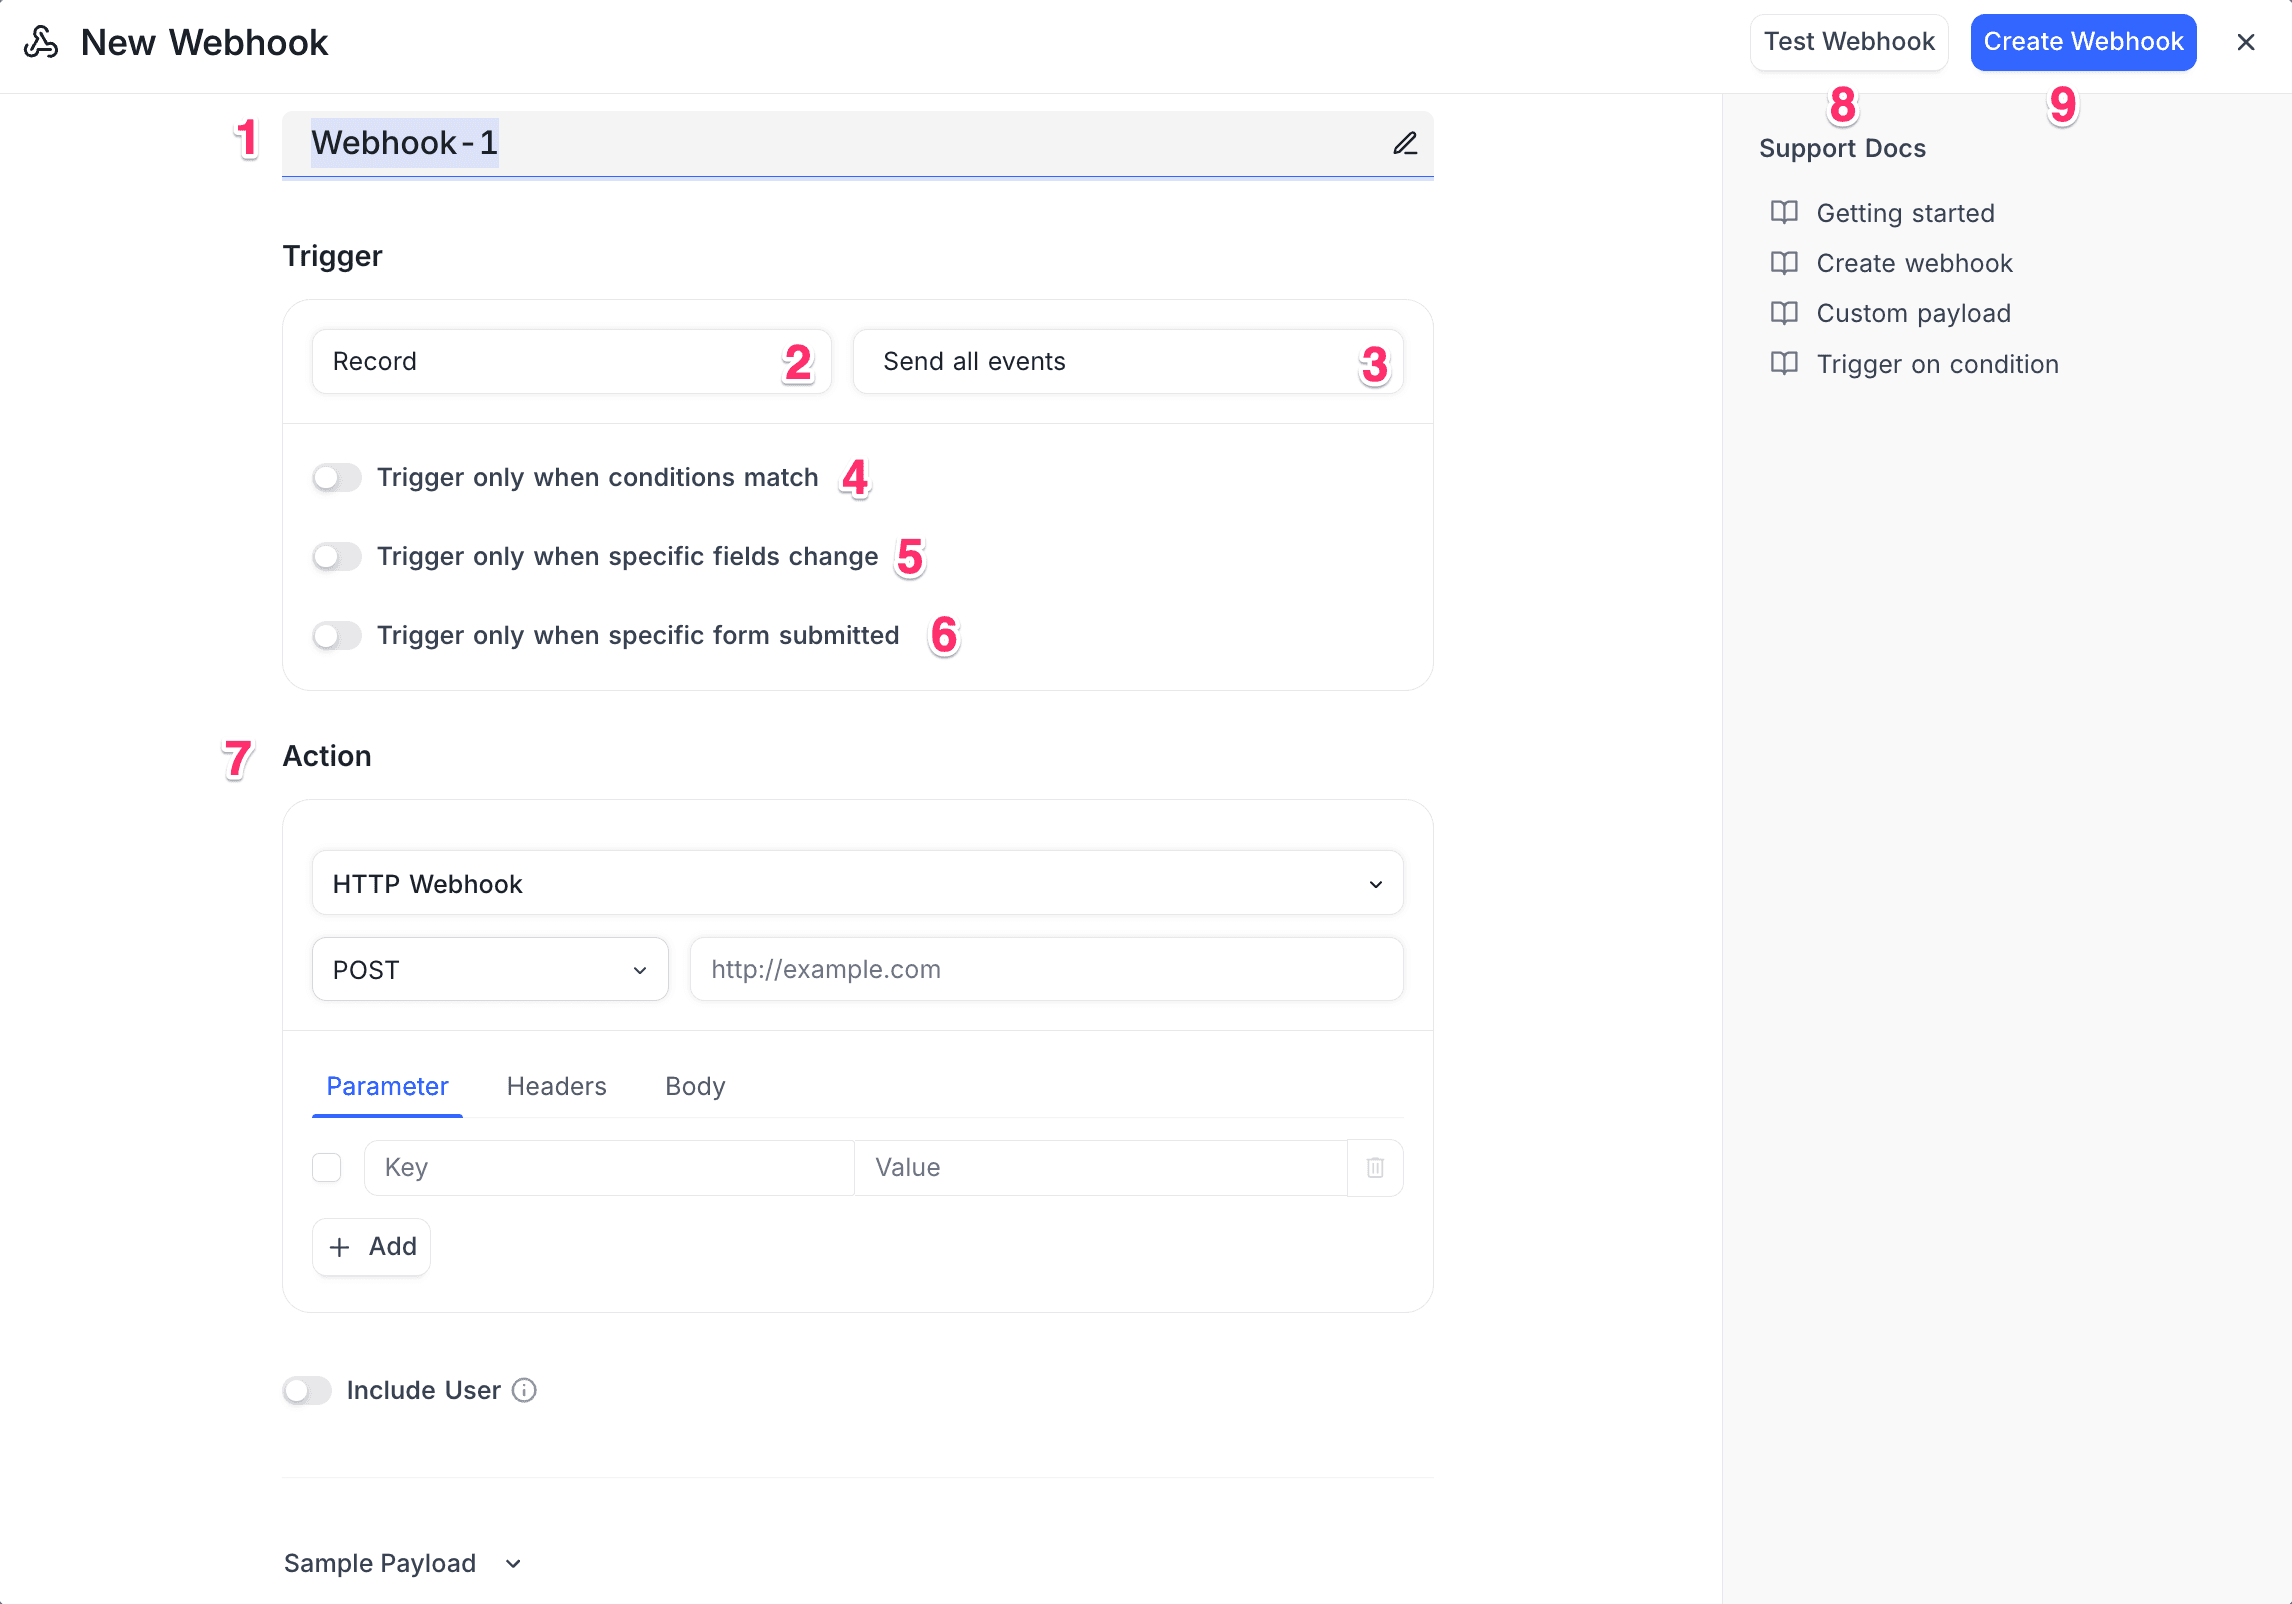
-
Name the webhook - Give a clear & descriptive name.
-
Select the Trigger Source type :
Trigger Source type View, Field, and Comment are only available in the paid plans, in both cloud & self-hosted.- Record - Triggers when a record is inserted, updated, or deleted, or for all actions if “Send me everything” is selected.
- View - Triggers when a view is created, updated, or deleted, or for all actions if “Send me everything” is selected.
- Field - Triggers when a field is created, updated, or deleted, or for all actions if “Send me everything” is selected.
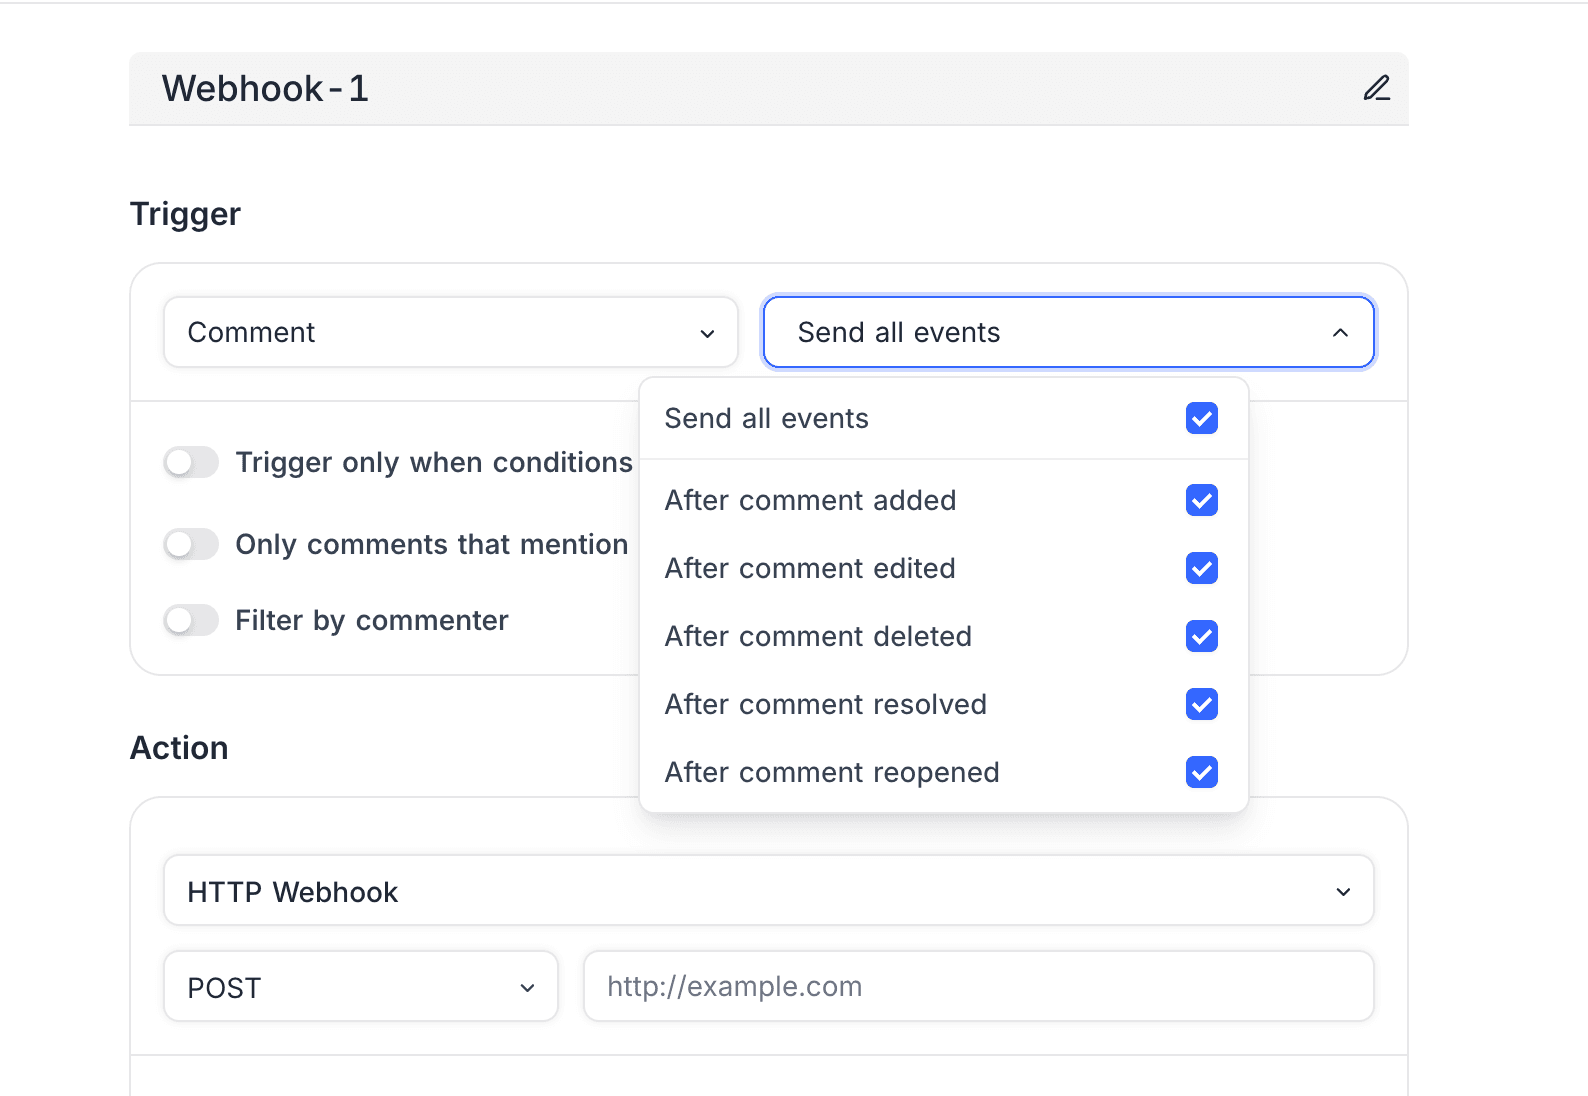
- Comment - Triggers when a comment is added, edited, deleted, resolved, or reopened on a record. See Comment trigger for the comment-specific filters and payload.
- Manual Trigger / Button Trigger - Trigger runs when a user manually clicks a webhook configured button.
-
Select Trigger Event type : Refer table here for available events for each source
-
[Optional] Trigger based on condition : details here
Conditions are only applicable for Record trigger source events- Specify the condition for which webhook should be triggered
- You can select multiple conditions
- If no condition is selected, webhook will be triggered for all records
-
[Optional] Trigger for updates in specific fields : details here
This is only applicable for RecordAfter Updateevent.- Select the fields for which webhook should be triggered.
- If no field is selected, any field update will trigger webhook
-
[Optional] Trigger only when specific form submitted: details here
This is only applicable for RecordAfter Insertevent.- Select the form for which webhook should be triggered.
-
Webhook Action : Select the action to be performed when webhook is triggered. Action can be one of the following:
-
HTTP Request : Send an HTTP request to a specified URL. You can configure the HTTP method, headers, parameters, and body of the request.
- Method & URL : Specify the endpoint that the webhook will call when triggered. You can choose from the following HTTP methods: GET, POST, PUT, DELETE, PATCH, and HEAD.
- Headers & Parameters : Configure Request headers & parameters
- Body : Configure request body. You can use handlebar syntax to access and manipulate the data easily. For example,
{{ json event }}will give you the complete event data (default behaviour if body not configured).
-
Run Script : Run a custom script using NocoDB's built-in scripting engine. You can write JavaScript code to perform various actions when the webhook is triggered.
- Script : Select the script to be executed when the webhook is triggered. You can create and manage scripts in the
Scriptstab in the left sidebar.
- Script : Select the script to be executed when the webhook is triggered. You can create and manage scripts in the
-
-
[Optional] Click Test webhook button to verify if parameter are configured appropriately (with sample payload)
-
Click Create Webhook button to complete webhook creation
Trigger Source and Event
Webhooks in NocoDB can be configured based on the source of the trigger and the type of event. The table below outlines the available combinations:
| Trigger Source | Trigger Event | Description |
|---|---|---|
| Record | Send Me Everything | Triggers on any record insert, update, or delete operation |
| After Insert | Triggers after one or more records are inserted | |
| After Update | Triggers after one or more records are updated | |
| After Delete | Triggers after one or more records are deleted | |
| View | Send Me Everything | Triggers on any view create, update, or delete operation |
| After Create | Triggers after a view is created | |
| After Update | Triggers after a view is updated | |
| After Delete | Triggers after a view is deleted | |
| Field | Send Me Everything | Triggers on any field create, update, or delete operation |
| After Create | Triggers after a field is created | |
| After Update | Triggers after a field is updated | |
| After Delete | Triggers after a field is deleted | |
| Comment | Comment Added | Triggers after a comment is added to a record |
| Comment Edited | Triggers after a comment is edited | |
| Comment Deleted | Triggers after a comment is deleted | |
| Comment Resolved | Triggers after a comment thread is resolved | |
| Comment Reopened | Triggers after a resolved comment thread is reopened | |
| Button Trigger | — | Triggers when a button field is clicked |
For more details on using Button Trigger webhooks with the Button field, see the Button field documentation.
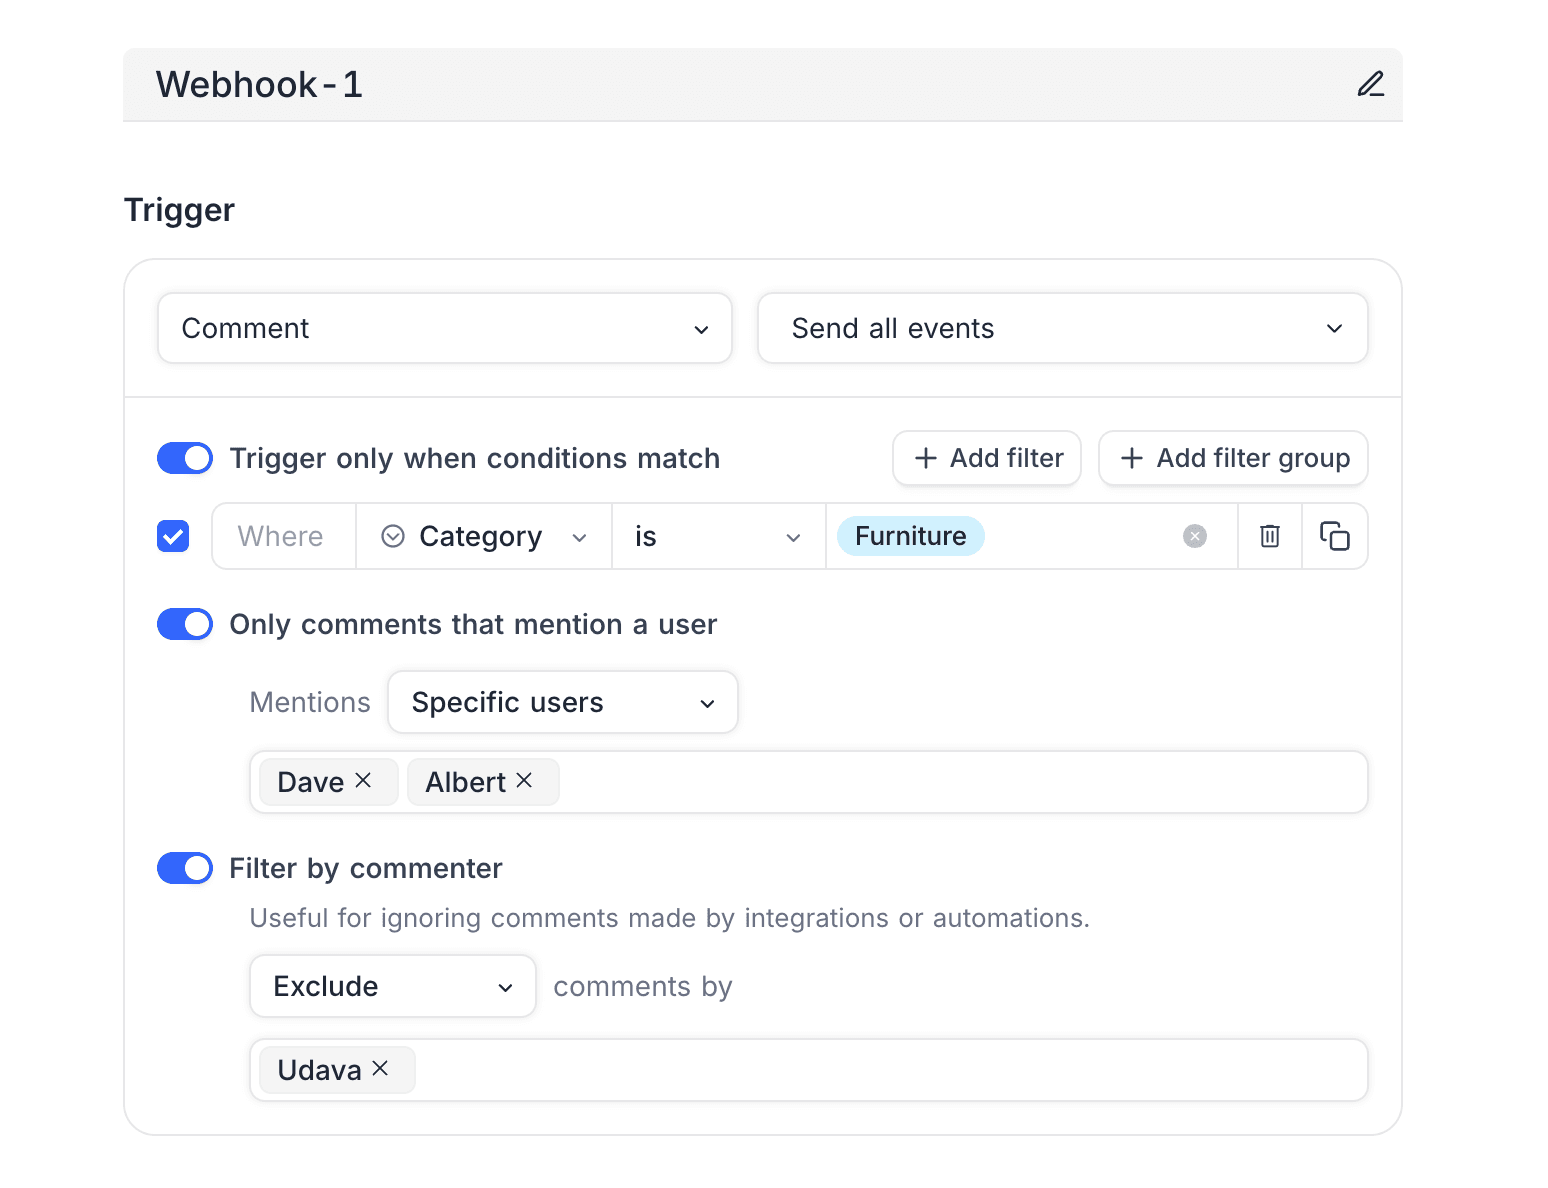
Comment trigger
The Comment trigger source fires when a comment is added, edited, deleted, resolved, or reopened on a record. Pick the specific comment events you want to listen for when configuring the webhook.
Comment triggers support a few dedicated filters to narrow down when the webhook runs:
- Only comments that mention a user - Restrict the trigger to comments that @mention someone. Under Mentions, choose Anyone to fire on any mention, or Specific users to fire only when the selected users are mentioned.
- Filter by commenter - Choose to Include or Exclude comments by specific commenters. Excluding commenters is useful for ignoring comments made by integrations or automations.
- Trigger only when conditions match - Reuse the standard condition builder to fire only when the comment's parent record matches the specified conditions.
The webhook payload includes the comment (id, body, body_plain, author), the parent_comment_id, the parent record (id and display_value), and the mentions array. Edited comments also include a previous block, and resolved or reopened comments include a resolution block.
{
  "type": "comment.insert",
  "id": "b2c9c6a1-4a1f-4e2a-9d0c-1e6f0a3d5b21",
  "version": "v3",
  "data": {
    "table_id": "mbmppjnstflsqq1",
    "base_id": "p1a2b3c4d5e6f7g",
    "comment": {
      "id": "cmt_sample_comment_id",
      "body": "Looks good @(usr_sample_user_id|user@example.com|Sample User)",
      "body_plain": "Looks good @Sample User",
      "author": {
        "id": "usr_sample_user_id",
        "name": "Sample User",
        "email": "user@example.com"
      },
      "created_at": "2026-07-09T10:40:20.998Z",
      "updated_at": "2026-07-09T10:40:20.998Z"
    },
    "parent_comment_id": null,
    "record": {
      "id": 1,
      "display_value": "Task-1"
    },
    "mentions": [
      {
        "id": "usr_sample_user_id",
        "name": "Sample User",
        "email": "user@example.com"
      }
    ]
  }
}
Run Script action ☁
The Run Script action enables you to execute custom JavaScript code directly within NocoDB whenever a webhook is triggered. It is ideal for use cases where data needs to be processed or transformed internally. When triggered, the associated script runs within NocoDB’s secure scripting engine and automatically receives an event object (see example below) containing the webhook context, such as record creation, update, or deletion details.
/*
  Update record on trigger; This script updates the 'Department' and 'Employment Status' fields when a new record is inserted. Note the usage of `cursor.row` to access the record that triggered the webhook.
*/

const record = cursor.row;

// Exit if no record found (safeguard)
if(!record) {
  return
}

// Get the table
const table1 = base.getTable("Employee")

// Update the record
await table1.updateRecordAsync(record.id, {
  "Department": "New Hire",
  "Employment Status": "Active"
})
Refer to the Scripts documentation for detailed guide on creating and managing scripts. Note that, scripts that seek explicit user input (such as input.textAsync()) cannot be used in webhook context, since webhooks run in the background without user interaction.
Webhook with conditions
Webhooks (record trigger related) in NocoDB can be configured to trigger only when specific conditions are met. For example, you may choose to trigger a webhook only when the Status field is set to Complete. You can define multiple conditions using logical operators like AND or OR—such as triggering the webhook on record update only when Status is Complete and Priority is High.
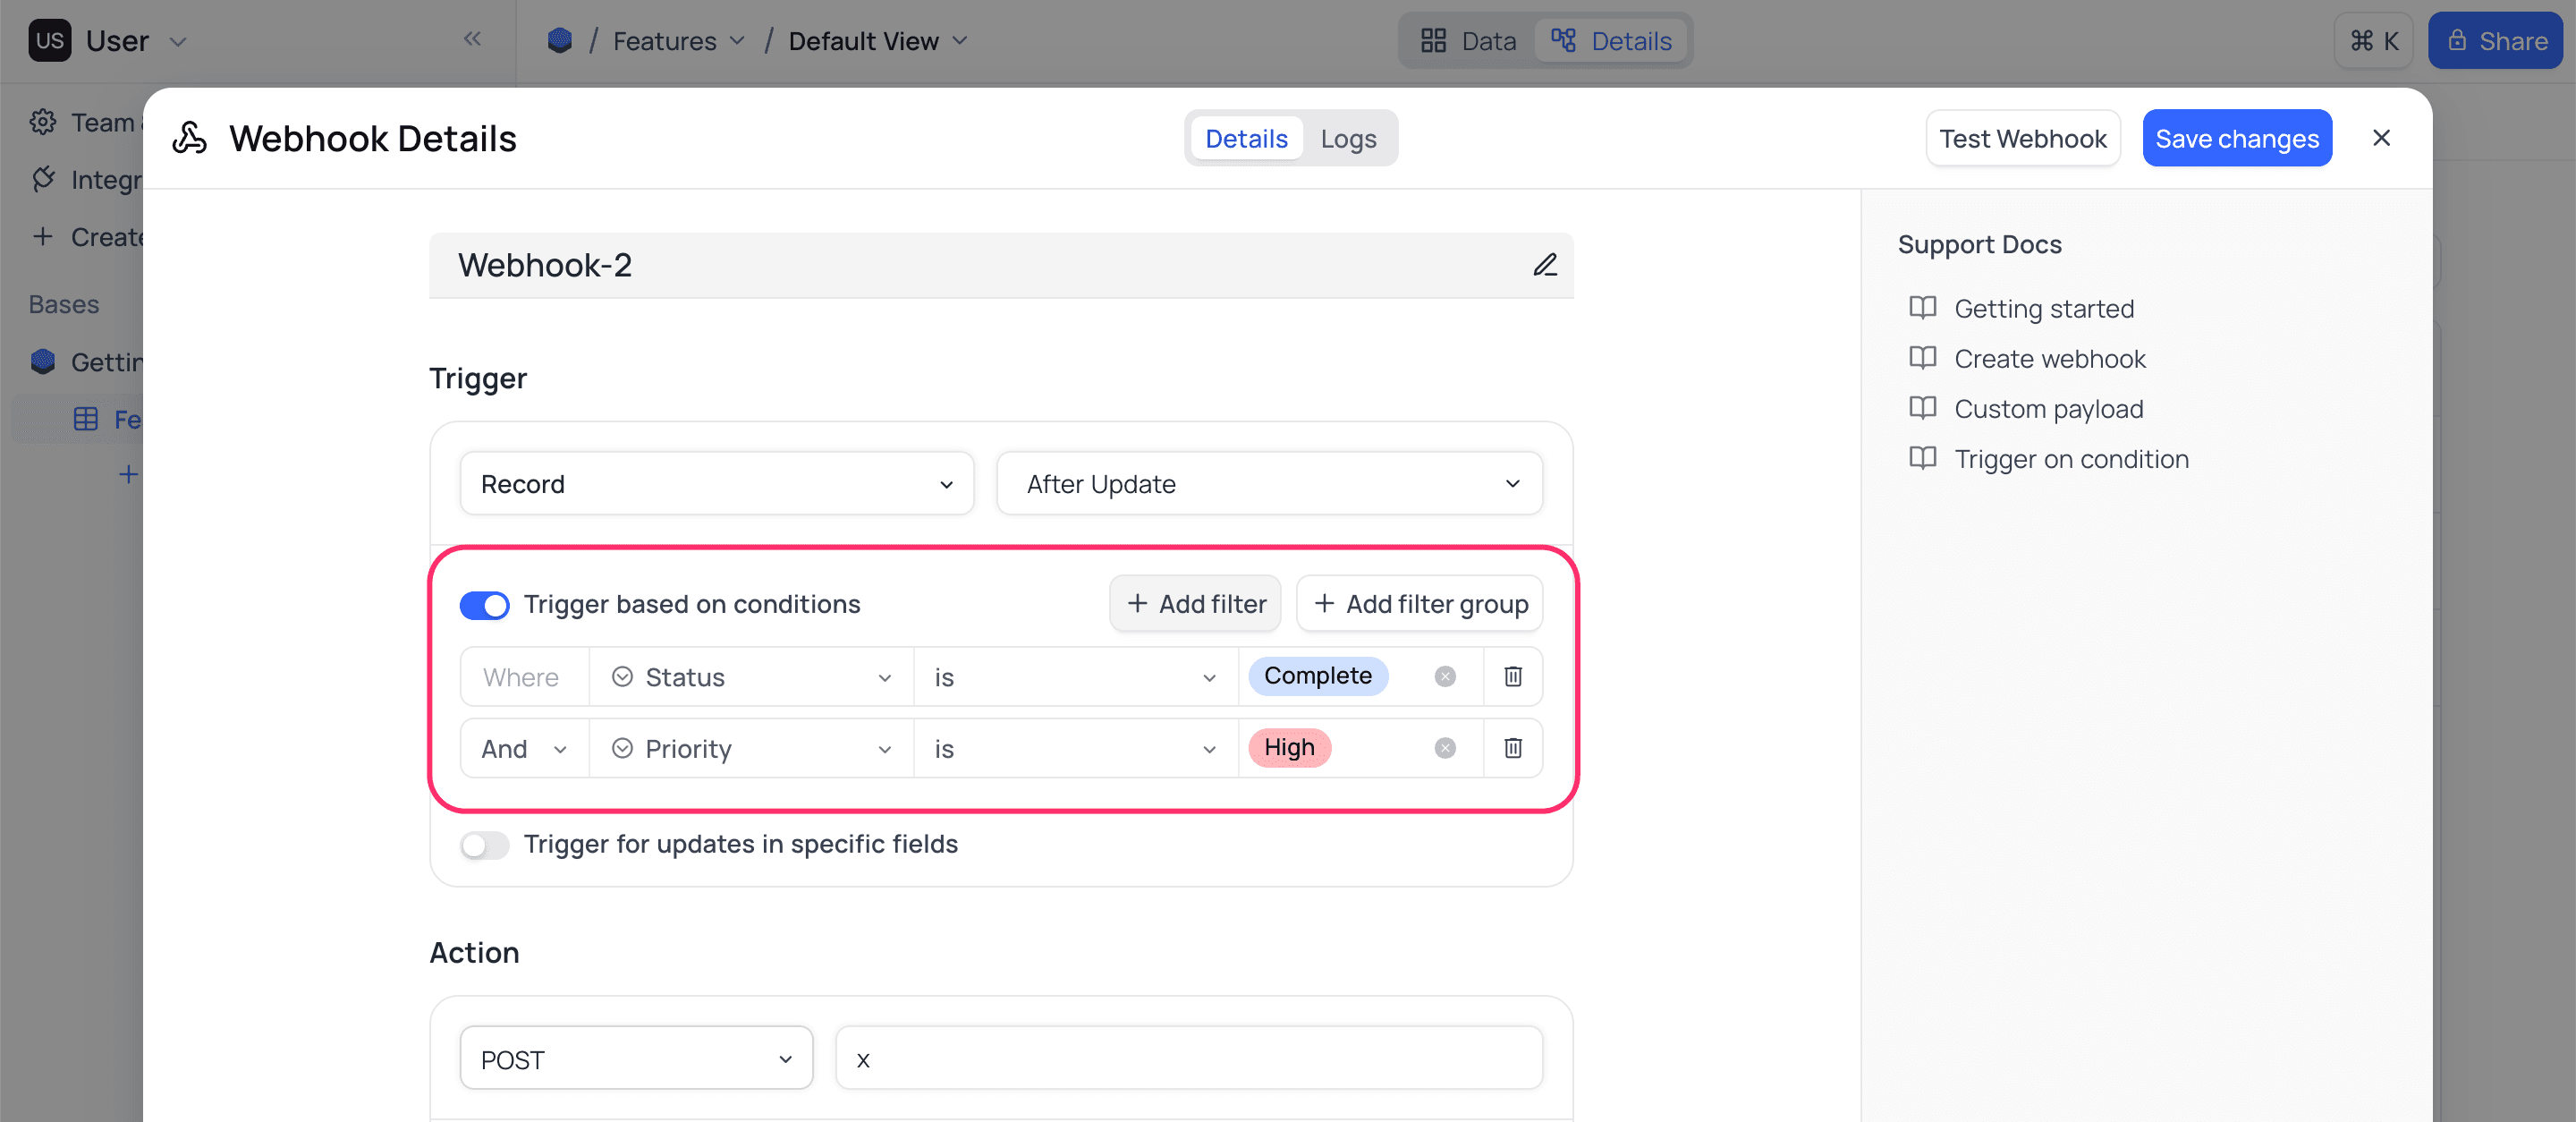
A webhook will only be triggered if the condition transitions from not met to met during a record event. For instance (for above example), if the original record has Status = Complete and Priority = Low, and you update it to Priority = High, the webhook will trigger—since the condition was not met before but is met after the update. However, if a record already satisfies the condition (Status = Complete and Priority = High) and you update unrelated fields, the webhook will not be triggered.
In short, a webhook is triggered only when the condition changes from false (old record) to true (new record).
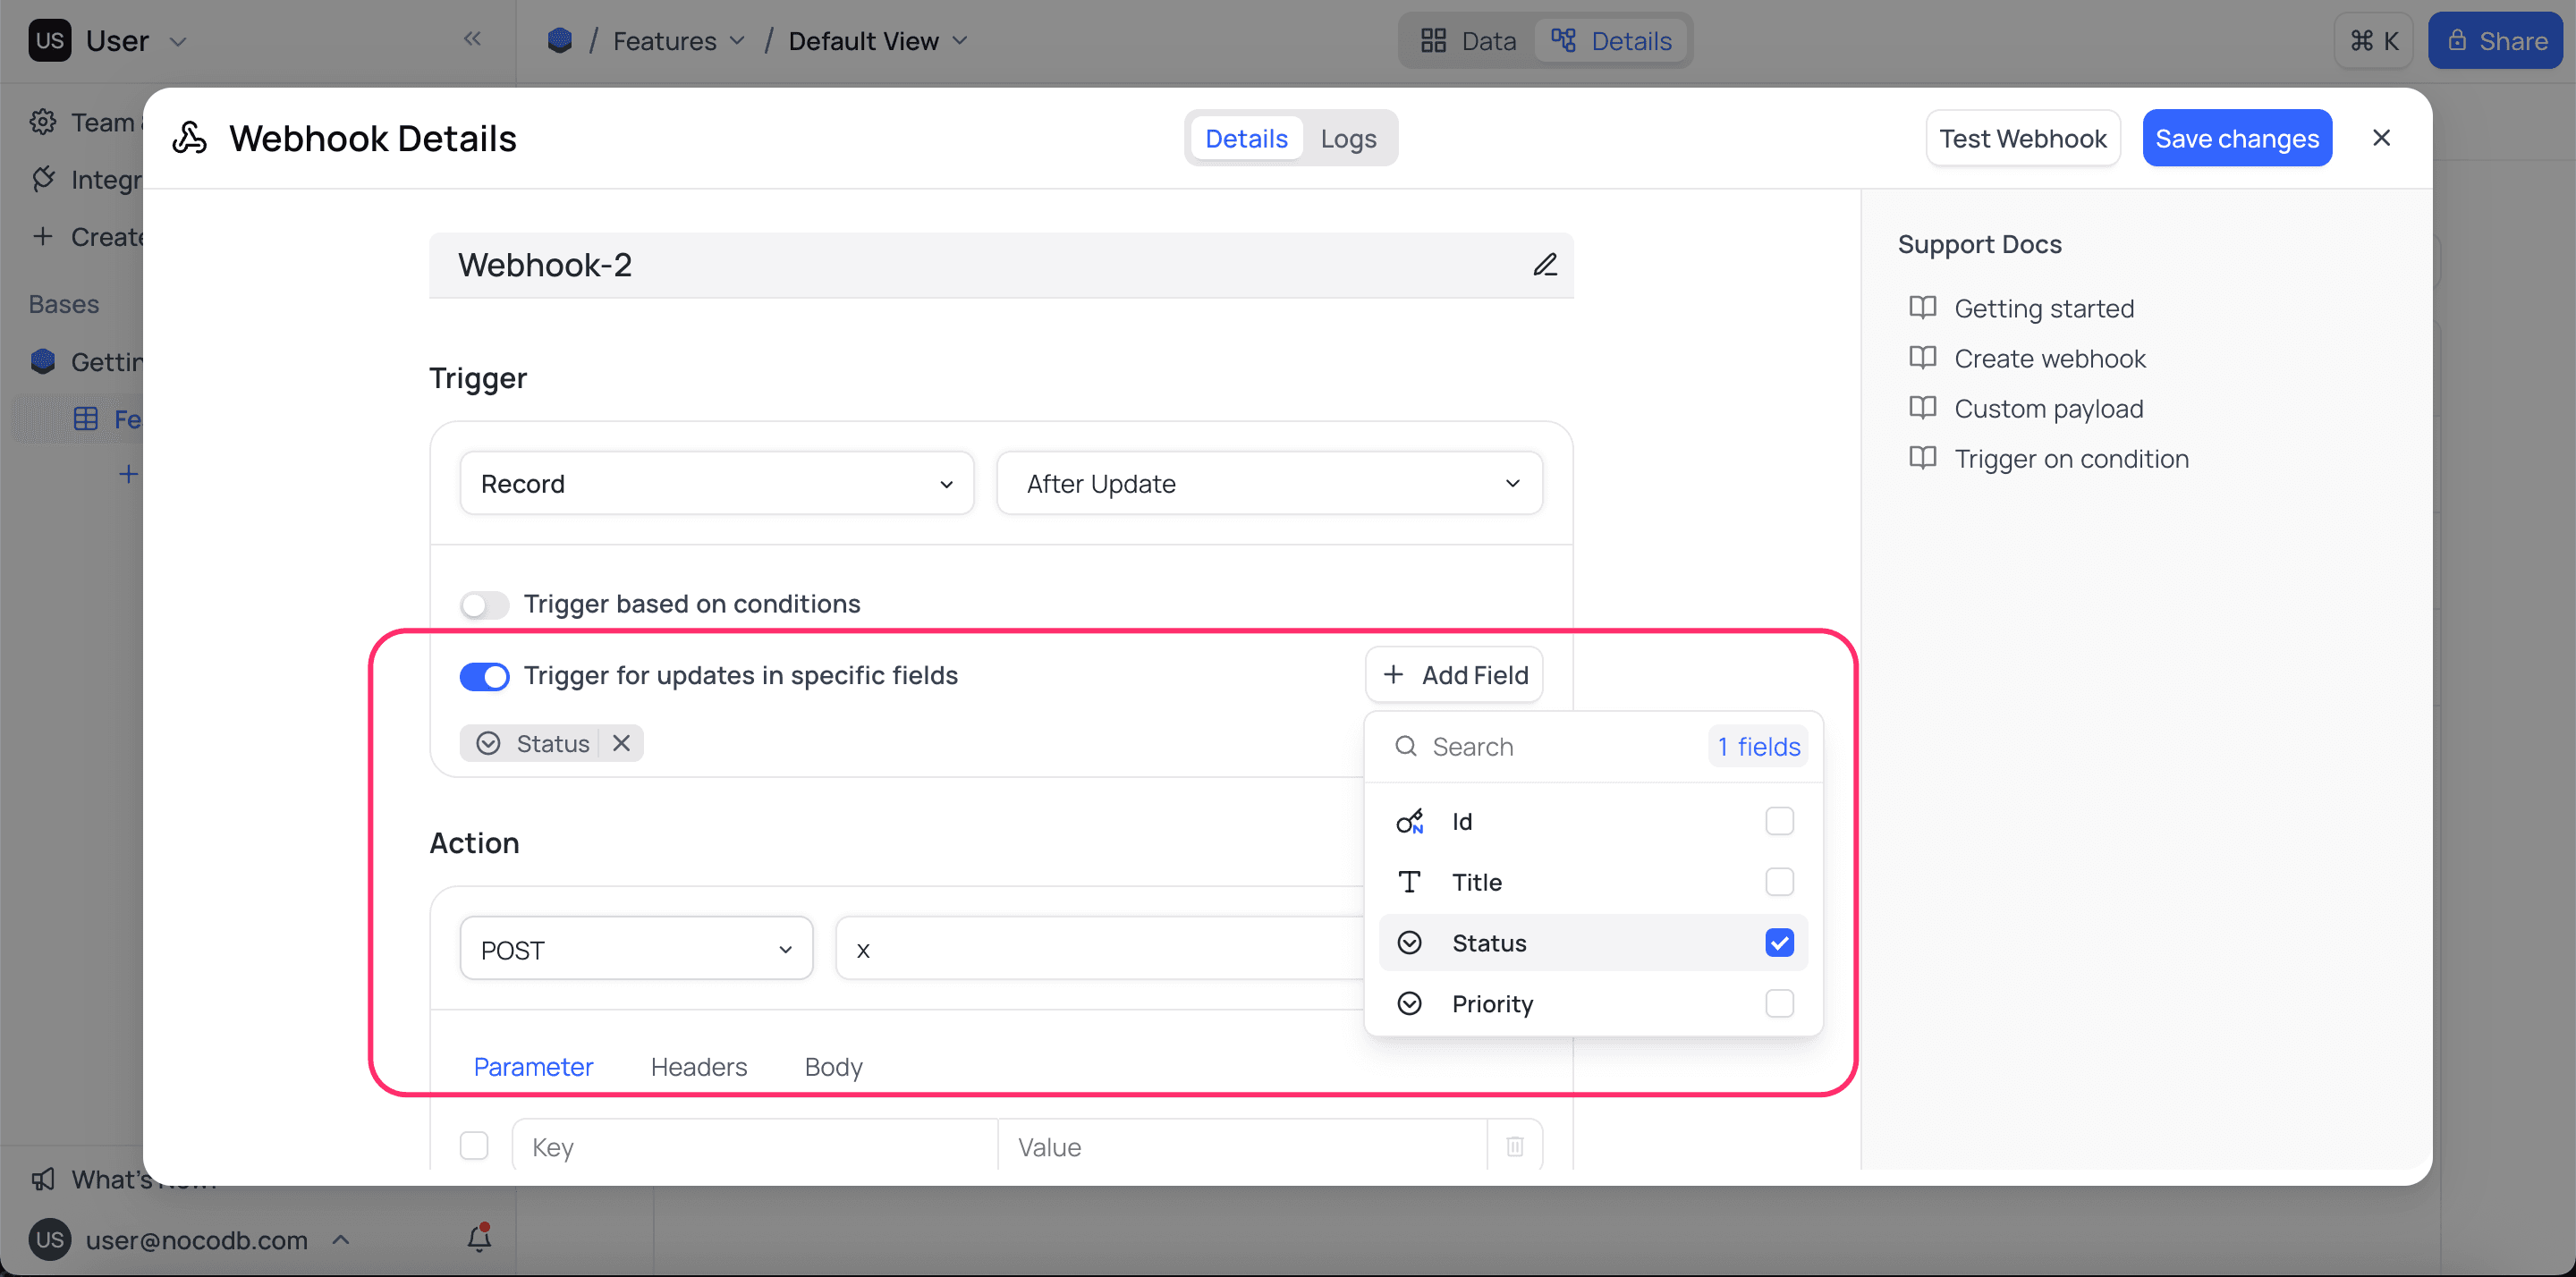
Webhook on field changes ☁
For After Update event, you can configure webhook to trigger only when certain fields are updated. For example, trigger webhook only when Status is updated. You can also configure multiple fields.
Webhook on specific form submission ☁
For After Insert event, you can configure webhook to trigger only when a specific form is submitted. For example, if you have multiple forms for a table, you can choose to trigger webhook only when Form A is submitted.

Webhook with custom payload
Custom payload lets you fully control the body a webhook sends when an event is triggered. You can send the entire event object, a specific field, a compact row summary, or transform rows into arrays/objects that downstream services expect.
NocoDB exposes the current event as event inside custom payload. These are processed with Handlebars-like expressions and a built-in json helper (examples below).
Example event object
This is the sample event generated by NocoDB after a record is inserted.
{
  "type": "records.after.insert",
  "id": "0698517a-d83a-4e72-bf7a-75f46b704ad1",
  "version": "v3",
  "data": {
    "table_id": "m969t01blwprpef",
    "table_name": "Table-2",
    "view_id": "vwib3bvfxdqgymun",
    "view_name": "Table-2",
    "rows": [
      {
        "Id": 1,
        "Tags": "Sample Text",
        "CreatedAt": "2024-04-11T10:40:20.998Z",
        "UpdatedAt": "2024-04-11T10:40:20.998Z"
      }
    ]
  }
}
In custom payload, you will typically access paths such as event.data.table_name or event.data.rows.[0].Tags.
Adding a custom payload
To add a custom payload, open your webhook in NocoDB's UI and follow these steps:
- Click on the Body tab
- Enter your template using Handlebars expressions and the
jsonhelper. - Create/update Webhook or use the Test Webhook action to verify rendering.

Content-Type header in your webhook configuration (commonly application/json).The json helper is used to safely serialize values into valid JSON, whether they’re strings, objects, or arrays. It ensures proper quoting and escaping, preventing common errors with quotes, newlines, or special characters. For example, {{ json event }} outputs the full event object, while {{ json event.data.rows.[0].Title }} safely inserts a single field as a JSON string. This makes it the most reliable way to embed dynamic values in webhook payloads.
Handlebars expressions allow you to dynamically access and manipulate data within templates, similar to how the json helper works for serialization. You can reference fields using dot or bracket notation, iterate over arrays with {{#each ...}}, and conditionally include content with {{#if ...}}. Learn more about using Handlebars expressions in Handlebars documentation.
Examples
Here are some common payload templates you can use as a starting point:
- Full event object: Sends the complete event data as JSON
{
  "event": {{ json event }}
}- Single field value:
Sends just the
Titlefield of the first row
{
  "content": {{ json event.data.rows.[0].Title }}
}- Compact row summary: Sends all fields of the first row as a JSON object
{
  "row": {{ json event.data.rows.[0] }}
}- All rows as array: Sends all rows in the event as a JSON array
{
  "rows": {{ json event.data.rows }}
}- Custom object with metadata: Sends an object with table name, row count, and all rows
{
  "table": {{ json event.data.table_name }},
  "count": {{ json event.data.rows.length }},
  "rows": {{ json event.data.rows }}
}- Custom text with field value:
Sends a simple message including the
Titlefield
{
  "message": "New record created with title: {{ event.data.rows.[0].Title }}"
}- Handlebar logic example: Sends different payloads based on whether rows exist
{{#if event.data.rows.length}}
{
  "hasRows": true,
  "rows": {{ json event.data.rows }}
}
{{else}}
{
  "hasRows": false
}
{{/if}}- Multiple rows with formatting:
Sends all rows with only
IdandTitle, formatted as a JSON array
{
  "records": [
    {{#each event.data.rows}}
      {{#if @first}}{{else}},{{/if}}
      {
        "Id": {{ Id }},
        "Title": {{ json Title }}
      }
    {{/each}}
  ]
}
Webhook response sample
Record trigger
{
  "type": "records.after.insert",
  "id": "c245c528-8759-4e10-b7d5-e2626dd7c321",
  "version": "v3",
  "data": {
    "table_id": "mbmppjnstflsqq1",
    "table_name": "Features",
    "rows": [
      {
        "Id": 4,
        "CreatedAt": "2025-05-07 17:18:37+00:00",
        "UpdatedAt": null,
        "Title": "Task-2",
        "Status": "Ongoing",
        "Priority": "Low"
      }
    ]
  }
}
{
"type": "records.after.update",
"id": "f5e6a827-fb37-4a04-8cd9-be7831f9d897",
"version": "v3",
"data": {
"table_id": "mbmppjnstflsqq1",
"table_name": "Features",
"previous_rows": [
{
"Id": 3,
"CreatedAt": "2025-05-07 17:18:33+00:00",
"UpdatedAt": null,
"Title": null,
"Status": null,
"Priority": null
}
],
"rows": [
{
"Id": 3,
"CreatedAt": "2025-05-07 17:18:33+00:00",
"UpdatedAt": "2025-05-07 17:18:37+00:00",
"Title": "Task-1",
"Status": "Complete",
"Priority": "High"
}
]
}
}{
"type": "records.after.delete",
"id": "4cad2ff8-9ee6-4889-8c85-9969361a1df0",
"version": "v3",
"data": {
"table_id": "mbmppjnstflsqq1",
"table_name": "Features",
"rows": [
{
"Title": "Task-2",
"Id": 2,
"Status": "Ongoing",
"Priority": "Low"
},
{
"Title": "Task-1",
"Id": 3,
"Status": "Complete",
"Priority": "High"
}
]
}
}View trigger
{
  "type": "view.after.create",
  "id": "2f62c921-4dcc-4f37-8e3d-fd3612aaf269",
  "version": "v3",
  "data": {
    "table_id": "ma334932sjnwp3e",
    "table_name": "AllTypes",
    "views": [
      {
        "id": "vw45okb4letthls6",
        "table_id": "ma334932sjnwp3e",
        "title": "Grid-1",
        "type": "grid",
        "lock_type": "collaborative",
        "created_at": "2025-09-22 06:51:13+00:00",
        "updated_at": "2025-09-22 06:51:13+00:00",
        "description": "Grid view sample description",
        "created_by": "usq6o3vavwf0twzr",
        "fields": [
          {
              "field_id": "cc5i4wkzktyqedh",
              "show": true
          },
          {
              "field_id": "ct41ytilwlxf7u3",
              "show": true
          },
          {
              "field_id": "cmbcaa8aoxtpdr9",
              "show": true
          }
        ],
        "options": {
          "row_height": "short"
        }
      }
    ]
  }
}
{
"type": "view.after.update",
"id": "08faf0d1-6c02-4f66-8851-2e6405c6c76b",
"version": "v3",
"data": {
"table_id": "ma334932sjnwp3e",
"table_name": "AllTypes",
"previous_views": [
{
"id": "vw45okb4letthls6",
"table_id": "ma334932sjnwp3e",
"title": "Grid-1",
"type": "grid",
"lock_type": "collaborative",
"created_at": "2025-09-22 06:51:13+00:00",
"updated_at": "2025-09-22 06:51:13+00:00",
"description": "",
"created_by": "usq6o3vavwf0twzr",
"fields": [
{
"field_id": "cc5i4wkzktyqedh",
"show": true
},
{
"field_id": "ct41ytilwlxf7u3",
"show": true
}
],
"options": {
"row_height": "short"
}
}
],
"views": [
{
"id": "vw45okb4letthls6",
"table_id": "ma334932sjnwp3e",
"title": "Grid-1 Renamed",
"type": "grid",
"lock_type": "collaborative",
"created_at": "2025-09-22 06:51:13+00:00",
"updated_at": "2025-09-22 07:08:29+00:00",
"description": "",
"created_by": "usq6o3vavwf0twzr",
"fields": [
{
"field_id": "cc5i4wkzktyqedh",
"show": true
},
{
"field_id": "ct41ytilwlxf7u3",
"show": true
}
],
"options": {
"row_height": "short"
}
}
]
}
}{
"type": "view.after.delete",
"id": "af6a6298-91e9-4642-a729-93fb0eae9d61",
"version": "v3",
"data": {
"table_id": "ma334932sjnwp3e",
"table_name": "AllTypes",
"views": [
{
"id": "vw45okb4letthls6",
"table_id": "ma334932sjnwp3e",
"title": "Grid-1 Renamed",
"type": "grid",
"lock_type": "collaborative",
"created_at": "2025-09-22 06:51:13+00:00",
"updated_at": "2025-09-22 07:08:29+00:00",
"description": "",
"created_by": "usq6o3vavwf0twzr",
"fields": [
{
"field_id": "cc5i4wkzktyqedh",
"show": true
},
{
"field_id": "ct41ytilwlxf7u3",
"show": true
}
],
"options": {
"row_height": "short"
}
}
]
}
}Field trigger
{
  "type": "field.after.create",
  "id": "2e97d383-1d94-48d7-8214-3a7fd013c801",
  "version": "v3",
  "data": {
    "table_id": "ma334932sjnwp3e",
    "table_name": "AllTypes",
    "fields": [
      {
        "id": "cqxah2exzt1lxbz",
        "table_id": "ma334932sjnwp3e",
        "title": "Financial Quarter",
        "type": "SingleSelect",
        "default_value": "'Q1'",
        "system": false,
        "options": {
          "choices": [
            {
              "title": "Q1",
              "color": "#cfdffe",
              "id": "shs9oq0ddo1ecnq"
            },
            {
              "title": "Q2",
              "color": "#d0f1fd",
              "id": "s65lkpm9822w8t7"
            },
            {
              "title": "Q3",
              "color": "#c2f5e8",
              "id": "swg8jzbgh99t36f"
            },
            {
              "title": "Q4",
              "color": "#ffdaf6",
              "id": "s9duce07erlzq5n"
            }
          ]
        },
        "description": "Specifies quarter in which this task is required to be included."
      }
    ]
  }
}
{
"type": "field.after.update",
"id": "6a4c9326-0bdc-4920-9089-6340394340b4",
"version": "v3",
"data": {
"table_id": "ma334932sjnwp3e",
"table_name": "AllTypes",
"previous_fields": [
{
"id": "cqxah2exzt1lxbz",
"table_id": "ma334932sjnwp3e",
"title": "Financial Quarter",
"type": "SingleSelect",
"default_value": "'Q1'",
"system": false,
"options": {
"choices": [
{
"title": "Q1",
"color": "#cfdffe",
"id": "shs9oq0ddo1ecnq"
},
{
"title": "Q2",
"color": "#d0f1fd",
"id": "s65lkpm9822w8t7"
},
{
"title": "Q3",
"color": "#c2f5e8",
"id": "swg8jzbgh99t36f"
},
{
"title": "Q4",
"color": "#ffdaf6",
"id": "s9duce07erlzq5n"
}
]
},
"description": "Specifies quarter in which this task is required to be included."
}
],
"fields": [
{
"id": "cqxah2exzt1lxbz",
"table_id": "ma334932sjnwp3e",
"title": "Financial Quarter",
"type": "SingleSelect",
"default_value": "'Quarter-1'",
"system": false,
"options": {
"choices": [
{
"title": "Quarter-1",
"color": "#cfdffe",
"id": "shs9oq0ddo1ecnq"
},
{
"title": "Quarter-2",
"color": "#d0f1fd",
"id": "s65lkpm9822w8t7"
},
{
"title": "Quarter-3",
"color": "#c2f5e8",
"id": "swg8jzbgh99t36f"
},
{
"title": "Quarter-4",
"color": "#ffdaf6",
"id": "s9duce07erlzq5n"
}
]
},
"description": "Specifies quarter in which this task is required to be included."
}
]
}
}{
"type": "field.after.delete",
"id": "8b2b293f-a926-4280-b116-493ac197ba10",
"version": "v3",
"data": {
"table_id": "ma334932sjnwp3e",
"table_name": "AllTypes",
"fields": [
{
"id": "cqxah2exzt1lxbz",
"table_id": "ma334932sjnwp3e",
"title": "Financial Quarter",
"type": "SingleSelect",
"default_value": "'Quarter-1'",
"system": false,
"options": {
"choices": [
{
"title": "Quarter-1",
"color": "#cfdffe",
"id": "shs9oq0ddo1ecnq"
},
{
"title": "Quarter-2",
"color": "#d0f1fd",
"id": "s65lkpm9822w8t7"
},
{
"title": "Quarter-3",
"color": "#c2f5e8",
"id": "swg8jzbgh99t36f"
},
{
"title": "Quarter-4",
"color": "#ffdaf6",
"id": "s9duce07erlzq5n"
}
]
},
"description": "Specifies quarter in which this task is required to be included."
}
]
}
}Manual trigger
{
  "type": "records.manual.trigger",
  "id": "551a2010-d658-4185-a050-cf3fca56a5a9",
  "version": "v3",
  "data": {
    "table_id": "mzo4r3zrbcph43i",
    "table_name": "Features",
    "rows": [
      {
        "Id": 1,
        "Title": "dstala",
        "CreatedAt": "2024-08-12 11:56:15+00:00",
        "UpdatedAt": "2024-08-12 11:56:48+00:00",
        "Button": {
          "type": "url",
          "label": "Button",
          "url": "https://github.com/dstala"
        },
      }
    ]
  }
}
Discord Webhook
Discord webhook can be configured to send messages to a Discord channel. Discord request body should contain content, embeds or attachments, otherwise request will fail. Below is an example of Discord webhook payload. More details can be found here
{
  "content": "Hello, this is a webhook message",
  "embeds": [
    {
      "title": "Webhook",
      "description": "This is a webhook message",
      "color": 16711680
    }
  ]
}
To send complete event data to Discord, use below payload
{
  "content" : {{ json ( json event ) }}
}
One can also customize the payload as per the requirement. For example, to send only the Title field to Discord, use below payload. Note that, the value of content is what that will get displayed in the Discord channel.
{
   "content": "{{ event.data.rows.[0].Title }}"
}
Environment Variables
In self-hosted version, you can configure the following environment variables to customize the webhook behavior.
- NC_ALLOW_LOCAL_HOOKS: Allow localhost based links to be triggered. Default: false
Find more about environment variables here