MCP Server
The Model Context Protocol (MCP) Server lets you connect NocoDB with LLMs that support MCP, such as Claude, Cursor, Windsurf, or Codex. With this integration, LLMs can work directly with your NocoDB base: query and edit records and, on NocoDB Cloud and licensed self-hosted deployments, manage tables, fields, views, workflows, interfaces, permissions, and more.
Available tools
Every edition exposes the record tools. An MCP client can list tables and read their schema, query, count, and aggregate records, read attachments, create, update, and delete records, and add or remove individual links through a link field. Record tools take up to 100 records per call.
| Action | Purpose | Sample Prompt |
|---|---|---|
| Create | Add new records | Create a task named 'Review Documentation' |
| Read | Look up information | Show me all projects with deadlines this week |
| Update | Change existing data | Mark the status of Project X as completed & re-assign to John |
| Delete | Remove records | Remove all tasks assigned to John |
| Link | Link or unlink related records | Link the onboarding tasks to the Acme project |
[] to clear it. null is not a link value and leaves the links untouched. The link and unlink tools add or remove individual links without restating the set.On NocoDB Cloud and licensed self-hosted deployments, the server also exposes tools for the rest of the workspace. Each tool wraps the same service as the matching REST API, so validation, permissions, and audit behave identically.
| Area | What an MCP client can do |
|---|---|
| Records | Link records by their display value rather than by record id; upsert records matched on up to three business-key fields instead of on record id; and set the same field values on every record matching a condition, in one call and with no 100-record cap |
| Tables and fields | Create, update, and delete tables and fields; add or remove select options; set a table's display field; read the base schema, every table you can see with its fields and views, in one call |
| Views, filters, and sorts | Create and configure views, replace their filters, and manage sorts |
| Scripts | List, read, create, update, and delete scripts |
| Dashboards | Manage dashboards and widgets, and read widget data |
| Webhooks and comments | Manage webhooks; list, post, resolve, and delete comments |
| Interfaces | Create and configure interface pages, and publish an interface so its draft pages go live |
| Workflows | Read and write workflow drafts, add nodes, test nodes, and publish an automation once every node is tested |
| Permissions | Set table and field permissions and Record-Level Security policies |
| Audits | Read the change history of one record, and, for base owners, the audit log of a whole base filtered by user, event type, or date range |
| Documents | Create and edit pages, patch Markdown, and manage share links |
| Attachments | Upload files into an Attachment field from an http(s) or data: URL, at most 10 files per call; they are appended to the cell you name, or returned for you to write into a record yourself |
| Trash | List what is in the base trash, restore one entry by its trash id, and restore deleted records by row id; only tables on a NocoDB-managed source keep deleted rows |
| Record templates | List, read, create, update, and delete record templates, and create a record from one together with the records it links |
| Data import and export | Export a table or view to CSV, export it as an .xlsx workbook, and import CSV into a table; exported Decimal and Currency values carry their stored precision, not the field's display setting |
| Duplicates | Duplicate tables, fields, views, and bases, and poll job status |
| Links | Get the web app URL for a table, view, workflow, interface, dashboard, script, or document |
| Row colouring | Manage record colour conditions and rules |
| Date dependencies | Read, set, and remove the rule that links a start field, an end field, and a link field so moving one record shifts the records that depend on it |
| Folders and shared views | Manage base, view, and workflow folders; list shared views |
| Members and teams | List base members and the teams that hold a role on a base, give a person or a team a role there, change it, and remove it; list workspace members and teams, invite people to a workspace, change a workspace role, and remove someone from a workspace |
| Bases and workspaces | List workspaces and bases, create and read bases, and rename a base or change its icon colour |
Testing a workflow node over MCP is a check, not a run. The node does not carry out its action, so a create-record node writes no row and a messaging node sends nothing. Its configuration is resolved against the results of the nodes upstream of it and checked with read-only calls, and the result comes back marked as simulated. A node that can only be checked by running it for real, such as a script step or a node that declares no outputs, comes back as a failed test that MCP cannot clear, and publishing stays blocked until someone runs that step in the automation editor.
Connection tools and access
Outside the Community Edition, an MCP connection is created against your account rather than a single base, and you choose what it is allowed to do when you create it. One connection is meant for one MCP client.
Access is where the connection reaches: add the bases it may use, or grant it all resources.
Tools & Permissions is an allowlist of the tools the connection may call. A tool you do not allow is never registered, so it does not appear in the client's tool list at all. Each section is set to Read, Read & write, Read, write & delete, or None; expand one to allow individual tools instead.
| Section | What it covers | A new connection starts at |
|---|---|---|
| Records & data | Records, comments, import and export | Read, write & delete |
| Schema | Tables, fields, duplicating, and how a base is organized | Read, write & delete |
| Views | Views, filters, sorts, sharing, form fields, row colors | Read, write & delete |
| Automation | Workflows, webhooks, scripts, and agents | Read, write & delete |
| Interfaces, dashboards & docs | Interface pages, dashboards, widgets, and documents | Read, write & delete |
| Account & workspaces | Who you are, your workspaces, the bases in them, and links into the app | Read |
| Access & security | Field and table permissions, row-level security | Read |
| Platform | Integrations, environments, and apps | Read |
A connection can be changed after it is created. Open it from the list, or use Edit connection in its row menu, to rename it or change its Access and Tools & Permissions; the change applies on the client's next call and the key stays the same. The key itself is shown only when a connection is created or regenerated.
A connection can never do more than you can. Its authority is what you picked, intersected with your own roles, and it is resolved on every tool call, so a role change applies from the next call onwards. Two things sit outside the access list: a base the connection creates is always reachable by it, and creating a workspace is not offered to MCP connections at all.
API call usage
A tool call counts towards the workspace's API Calls allowance for what the same work would cost over the REST API, rather than as one call per request. A client that sends several tool calls in a single request is charged for each of them.
| Tool | Counts as |
|---|---|
| Link records, unlink records | one call per record, since the REST route takes one record at a time |
| Create, update, delete records | one call per 10 records, the REST bulk limit |
| Export CSV | one call per 1,000 rows returned |
| Upload attachments, import CSV | one call, since the REST route takes the whole set or file in one request |
| Every other tool | one call |
Desktop LLM Clients
Each MCP endpoint in NocoDB provides a secure URL that can be linked to an MCP-compatible client. Once configured, the LLM can execute database operations in your workspace through natural language prompts, without writing SQL or scripts.
Server Configuration (NocoDB)
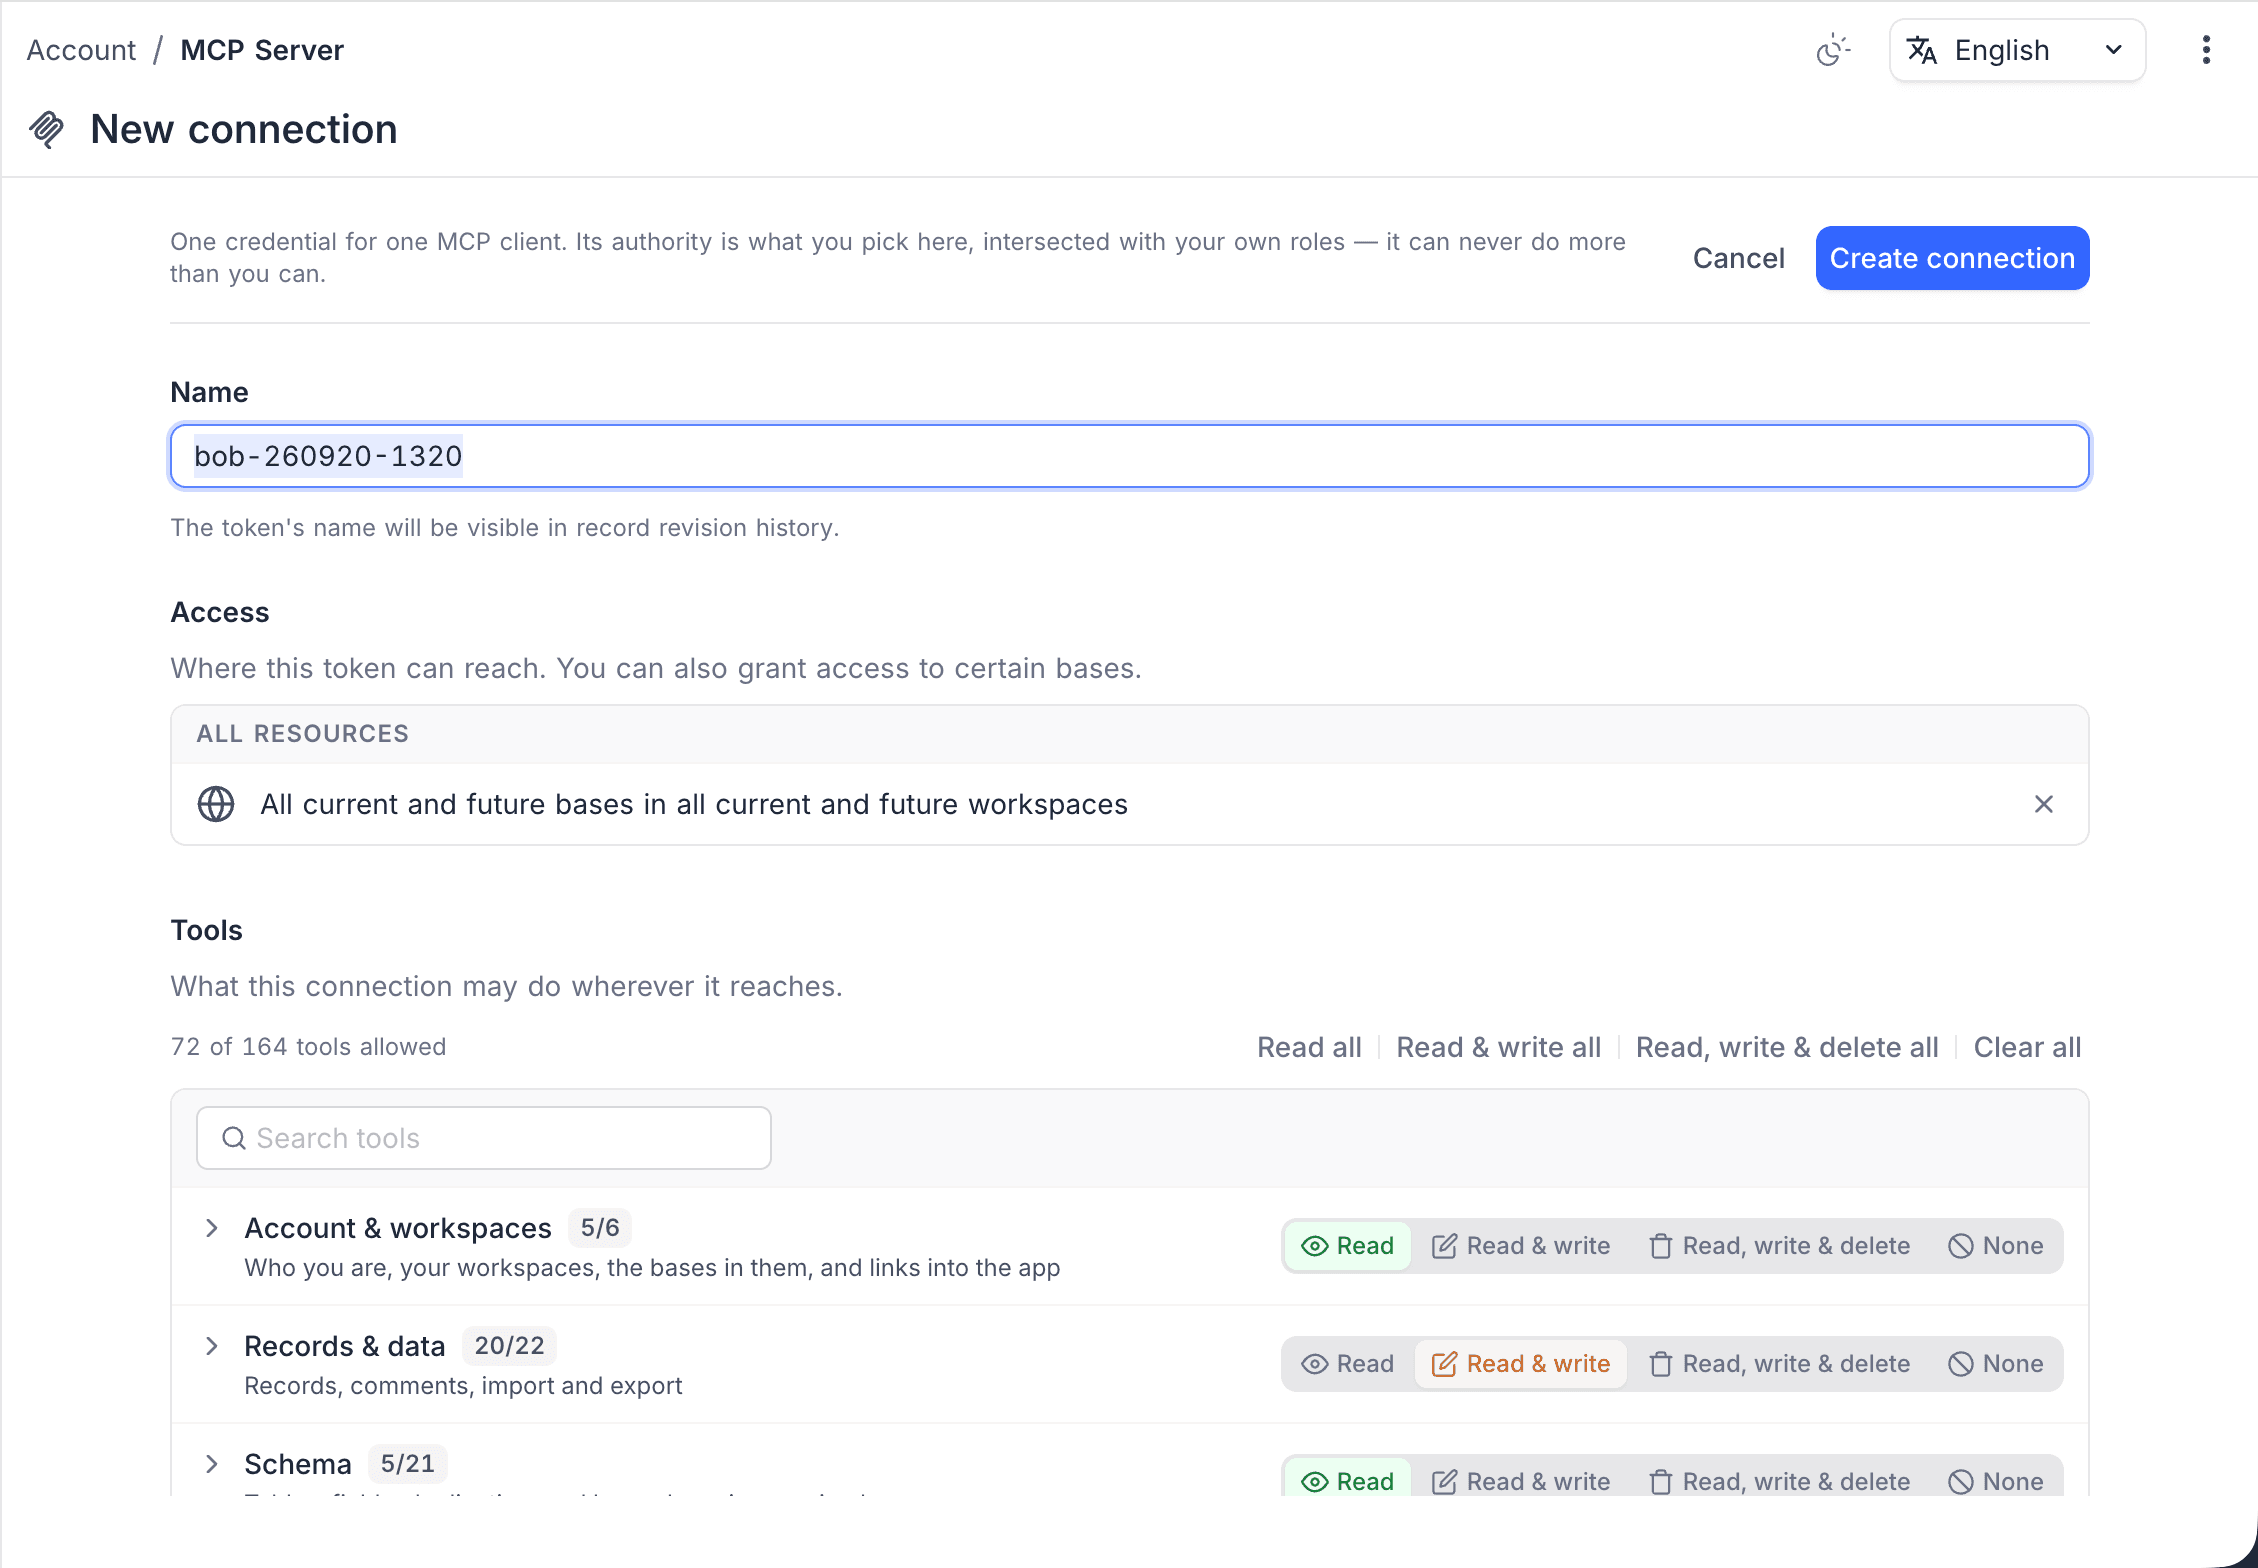
- Open Account Settings and select the MCP tab.
- Click New connection.
- Provide a name for the connection.
- Under Access, add the bases it may reach, or grant access to all resources.
- Under Tools & Permissions, allow the tools this connection may call.
- Click Create connection to generate the MCP Config JSON.
- Copy the generated JSON configuration. This will be used in your LLM client configuration.
A base's MCP Server screen lists the connections that reach that base and creates new ones pinned to it, so Access is not shown there, whether you are creating a connection or editing one. Change a connection's access from the MCP tab in Account Settings.
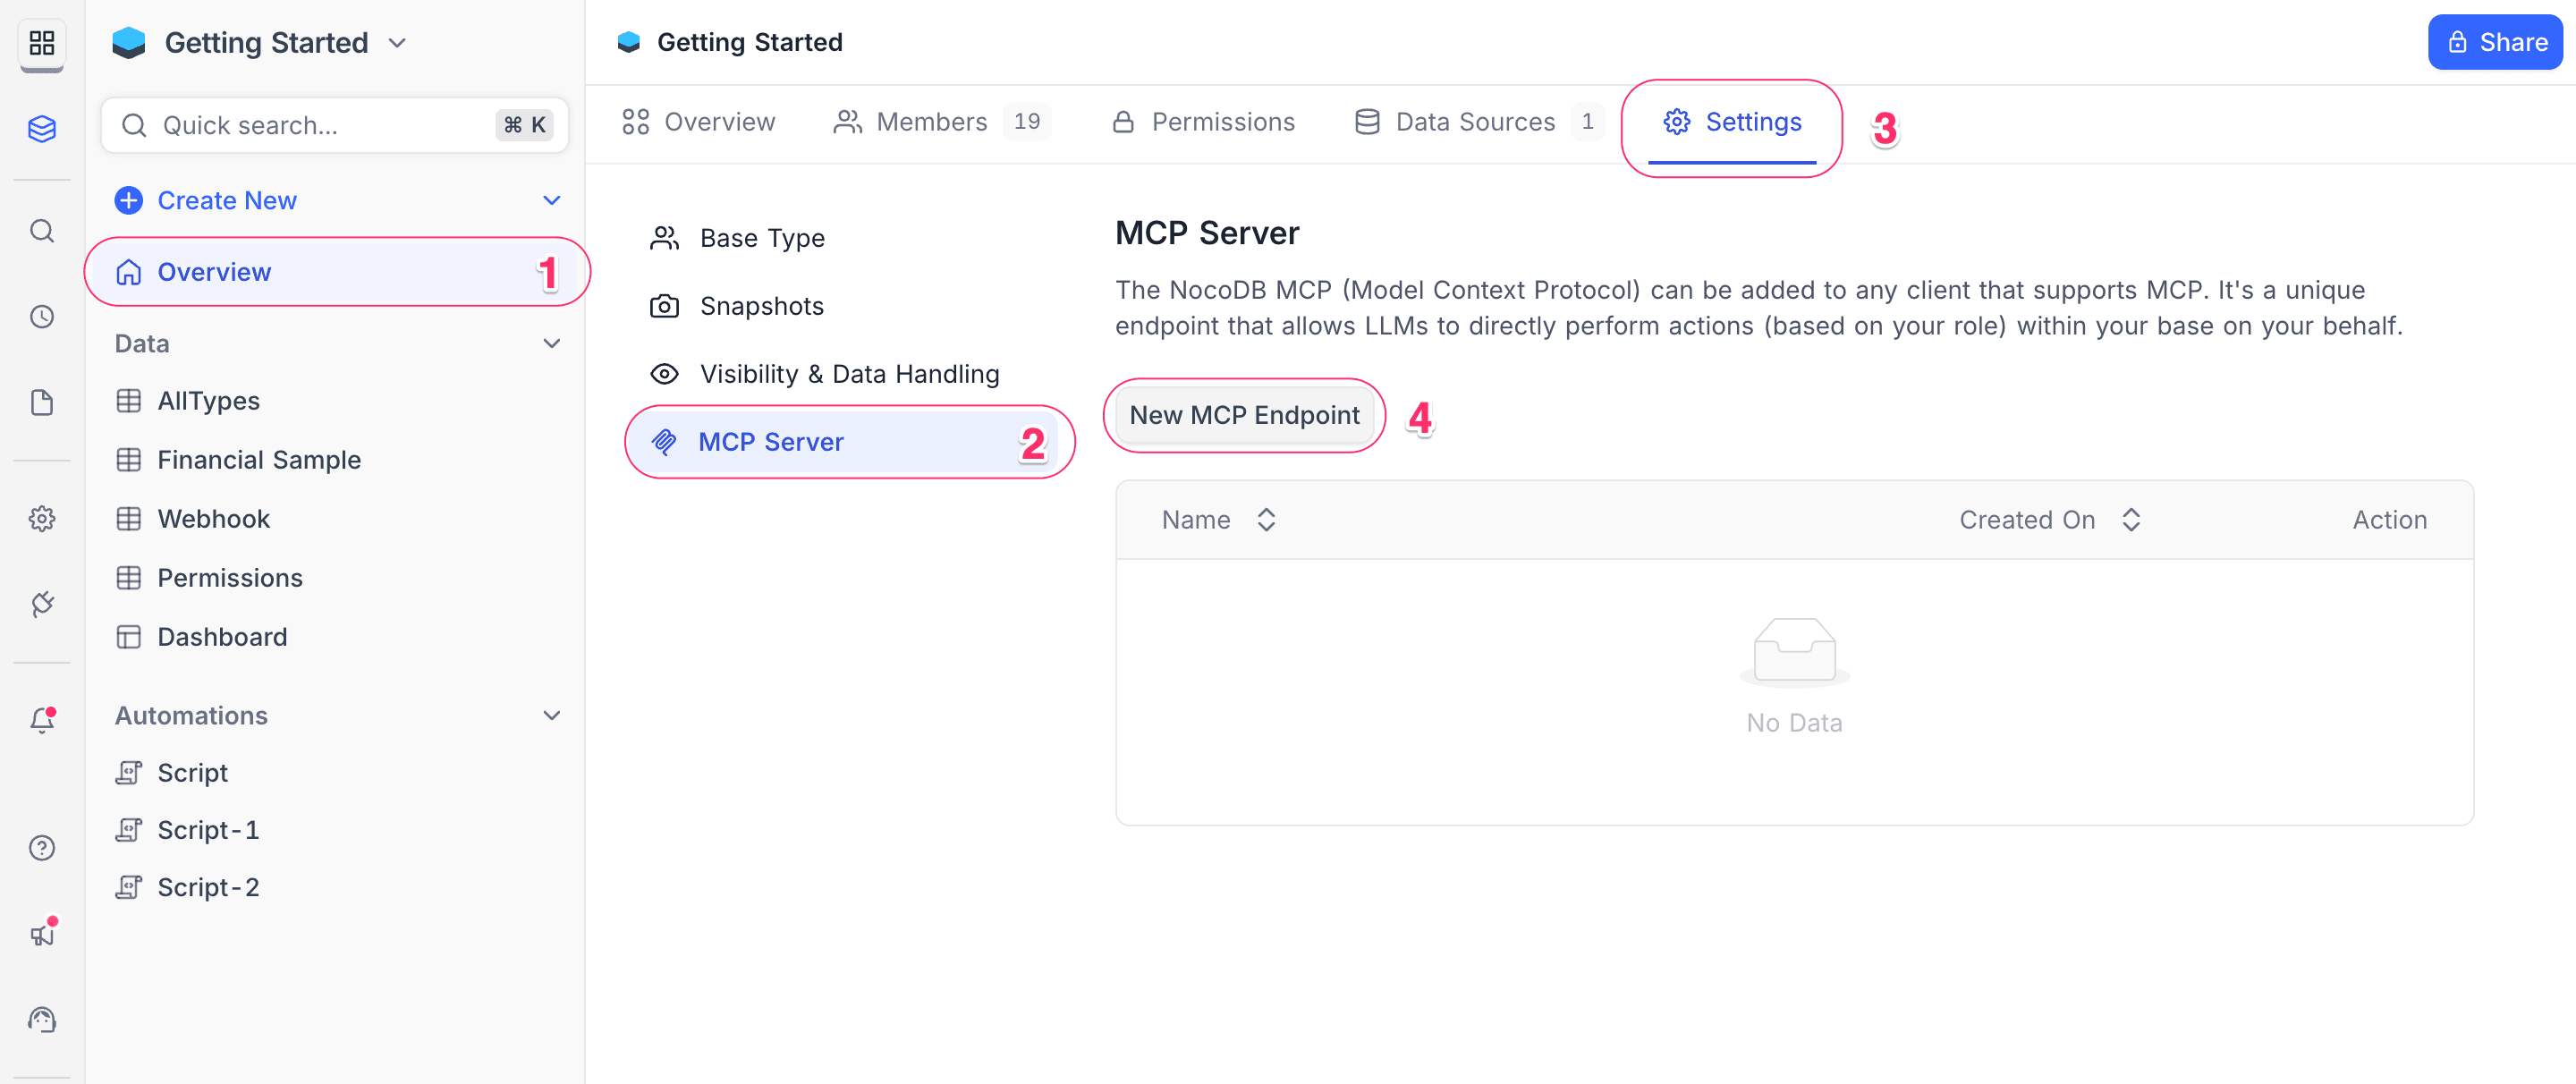
In the Community Edition, connections are created per base instead:
- Click on the Overview button in the left sidebar.
- Select the Settings tab.
- Select the Model Context Protocol
- Click on the New MCP Endpoint to create a new MCP config JSON for your base.
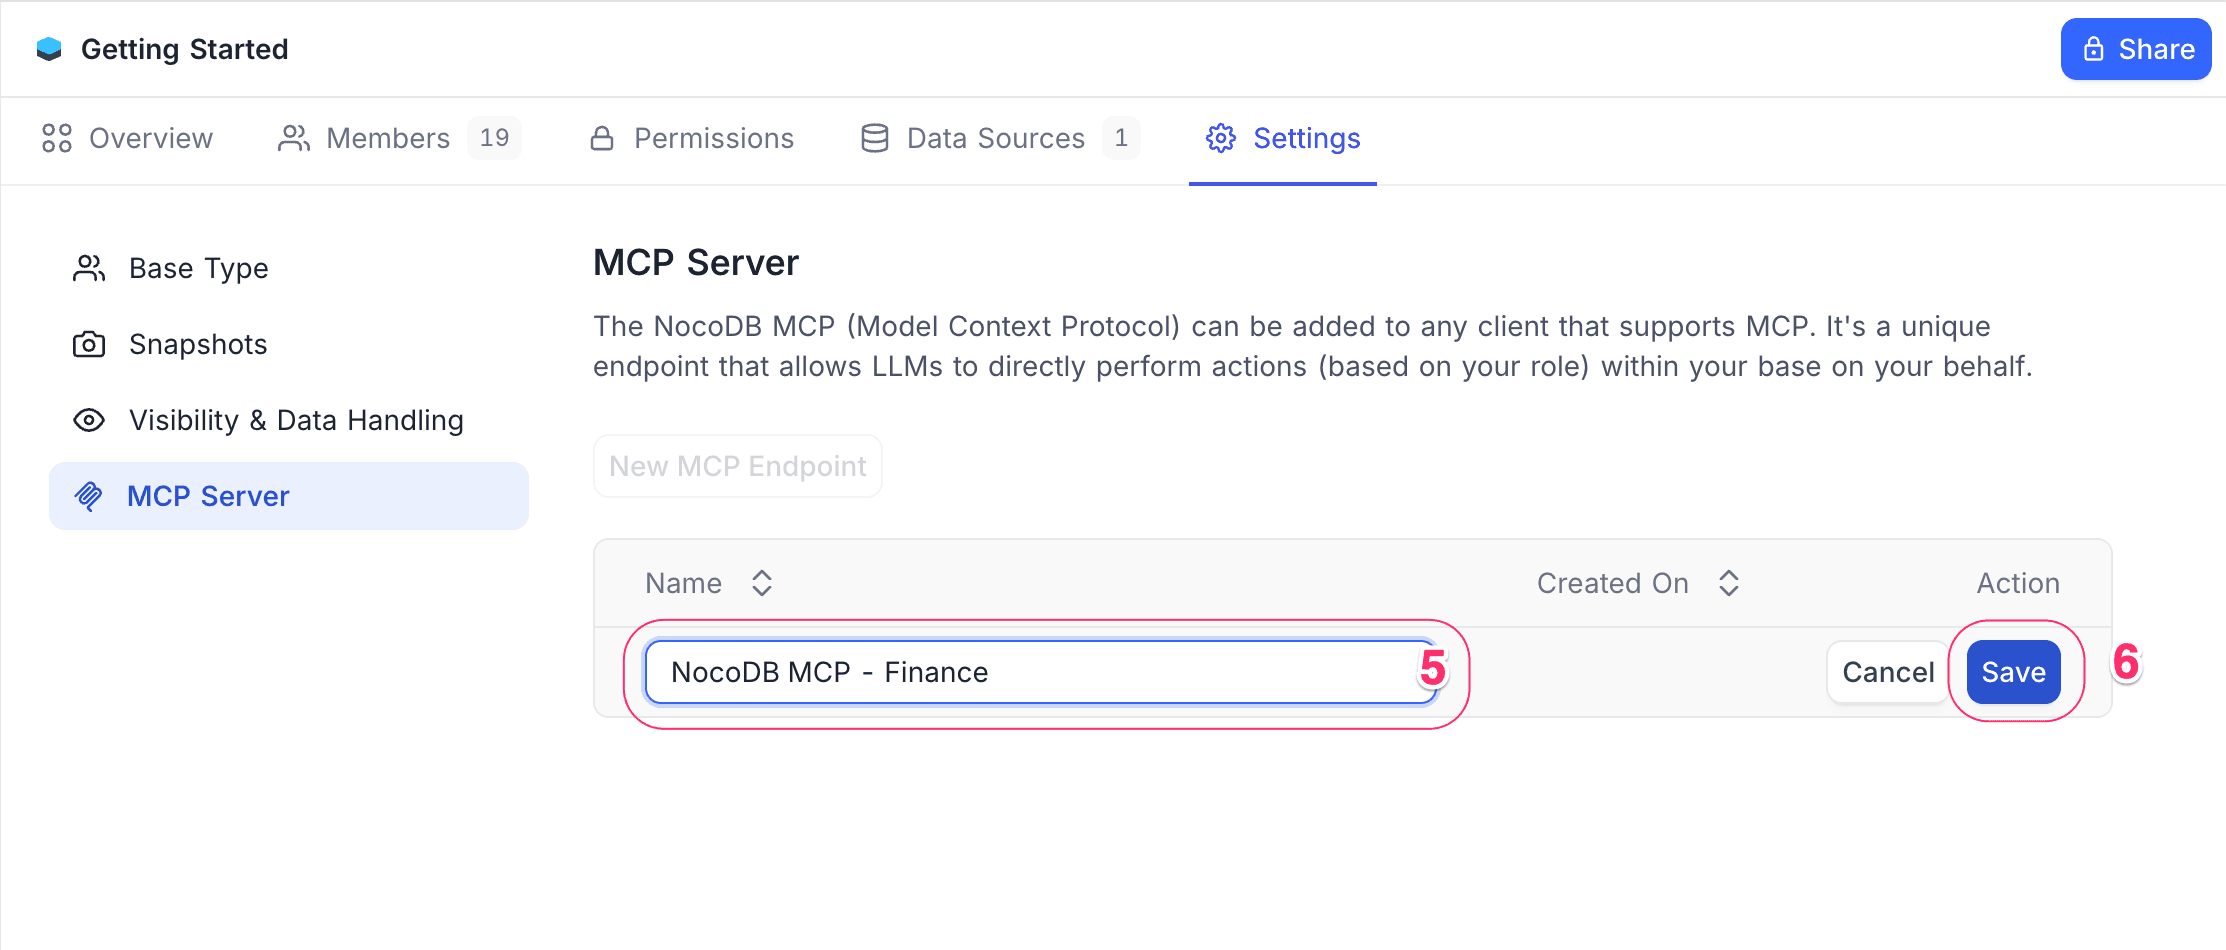
- Provide a name for the MCP endpoint
- Click Create to generate the MCP Config JSON.
- Copy the generated JSON configuration. This will be used in your LLM client configuration.
Client Configuration
Claude
- Open Claude Desktop Preferences (
⌘+,). - Under Develop, click Edit Config.
- Insert the JSON block copied here as
claude_desktop_config.json. - Save the file and restart Claude Desktop.
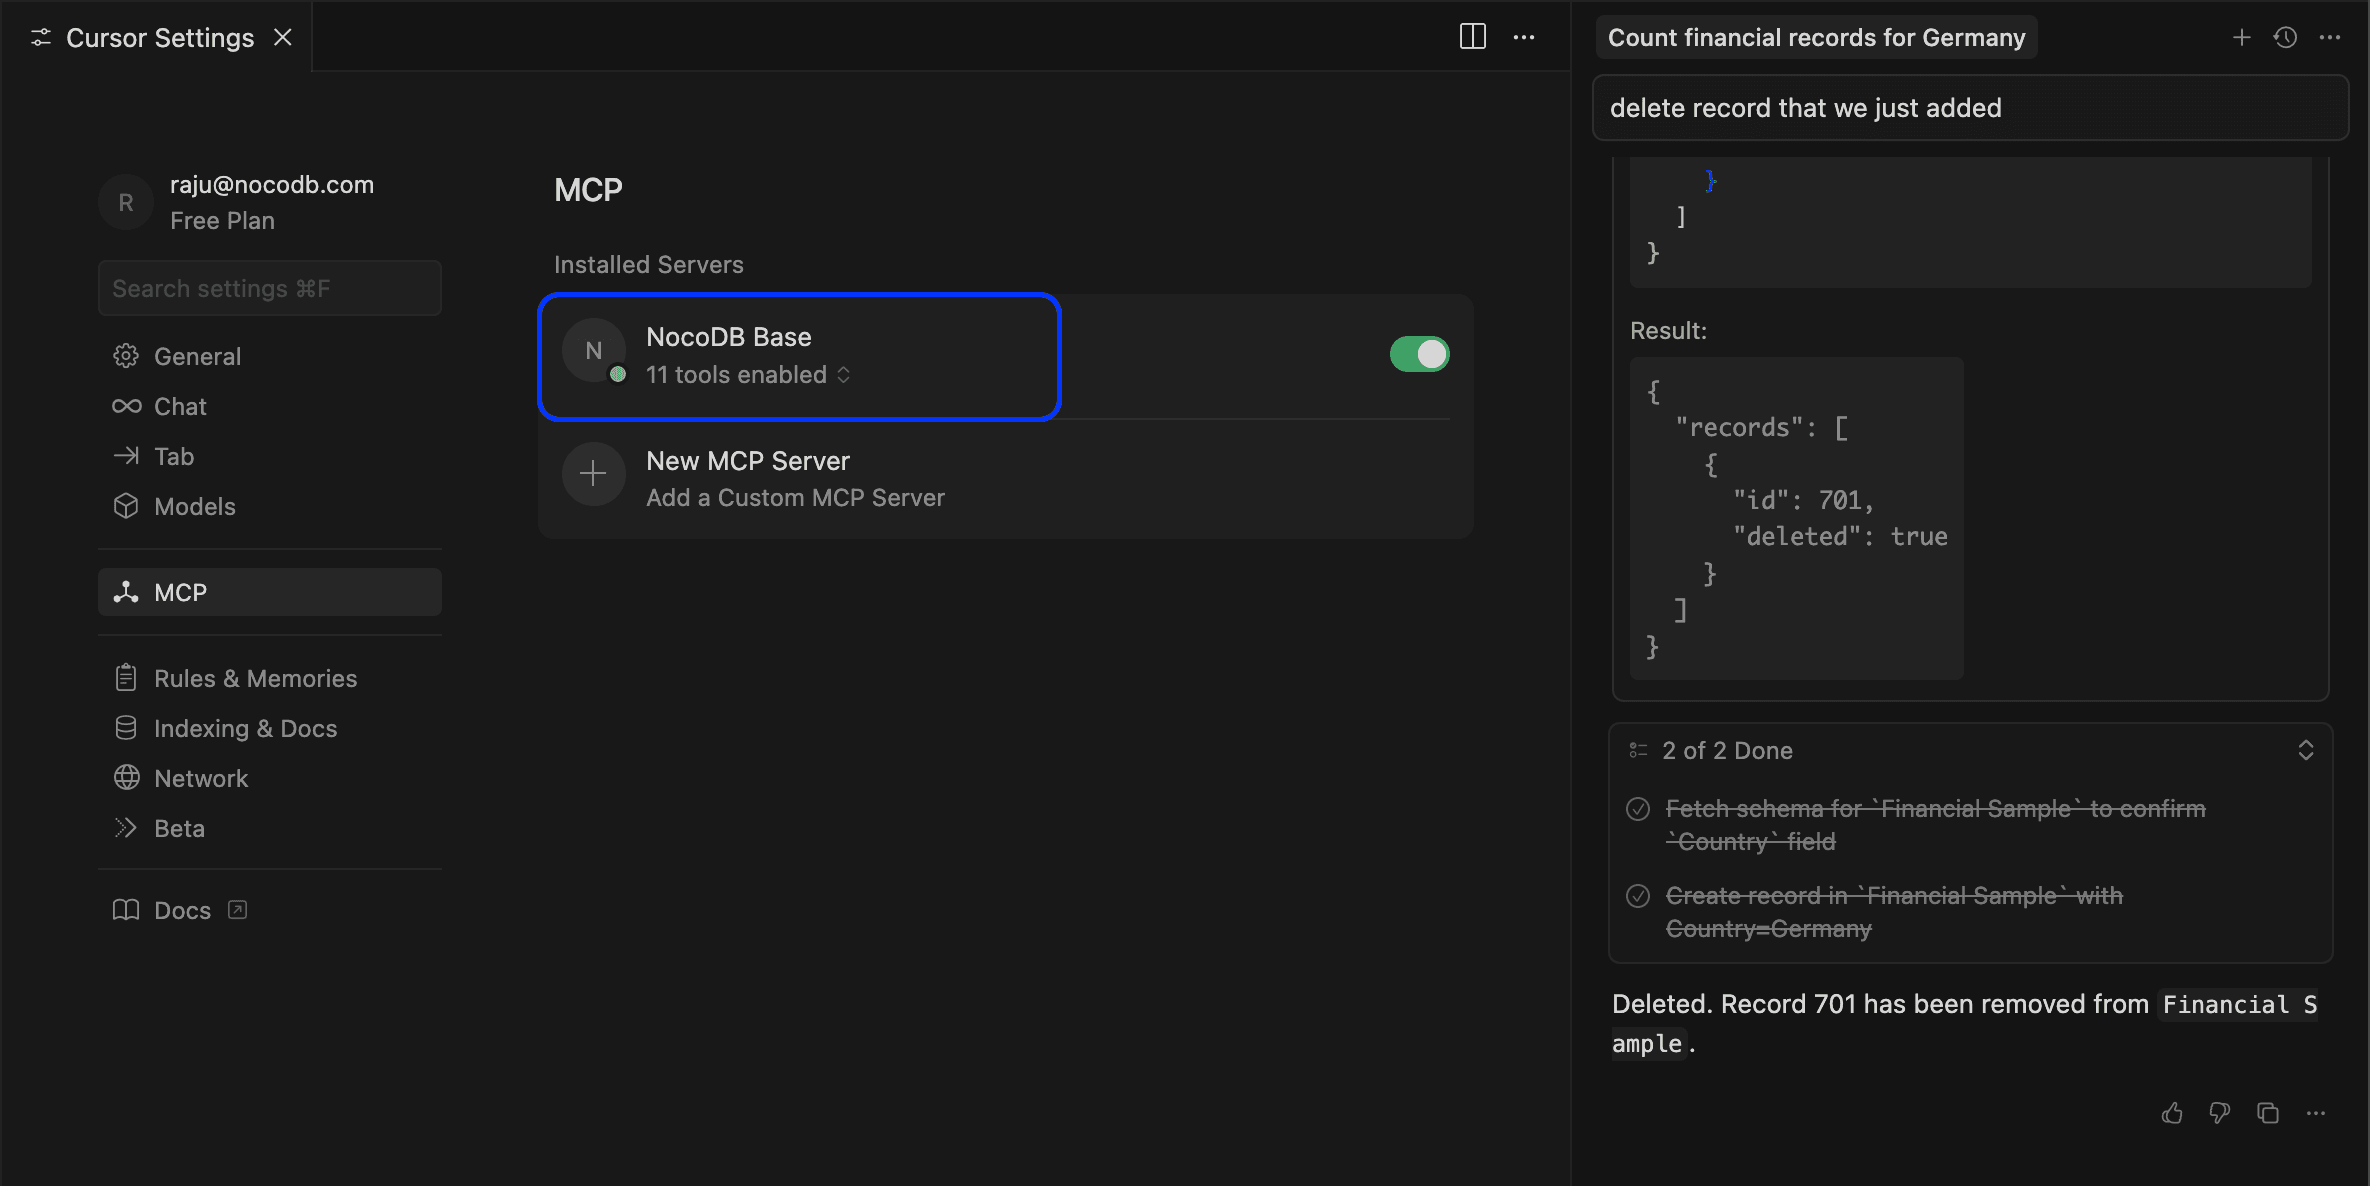
Cursor
- Go to Cursor Settings (
⇧+⌘+J). - Open the MCP tab and select Add Custom MCP.
- Paste the JSON block copied here. Save.
Windsurf
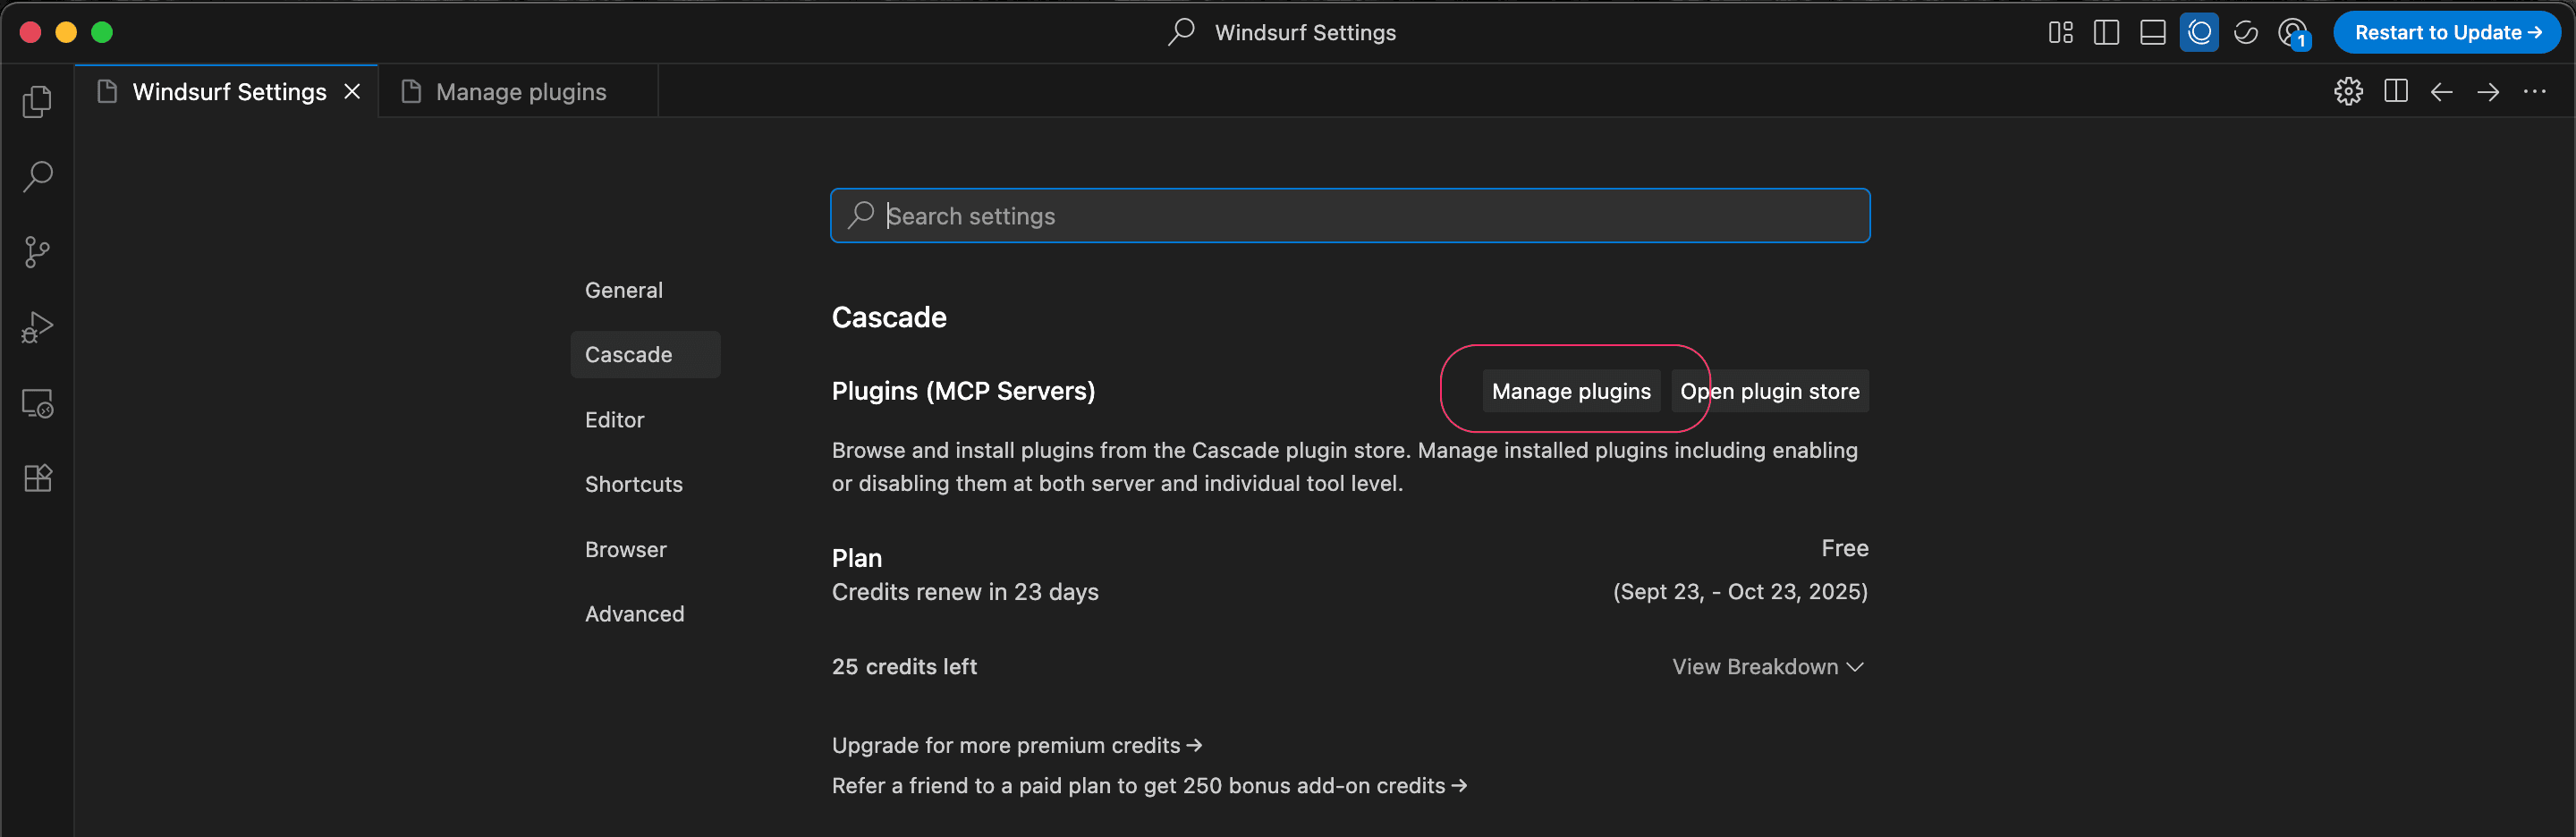
- Open Windsurf Settings (
⌘+,). - In the Cascade section >
Plugins (MCP Server)> Click Manage Plugins - Paste the JSON block copied here. Save.
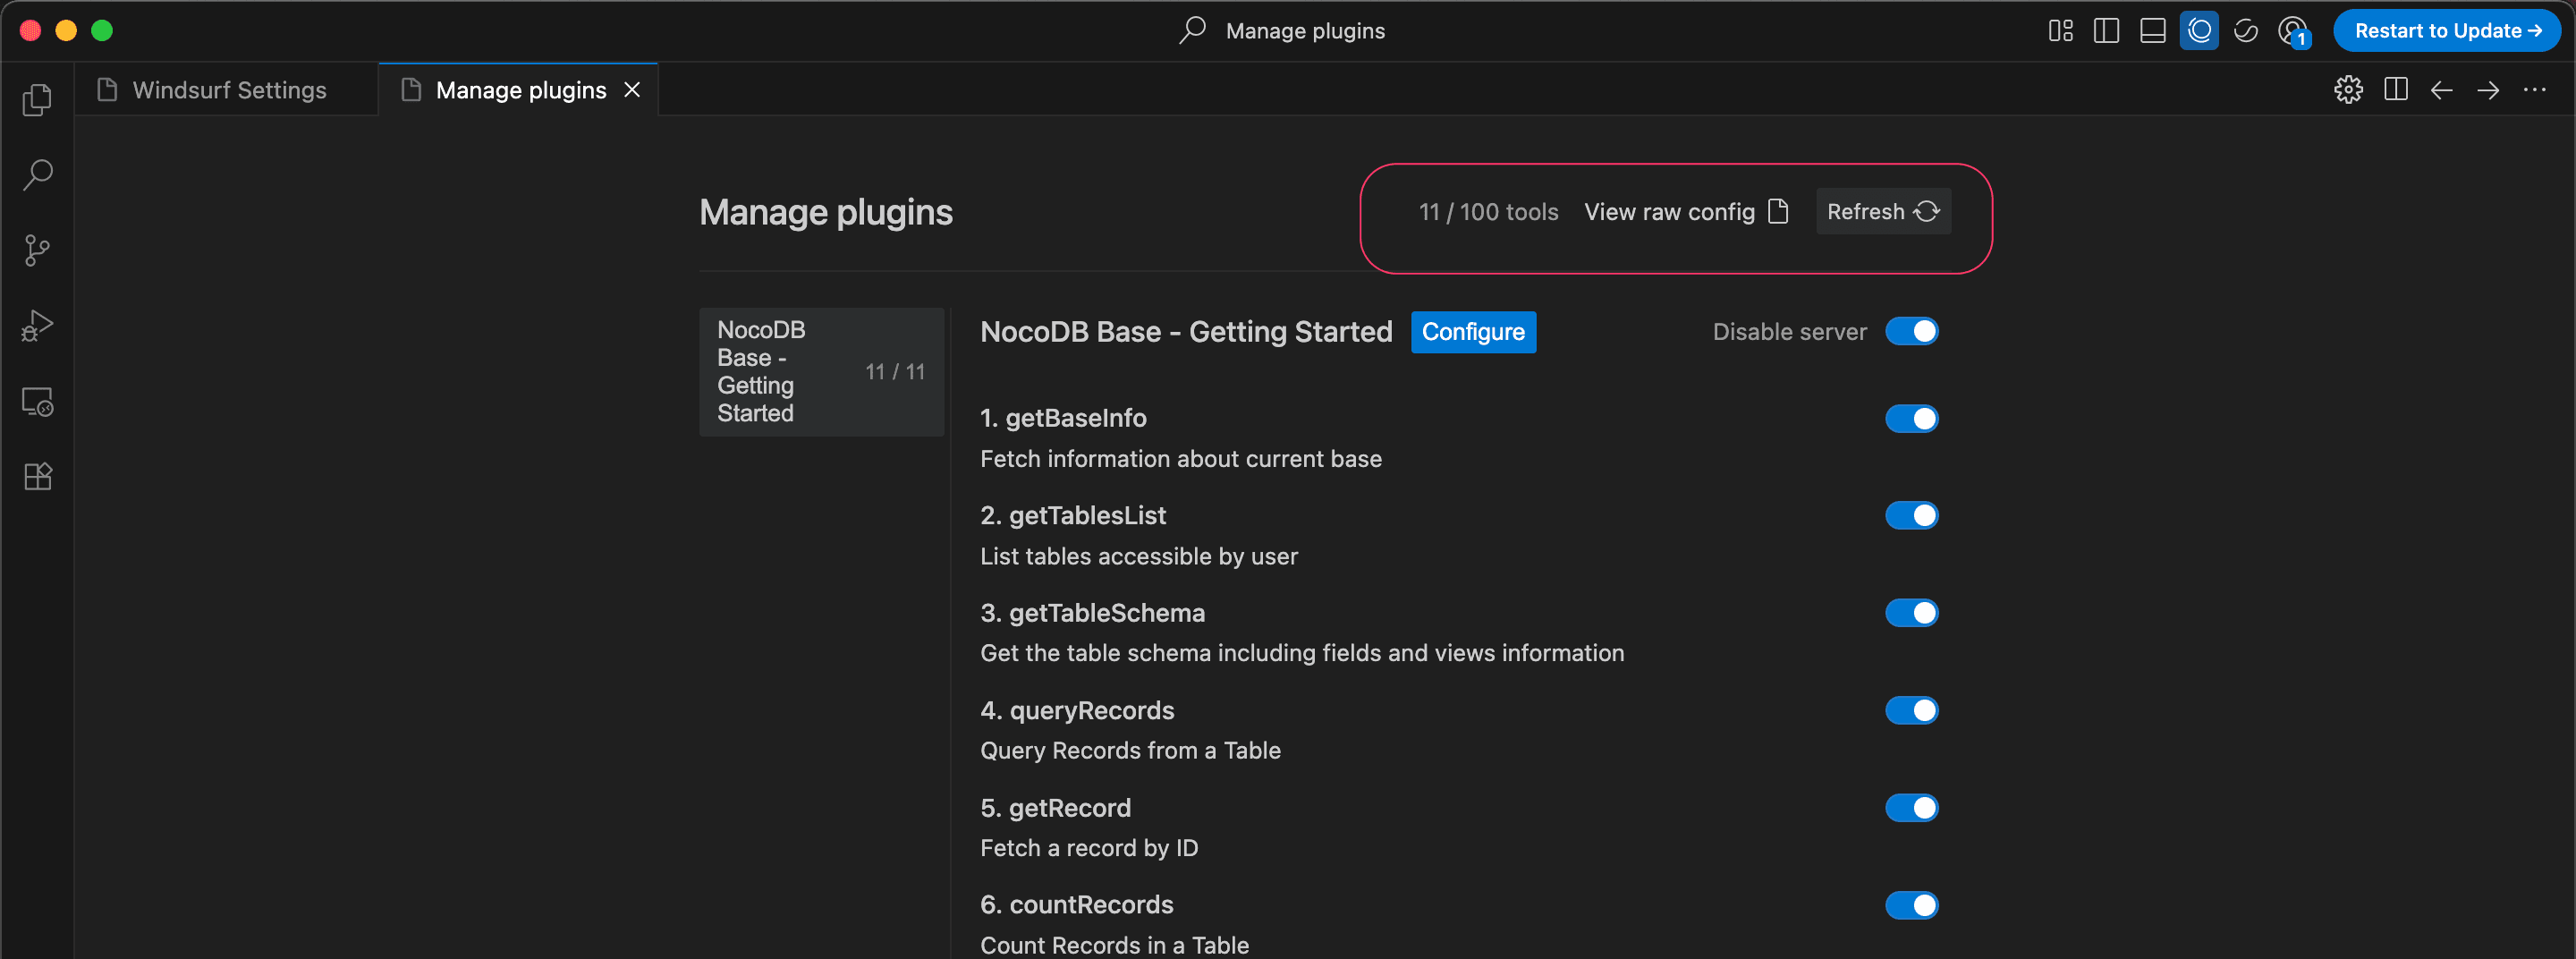
AntiGravity
- Click the three dots in the top right of the agent window and select MCP Servers.
- Click Manage MCP Servers.
- Click View raw config.
- Paste the JSON block copied here into the file that opens. Save.
Codex
Codex CLI connects to the MCP endpoint over HTTP directly, so it needs no mcp-remote bridge and takes a TOML configuration instead of the shared JSON block.
- Open
~/.codex/config.toml, creating it if it does not exist. - Add the TOML block shown in the Codex tab of the MCP endpoint dialog, using the URL and token generated here.
- Run
codex mcp listto confirm the server is connected.
[mcp_servers.NocoDB_MCP]
url = "https://your-domain.com/mcp/<ncId>"
http_headers = { "x-api-key" = "<ncToken>" }_, and - in the endpoint name: an endpoint named My Base MCP appears as [mcp_servers.My_Base_MCP].JSON Example
{
  "mcpServers": {
    "NocoDB MCP": {
      "command": "npx",
      "args": [
        "mcp-remote",
        "https://your-domain.com/mcp/<ncId>",
        "--header",
        "x-api-key: <ncToken>"
      ]
    }
  }
}xc-mcp-token header, so existing configurations using it keep working.Web based LLM Clients (OAuth)
Connect NocoDB to web-based LLM applications using OAuth, enabling seamless database access directly from the browser without requiring desktop client setup. This approach grants granular permission controls and eliminates the need for manual JSON configuration.
The authorization screen carries the same Access and Tools & Permissions pickers as an MCP connection, so a client reaches only the bases you add and calls only the tools you allow. It starts at Read & write on Records & data and at Read everywhere else.
Some clients name the permissions they need in the authorization request itself, as <category>:<level> pairs such as records:read or tables:write, where the level is read, write or delete. When a client does, the screen lists what it asked for under Requested permissions in place of the Tools & Permissions picker, and the list cannot be edited: authorize it as it stands or cancel. Which bases the client reaches is still yours to choose under Access. A permission NocoDB does not offer is listed as such, and authorizing sends the client back an invalid_scope error instead of a grant.
Claude Web
OAuth-based integration allows Claude web users to access NocoDB databases through the connectors interface.
Setup Steps
-
Click here to open Claude Web Settings in a new tab.
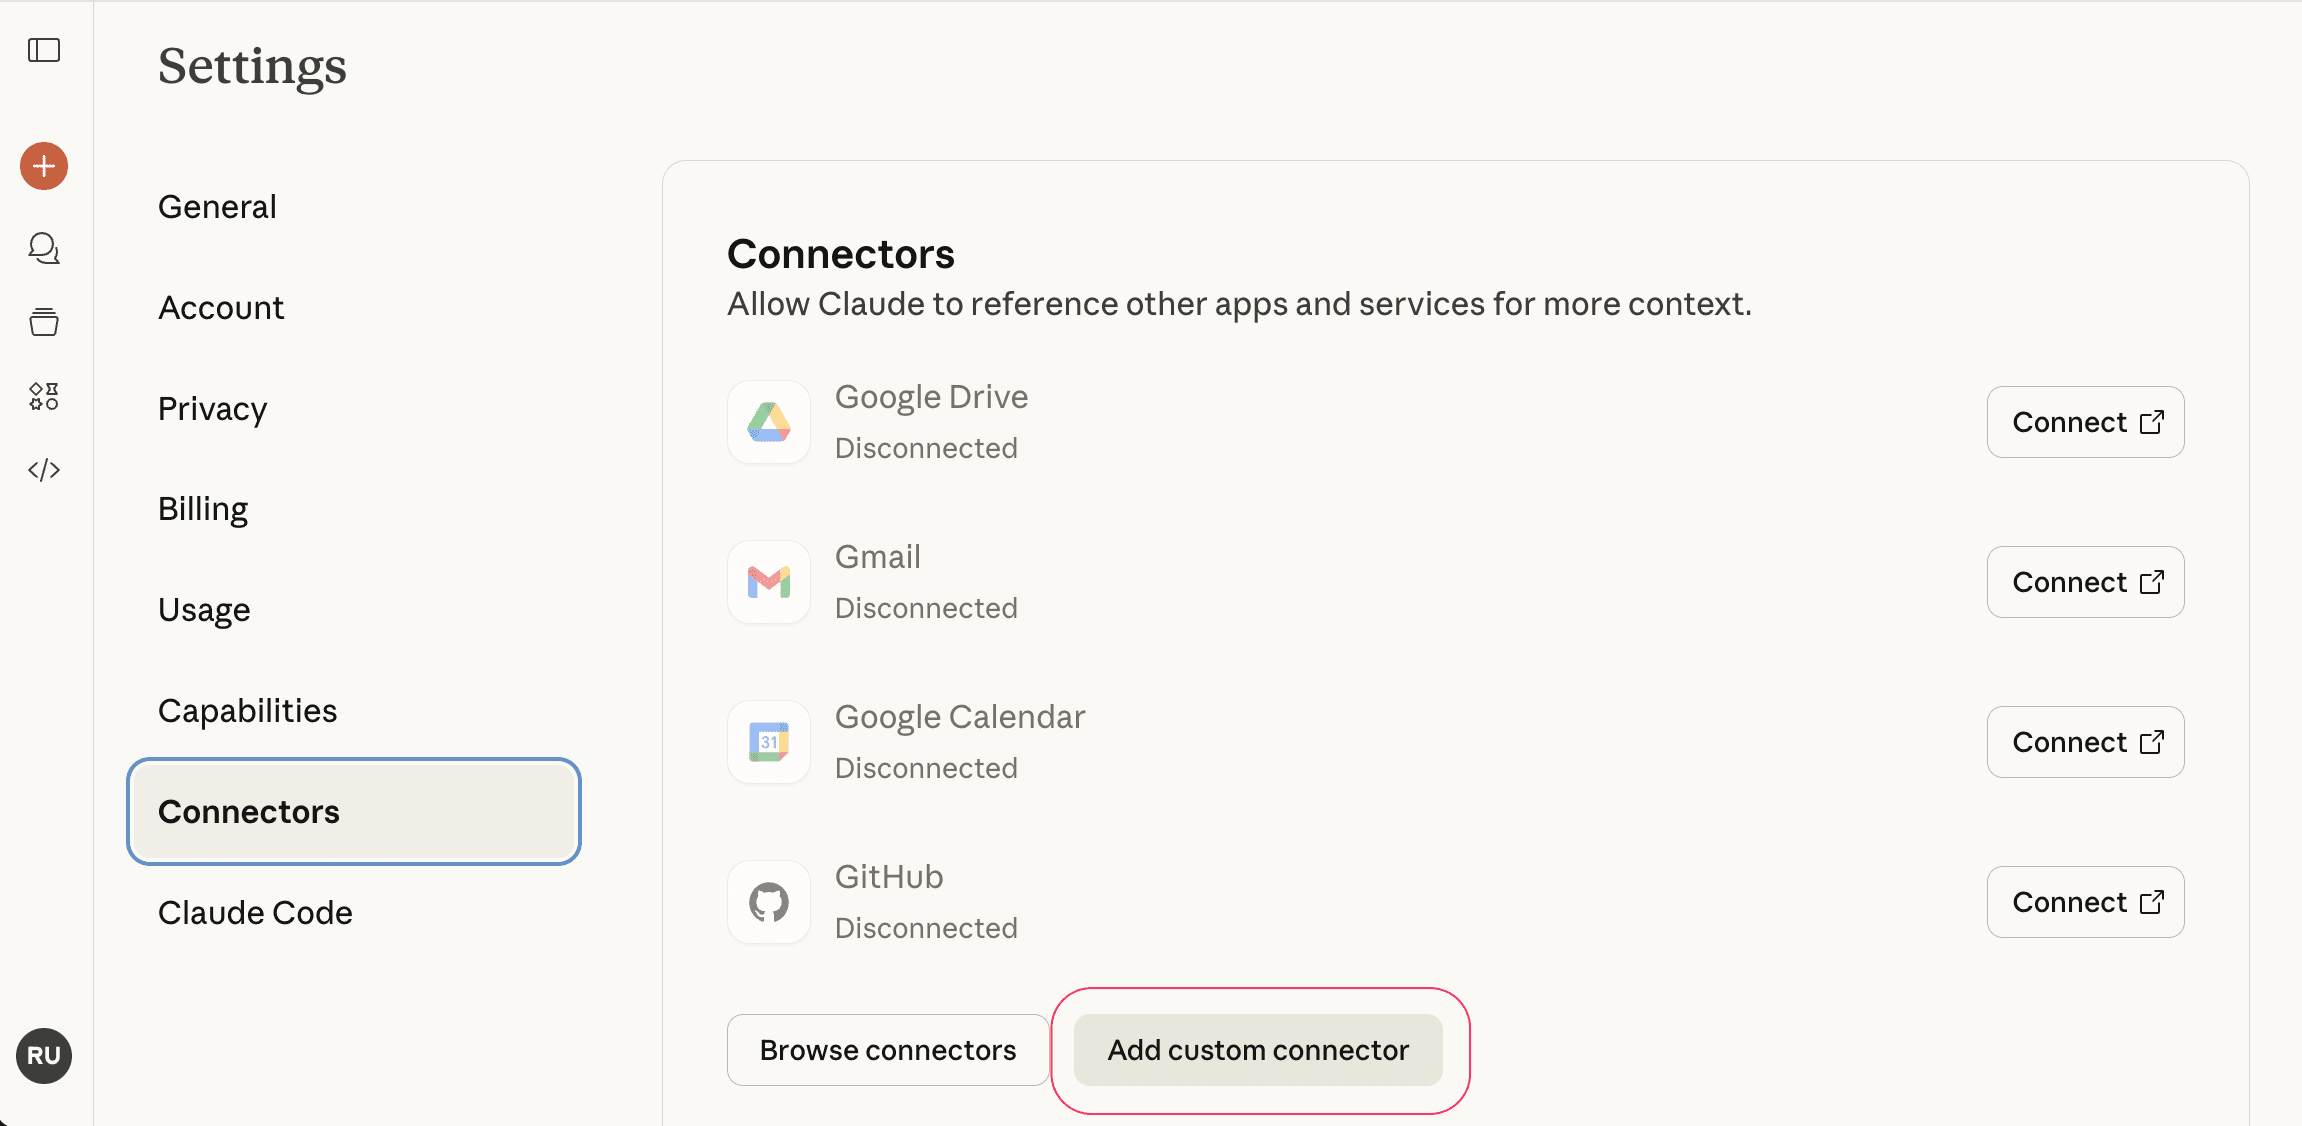
- Alternatively, navigate to Settings > Connectors from the Claude Web app.
-
Click Add custom connector.
-
In the "Add custom connector" dialog:
- Provide a connector name of your choice
- Enter the MCP endpoint URL:
https://app.nocodb.com/mcp - Click
Add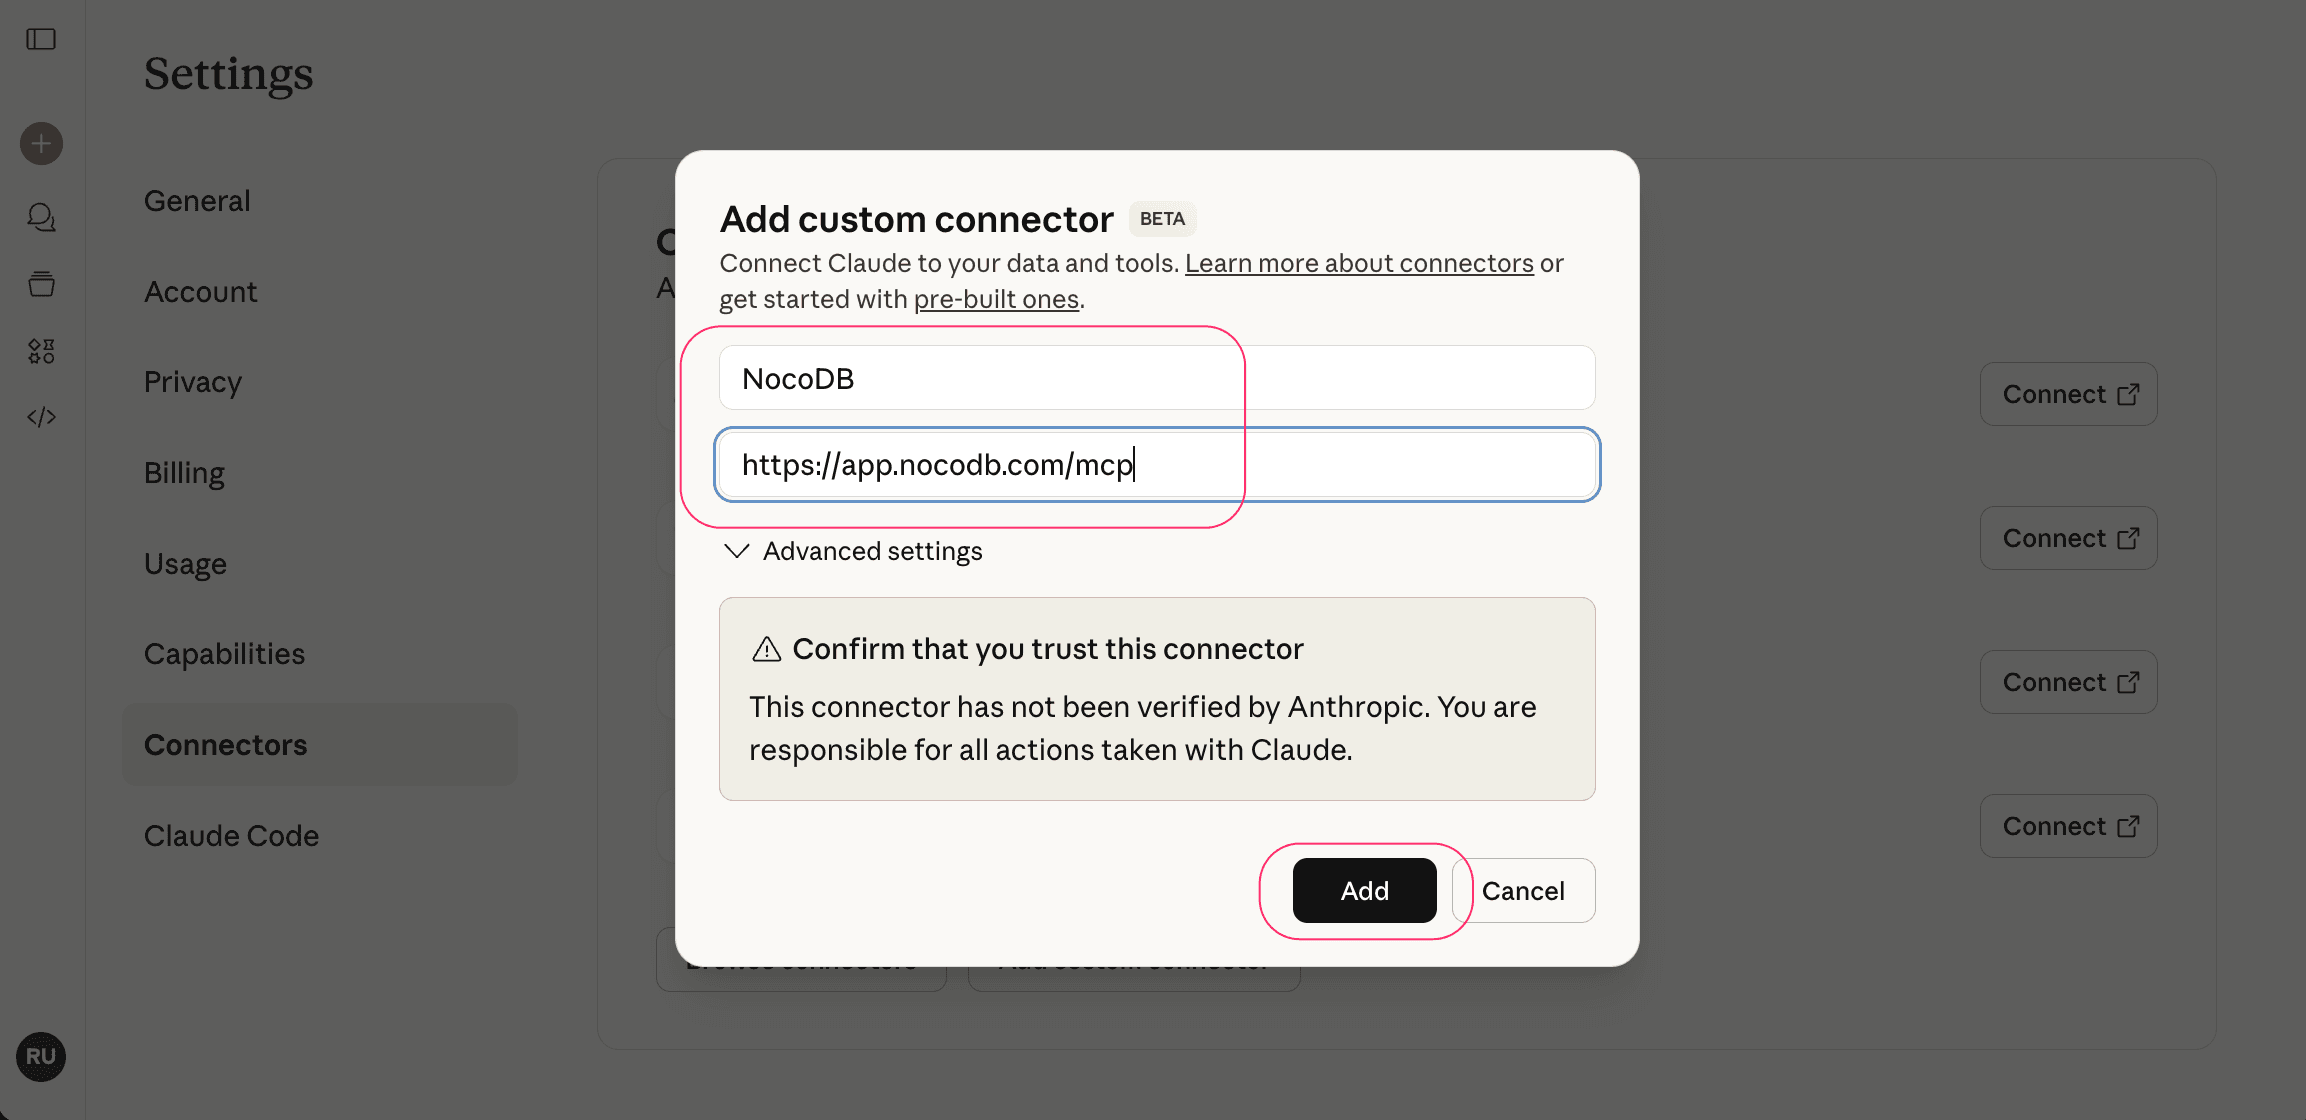
-
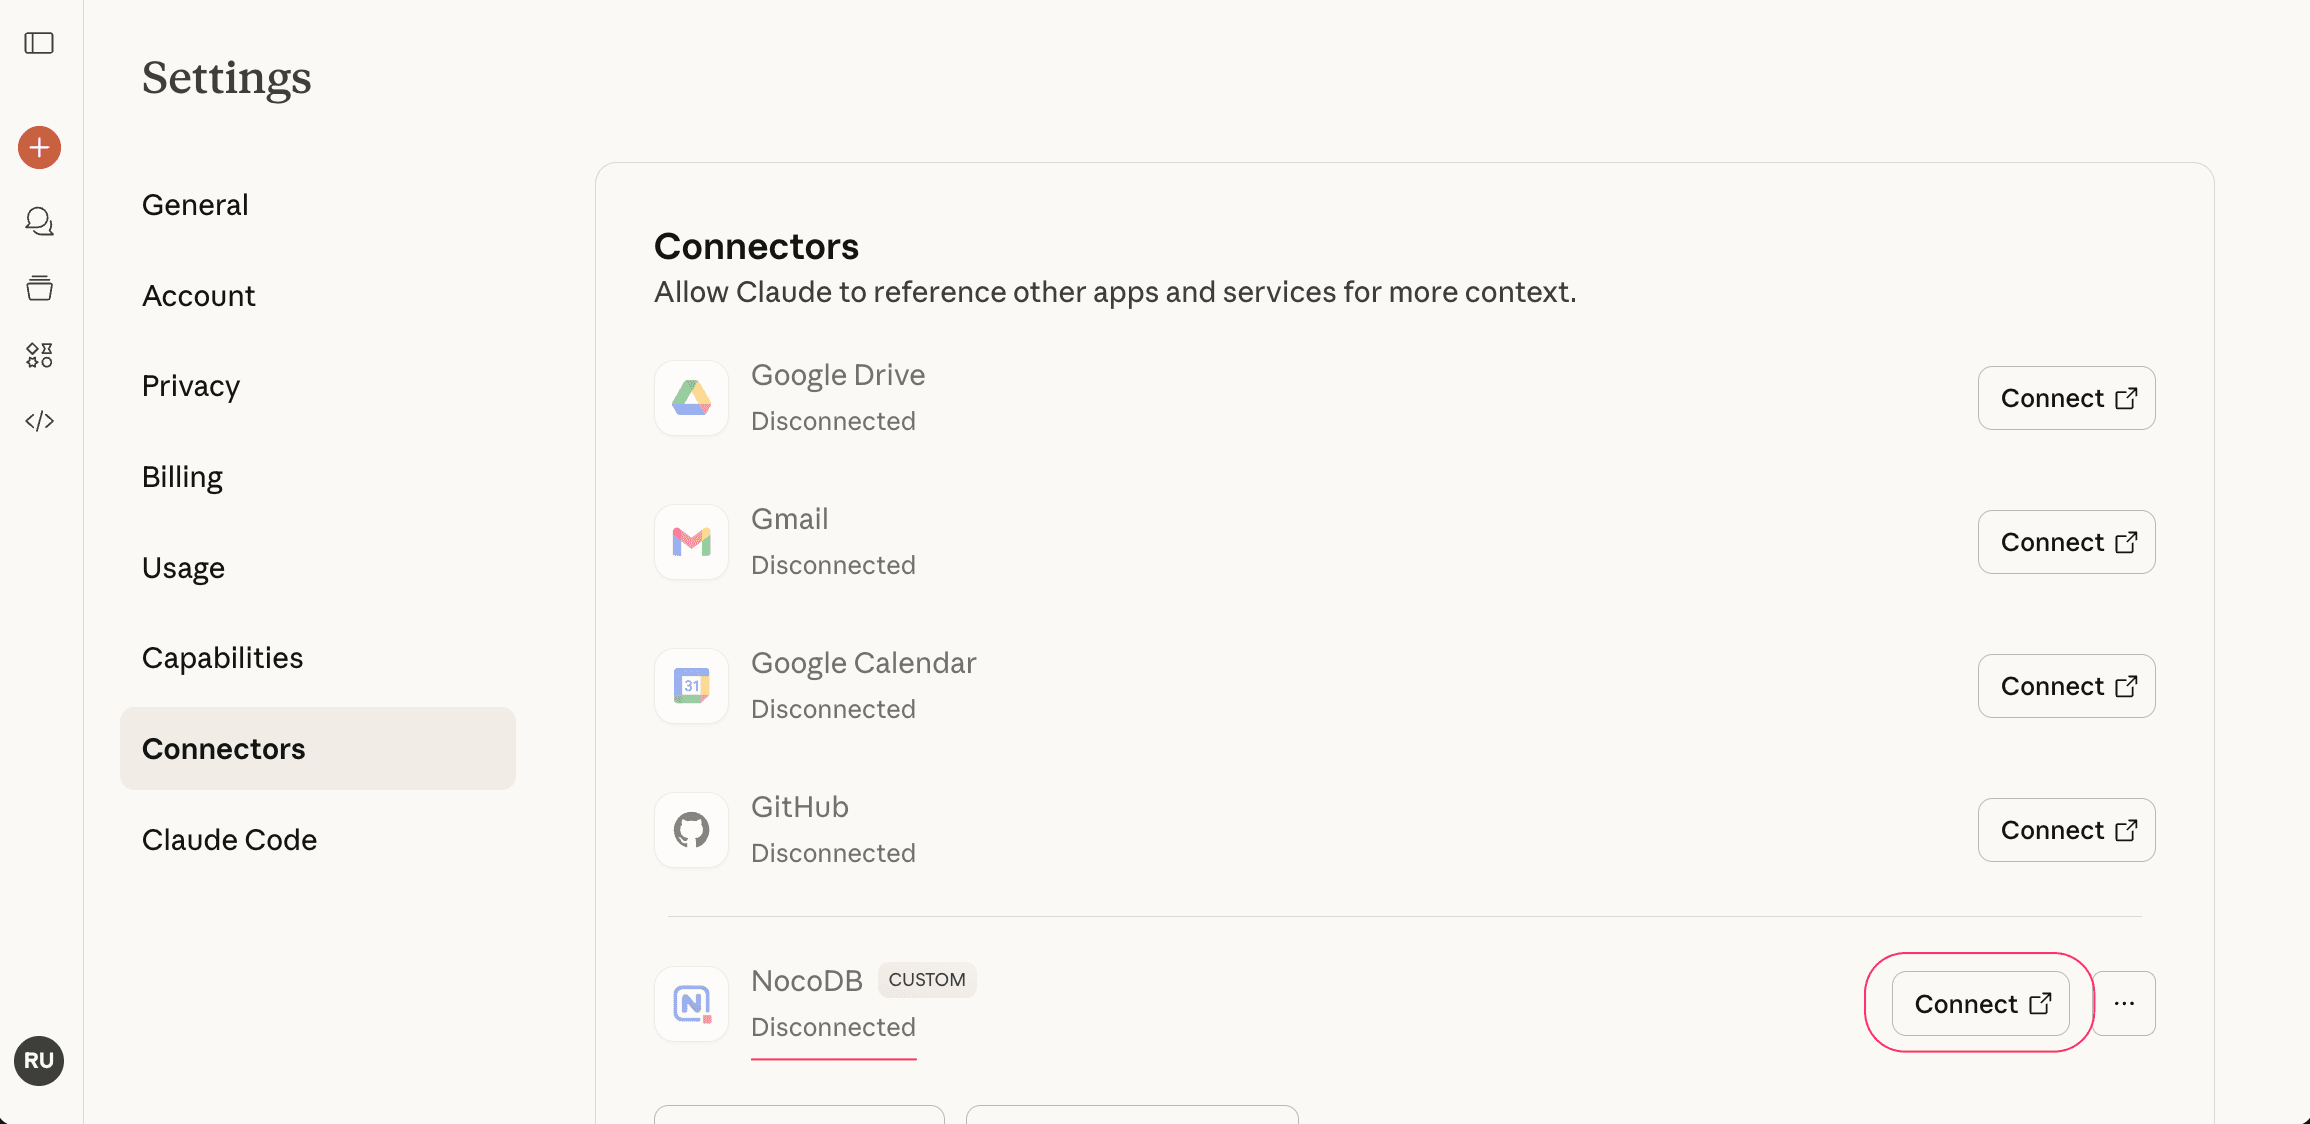
NocoDB Connector will now be listed in "Disconnected" state. Click Connect to initiate the OAuth authorization flow (Opens in a new tab).
-
Authorize Access
- You will be asked to log in to your NocoDB account (if not already logged in)
- Under Access, add the bases Claude may reach, or grant it all resources
- Under Tools & Permissions, allow the tools Claude may call
- Confirm the permissions Claude will have
- Access the resources you selected on your behalf
- Use only the tools you allowed
- Act with your own permissions in those resources
- Click Authorize to grant access
Authorize stays disabled until you have added at least one resource and allowed at least one tool. Where Claude names its own permissions, there is no tool picker and a resource is all that is needed.
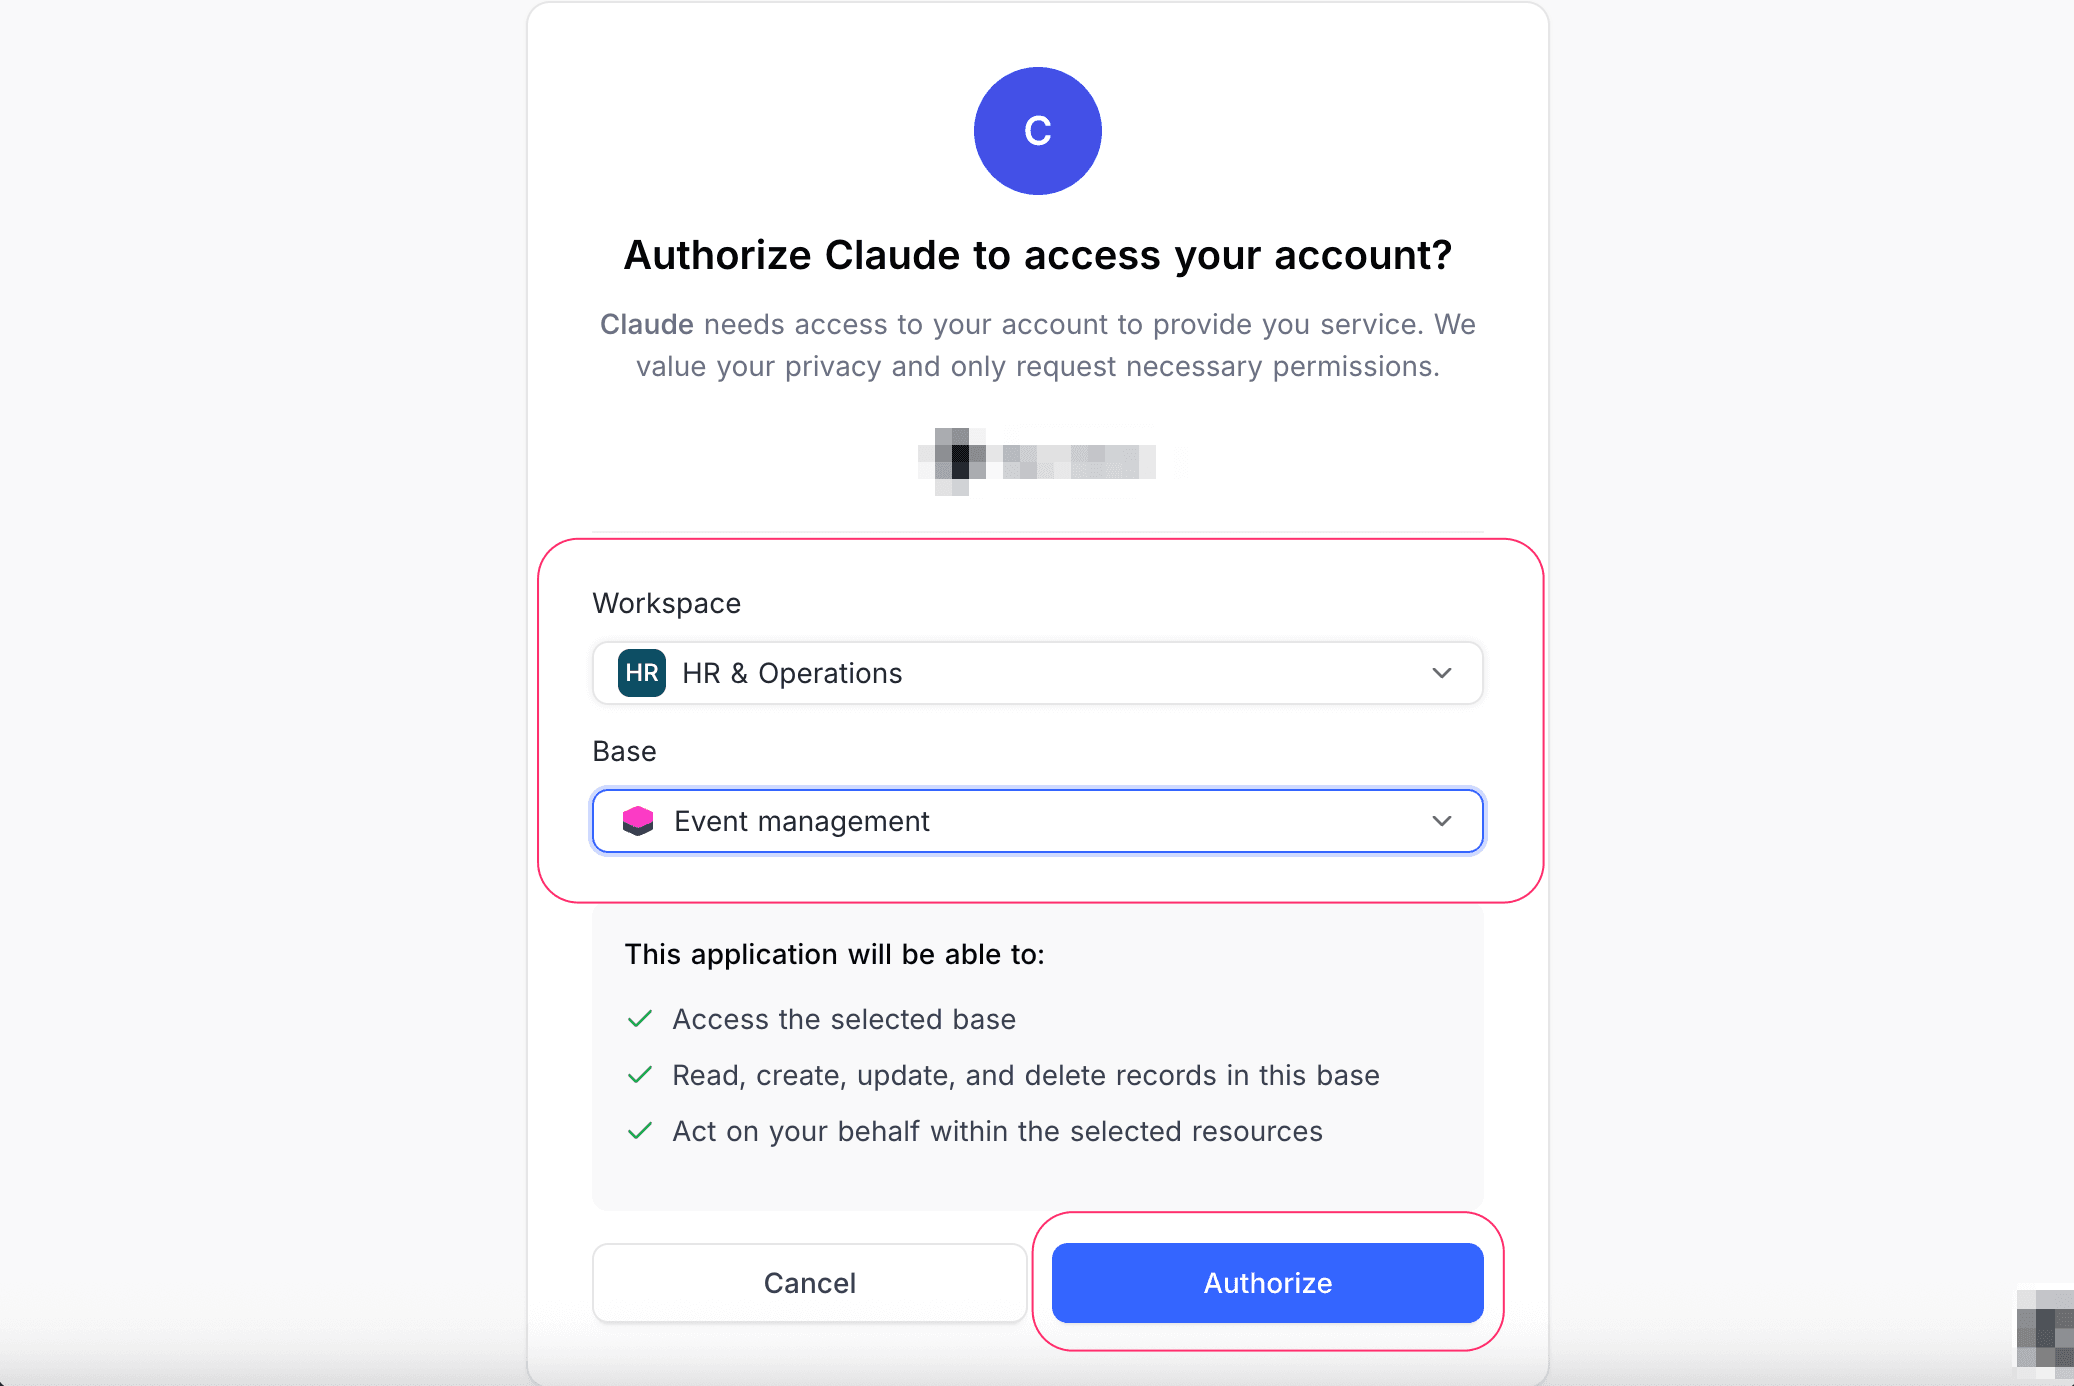
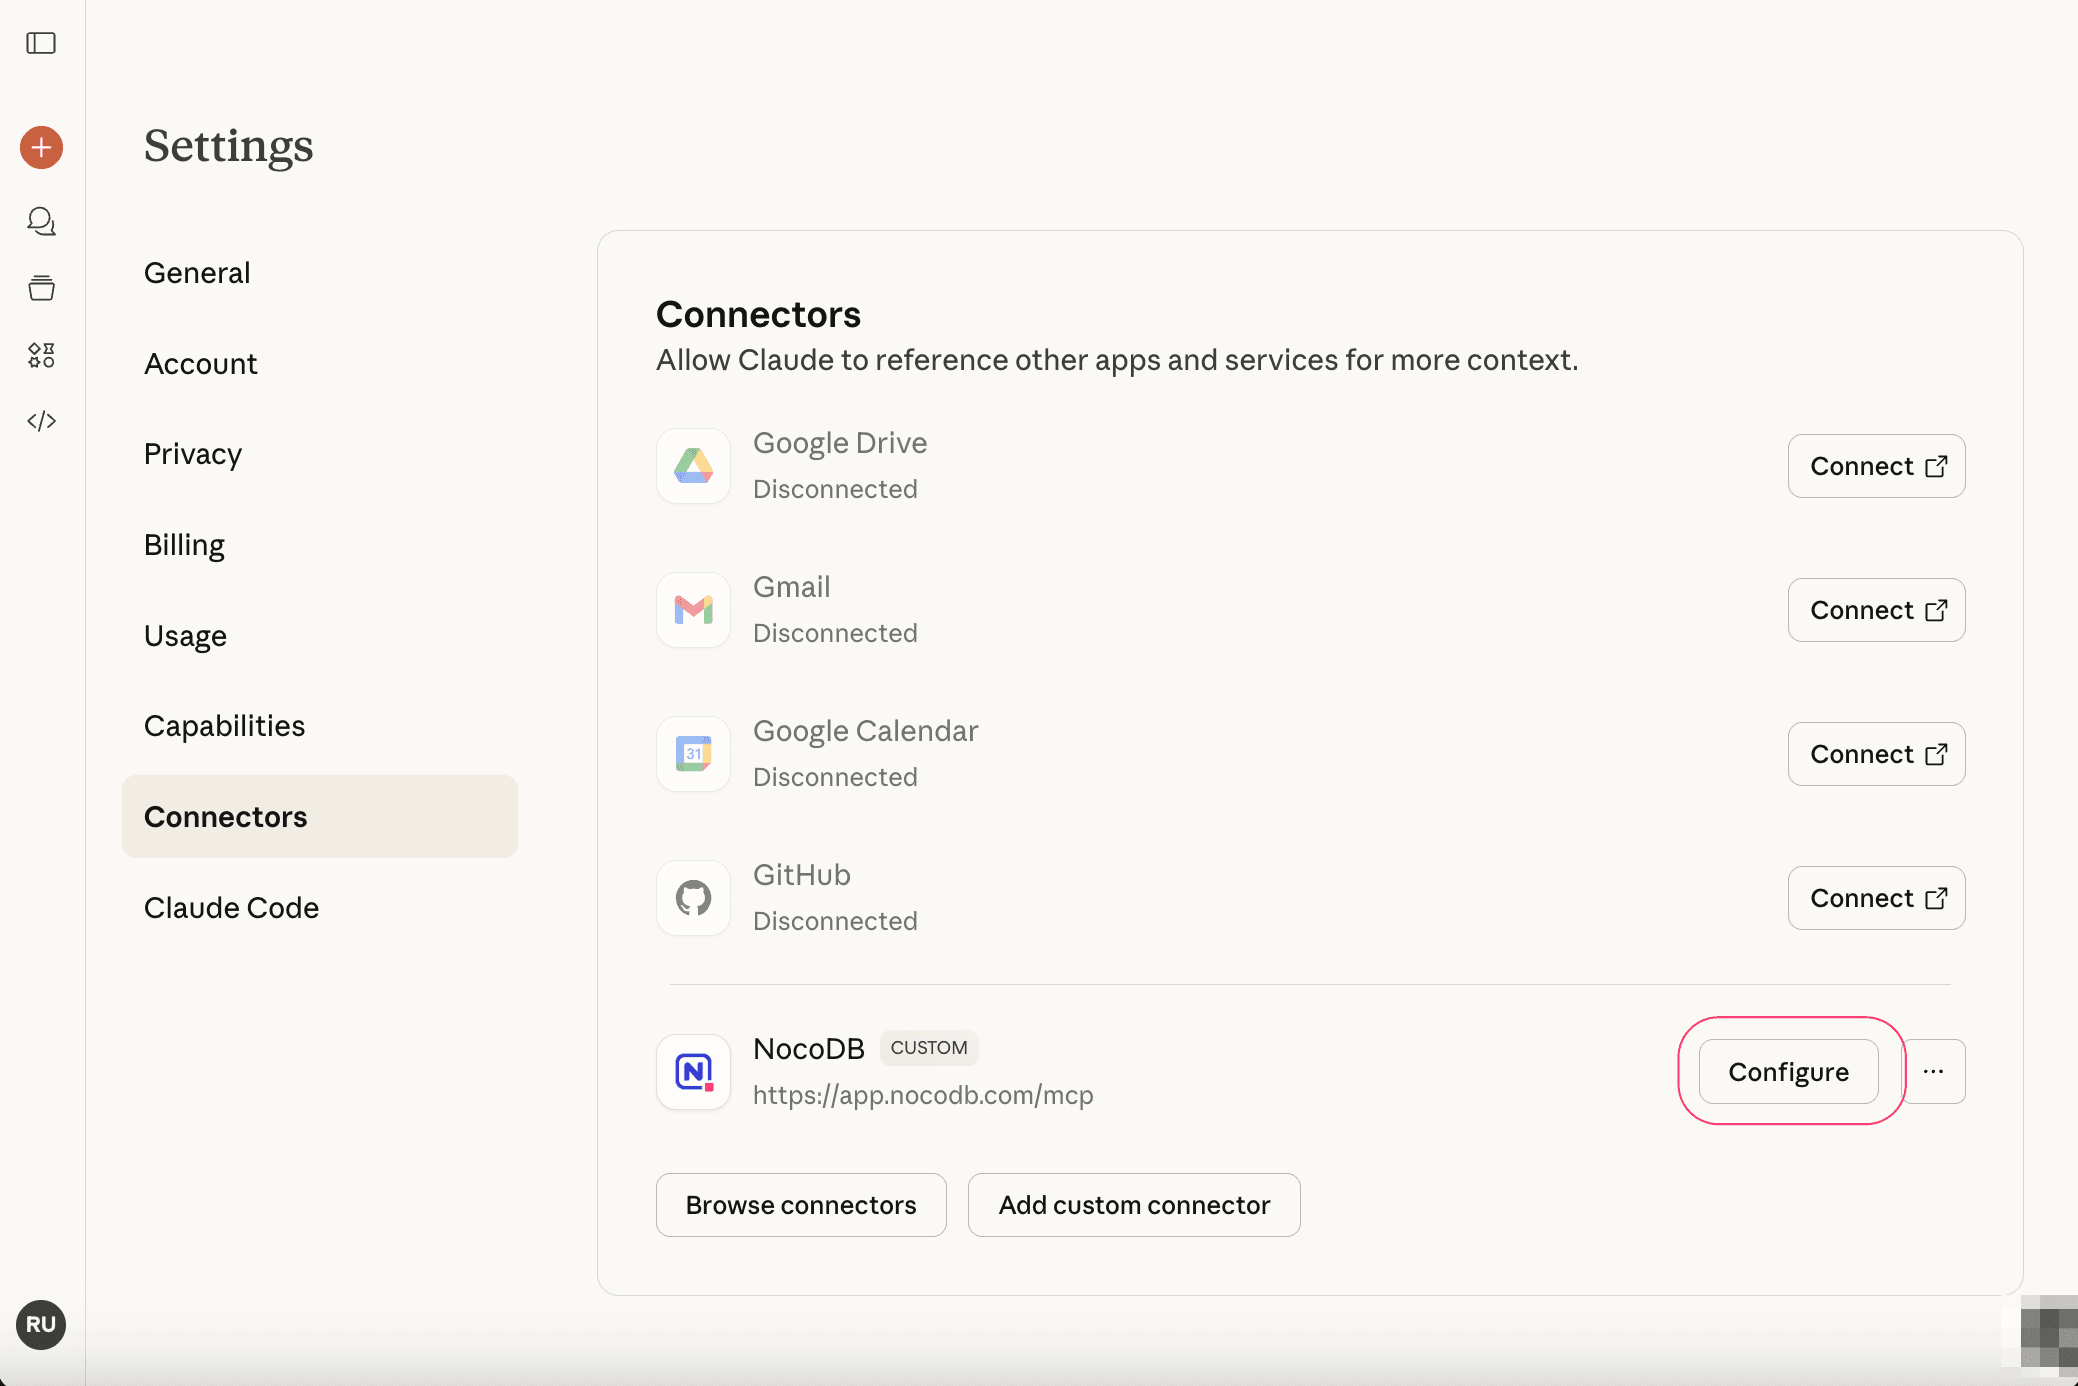
With this, the NocoDB connector will move to "Connected" state in Claude Web. You can now interact with your NocoDB data through Claude web application.
Configure Tool Permissions
By default, all tools are set to "Always ask permission" to ensure you have control over each operation Claude performs. You can modify these settings as needed.
Click here to open Claude Web Settings in a new tab. Click Configure on the NocoDB connector to manage tool permissions. Set each tool's permission level using the dropdown menu:
- Always ask permission — Your approval is required every time Claude uses this tool
- Allow unsupervised — Claude can use this tool without requesting approval

To retrieve Workspace & Base information that this connector has access to, use the "Get Base Info" tool.
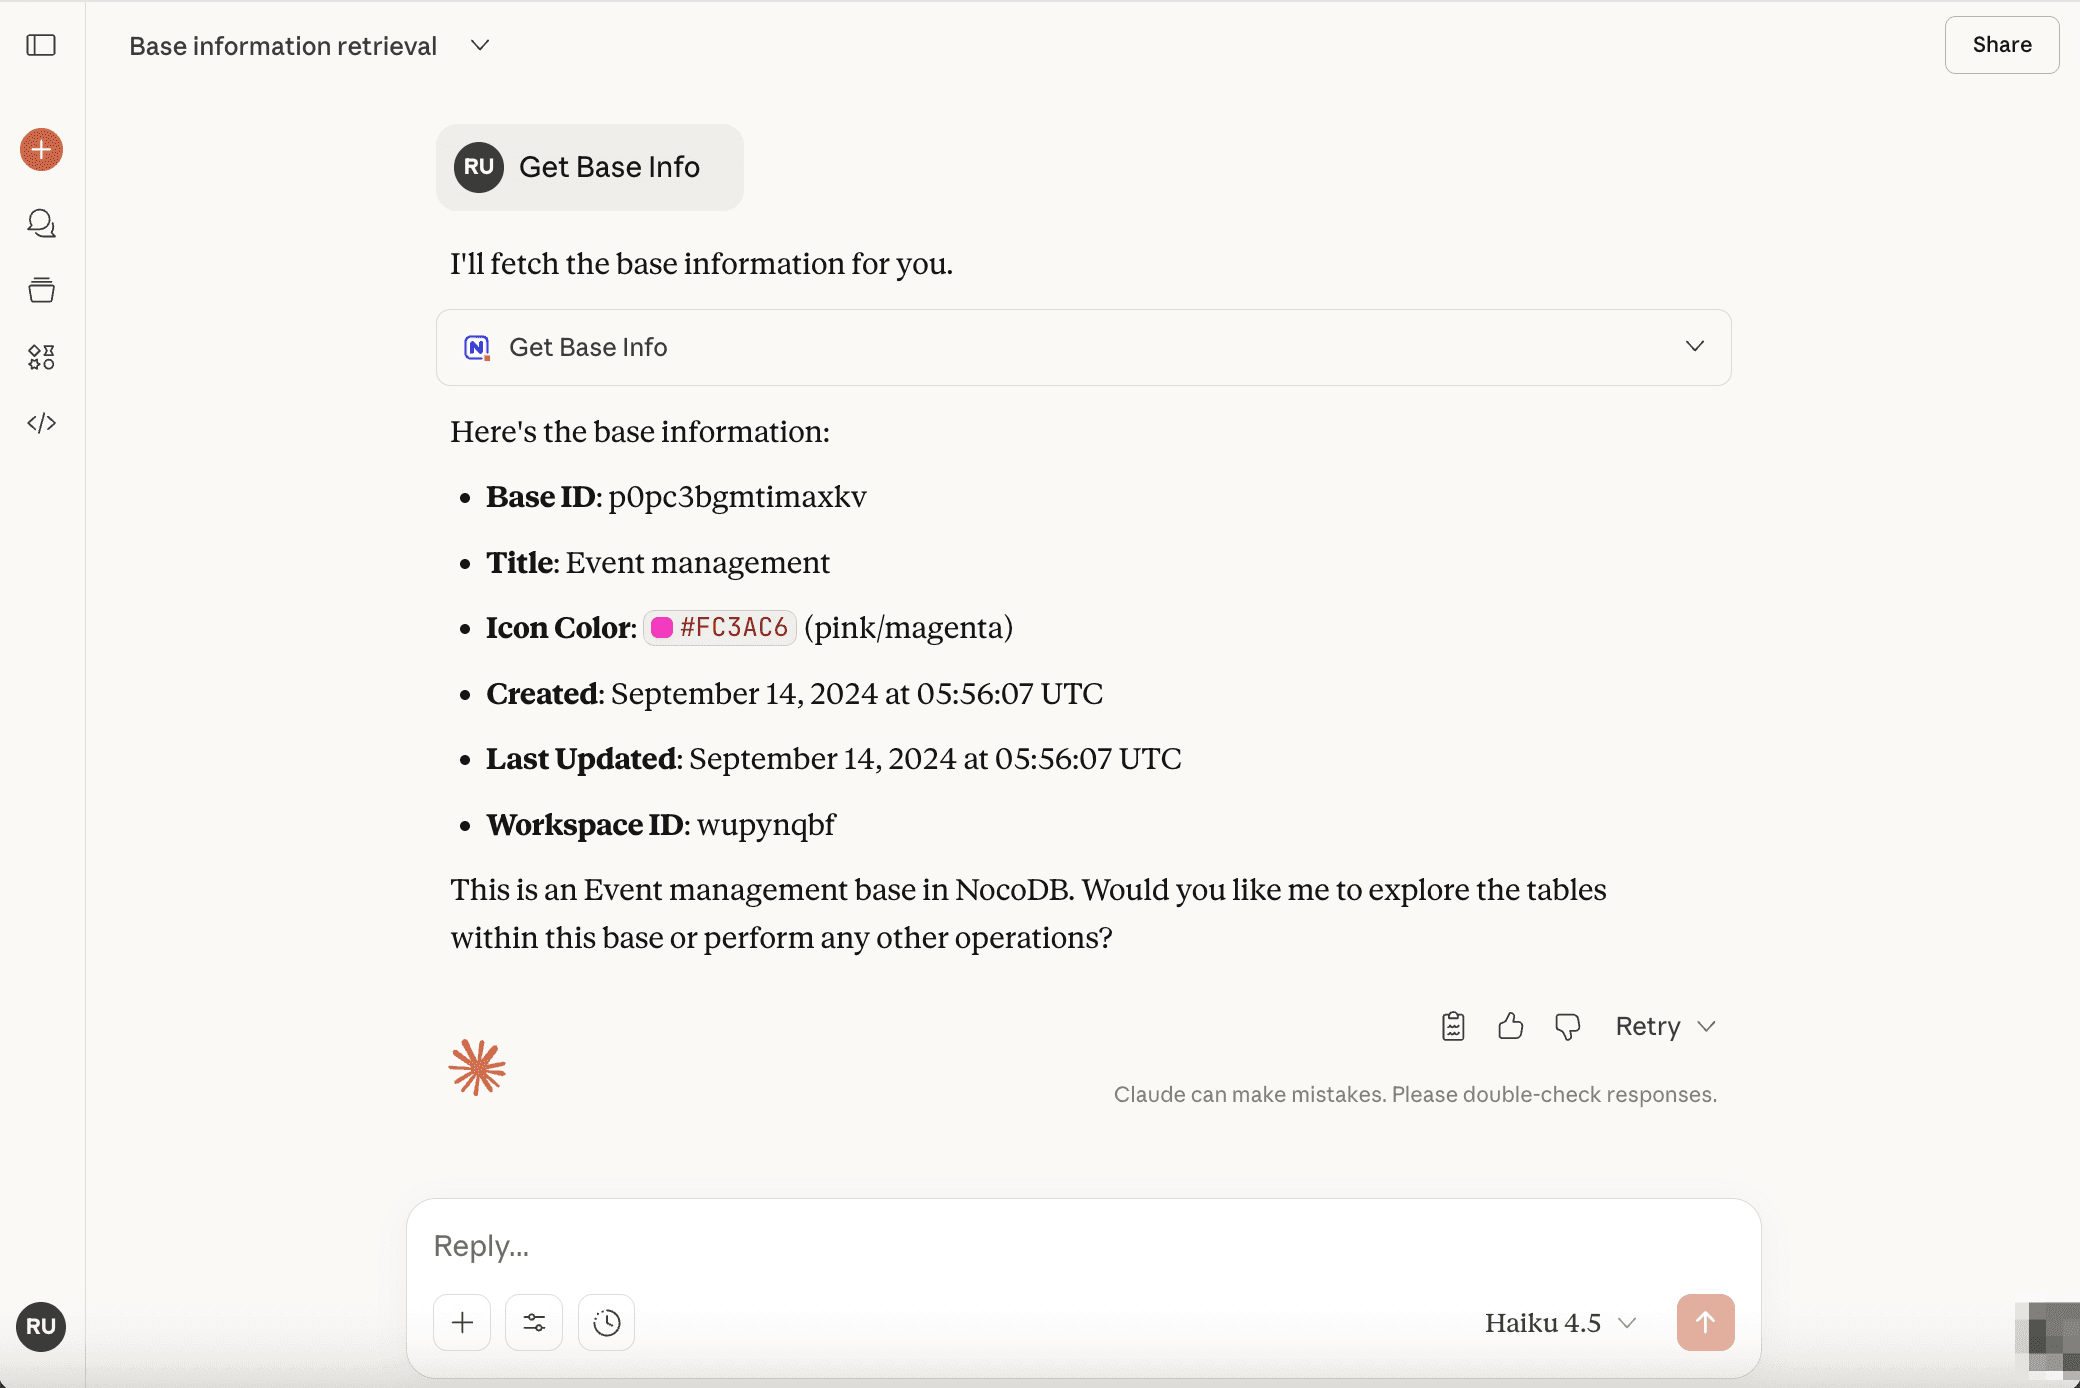
Using NocoDB Tools in Claude Web
Once configured, you can interact with your NocoDB data conversationally. For example:
- "Show me all projects with deadlines this week"
- "Create a task named 'Review Documentation'"
- "Mark the status of Project X as completed and reassign to John"
- "Provide details of our top 3 sponsors"
Claude will execute these requests using the enabled NocoDB tools, reading from and writing to your database based on the permissions you've granted.

ChatGPT
OAuth-based integration enables OpenAI web users (ChatGPT) to securely connect with NocoDB databases through the MCP connector, directly from their browser environment. This provides the same granular access control and eliminates the need for manual configuration or desktop client setup.
Prerequisites
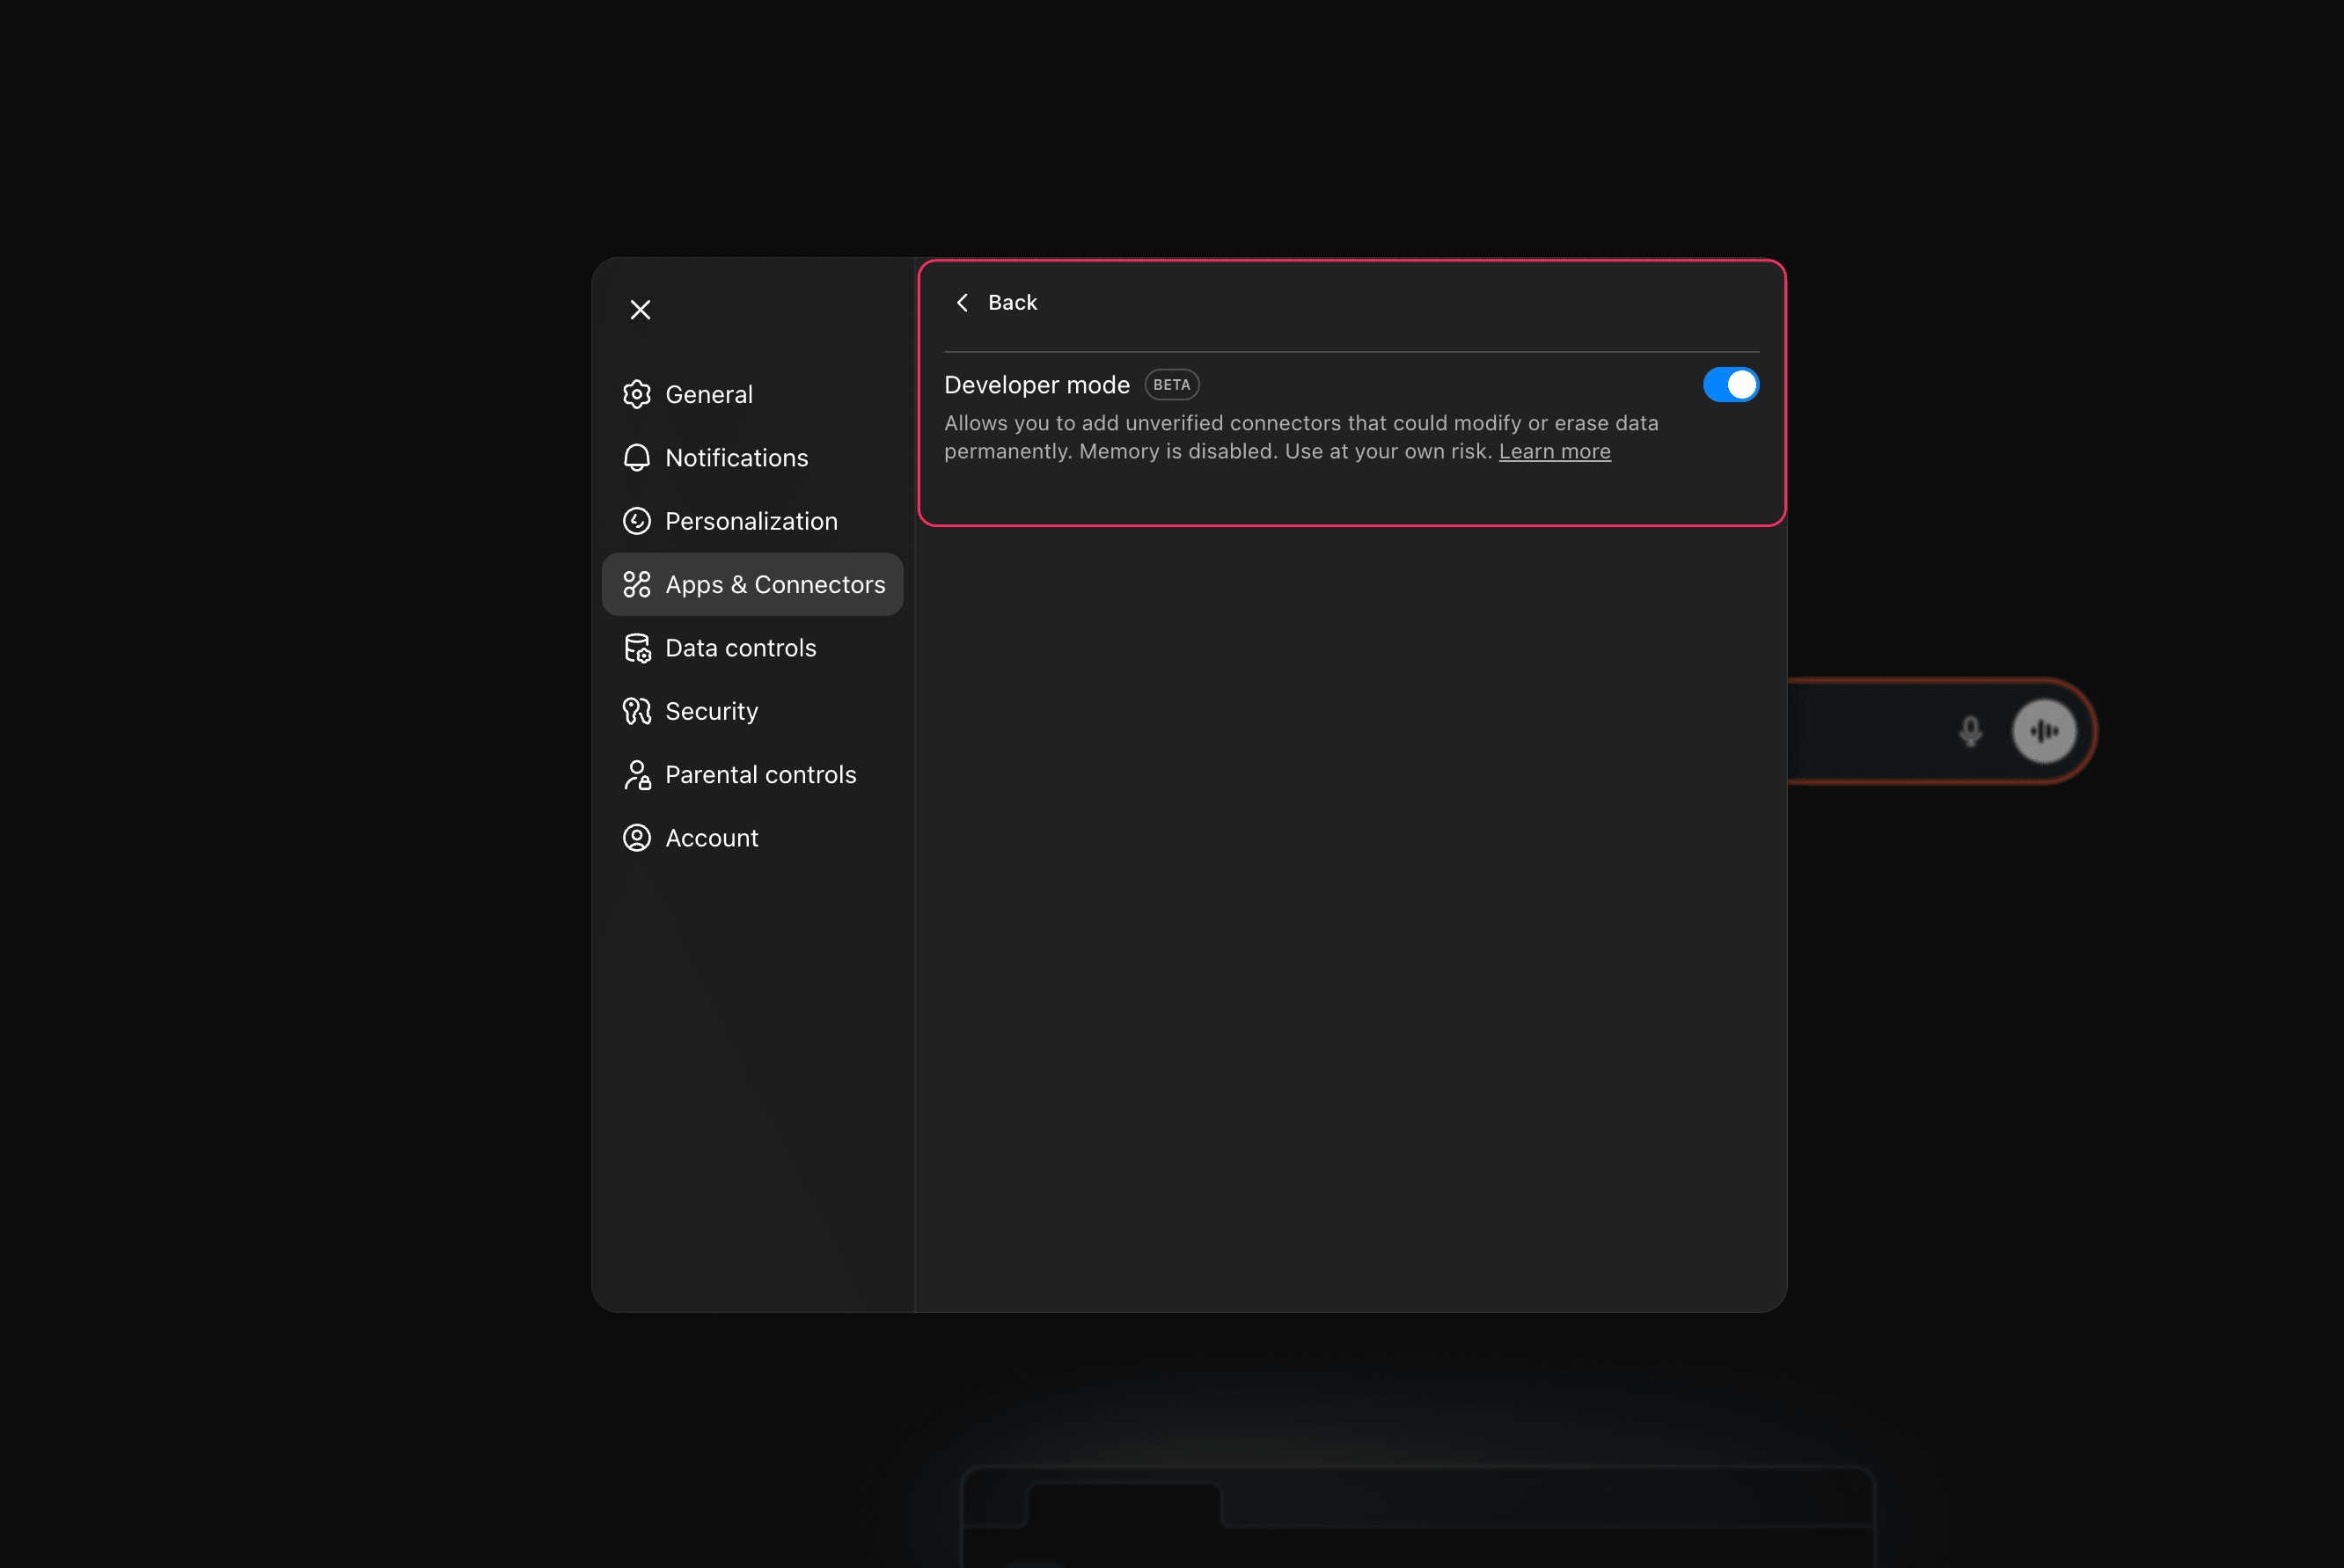
Enable Developer Mode in ChatGPT settings to allow custom connector additions.
- Open ChatGPT Settings in a new tab.
- Alternatively, click your Profile Icon → Settings → Settings → Apps & Connectors).
- Click Advanced Settings & enable Developer Mode.
Setup Steps
- Open ChatGPT Settings in a new tab.
- Alternatively, click your Profile Icon → Settings → Settings → Apps & Connectors).
- Click Create button in top right corner of the Connectors modal.
- In the "New connector" dialog:
- Provide a connector name of your choice. Optionally, add a description / icon.
- Enter the MCP Server URL:
https://app.nocodb.com/mcp - Check the box for I trust this application.
- Click
Create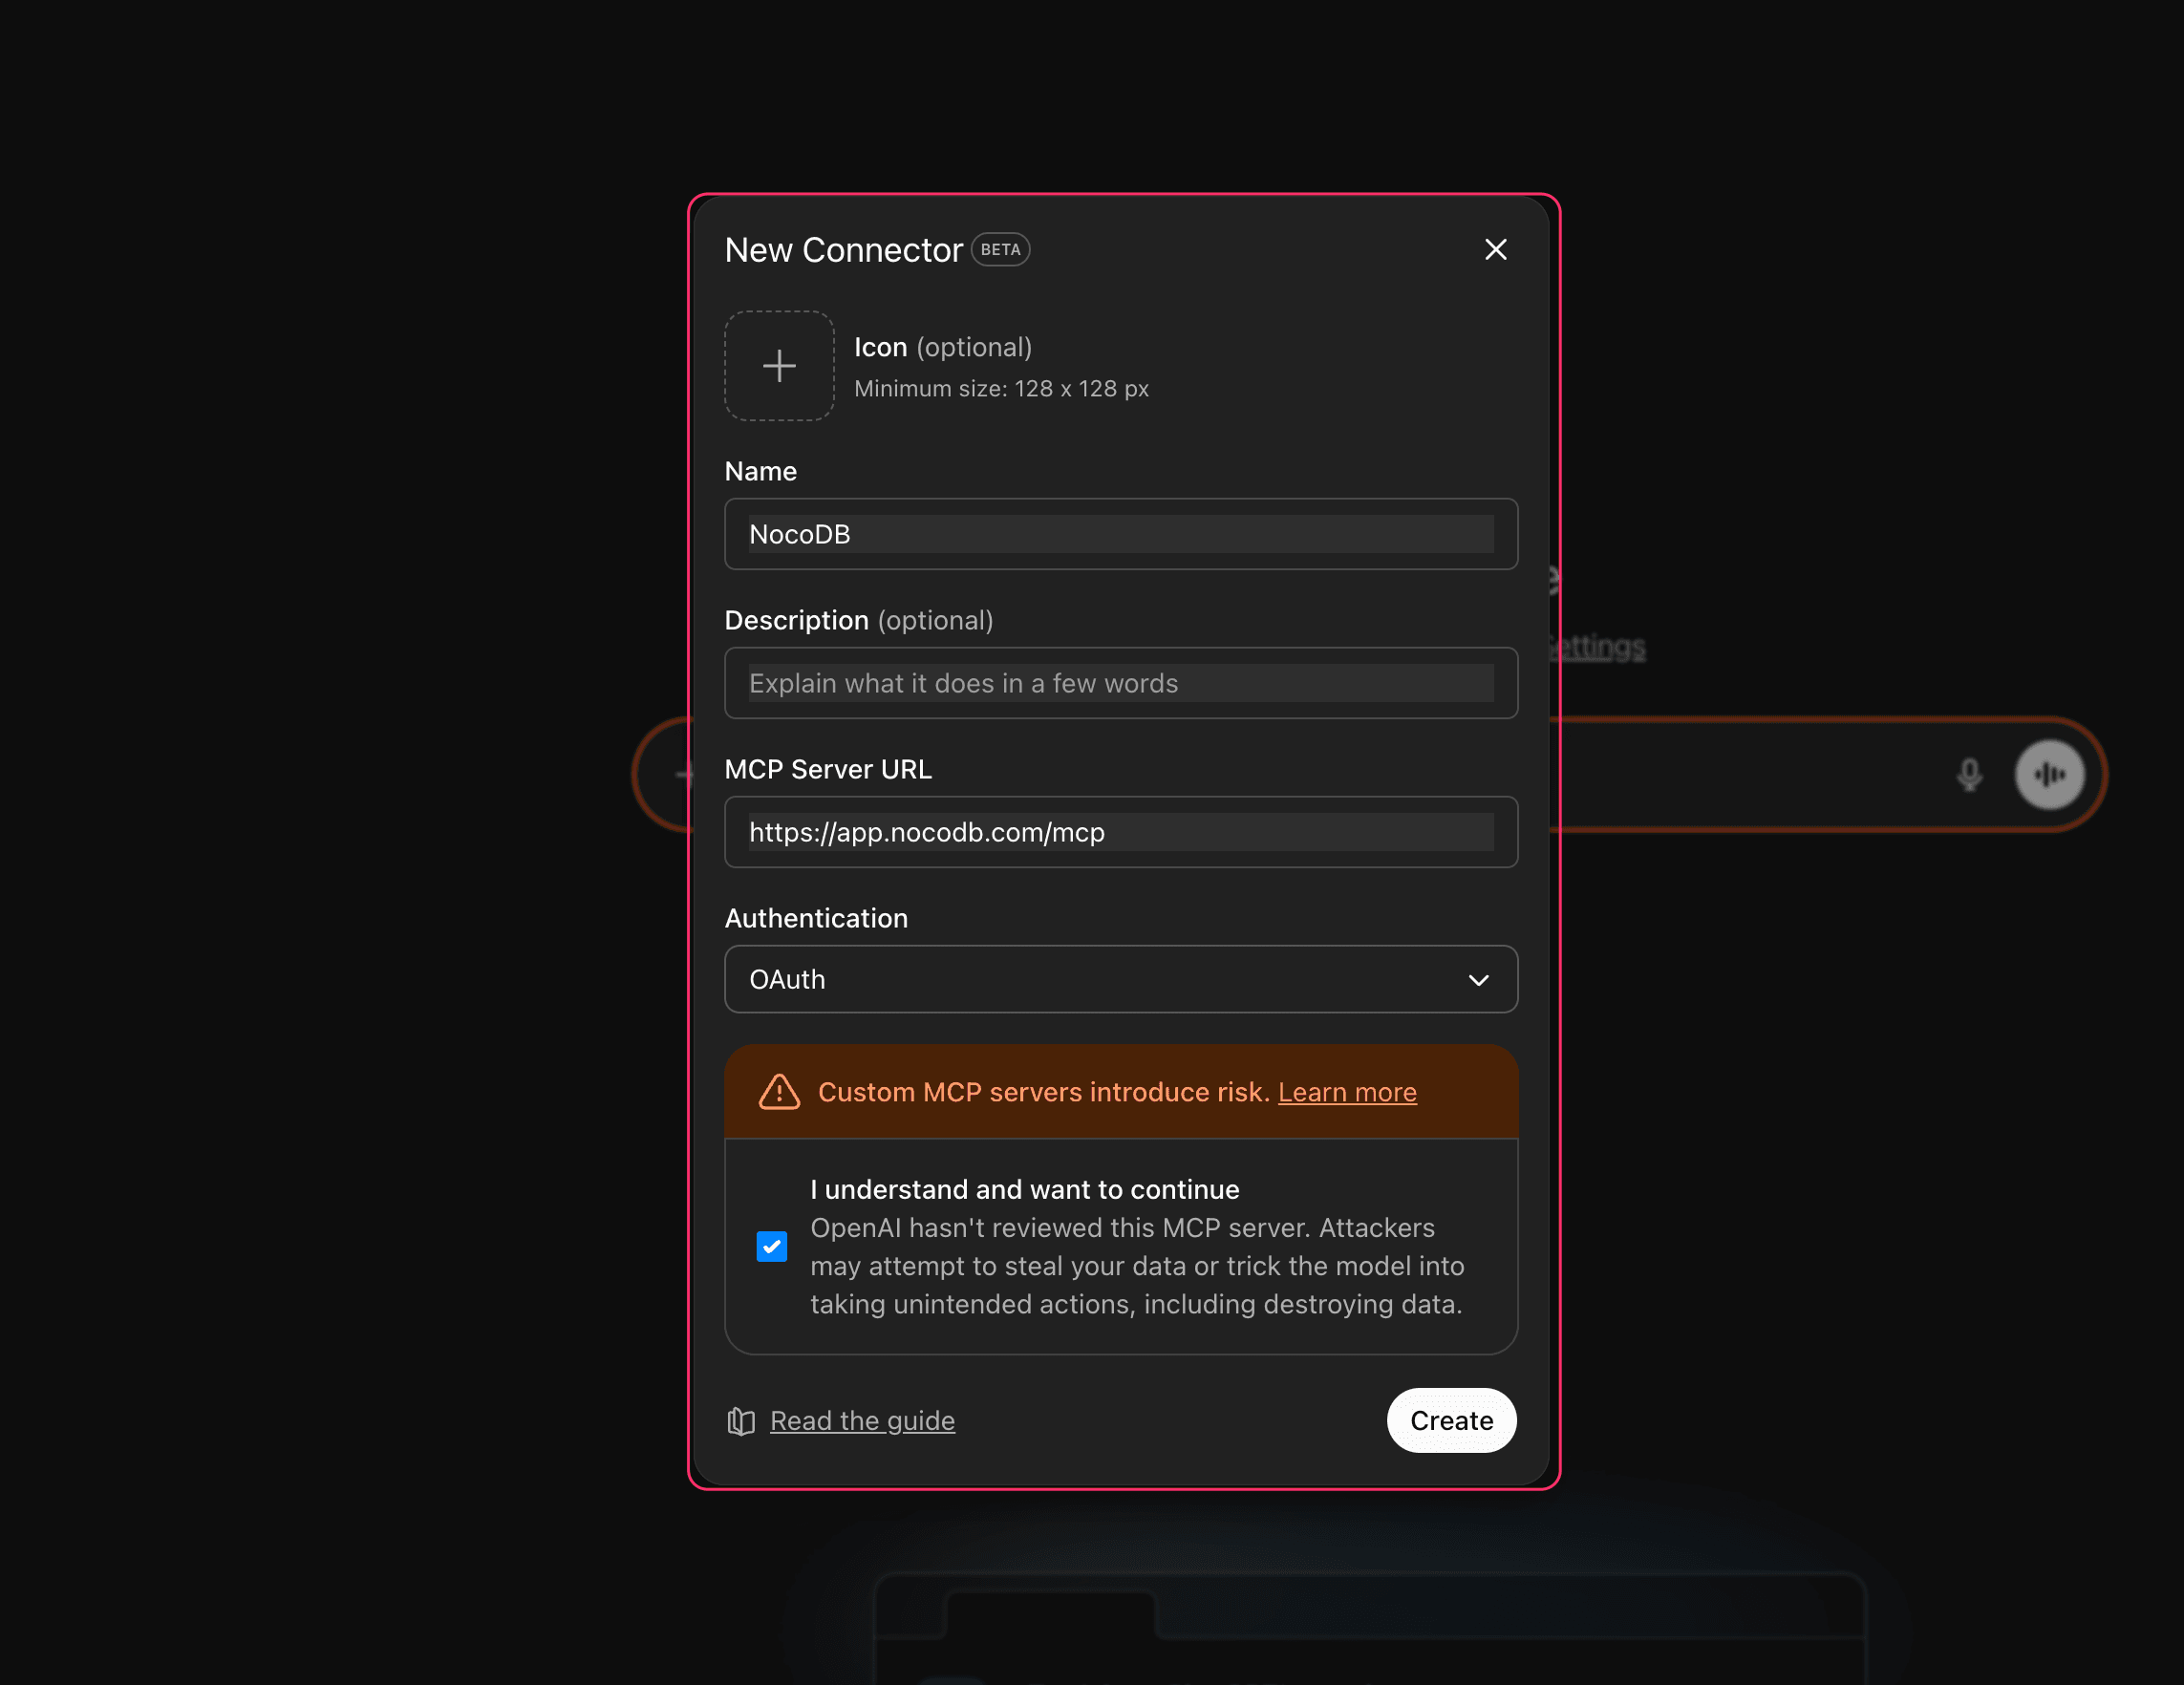
- Authorize Access:
- Log in to your NocoDB account if prompted
- Under Access, add the bases ChatGPT may reach, or grant it all resources
- Under Tools & Permissions, allow the tools ChatGPT may call
- Review and confirm the permissions being requested:
- Access to the resources you selected on your behalf
- Use of only the tools you allowed
- Acting with your own permissions in those resources
- Click Authorize
Once authorization completes, you will see a confirmation message in ChatGPT Web indicating the NocoDB connector is now connected.
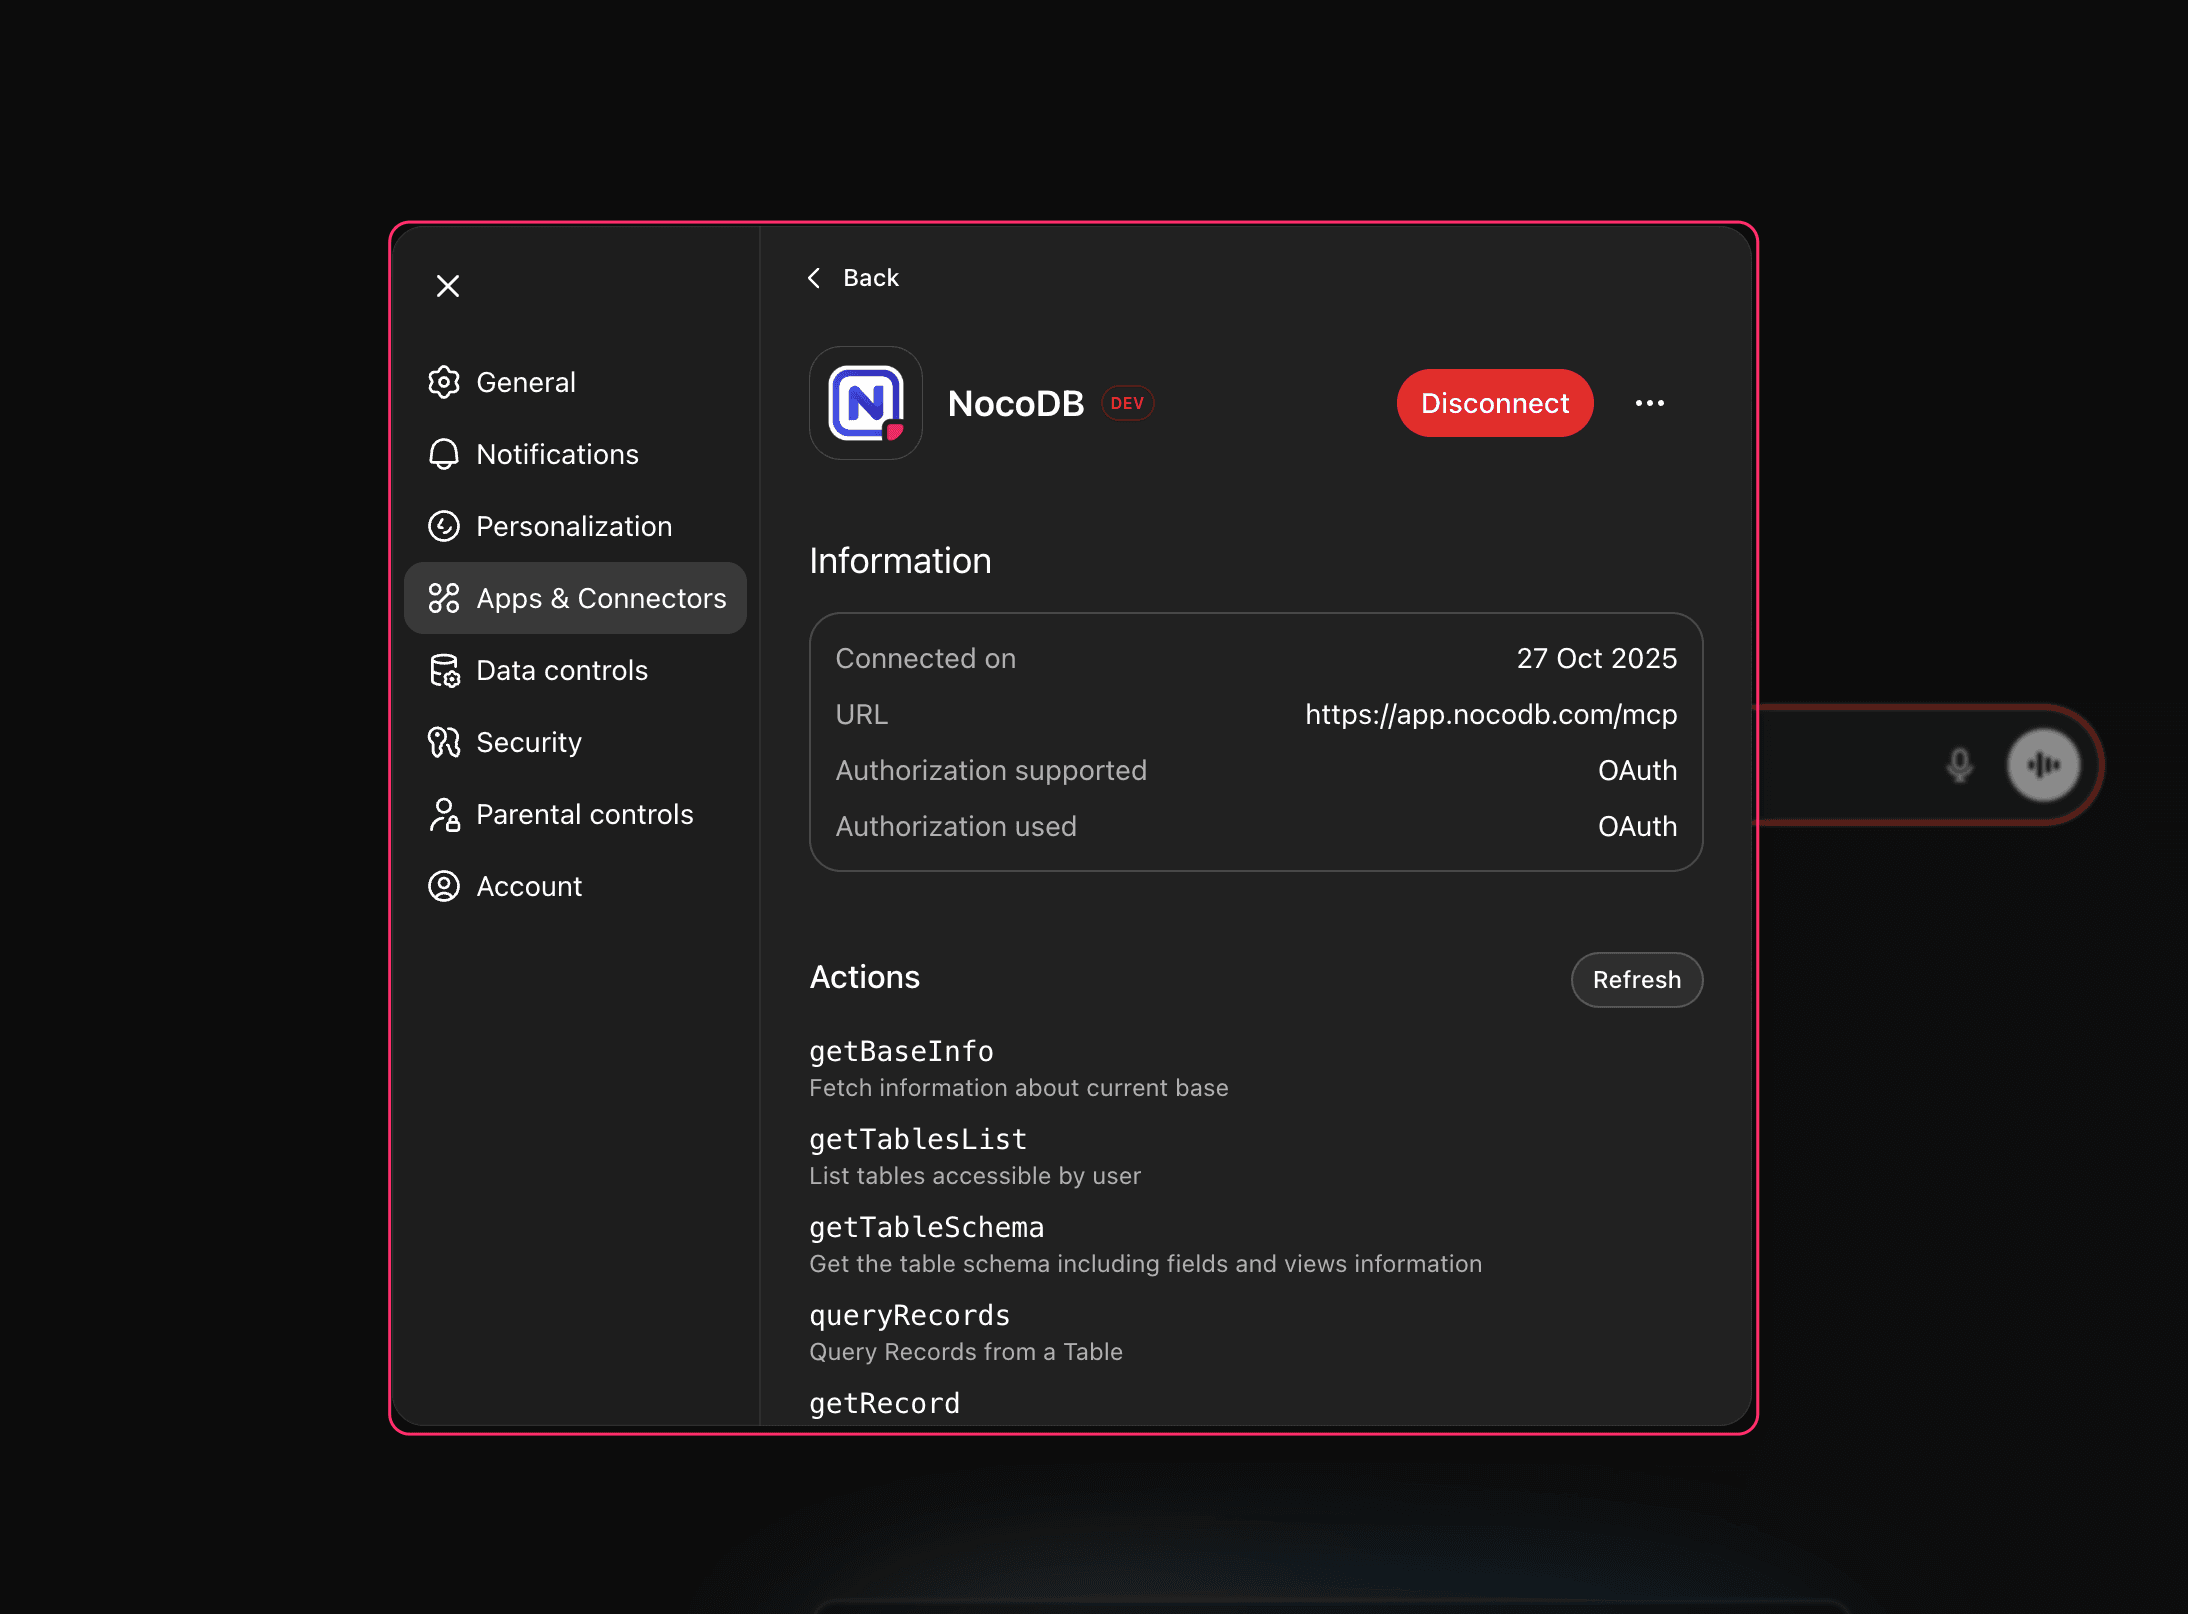
https://app.nocodb.com with your NocoDB instance URL.Using NocoDB Tools in OpenAI Web
On the ChatGPT interface, start a new conversation and
- Click the + icon to open the "Tools" menu, enable
Developer Modeif not already enabled. - Click
Moreto find and select the NocoDB connector you created. Toggle to enable it.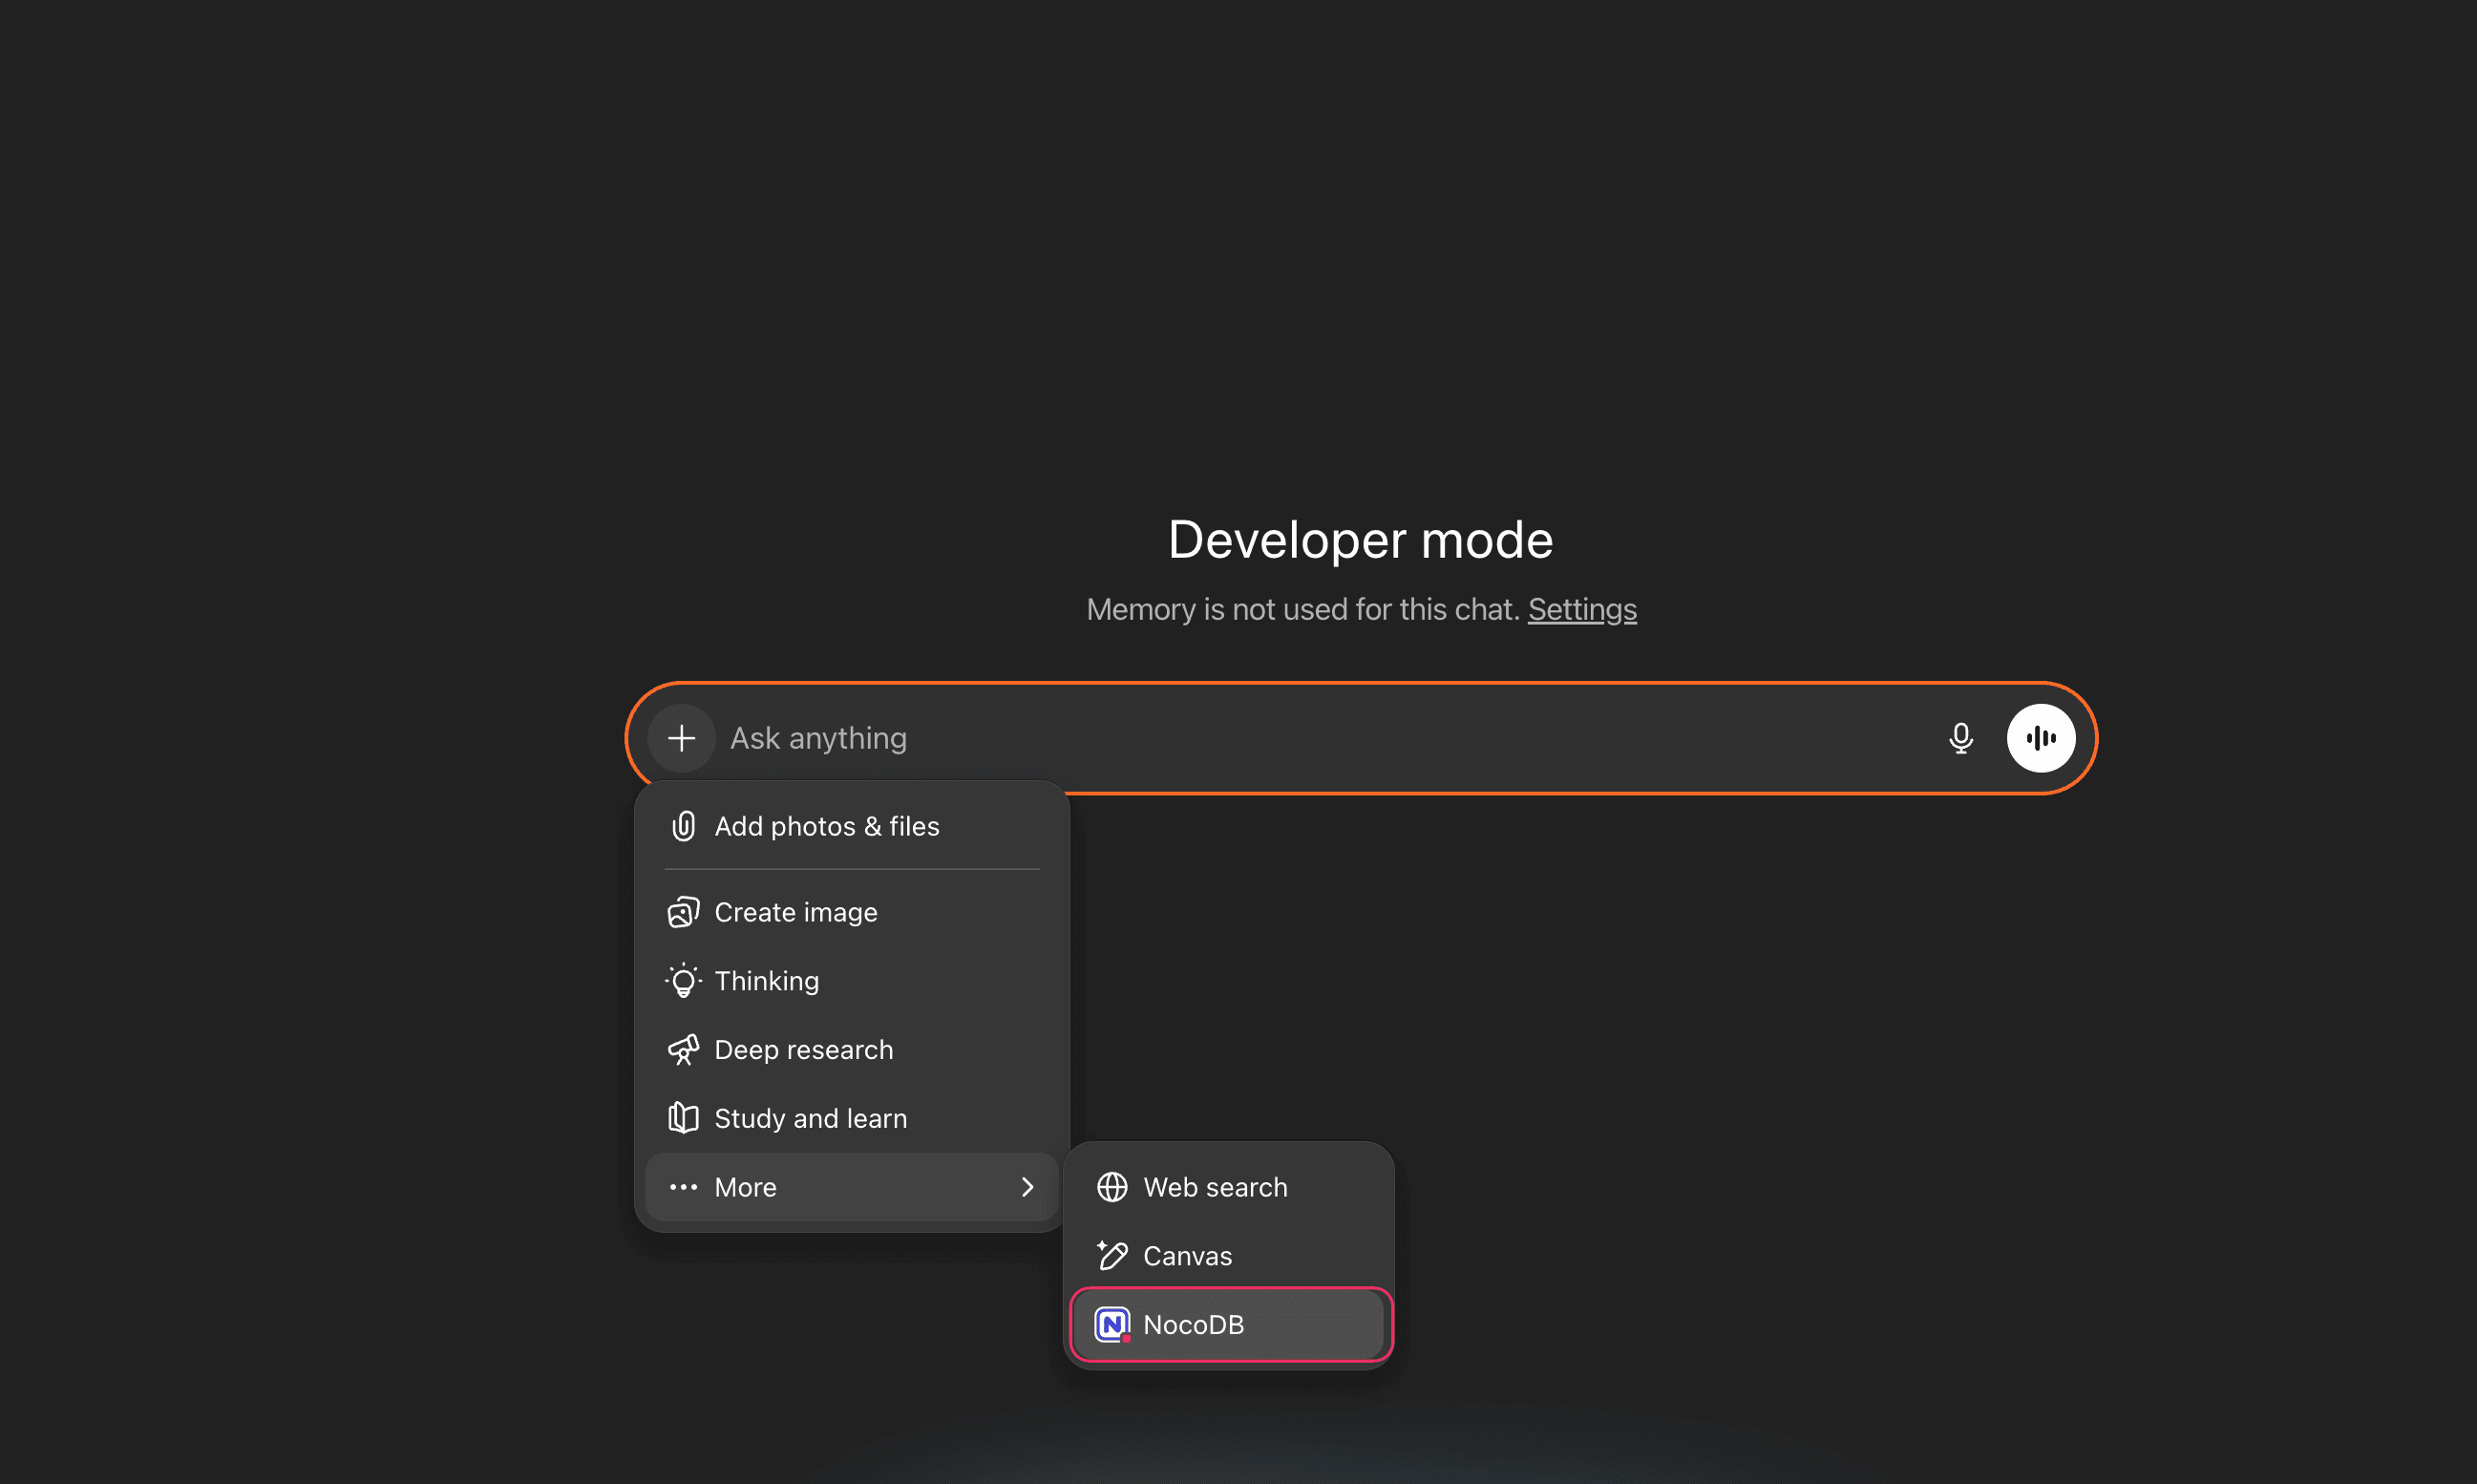
Once configured, you can query or update your NocoDB data conversationally. For example:
- “List all open support tickets assigned to me”
- “Add a new contact named ‘Alice Chen’ to the CRM base”
- “Update the status of Order #2456 to ‘Shipped’”
- “Summarize total revenue by month from the Sales base”
ChatGPT executes these actions using the connected NocoDB tools according to the permissions granted.
Last updated on