# FAQs
URL: /docs/product-docs/FAQs
General FAQs
## How to upgrade NocoDB ?
* Please see [here](/docs/self-hosting/upgrading)
## What is available in free version ?
* [Detailed comparison of Community Edition vs Enterprise Edition is here](/docs/product-docs/cloud-enterprise-edition/community-vs-paid-editions).
* NocoDB has just one community edition version which is free forever.
* In it you will notice advanced features are all available for free.
* ACL
* Collaboration
* Advanced Views : Form View, Gallery View & Kanban View
* Share View
* Embed View
* Password protected View
* Automations
* API Token Support
* And we would never move these features from free to an enterprise version of NocoDB.
* There is no limitations to number of bases, records or fields either.
## Is NocoDB available on the cloud?
Yes! NocoDB is currently available in technical preview.
You can simply signup by clicking [here](https://app.nocodb.com/#/signin?utm_source=OSS\&utm_medium=OSS\&utm_campaign=OSS\&utm_content=OSS).
## Why is the feature I need not in Community Edition?
We know it can be disappointing when a feature you need isn’t available in community edition.
But before we react, let’s reflect: NocoDB community edition is empowering over 20,000 companies — for free without any cost.
In the sector of software that often takes, we choose to give. Yet, to continue serving with integrity,
some capabilities are part of our paid plans — not as a barrier, but as a way to sustain the service for all.
Should you need these features, you’re welcome to support us through the cloud or a self-hosted license.
## Scrollbar disappears, how should I make it visible always?
NocoDB follows the system settings for scrollbars. If you have configured your system to always show scrollbars,
NocoDB will respect that setting. If you want to change this behavior, you can adjust your system settings accordingly.
## How to check my Base info in the community edition ?
* You can open `Base context menu` and click `Copy Base Info`.
You should see the similar result as below.
```
Node: **v20.15.1**
Arch: **x64**
Platform: **linux**
Docker: **true**
RootDB: **pg**
PackageVersion: **0.258.2**
```
## What are the official socials for NocoDB?
* Youtube: [https://www.youtube.com/@nocodb](https://www.youtube.com/@nocodb)
* Twitter: [https://twitter.com/nocodb](https://twitter.com/nocodb)
* Discord: [http://discord.nocodb.com/](http://discord.nocodb.com/)
* GitHub: [https://github.com/nocodb/nocodb](https://github.com/nocodb/nocodb)
* Community Forums: [https://community.nocodb.com/](https://community.nocodb.com/)
* LinkedIn: [https://www.linkedin.com/company/nocodb](https://www.linkedin.com/company/nocodb)
* Reddit: [https://www.reddit.com/r/NocoDB/](https://www.reddit.com/r/NocoDB/)
## SSO (Single Sign-On) FAQs
For all questions related to SSO, please see the dedicated SSO FAQ section: [SSO FAQs](/docs/product-docs/account-settings/authentication/FAQs)
# Welcome
URL: /docs/product-docs
NocoDB Documentation
NocoDB is a no-code database platform that allows teams to collaborate and build processes with ease of a familiar and intuitive spreadsheet interface.
This allows even non-developers or business users to become software creators.
## Features
### Rich Spreadsheet Interface
* Basic Operations: Create, Read, Update and Delete on Tables, Fields, and Records
* Fields Operations: Sort, Filter, Group By, Search, Hide / Reorder Fields
* Rich Field Types: Text, Number, Date/Time, Select, Attachment, Formula, Links, Lookup, Rollup and more
* Multiple View Types: Grid (default), Form, Gallery, Kanban, Calendar, Timeline, List and Map
* View Permissions: Collaborative Views, Locked Views, and Personal Views
* Share Bases / Views: Public or Private (with Password Protection)
* Access Control with Roles: Fine-grained access control at Workspace, Base, Table, Field, and Record levels
### Automation & Scripting
* Workflows: Visual workflow builder with triggers, actions, conditions, and loops (beta)
* Scripts: JavaScript-based automation with full API access to bases, tables, fields, and records
* Webhooks: Event-driven notifications on record create, update, and delete
### Dashboards & Extensions
* Dashboards: Build visual dashboards with chart widgets (Bar, Line, Pie, Donut), numbers, text, and iframes
* Extensions: Bulk Update, Data Exporter, Dedupe, Org Chart, Page Designer, URL Preview, and more
### AI & Integrations
* NocoAI: AI-assisted creation of bases, tables, fields, views, filters, formulas, and select options
* NocoDocs: Built-in document editor with rich text, comments, AI assistant, and permissions
* NocoSync: Sync data from GitHub, GitLab, Bitbucket, and Linear
* Integrations: Connect external data sources (PostgreSQL, MySQL, SQL Server, and more)
### Programmatic Access
* REST APIs
* MCP Server: Model Context Protocol server for AI agent integration
## Why are we building this?
Most internet businesses equip themselves with either spreadsheet or a database to solve their business needs.
Spreadsheets are used by a Billion+ humans collaboratively every single day.
However, we are way off working at similar speeds on databases which are way more powerful tools when it comes to computing.
Attempts to solve this with SaaS offerings has meant horrible access controls, vendor lockin, data lockin, abrupt price changes
& most importantly a glass ceiling on what's possible in the future.
## Our Mission
Our mission is to provide the most powerful no-code interface for databases, accessible to every internet business across the world. By making this capability broadly available under a fair and sustainable model, we aim to democratise access to powerful computing tools and enable a billion-plus people to develop radical tinkering and building abilities on the internet.
Follow us for updates, content, and other activities with our community:
* [Youtube](https://www.youtube.com/@nocodb)
* [Twitter](https://twitter.com/nocodb)
* [Discord](http://discord.nocodb.com/)
* [GitHub](https://github.com/nocodb/nocodb)
* [Community Forums](https://community.nocodb.com/)
* [LinkedIn](https://www.linkedin.com/company/nocodb)
* [Reddit](https://www.reddit.com/r/NocoDB/)
# MCP Server
URL: /docs/product-docs/mcp
Connect NocoDB to Large Language Models (LLMs) via the Model Context Protocol (MCP).
The **Model Context Protocol (MCP) Server** lets you connect NocoDB with LLMs that support MCP, such as Claude, Cursor, or Windsurf. With this integration, LLMs can interact directly with your NocoDB base to create, query, update, and manage records.
## Desktop LLM Clients
Each MCP endpoint in NocoDB provides a secure URL that can be linked to an MCP-compatible client.
Once configured, the LLM can execute database operations in your workspace through natural language prompts.
MCP server exposes standard CRUD operations. These can be triggered conversationally, without writing SQL or scripts.
| Action | Purpose | Sample Prompt |
| ------ | -------------------- | ------------------------------------------------------------- |
| Create | Add new records | Create a task named ‘Review Documentation’ |
| Read | Look up information | Show me all projects with deadlines this week |
| Update | Change existing data | Mark the status of Project X as completed & re-assign to John |
| Delete | Remove records | Remove all tasks assigned to John |
NocoDB MCP supports only record-level operations and does not handle table, field, or other metadata changes.
### Server Configuration (NocoDB)
1. Click on the **Overview** button in the left sidebar.
2. Select the **Settings** tab.
3. Select the **Model Context Protocol**
4. Click on the **New MCP Endpoint** to create a new MCP config JSON for your base.
5. Provide a name for the MCP endpoint
6. Click **Create** to generate the MCP Config JSON.
7. Copy the generated JSON configuration. This will be used in your LLM client configuration.
### Client Configuration
#### Claude
1. Open **Claude Desktop Preferences** (`⌘+,`).
2. Under **Develop**, click **Edit Config**.
3. Insert the JSON block copied [here](#server-configuration-nocodb) as `claude_desktop_config.json`.
4. Save the file and restart Claude Desktop.
#### Cursor
1. Go to **Cursor Settings** (`⇧+⌘+J`).
2. Open the **MCP** tab and select **Add Custom MCP**.
3. Paste the JSON block copied [here](#server-configuration-nocodb). Save.
On success, you will see
`11 tools enabled`
below the MCP Server just installed. If you see an error, double-check the JSON configuration.
#### Windsurf
1. Open **Windsurf Settings** (`⌘+,`).
2. In the **Cascade** section > `Plugins (MCP Server)` > Click **Manage Plugins**
3. Paste the JSON block copied [here](#server-configuration-nocodb). Save.
### JSON Example
```json
{
"mcpServers": {
"NocoDB MCP": {
"command": "npx",
"args": [
"mcp-remote",
"https://your-domain.com/mcp/",
"--header",
"xc-mcp-token: "
]
}
}
}
```
Your MCP configurations generated above functions as a set of access credentials, granting full control over your NocoDB base. Ensure it remains confidential, never include it in source control, and store it only in secure, protected locations.
***
## Web based LLM Clients (OAuth)
Connect NocoDB to web-based LLM applications using OAuth, enabling seamless database access directly from the browser without requiring desktop client setup. This approach grants granular permission controls and eliminates the need for manual JSON configuration.
### Claude Web
OAuth-based integration allows Claude web users to access NocoDB databases through the connectors interface.
#### Setup Steps
1. Click [here](https://claude.ai/settings/connectors) to open Claude Web Settings in a new tab.
* Alternatively, navigate to **Settings** > **Connectors** from the Claude Web app.
2. Click **Add custom connector**.
3. In the "Add custom connector" dialog:
* Provide a connector name of your choice
* Enter the MCP endpoint URL: `https://app.nocodb.com/mcp`
* Click `Add`
4. NocoDB Connector will now be listed in "Disconnected" state. Click **Connect** to initiate the OAuth authorization flow (Opens in a new tab).
5. Authorize Access
* You will be asked to log in to your NocoDB account (if not already logged in)
* Select the workspace and base you want to connect
* Confirm the permissions Claude will have
* Access the selected base
* Read / create / update / delete records in the selected base
* Act on your behalf within the selected resources
* Click **Authorize** to grant access
With this, the NocoDB connector will move to "Connected" state in Claude Web. You can now interact with your NocoDB data through Claude web application.
On-prem enterprise users should replace
[https://app.nocodb.com](https://app.nocodb.com)
with their NocoDB instance URL
#### Configure Tool Permissions
By default, all tools are set to "Always ask permission" to ensure you have control over each operation Claude performs. You can modify these settings as needed.
Click [here](https://claude.ai/settings/connectors) to open Claude Web Settings in a new tab. Click **Configure** on the NocoDB connector to manage tool permissions. Set each tool's permission level using the dropdown menu:
* **Always ask permission** — Your approval is required every time Claude uses this tool
* **Allow unsupervised** — Claude can use this tool without requesting approval
To retrieve Workspace & Base information that this connector has access to, use the "Get Base Info" tool.
#### Using NocoDB Tools in Claude Web
Once configured, you can interact with your NocoDB data conversationally. For example:
* "Show me all projects with deadlines this week"
* "Create a task named 'Review Documentation'"
* "Mark the status of Project X as completed and reassign to John"
* "Provide details of our top 3 sponsors"
Claude will execute these requests using the enabled NocoDB tools, reading from and writing to your database based on the permissions you've granted.
OAuth authorization functions as a set of access credentials granting Claude control over your NocoDB base within the selected workspace. Only authorize access to bases and operations you trust Claude to perform on your behalf.
### ChatGPT
OAuth-based integration enables OpenAI web users (ChatGPT) to securely connect with NocoDB databases through the MCP connector, directly from their browser environment. This provides the same granular access control and eliminates the need for manual configuration or desktop client setup.
#### Prerequisites
Enable Developer Mode in ChatGPT settings to allow custom connector additions.
1. Open [ChatGPT Settings](https://chatgpt.com/#settings/Connectors) in a new tab.
* Alternatively, click your **Profile Icon** → **Settings** → **Settings** → **Apps & Connectors**).
2. Click **Advanced Settings** & enable **Developer Mode**.
#### Setup Steps
1. Open [ChatGPT Settings](https://chatgpt.com/#settings/Connectors) in a new tab.
* Alternatively, click your **Profile Icon** → **Settings** → **Settings** → **Apps & Connectors**).
2. Click **Create** button in top right corner of the **Connectors** modal.
3. In the "New connector" dialog:
* Provide a connector name of your choice. Optionally, add a description / icon.
* Enter the MCP Server URL: `https://app.nocodb.com/mcp`
* Check the box for **I trust this application**.
* Click `Create`
4. Authorize Access:
* Log in to your NocoDB account if prompted
* Select the workspace and base you want to connect
* Review and confirm the permissions being requested:
* Access to the selected base
* Read / create / update / delete records
* Act on your behalf within the selected resources
* Click **Authorize**
Once authorization completes, you will see a confirmation message in ChatGPT Web indicating the NocoDB connector is now connected.
For on-prem enterprise users, replace
`https://app.nocodb.com`
with your NocoDB instance URL.
#### Using NocoDB Tools in OpenAI Web
On the ChatGPT interface, start a new conversation and
* Click the **+** icon to open the "Tools" menu, enable `Developer Mode` if not already enabled.
* Click `More` to find and select the NocoDB connector you created. Toggle to enable it.
Once configured, you can query or update your NocoDB data conversationally. For example:
* “List all open support tickets assigned to me”
* “Add a new contact named ‘Alice Chen’ to the CRM base”
* “Update the status of Order #2456 to ‘Shipped’”
* “Summarize total revenue by month from the Sales base”
ChatGPT executes these actions using the connected NocoDB tools according to the permissions granted.
OAuth authorization provides ChatGPT controlled access to your NocoDB base within the selected workspace. Only authorize operations and bases you trust ChatGPT to manage on your behalf.
***
# Skills
URL: /docs/product-docs/skills
Extend Claude's capabilities with the NocoDB skill for managing nocodb bases through natural language.
#### Setup
* Download the [NocoDB Skill](/nocodb-skills.zip)
* Get your API token from NocoDB
* Upload the skill to Claude
* Configure environment variables
#### Usage
Claude automatically uses the skill when relevant. Interact with your databases using natural language:
| Action | Sample Prompt |
| --------------- | ------------------------------------------------- |
| List workspaces | "Show me all my NocoDB workspaces" |
| View tables | "List all tables in my Sales base" |
| Query records | "Show me all customers from New York" |
| Create records | "Add a new task called 'Review Documentation'" |
| Update records | "Mark order #123 as shipped" |
| Delete records | "Remove all completed tasks from last month" |
| Filter data | "Find all high-priority tickets that are overdue" |
#### Supported Operations
* **Workspaces**: List, create, update, delete, manage members
* **Bases**: List, create, update, delete
* **Tables**: List, create, update, delete
* **Fields**: List, create, update, delete (all field types)
* **Views**: List, create, update, delete (grid, gallery, kanban, calendar)
* **Records**: List, get, create, update, delete, count with filtering
* **Linked Records**: List, add, remove relationships
* **Filters & Sorts**: Create view-level filters and sorts
* **Attachments**: Upload files to records
#### Related
* [MCP Server](/docs/product-docs/mcp) - Connect NocoDB to LLMs via Model Context Protocol
# Table details
URL: /docs/product-docs/table-details
Manage fields, relations, APIs, and webhooks for your table
`Table Details` helps **creators** manage table structure and integrate with external systems. Access it using the `Data-Details` toggle in the top navbar.
## Fields
Manage all your fields in one place — add, edit, delete, or reorder using the multi-field editor.
Learn more about the [multi-field editor](/docs/product-docs/fields/multi-fields-editor).
## Permissions
Control who can add / delete records in your table & who can edit fields. Refer to the [Table permissions](/docs/product-docs/roles-and-permissions/table-permissions) and [Field permissions](/docs/product-docs/roles-and-permissions/field-permissions) documentation for more details.
## Relations
Visualize and manage how tables connect using the Entity Relationship Diagram (ERD). This helps in:
* Designing your schema
* Ensuring data integrity
* Improving query performance
Drag-and-drop to rearrange tables in the ERD. Layout changes aren’t saved across sessions.
## API Snippet
Use prebuilt REST API examples to interact with your table programmatically — in Shell, JavaScript, Python, and more. Ideal for quickly connecting NocoDB to your applications.
### Supported languages
* **Shell:** cURL, wget
* **JavaScript:** Axios, Fetch, jQuery, XHR
* **Node:** Axios, Fetch, Request, Native, Unirest
* **NocoDB SDK:** JavaScript, Node
* **Python:** http.client, requests
* **PHP**, **Ruby**, **Java**, **C**
## Webhooks
Set up real-time triggers when records change. Use webhooks to:
* Send instant alerts
* Automate external workflows
* Sync data across platforms
* Handle batch updates efficiently
Webhooks are defined per table. More details
[here](/docs/product-docs/automation/webhook)
.
***
# API tokens
URL: /docs/product-docs/account-settings/api-tokens
This article explains how to create and work with API Tokens, including fine-grained tokens with scoped permissions.
NocoDB supports two types of API tokens:
* **Fine-grained tokens** — Scoped to specific bases with granular permission categories. Recommended for all new integrations.
* **Legacy tokens** — Org-wide tokens that inherit the creator's full role permissions.
***
## Fine-Grained API Tokens
Fine-grained API tokens give you precise control over what external integrations, scripts, and CI/CD pipelines can do in NocoDB. Unlike legacy tokens, fine-grained tokens let you restrict access to specific bases with granular permission categories.
Fine-grained tokens are available on all tiers. Granular scope and permission controls (base selection, permission categories) are available on
**Business**
and above plans (Cloud) and
**licensed Self-hosted**
. On Community Edition and unlicensed Self-hosted, tokens default to all-resources access.
### Key Concepts
* **Intersection model** — A token can only *restrict* what your role already allows. It never grants additional permissions beyond your role.
* **Deny by default** — Only permission categories you explicitly add are granted. Everything else is denied.
* **Show-once token** — The token string is displayed only at creation time and cannot be retrieved later. The token is stored as a SHA-256 hash — the plaintext is never persisted.
### Create a Fine-Grained Token
Navigate to **Account Settings** > **API Tokens** and click **Create new token**. This opens a single-page form with four sections.
#### Name
Give your token a descriptive name that identifies its purpose (e.g., "CI/CD Pipeline", "Zapier Integration"). The name must be between 1 and 255 characters.
#### Scopes (Permissions)
Define what operations this token can perform. Permissions use an additive model — start with no permissions and add only the categories you need.
Click **+ Add permission** to open a dropdown listing all available permission categories. Select a category to add it.
Each added category appears as a row with an access-level pill that defaults to **Read only**. Click the pill to switch between:
* **Read only** — Read-level access for that category
* **Read & write** — Full read and write access for that category
To remove a category, click the **×** button on its row. Any category not explicitly added will have no access.
The eight permission categories are:
| Category | Read only | Read & write |
| --------------------------------------------------- | ------------------------ | ---------------------------- |
| **Records** — record CRUD, data export, aggregation | List, read, export | Create, update, delete |
| **Comments** — record comments | View comments | Post, edit, delete |
| **Tables** — table management | List, read | Create, update, delete |
| **Fields** — column/field management | List columns | Create, update, delete |
| **Views** — views, sorts, filters, sharing | List views and config | Create, update, delete |
| **Webhooks** — webhook triggers and logs | List, view logs | Create, update, delete, test |
| **Base** — base settings, sources, jobs | View info, swagger, jobs | Create sources, delete base |
| **Users** — base and workspace members | List members | Invite, update roles, remove |
#### Access (Resource Scope)
Define which resources this token can access. Two options are available:
* **Add all resources** — Token can access all current and future bases across all workspaces.
* **Add a base** — Opens a searchable dropdown with bases grouped by workspace. Select individual bases to grant access.
You can add multiple bases. Selected resources appear in a bordered list where each item can be removed with the **×** button. If you add "All resources", any previously selected individual bases are cleared.
At least one resource must be selected on licensed plans. Use
**Add all resources**
for org-wide access, or
**Add a base**
to restrict to specific bases. On Community Edition and unlicensed Self-hosted, tokens automatically have all-resources access.
#### Expiration
Choose an expiration period from the dropdown:
* **7 days**, **30 days**, **60 days**, **90 days** (default), **1 year** — preset options
* **Custom** — pick a specific date
* **No expiration** — the token never expires
We recommend setting an expiration for better security. Expired tokens are automatically rejected.
Here is an example of a completed form with permissions and base scope configured:
Click **Create Token** to generate the token.
#### Copy Your Token
After creation, a modal displays the token string **once**. Copy it immediately and store it securely.
The token format is `nc_pat_` followed by 40 random characters:
```
nc_pat_V1StGXR8_Z5jdHi2B-xoMwDqE3G4n5p6q7r8s
```
The **Done** button is only enabled after you copy the token.
This token will not be displayed again after you close this dialog. If you lose it, you must delete the token and create a new one.
### Manage Tokens
The token list shows all your API tokens with columns: **Active** (toggle), **Token Name**, **Creator** (with avatar and email), **Expires On**, and **Actions**.
Fine-grained tokens display an **Expired** badge (red) when past their expiry date, and an **SSO** badge (orange) if created through SSO authentication.
#### Token Actions
Each token row provides action icons:
* **Edit** (pencil icon) — Opens the edit form inline, replacing the list view.
* **Delete** (trash icon) — Opens a confirmation dialog to permanently delete the token.
#### Edit a Token
Clicking edit opens the same form used for creation, pre-filled with the token's current values. You can update:
* **Token name** — Change the descriptive name
* **Scopes (Permissions)** — Add, remove, or change permission categories and their access levels
* **Access (Resource Scope)** — Add or remove bases, or switch to all resources
* **Expiration** — Extend or set a new expiry date. A **Keep** option preserves the current expiry.
Click **Save** to apply changes, or **Cancel** to return to the token list.
#### Enable / Disable a Token
Use the **Active** toggle on any token row to enable or disable it. A disabled token receives `401 Unauthorized` on all requests. Re-enable it at any time to restore access. This is useful for:
* Investigating suspicious activity without permanently revoking access
* Temporarily pausing an integration during maintenance
### Permission Enforcement
For each API request, the system checks:
1. **Is the token valid?** — exists, not expired, enabled
2. **Does the scope match?** — if base-scoped, the requested base must be in the token's scope
3. **Does the user's role allow this operation?** — standard role-based ACL check
4. **Does the token's permission level allow this operation?** — operation mapped to a category and checked against the token's level
All four checks must pass. The effective permission is the **intersection** of the user's role and the token's granted permissions.
| Scenario | HTTP Status |
| --------------------------------------------- | ----------- |
| Token is valid and has sufficient permissions | `200` |
| Token is expired | `401` |
| Token is disabled | `401` |
| Token does not exist or is malformed | `401` |
| Token scope does not match the requested base | `401` |
| Token permission level is insufficient | `403` |
***
## Legacy API Tokens
Legacy token creation is no longer available in the UI. The V1 API still supports creating them for backward compatibility, but we recommend using fine-grained tokens for all new integrations.
Legacy tokens are org-scoped and inherit the creator's full role permissions. They remain functional for backward compatibility but we recommend migrating to fine-grained tokens for better security and control.
### Create a Legacy Token (Deprecated)
1. Click on `User menu` in the bottom left corner of the sidebar
2. Select `Account Settings` from the dropdown
3. Click on `Tokens` tab in the `Account Settings` page
4. Click on `Add New API Token`
5. Enter the name for the API Token
6. Click on `Save` button to save the changes
7. Copy the API Token by clicking on `Copy` button displayed under `Actions` menu
Legacy API tokens do not expire, but can be deleted anytime.
API Token created will get added to the list. Copy API token by clicking on `Copy` button displayed under `Actions` menu.
### Delete a Token
All services using the API token will stop working once the token is deleted.
1. Click on `User menu` in the bottom left corner of the sidebar
2. Select `Account Settings` from the dropdown
3. Click on `Tokens` tab in the `Account Settings` page
4. From the `Actions` menu, click on `Delete` button associated with the API token to be deleted
***
## Authentication
Both fine-grained and legacy tokens support two authentication methods:
### Method 1: xc-token Header
```bash
curl -H "xc-token: nc_pat_..." https://your-nocodb.com/api/v3/...
```
### Method 2: Authorization Header
```bash
curl -H "Authorization: Bearer nc_pat_..." https://your-nocodb.com/api/v3/...
```
Both methods are equivalent. Choose the one that best fits your application's authentication patterns.
***
## Security Best Practices
1. **Set an expiration** — Use the shortest expiry that meets your needs. 90 days is a good default.
2. **Use the least permissions necessary** — A read-only dashboard only needs `Records: Read`.
3. **Scope to specific bases** — Avoid "All resources" when the integration only needs access to one base.
4. **Rotate tokens regularly** — Create a new token, update your integration, then delete the old one.
5. **Disable before deleting** — If you suspect a token is compromised, disable it immediately via the Active toggle to investigate before deleting.
6. **Store tokens securely** — Use environment variables or a secrets manager. Never hardcode tokens in source code.
7. **Audit your tokens** — Periodically review your token list. Delete tokens that are no longer needed.
***
## API Token Access with SSO-Enabled Workspaces
If a workspace is configured to enforce Single Sign-On (SSO), API access to that workspace is restricted to tokens that are created **after authenticating via SSO**.
**Tokens created before SSO was enabled**
do not have the necessary identity context and
**will not work**
for SSO-enforced workspaces.
To access an SSO-enforced workspace via API, users must:
1. Sign in using SSO.
2. Generate a new API token from their authenticated session.
Tokens created before SSO enforcement may still work for other workspaces that do not require SSO.
For ease of identification, tokens created after SSO is enabled will have a badge indicating they were generated through SSO authentication.
### What Happens When SSO is Disabled?
If SSO is later disabled for a workspace:
* API tokens that were created via SSO authentication will **continue to work** as long as the user is still active and has the required permissions.
* Tokens created prior to enabling SSO will continue to function & can now access the workspace without SSO authentication.
* No tokens are automatically revoked when SSO is disabled.
# Appearance
URL: /docs/product-docs/account-settings/appearance
This article explains how to customize the appearance of the NocoDB interface, including switching between Light and Dark modes.
NocoDB allows you to customize the visual appearance of the interface to suit your working preferences and environment.
## Dark mode
Dark mode reduces screen glare and can be more comfortable for extended usage, especially in low-light environments.
### Switching between modes
You can quickly switch between **Light** and **Dark** modes using the mode switch icon available in the left-side mini bar.
1. Locate the **Appearance** (sun/moon) icon in the left mini bar.
2. Click the icon to toggle between **Light** and **Dark** modes.
Appearance settings are applied instantly and stored in the browser’s local storage. This means that the selected mode will persist across sessions on the same browser.
***
# Experimental Features
URL: /docs/product-docs/account-settings/experimental-features
Learn how to enable or disable experimental features in NocoDB to try out new capabilities before they are generally available.
NocoDB includes an **Experimental Features** panel that lets you try out new capabilities before they are generally available. These features are still under development and may change or be removed in future releases.
## Accessing Experimental Features
1. Click on your **profile picture** in the bottom-left corner of the sidebar.
2. Select **Experimental Features** from the menu.
A panel opens listing all available experimental features, each with a toggle to enable or disable it and a brief description of what it does.
## Available Experimental Features
| Feature | Description |
| -------------------------- | --------------------------------------------------------------------------------------------------- |
| **Bases V3** | Experience the next generation of NocoDB with Bases V3 with enhanced performance and optimizations. |
| **Infinite Scrolling** | Effortlessly browse large datasets with infinite scrolling. |
| **Link To Another Record** | Show linked record display value in Link fields. |
| **Cross Base Link** | Enables link creation between tables in different bases. |
| **Custom Link** | Allows user to create custom links using existing fields. |
| **Templates** | Enable templates feature to browse and use templates. |
| **Optimized Kanban View** | Optimized Kanban view with optimised API for better performance. |
| **Map View** | Enable map view to visualize geo data fields on an interactive map. |
| **Timeline View** | Enable timeline view to visualize date-based data on a timeline. |
The list of experimental features may vary across NocoDB versions as new features are added and existing ones are promoted to general availability. Additionally, the available features can differ depending on your deployment type — NocoDB Cloud, self-hosted licensed (Enterprise), or self-hosted OSS.
## Toggle All Features
Use the **toggle all** switch at the top of the panel to enable or disable all experimental features at once. You can also use the **search bar** to quickly find a specific feature.
Experimental features may be unstable or incomplete. Use them with caution in production environments.
***
# Language settings
URL: /docs/product-docs/account-settings/language
This article explains how to change the language settings in NocoDB.
Language support is currently in beta. Some parts of the interface may still appear in English, as translations might be incomplete or missing.
NocoDB supports multiple languages for its user interface to help users work in their preferred language.
You can change the language directly from the app:
1. Click on your profile picture in the bottom-left corner.
2. Select **Language** from the dropdown menu.
3. Choose from the list of available languages.
The translations in NocoDB are community-driven and enhanced using AI-generated translations. As a result, some phrases or words may be inaccurate or not fully localized. We appreciate your help in improving translations!
## Contribute to Translations
You can help improve translations or add support for new languages through our community translation platform on [Crowdin](https://crowdin.com).
* NocoDB Project link: [https://crowdin.com/project/nocodb](https://crowdin.com/project/nocodb)
To contribute:
* Sign up or log in to Crowdin.
* Join the NocoDB project.
* Select your language and start translating or reviewing existing translations.
For more details, refer [here](/docs/product-docs/engineering/translation)
Every contribution helps make NocoDB more accessible across the world!
***
# In Community Edition
URL: /docs/product-docs/account-settings/oss-specific-details
This article explains Account settings specifics in Community Edition NocoDB.
Some of the Account settings features are available only in Community Edition NocoDB. This article explains details about such specifics.
## Enable / Disable Signup
Signup without an invitation is disabled by default and can be managed from UI by a super admin.
## App Store
App store lists available integrations for NocoDB. You can install and configure these integrations from the App store.
We provide different integrations in three main categories.
| Category | App Name |
| ----------- | -------------------------------------------------------------------------------------------------------------------------------------------------------------------------------------------------------------------------------------- |
| **Chat** | Microsoft Teams Discord Twilio Whatsapp Twilio Mattermost Slack |
| **Email** | SMTP MailerSend AWS SES |
| **Storage** | AWS S3 Minio Google Cloud Storage Spaces Backblaze B2 Vultr Object Storage OvhCloud Object Storage Linode Object Storage UpCloud Object Storage Scaleway Object Storage |
# Profile page
URL: /docs/product-docs/account-settings/profile-page
This article explains how to manage your profile page.
Profile page is the place where you can manage your profile information. Currently, only a custom username can be setup as part of profile configuration. To access your profile page,
1. Click on `User menu` in the bottom left corner of the sidebar,
2. Select `Account Settings` from the dropdown
3. Change `Profile name`
4. Click on `Save` button to save the changes
## Delete Account
This option is available currently only for the cloud users.
To delete your account permanently,
1. Click on `User menu` in the bottom left corner of the sidebar,
2. Select `Account Settings` from the dropdown
3. In the section for delete account, click on `Delete Account` button
4. Confirmation modal displays the Workspaces, Bases & Tokens that will be invalidated upon deletion. As a confirmation step, you will be asked to enter your email address associated with the account.
5. Click on `Delete Account` button to delete the account permanently.
* Deleting the account is irreversible and all the data associated with the account will be lost permanently.
* All the workspaces & bases for which you are the sole owner will be deleted. For all other workspaces & bases, you access permissions will be revoked.
* All the tokens associated with the account will be invalidated.
* You will be allowed to re-register with the same email address. However, you will require invite from the existing workspace owner to access the workspaces & bases.
# Admin Panel
URL: /docs/product-docs/cloud-enterprise-edition/admin-panel
This article explains how to use the Admin Panel in Cloud & Self hosted Enterprise Edition.
The Admin Panel in NocoDB provides organization-level oversight and control. It allows administrators to monitor usage metrics, manage workspaces and bases, provision and track users, configure Single Sign-On (SSO), and update branding settings. This guide walks through each section available within the Admin Panel to help administrators maintain governance, enforce security, and keep user and workspace configurations aligned with organizational standards.
## Navigation Overview
Admin panel is accessible for users with administrative privileges. To access the Admin Panel, click on the **Admin Panel** option located in the user menu in the bottom-left corner of the NocoDB interface.
The Admin Panel interface includes a sidebar menu with persistent access to the following sections:
* Dashboard
* Workspaces
* Bases
* User Management
* Single Sign-On (SSO)
* Teams
* SCIM
* Settings
Use the **Back** button in the top-left corner to return to the main NocoDB application interface.
### Dashboard
The Dashboard offers a high-level overview of key metrics across your NocoDB deployment. It acts as a basic control center for admins to monitor system usage and understand the scale of their organization’s data and user base. While the current functionality is limited, the visual summaries make it easy to track a few critical numbers at a glance.
**Displayed Metrics:**
* **Workspaces** – Number of workspaces created within the organization.
* **Users** – Count of unique users who are part of the organization.
* **Bases** – Total number of bases created across all workspaces.
* **Editors** – Number of users with Editor-level access or above.
### Workspaces
The **Workspaces** section lists all active workspaces within your organization. Each workspace displays its name, number of members, and number of bases. This view helps admins monitor workspace-level participation and data volume.
**Actions:**
* **Add Member** – Invite new users to the workspace.
* **Rename** – Edit the workspace name.
* **Manage Users** – Modify user roles or remove users from the workspace.
### Bases
The **Bases** section displays all databases across the organization, regardless of the workspace they belong to. Each base shows its name, the workspace it belongs to, and the number of members. This provides a centralized view to help admins maintain visibility over base creation and ownership.
**Actions:**
* **Rename** – Update the base name.
* **Manage Users** – Add or remove collaborators, or change their roles.
### User Management
The **User Management** section lists all users who are part of the organization. Each member is shown with their **Org Role** (Org-Admin, Org-Creator, or Org-Viewer) and the date they joined. The Org Admin can manage organization membership, assign org-level roles, and provision workspace access.
**Changing Org Roles:**
Click the role dropdown next to any member to change their org role. The available roles are:
* **Org-Viewer** – Can access workspaces and bases they are invited to, but cannot create new workspaces
* **Org-Creator** – Same as Org-Viewer, plus can create new workspaces within the organization. Cannot manage org membership.
* **Org-Admin** – Complete access to the organization, including member management, SSO, SCIM, domains, billing, and all org-level settings
The Org Admin's role is displayed as a distinct badge. See [Organization-level Roles](/docs/product-docs/roles-and-permissions#organization-level-roles) for details on org role constraints.
**Actions menu:**
Click the **Actions** (three dots) menu beside a member to access:
* **Resend Invite E-mail** – Resend the invitation email to the user.
* **Copy Invite URL** – Copy the invitation link to clipboard.
* **Copy password reset URL** – Generate and copy a password reset link.
* **Remove User** – Remove the user from the organization. This also removes them from all workspaces, bases, and teams within the organization.
Use the **+ Invite User** button to add new users to the organization.
For more details about organization-level roles, see [Organization-level Roles](/docs/product-docs/roles-and-permissions#organization-level-roles).
### Teams
The **Teams** section allows Org Admins to create and manage organization-level teams. Unlike workspace teams, org teams are available across all workspaces within the organization — they can be assigned roles in any workspace or base.
The teams list displays each team's name, badge, member count, creator, and an actions menu. Teams with sub-teams show an expand/collapse toggle. You can switch between tree view and flat view using the toggle buttons in the toolbar.
Click the **+ New Team** button to create a new team. You can optionally select a parent team to create it as a sub-team.
Click the **Actions** (three dots) menu beside a team to access:
* **Edit** – Open the team to manage its members and settings.
* **Add sub-team** – Create a nested sub-team under this team.
* **Move team** – Move the team under a different parent.
* **Delete team** – Remove the team from the organization.
For detailed team management instructions, see [Organization Teams](/docs/product-docs/collaboration/teams#organization-teams).
### Single Sign-On (SSO)
The **Single Sign-On (SSO)** section allows organizations to configure centralized authentication for their users. SSO reduces the burden of managing individual credentials and ensures that user authentication adheres to enterprise security policies.
Refer to the [SSO documentation](/docs/product-docs/account-settings/authentication#single-sign-on-sso) for detailed setup instructions.
### SCIM
The **SCIM** section allows Org Admins to configure SCIM v2.0 provisioning for automatic user and group management from an identity provider (IdP). When enabled, user onboarding, offboarding, and group membership changes in your IdP are automatically synced to NocoDB.
From this section, you can:
* Enable or disable SCIM provisioning
* Configure the default org role for provisioned users
* Copy the SCIM endpoint URL and provisioning token for IdP configuration
* Regenerate the provisioning token if compromised
* Remove the SCIM configuration entirely
Refer to the [SCIM Provisioning documentation](/docs/product-docs/account-settings/authentication/scim) for detailed setup instructions.
### Settings
The **Settings** section allows administrators to define the visual identity and branding of their NocoDB instance.
**Editable Fields:**
* **Organisation Name** – The display name for the organisation.
* **Organisation Logo** – Upload or update the logo for the organisation.
***
## Additional Notes
* Only users with the **Org Admin** role can access the Admin Panel. Org Creators and Org Viewers do not have access.
* Actions in the Admin Panel are scoped at the **organization level**, affecting all workspaces and bases.
* Any updates made in this panel reflect immediately and globally across your NocoDB deployment.
# Community Edition vs Enterprise Edition
URL: /docs/product-docs/cloud-enterprise-edition/community-vs-paid-editions
Complete overview of the differences between NocoDBs Community vs Enterprise Edition.
| **Section** | **Sub-section** | **Community Edition** | **Enterprise Edition** | **Comments** |
| ------------------- | --------------------------------------------------------------------------------------------------------------------------- | --------------------- | ---------------------- | ----------------------------------------- |
| **Usage** | [Workspaces](/docs/product-docs/workspaces) | Only one | Unlimited | |
| | [Bases](/docs/product-docs/bases) | Unlimited | Unlimited | |
| | [Audit: Workspace-level](/docs/product-docs/workspaces/workspace-audit) | ❌ | ✅ | |
| | [Base snapshots](/docs/product-docs/bases/snapshots) | ❌ | ✅ | |
| **Views** | [Grid](/docs/product-docs/views/view-types/grid) | ✅ | ✅ | |
| | [Gallery](/docs/product-docs/views/view-types/gallery) | ✅ | ✅ | |
| | [Form](/docs/product-docs/views/view-types/form) | ✅ | ✅ | |
| | [Calendar](/docs/product-docs/views/view-types/calendar) | ✅ | ✅ | |
| | [Kanban](/docs/product-docs/views/view-types/kanban) | ✅ | ✅ | |
| | [Map](/docs/product-docs/views/view-types/map) | ✅ | ✅ | |
| | [Timeline](/docs/product-docs/views/view-types/timeline) | ❌ | ✅ | |
| | [List](/docs/product-docs/views/view-types/list) | ❌ | ✅ | |
| **Expanded Record** | [Field layout](/docs/product-docs/records/expand-record#field-mode) | ✅ | ✅ | |
| | [Files layout](/docs/product-docs/records/expand-record#file-preview-mode--) | ❌ | ✅ | |
| | [Discussion layout](/docs/product-docs/records/expand-record#discussion-mode--) | ❌ | ✅ | |
| **Form View** | [Background theme](/docs/product-docs/views/view-types/form#change-background-color) | ✅ | ✅ | |
| | Forms | ✅ | ✅ | |
| | [Email responses](/docs/product-docs/views/view-types/form#post-form-submission-settings) | ✅ | ✅ | |
| | [Prefilled forms](/docs/product-docs/views/view-types/form#post-form-submission-settings) | ✅ | ✅ | |
| | Custom logo & banner | ❌ | ✅ | |
| | [Hide NocoDB branding](/docs/product-docs/views/view-types/form#hide-branding) | ❌ | ✅ | |
| | [Form redirection](/docs/product-docs/views/view-types/form#redirect-url) | ❌ | ✅ | |
| | [Customize & shorten shared URL](/docs/product-docs/views/share-view#custom-url) | ❌ | ✅ | |
| | [Field input validation](/docs/product-docs/views/view-types/form#field-validations-) | ❌ | ✅ | |
| | [Conditional field display](/docs/product-docs/views/view-types/form#field-show-on-conditions) | ❌ | ✅ | |
| | [Form scheduling](/docs/product-docs/views/view-types/form#form-scheduling-) | ❌ | ✅ | |
| **Fields** | AI button (Action) | ❌ | ✅ | |
| | AI prompt (Field) | ❌ | ✅ | |
| | [Single line text](/docs/product-docs/fields/field-types/text-based/single-line-text) | ✅ | ✅ | |
| | [Long text](/docs/product-docs/fields/field-types/text-based/long-text) | ✅ | ✅ | |
| | [Rich text](/docs/product-docs/fields/field-types/text-based/long-text) | ✅ | ✅ | |
| | [URL](/docs/product-docs/fields/field-types/text-based/url) | ✅ | ✅ | |
| | [Email](/docs/product-docs/fields/field-types/text-based/email) | ✅ | ✅ | |
| | [Phone](/docs/product-docs/fields/field-types/text-based/phonenumber) | ✅ | ✅ | |
| | [Single select](/docs/product-docs/fields/field-types/select-based/single-select) | ✅ | ✅ | |
| | [Multiple select](/docs/product-docs/fields/field-types/select-based/multi-select) | ✅ | ✅ | |
| | [Number](/docs/product-docs/fields/field-types/numerical/number) | ✅ | ✅ | |
| | [Decimal](/docs/product-docs/fields/field-types/numerical/decimal) | ✅ | ✅ | |
| | [Currency](/docs/product-docs/fields/field-types/numerical/currency) | ✅ | ✅ | |
| | [Duration](/docs/product-docs/fields/field-types/date-time-based/duration) | ✅ | ✅ | |
| | [Percent](/docs/product-docs/fields/field-types/numerical/percent) | ✅ | ✅ | |
| | [Progress bar (Percent)](/docs/product-docs/fields/field-types/numerical/percent) | ✅ | ✅ | |
| | [Date](/docs/product-docs/fields/field-types/date-time-based/date) | ✅ | ✅ | |
| | [Time](/docs/product-docs/fields/field-types/date-time-based/time) | ✅ | ✅ | |
| | [DateTime](/docs/product-docs/fields/field-types/date-time-based/date-time) | ✅ | ✅ | |
| | Year | ✅ | ✅ | |
| | [Links](/docs/product-docs/fields/field-types/links-based/links) | ✅ | ✅ | |
| | [Link to another record](/docs/product-docs/fields/field-types/links-based/links) | ✅ | ✅ | |
| | [Lookup](/docs/product-docs/fields/field-types/links-based/lookup) | ✅ | ✅ | |
| | [Rollup](/docs/product-docs/fields/field-types/links-based/rollup) | ✅ | ✅ | |
| | [Attachment](/docs/product-docs/fields/field-types/custom-types/attachment) | ✅ | ✅ | |
| | [Rating](/docs/product-docs/fields/field-types/custom-types/rating) | ✅ | ✅ | |
| | [Checkbox](/docs/product-docs/fields/field-types/custom-types/checkbox) | ✅ | ✅ | |
| | [User](/docs/product-docs/fields/field-types/user-based/user) | ✅ | ✅ | |
| | [QR code](/docs/product-docs/fields/field-types/custom-types/QR-code) | ✅ | ✅ | |
| | [Barcode](/docs/product-docs/fields/field-types/custom-types/barcode) | ✅ | ✅ | |
| | [Button](/docs/product-docs/fields/field-types/custom-types/button) | ✅ | ✅ | |
| | [Formula](/docs/product-docs/fields/field-types/formula/formula) | ✅ | ✅ | |
| | [Created at](/docs/product-docs/fields/field-types/date-time-based/created-time) | ✅ | ✅ | |
| | [Last modified at](/docs/product-docs/fields/field-types/date-time-based/last-modified-time) | ✅ | ✅ | |
| | [Created by](/docs/product-docs/fields/field-types/user-based/created-by) | ✅ | ✅ | |
| | [Last modified by](/docs/product-docs/fields/field-types/user-based/last-modified-by) | ✅ | ✅ | |
| | [UUID](/docs/product-docs/fields/field-types/identifier-types/uuid) | ❌ | ✅ | PostgreSQL only |
| | [Colour](/docs/product-docs/fields/field-types/custom-types/colour) | ❌ | ✅ | |
| | [Auto-number](/docs/product-docs/fields/field-types/identifier-types/auto-number) | ❌ | ✅ | |
| **Features** | [Filter](/docs/product-docs/table-operations/filter) | ✅ | ✅ | |
| | [Filter groups](/docs/product-docs/table-operations/filter#group-filters) | ✅ | ✅ | |
| | [Pinned filters](/docs/product-docs/table-operations/filter#pinned-filters-) | ❌ | ✅ | |
| | [Toggle filters](/docs/product-docs/table-operations/filter#toggle-filters-) | ❌ | ✅ | |
| | [AI filters](/docs/product-docs/noco-ai/create-filter) | ❌ | ✅ | |
| | [Sort](/docs/product-docs/table-operations/sort) | ✅ | ✅ | |
| | [Group by](/docs/product-docs/table-operations/group-by) | ✅ | ✅ | |
| | [Row height](/docs/product-docs/table-operations/row-height) | ✅ | ✅ | |
| | [Footer aggregations](/docs/product-docs/fields/field-summary-footer) | ✅ | ✅ | |
| | [Group by aggregations](/docs/product-docs/table-operations/group-by#group-level-field-aggregations) | ✅ | ✅ | |
| | Table & field description | ✅ | ✅ | |
| | [Unique fields](/docs/product-docs/fields#unique-fields-) | ❌ | ✅ | |
| | Undo / Redo | ✅ | ✅ | |
| | [Quick navigation (Cmd + K)](/docs/product-docs/getting-started/keyboard-shortcuts#quick-actions) | ✅ | ✅ | |
| | Search | Limited | Limited | |
| | Templates | Limited | Coming soon | |
| | [Record templates](/docs/product-docs/records/record-templates) | ❌ | ✅ | |
| | [API snippets](/docs/product-docs/table-details#api-snippet) | ✅ | ✅ | |
| | [Field manager (bulk edit)](/docs/product-docs/table-details#fields) | ✅ | ✅ | |
| | Filter, Sort & Group re-order | ❌ | ✅ | |
| | [Base relationship diagram (ERD)](/docs/product-docs/table-details) | ✅ | ✅ | |
| | [Link field : Limit to view](/docs/product-docs/fields/field-types/links-based/links#limit-by-view) | ✅ | ✅ | |
| | [Link field : Limit by filter](/docs/product-docs/fields/field-types/links-based/links#limit-by-filter-) | ❌ | ✅ | |
| | [Conditional lookup](/docs/product-docs/fields/field-types/links-based/lookup#conditional-lookup-) | ❌ | ✅ | |
| | [Conditional rollup](/docs/product-docs/fields/field-types/links-based/rollup#conditional-rollup-) | ❌ | ✅ | |
| | [Conditional button fields](/docs/product-docs/fields/field-types/custom-types/button#conditional-buttons-) | ❌ | ✅ | |
| | [Locked views](/docs/product-docs/views#locked-views) | ✅ | ✅ | |
| | [Personal views](/docs/product-docs/views#personal-views-) | ❌ | ✅ | |
| | [View sections](/docs/product-docs/views/view-sections) | ❌ | ✅ | |
| | [Calendar view with end date](/docs/product-docs/views/view-types/calendar#configuring-date-range) | ❌ | ✅ | |
| | [Date dependencies](/docs/product-docs/tables/date-dependency) | ❌ | ✅ | |
| | [Copy another view config](/docs/product-docs/views/actions-on-view#copy-another-views-configuration-) | ❌ | ✅ | |
| | [Hide field labels](/docs/product-docs/table-operations/field-operations#hide-field-labels-) | ❌ | ✅ | Applicable for Gallery & Kanban views |
| | [Row colouring](/docs/product-docs/table-operations/record-colouring) | ❌ | ✅ | |
| | [Cell colouring](/docs/product-docs/table-operations/record-colouring#cell-colouring) | ❌ | ✅ | |
| | [Dashboards](/docs/product-docs/dashboards) | ❌ | ✅ | |
| | [Private Bases](/docs/product-docs/bases/private-base) | ❌ | ✅ | |
| | [Extensions](/docs/product-docs/extensions) | ❌ | ✅ | |
| | [MCP Server (desktop)](/docs/product-docs/mcp) | ✅ | ✅ | Desktop apps for Claude, Cursor, Windsurf |
| | [MCP OAuth](/docs/product-docs/mcp) | ❌ | ✅ | ChatGPT, Claude |
| **Extensions** | [Bulk update](/docs/product-docs/extensions/bulk-update) | ❌ | ✅ | |
| | [Data exporter](/docs/product-docs/extensions/data-exporter) | ❌ | ✅ | |
| | [URL preview](/docs/product-docs/extensions/url-preview) | ❌ | ✅ | |
| | [World clock](/docs/product-docs/extensions/world-clock) | ❌ | ✅ | |
| | [Upload CSV with upsert](/docs/product-docs/extensions/upload-data-from-csv) | ❌ | ✅ | |
| | [Org chart](/docs/product-docs/extensions/org-chart) | ❌ | ✅ | |
| | [Page designer](/docs/product-docs/extensions/page-designer) | ❌ | ✅ | |
| | [De-duplicate](/docs/product-docs/extensions/dedupe) | ❌ | ✅ | |
| **Import/Export** | [Export: CSV, XLS](/docs/product-docs/table-operations/download#download-data) | ✅ | ✅ | |
| | [Import to new table: CSV, XLS, JSON](/docs/product-docs/tables/create-table-via-import#import-table-from-csv--excel--json) | ✅ | ✅ | |
| | [Import: Airtable](/docs/product-docs/bases/import-base-from-airtable) | ✅ | ✅ | |
| | [Import to existing table](/docs/product-docs/tables/import-data-into-existing-table) | ✅ | ✅ | |
| **Developers** | [Core REST API](/docs/product-docs/developer-resources/rest-apis) | ✅ | ✅ | |
| | [Advanced REST API](/docs/product-docs/developer-resources/rest-apis) | ❌ | ✅ | View, Script & Collaboration APIs |
| | [Swagger specification](/docs/product-docs/developer-resources/rest-apis/accessing-apis#swagger-ui) | ✅ | ✅ | |
| | [API tokens](/docs/product-docs/account-settings/api-tokens) | ✅ | ✅ | |
| | [Fine-grained API tokens](/docs/product-docs/account-settings/api-tokens#fine-grained-api-tokens) | ❌ | ✅ | |
| **Public Sharing** | [Public view sharing](/docs/product-docs/views/share-view) | ✅ | ✅ | |
| | [Public view sharing with password](/docs/product-docs/views/share-view#password-protection) | ✅ | ✅ | |
| | [Public view custom URL](/docs/product-docs/views/share-view#custom-url) | ❌ | ✅ | |
| | Public base custom URL | ❌ | ✅ | |
| **Automations** | [Webhooks](/docs/product-docs/automation/webhook) | ✅ | ✅ | |
| | [Webhooks with conditions](/docs/product-docs/automation/webhook/create-webhook#webhook-with-conditions) | ✅ | ✅ | |
| | [Webhooks with custom payload](/docs/product-docs/automation/webhook/create-webhook#webhook-with-custom-payload) | ✅ | ✅ | |
| | [Webhooks on specific field changes](/docs/product-docs/automation/webhook/create-webhook#webhook-on-field-changes-) | ❌ | ✅ | |
| | [Webhooks view & field specific triggers](/docs/product-docs/automation/webhook/create-webhook#trigger-source-and-event) | ❌ | ✅ | |
| | [Webhook logs](/docs/product-docs/automation/webhook/actions-on-webhook#webhook-logs-) | ❌ | ✅ | |
| | [Scripts (Custom JS code)](/docs/scripts) | ❌ | ✅ | |
| | [Run scripts via Button field](/docs/product-docs/fields/field-types/custom-types/button) | ❌ | ✅ | |
| **Workflows** | [Workflows](/docs/workflows) | ❌ | ✅ | |
| **Collaboration** | [Workspace collaboration](/docs/product-docs/workspaces/workspace-collaboration) | ✅ | ✅ | Community Edition supports 1 workspace |
| | [Base collaboration](/docs/product-docs/bases/base-collaboration) | ✅ | ✅ | |
| | [Role-based permissions](/docs/product-docs/roles-and-permissions) | ✅ | ✅ | |
| | [Record-level security](/docs/product-docs/roles-and-permissions/record-level-security) | ❌ | ✅ | |
| | [Table permissions](/docs/product-docs/roles-and-permissions/table-permissions) | ❌ | ✅ | |
| | [Field permissions](/docs/product-docs/roles-and-permissions/field-permissions) | ❌ | ✅ | |
| | Notifications | ✅ | ✅ | |
| | [Row comments](/docs/product-docs/records/expand-record#record-comment) | ✅ | ✅ | |
| | Row comments resolve | ❌ | ✅ | |
| | @Mentions in comments fields | ❌ | ✅ | |
| | Realtime collaboration | ❌ | ✅ | |
| | [Teams (workspace-level)](/docs/product-docs/collaboration/teams) | ❌ | ✅ | |
| | [Organization roles](/docs/product-docs/roles-and-permissions#organization-level-roles) | ✅ | ✅ | |
| | [Organization teams](/docs/product-docs/collaboration/teams#organization-teams) | ❌ | ✅ | |
| **Integrations** | PostgreSQL | ✅ | ✅ | |
| | MySQL | ✅ | ✅ | |
| | SQLite | ✅ | ❌ | |
| | OpenAI | ❌ | ✅ | |
| | Claude | ❌ | ✅ | |
| | Ollama | ❌ | ✅ | |
| | Groq | ❌ | ✅ | |
| | Private integrations | ❌ | ✅ | |
| **NocoDocs** | [Documents](/docs/noco-docs) | ❌ | ✅ | |
| **Sync** | [Sync](/docs/product-docs/noco-sync) | ❌ | ✅ | |
| **Admin** | [Admin panel](/docs/product-docs/cloud-enterprise-edition/admin-panel) | ❌ | ✅ | |
| | [SSO](/docs/product-docs/account-settings/authentication#single-sign-on-sso) | ❌ | ✅ | |
| | [Audit logs](/docs/product-docs/workspaces/workspace-audit) | ❌ | ✅ | |
| | Co-branding | ❌ | ✅ | |
| | 2FA | ❌ | Coming soon | Q2 2026 |
| | [SCIM](/docs/product-docs/account-settings/authentication/scim) | ❌ | ✅ | |
| **Support** | Community support | ✅ | ✅ | |
| | Priority support | ❌ | ✅ | |
| | SLA-based support | ❌ | ✅ | |
***
# OSS to Enterprise Migration
URL: /docs/product-docs/cloud-enterprise-edition/oss-to-enterprise-migration
This guide outlines the steps to migrate from the OSS version of NocoDB to the Enterprise Edition. Migration is supported for both **on-prem** and **cloud** deployments.
## Prerequisites
Before you begin, ensure the following:
* The OSS version of NocoDB (`Instance-1`) is accessible.
* You have access to the Enterprise Edition of NocoDB (`Instance-2`) — either self-hosted (on-prem) or provisioned via a cloud subscription on NocoDB.
* If using the self-hosted (on-prem) Enterprise Edition, it must be running version v0.262.2 or higher.
* You have administrative access to both instances.
***
## Steps
The migration process consists of two parts:
### Part 1: Generate Migration URL
On the Enterprise Edition (**Instance-2**)
1. On the base homepage, click **Import Data**.
2. Choose **NocoDB** as the data source.
3. Click **Generate & Copy URL**.
4. The URL will be copied to your clipboard. The modal will now enter **listening mode**, waiting for a migration request from the OSS instance.
***
### Part 2: Migrate Base from Self hosted instance
On the OSS instance (**Instance-1**):
1. Open the base context menu and select **Settings**.
2. Navigate to the **Migrate** tab.
3. Paste the migration URL copied from Instance-2.
4. Click **Migrate**.
Once the migration is triggered, a status popup will appear on the OSS instance (Instance-1). Upon successful completion, a confirmation message will be displayed on the Enterprise Edition (Instance-2).
Click **Go to Base** to access the migrated base.
***
# NocoDB Pricing Guide
URL: /docs/product-docs/cloud-enterprise-edition/understanding-pricing
Transparent, Scalable, and Business-Friendly
## Executive Summary
NocoDB's pricing model is designed with growing businesses in mind. Our unique "**pay for 9, get unlimited**" approach means you'll never pay for more than 9 editor seats, regardless of your team size. This creates predictable costs and exceptional value as your organization scales.
**Key Benefits:**
* **Predictable costs** - Your bill caps at 9 editor seats automatically
* **Unlimited scale** - Add as many team members as needed without additional cost
* **Immediate value** - Start small and grow without pricing penalties
* **No surprises** - Transparent billing with no hidden fees
***
## Understanding User Roles and Billing
### Billable vs. Non-Billable Users
**Billable Users (Editors):** Team members who can create, modify, or delete data
* **Owner:** Full administrative control
* **Creator:** Can create new bases and modify data
* **Editor:** Can modify existing data and records
**Non-Billable Users (Always Free):** Team members with view-only or limited access
* **Commenter:** Can view records and add comments, but cannot edit data
* **Viewer:** Read-only access to data and dashboards
💡 **Pro Tip:** Maximize your investment by assigning Commenter or Viewer roles to stakeholders who only need to review data, not edit it.
***
## The "Pay for 9, Get Unlimited" Model
**How It Works**
1. **You pay for only the first 9 editor seats** - regardless of your actual number of editors
2. **Every editor beyond the 9th is completely free** - no limits, no restrictions
3. **Start with any number** - begin with 1-2 users and grow naturally
4. **Automatic billing cap** - NocoDB stops charging after the 9th editor
### Real-World Example
**Scenario:** Your company has 45 total users across different departments
* **25 editors** (Sales, Operations, Product teams who need to update data)
* **20 commenters/viewers** (Executives, stakeholders who review reports)
**What you pay for:**
* Only 9 editor seats (not all 25 editors)
* 0 seats for commenters/viewers
**Your cost:** Same as a 9-person team, but with 45 people using the platform.
***
## Pricing Plans Comparison
### Plus Plan
**Price:** $12 per editor/month (Annual)
**Best for:** Growing teams and departments
| Team Size (Editors) | Monthly Cost | Annual Cost | Cost Per User/Month |
| ------------------- | ------------ | ----------- | ------------------- |
| 5 editors | $60 | $720 | **$12.00** |
| 10 editors | $108 | $1,296 | **$10.80** |
| 25 editors | $108 | $1,296 | **$4.32** |
| 50 editors | $108 | $1,296 | **$2.16** |
| 100 editors | $108 | $1,296 | **$1.08** |
### Business Plan
**Price:** $24 per editor/month (Annual)
**Best for:** Enterprise teams requiring advanced features
| Team Size (Editors) | Monthly Cost | Annual Cost | Cost Per User/Month |
| ------------------- | ------------ | ----------- | ------------------- |
| 5 editors | $120 | $1,440 | **$24.00** |
| 10 editors | $216 | $2,592 | **$21.60** |
| 25 editors | $216 | $2,592 | **$8.64** |
| 50 editors | $216 | $2,592 | **$4.32** |
| 100 editors | $216 | $2,592 | **$2.16** |
***
## ROI Calculator
**Traditional Per-Seat Pricing vs. NocoDB**
Example: 40-person team needing editing access
| Pricing Model | Monthly Cost | Annual Cost | Savings with NocoDB |
| --------------------------- | ------------ | ----------- | ------------------- |
| Traditional SaaS ($15/user) | $600 | $7,200 | - |
| **NocoDB Plus** | $108 | $1,296 | **$5,904 saved** |
| **NocoDB Business** | $216 | $2,592 | **$4,608 saved** |
*The larger your team, the greater your savings.*
## Changing plans
Note that, you can change your plan at any time from the billing dashboard. Upgrades take effect immediately, and you'll be billed on a prorated basis. Downgrades take effect at the end of your current billing cycle.
Please ensure your workspace usage fits within the limits of the downgraded plan (record limits, storage, etc.).
The detailed steps for change plan are captured [here](/docs/product-docs/workspaces/billing#change-your-plan).
## Access your invoices
To view and download your invoices, go to the **Billing** tab in your workspace settings. You can access past invoices, their statuses, and download them for your records. Find more details [here](/docs/product-docs/workspaces/billing#download-invoices).
***
## Cancel your plan
You can cancel your paid plan anytime from the billing dashboard. Upon cancellation, your workspace remains on the current plan until the end of the billing period. After that, it automatically moves to the Free plan, and no further charges are made.
Before canceling, ensure you’ve backed up any data or features available only in paid plans, as these may become unavailable after the downgrade.
Follow the detailed steps [here](/docs/product-docs/workspaces/billing#cancel-plan).
***
## Frequently Asked Questions
### Can I change user roles after setup?
Yes, you can promote Commenters to Editors or vice versa at any time. Billing adjusts automatically based on your current editor count (up to 9 paid seats).
### What happens if I temporarily need more than 9 editors?
Nothing changes with your billing. Add as many editors as needed - you'll still only pay for 9 seats.
### Do I need to commit to 9 seats upfront?
No. Start with the number of editors you need today. You'll only pay for active editor seats until you reach 9.
### How does annual vs. monthly billing work?
Annual billing provides the pricing shown above and helps you save 20% compared to monthly billing.
### Questions About Pricing?
Our sales team is here to help you understand how NocoDB's pricing model works for your specific situation. **[Book a consultation call →](https://cal.com/nocodb/sales/)**
***
# Base collaboration
URL: /docs/product-docs/collaboration/base-collaboration
This article explains how to invite members or teams to your base, manage their roles, and remove them when needed.
A comprehensive guide regarding roles and permissions can be accessed
[here](/docs/product-docs/roles-and-permissions)
Teams feature availability:
**Business**
plan onwards in cloud and On-premise
**Enterprise**
edition
## Invite Members to Base
Base-level member management allows you to control granular access to specific bases within your workspace. You can invite individual members directly to a base with specific role assignments.
1. Navigate to the **Overview** > **Members** tab within your base.
2. Click **Add Members**.
3. Enter one or more email addresses (comma-separated).
4. Select a role for the invited member(s) from the dropdown menu.
5. Click **Invite to Base**.
You can only assign roles that are at most equal to your own role on the base.
You can invite multiple members simultaneously by entering their email addresses separated by commas.
Members added to a workspace inherit the role assigned at the workspace level, unless a specific role is configured at the base level. Alternatively, you can invite users directly to a base with restricted workspace access. This allows you to grant access to a single base without exposing other workspace data — ideal for collaborating with external partners, clients, or temporary contributors in a controlled manner.
## Invite Teams to Base ☁
You can assign entire teams to a base for streamlined collaboration. Teams inherit the base-level role assigned to them, making it easier to manage access for department-wide or functional group permissions.
1. Navigate to the **Overview** > **Members** tab within your base.
2. Click on the **Add Teams** button.
3. From the dropdown, select one or multiple teams to add to the base. Teams already added to the base will be indicated as disabled in the dropdown.
4. Choose the appropriate base-level role from the dropdown menu. Note that:
* Similar to individual members, you can only assign roles that are at most equal to your own role on the base.
* Teams can't be assigned the **Owner** role at the base level.
5. Click on the **Add Teams** button to complete the process.
When a team is invited to the base, all users under that team inherit the assigned base-level role unless overridden by an individual explicit member role.
To learn more about creating and managing teams, refer to the [Teams documentation](/docs/product-docs/collaboration/teams).
Teams added to a workspace inherit the role assigned at the workspace level, unless a different role is configured at the base level. Alternatively, you can invite teams directly to a base with restricted workspace access. This allows team members to collaborate on a specific base without access to other workspace data — ideal for engaging external teams, partner organizations, or temporary project groups securely and efficiently.
## List Base Members and Teams
The `Members` tab displays all users and teams that have access to the base.
* Individual members appear with their email addresses and assigned base role.
* Teams are listed with their name, member count, and assigned base role.
Inherited roles from workspace-level are displayed with `workspace` suffix to indicate their origin.
## Modify Roles for Members or Teams
Access permissions for both members and teams can be updated directly from the `Members` tab.
1. Click on the role dropdown next to the member or team.
2. Select a new role from the list of available options.
3. The role change takes effect immediately.
You can only assign roles that are at most equal to your own role on the base. Teams cannot be assigned the
**Owner**
role at the base level.
Learn more about [roles and permissions](/docs/product-docs/roles-and-permissions).
## Role Precedence
When a user has multiple role assignments through both team and individual access at the base level, NocoDB resolves the final permission using a clear precedence order.
* Individual explicit role takes precedence over team-assigned role.
* Base-level roles override workspace-level roles.
* In case of multiple team roles, the **highest** permission applies.
Learn more about [roles and permissions](/docs/product-docs/collaboration/teams#effective-role-resolution).
## Remove or Revoke Base Access
There are two ways to manage member or team access to a base:
### Deny Access
To prevent a user or team from accessing the base:
* Click on the role dropdown next to the member or team entry.
* Select `No Access` from the available roles.
The member or team will be blocked from accessing this base, regardless of their workspace or team-level permissions.
### Revoke Explicit Assignment
To remove an explicit base-level role assignment and allow the user to inherit their workspace or team-level role:
* Click on the role dropdown next to the member or team entry.
* Select `Inherit` from the available roles.
The member or team will now access the base based on their workspace-level or team-level permissions, rather than an explicit base-level assignment.
Use
**No Access**
to explicitly block someone from a base. Use
**Inherit**
to remove the base-level assignment and fall back to workspace or team inheritance.
## Best Practice
* Use base-level permissions to restrict access to sensitive data while maintaining broader workspace access.
* Assign teams to bases for departments or functional groups to manage access efficiently without individual invitations.
* Start by inviting teams to bases when possible, then add individual members for exceptions.
* Regularly audit base member lists to ensure access remains appropriate as team compositions change.
Learn more [here](/docs/product-docs/collaboration/teams#best-practices).
***
# Collaboration
URL: /docs/product-docs/collaboration
This article explains various collaboration features that NocoDB offers.
At NocoDB, teamwork is at the core of what we do. Our collaboration features make it easy to share work, assign tasks, and communicate effectively with your team.
In this section, we’ll explore the different collaboration tools available in NocoDB.
[Workspace collaboration](/docs/product-docs/collaboration/workspace-collaboration)\
[Base collaboration](/docs/product-docs/collaboration/base-collaboration)\
[Teams](/docs/product-docs/collaboration/teams)\
[Share base](/docs/product-docs/collaboration/share-base)\
[Share view](/docs/product-docs/collaboration/share-view)
# Notifications
URL: /docs/product-docs/collaboration/notifications
This article explains specifics of Notifications.
The Notifications feature in NocoDB helps you stay informed about important updates, invitations, and activities within your bases and workspaces. This feature allows you to easily manage and keep track of all your notifications in one place.
## Notification Center
The Notification Center is accessible via the bell icon located at the bottom of the sidebar in your NocoDB interface. Clicking on this icon opens a menu that displays all your recent notifications. Whenever someone mentions you in the comments or invites you to a workspace, you will receive a notification.
A red dot on the bell icon indicates that you have new, unread notifications. This visual cue helps you quickly identify when there's something new that needs your attention
### Unread and Read Notifications
Notifications are categorized into two sections:
1. **Unread**: Displays all notifications that you haven't viewed yet.
2. **Read**: Displays notifications that you have already seen.
### Mark as Read/Unread
You can easily change the status of your notifications:
1. **Mark as Read**: Hover over any unread notification and click the checkmark to mark it as read. Alternatively, you can click the "Mark all as read" option at the top of the menu to mark all notifications as read.
2. **Mark as Unread**: If you need to revisit a notification later, simply hover over a read notification, click on the `⋮` menu, and select 'Mark as Unread'. This will move it back to the 'Unread' section.
### Delete Notifications
Read notifications can be deleted individually by clicking on the `⋮` menu and selecting 'Delete'. Once deleted, the notification will no longer appear in your list, ensuring that you only keep relevant information.
## Related Articles
* [Workspace Collaboration](/docs/product-docs/collaboration/workspace-collaboration)
* [Base Collaboration](/docs/product-docs/collaboration/base-collaboration)
* [Expanded Records](/docs/product-docs/records/expand-record)
# In Community Edition
URL: /docs/product-docs/collaboration/oss-specific-details
This article explains specifics of User management in Community Edition.
Community Edition of NocoDB includes a default workspace, and it does not allow the creation of additional workspaces. And hence, the user management on community edition is different from Cloud hosted solutions. This article details the specifics of User management in the Community Edition.
# Share base
URL: /docs/product-docs/collaboration/share-base
Procedures to share a base publicly & generating embedded iframe
To share a base, follow the steps below:
1. Navigate to the top right corner of the top navigation bar and click on the `Share` button.
2. In the `Shared base` section, toggle the switch to `Enable public access` in order to activate the shared base feature.
3. The generated link for the shared base will be displayed above and can be utilized to share this base with others. To copy the URL, simply click on the `Copy Link` option.
## Copy base
The `Copy base` feature allows users to create a copy of the base (import base) into their own Workspace. This feature is also useful for users who wish to utilize a base as a template for future bases. To copy a base, follow the steps below:
1. Access shared base URL that you wish to copy.
2. Click on the `Copy base` button located in the top right corner of the toolbar.
3. A modal will appear, prompting you to select the Workspace you wish to copy the base to. Select the desired Workspace
4. Configure if you wish to copy the base with or without data / views.
5. Click on the `Copy base` button to complete the process.
## Modify Share base
Amending the `Share base` setting will render the previously generated `Share base` link invalid and generate a new link in its place.
Here are the steps to modify it:
1. Click on the `Share` button located in the top right corner of the toolbar.
2. Toggle the option labeled `Enable public access` to deactivate the base share.
3. Toggle the same option, `Enable public access,` to reactivate the base share, subsequently generating a new link.
## Disable Share base
Disabling `Share base` will render the previously generated `Share base` link invalid
Here are the steps to disable it:
1. Click on the 'Share' button located in the top right corner of the toolbar.
2. Toggle the option labeled `Enable public access` to deactivate the base share.
## Share base Access Permissions
Users with the shared base link will have **read-only** access to the base data.
## Embeddable Frame
The NocoDB interface can be seamlessly integrated into existing applications through the utilization of the [HTML IFRAME](https://developer.mozilla.org/en-US/docs/Web/HTML/Element/iframe) attribute. This feature empowers users to embed the NocoDB interface into their applications, allowing for a unified user experience. To generate the embeddable HTML code, follow these steps:
**To Generate Embeddable HTML Code:**
1. Click the `Share` button located in the top right corner of the toolbar.
2. Within the `Shared base link` tab, select the button to copy the `Embeddable HTML code` to your clipboard.
Example:
```html
```
### Embed into application's HTML Body
Sample code with embedded iframe generated above
```html
```
# Share view
URL: /docs/product-docs/collaboration/share-view
Procedures to share a view publicly
## Generate Share View
1. Click `Share` button on the top right of the toolbar
2. Toggle `Enable public viewing` to create shared view link
3. Click `Copy` button to copy the link to clipboard
### Share view options
#### Password protection
You can enable `Restrict access with a password` if you want a password-protected view
#### Download options
You can toggle `Allow Download` button to enable or disable download CSV/XLSX options in the shared view link
### Share Form View Options
Form view has additional customizations for shared view. You can enable/disable the following options for shared form view:
1. `Survey mode`: This option when enabled, will display the form in survey mode.
2. `RTL Orientation`: This option when enabled, will display the form in RTL orientation.
3. `Themes`: You can select a theme for the form from the dropdown.
## Access Share View
To access the shared view, please follow the steps below:
Click on the `Shared View URL`. If the URL is password-protected, you will be prompted to enter the password to unlock it. Please input the required password to proceed.
Once the password is successfully entered and authenticated, you will gain access to the shared view.
In the event that the URL is not password-protected, you will be directed to the shared view directly, without the need for a password.
Users with the shared view link can only view the data and cannot make any changes to the view or its content. Records and fields in the shared view will be updated in real-time as changes are made to the original view. Users accessing shared view can apply filters and sort records as per their requirements.
:::info
Note that, filters & sorts applied to shared view will not be persisted. These filters & sorts will be reset when the shared view is accessed again.
:::
# Teams
URL: /docs/product-docs/collaboration/teams
Manage groups of users with role-based access to workspaces & bases
Workspace Teams:
**Business**
plan onwards in Cloud and On-premise
**Enterprise**
edition. Organization Teams:
**Enterprise**
plan only (Cloud & On-premise).
## Overview
Teams let you group members so you can assign and manage permissions at scale. Instead of configuring the same role for each person on every base, add users to a team and grant that team a role on one or more bases.
NocoDB supports two scopes of teams:
| | Workspace Teams | Organization Teams |
| ---------------- | -------------------------- | -------------------- |
| **Scope** | Single workspace | Entire organization |
| **Managed in** | Workspace Settings > Teams | Admin Panel > Teams |
| **Availability** | Business plan onwards | Enterprise plan only |
**When to use which:**
* **Org teams** are ideal for company-wide groups like departments (Engineering, Marketing, HR) that need consistent access across multiple workspaces. The Org Admin manages them centrally, and they can be assigned roles in any workspace.
* **Workspace teams** are better for project-specific or workspace-local groups — for example, a "Sprint Team" or "External Contractors" group that only needs access within a single workspace.
Teams help you to
* **Organize** members by department, project, or function
* **Manage permissions** efficiently by assigning roles to teams instead of individuals
* **Scale access control** without managing individual user permissions
* **Maintain flexibility** with inheritance and override capabilities
* **Create sub-teams** for more granular organization with up to 4 levels of nesting
## Workspace Teams
The following sections cover
**Workspace Teams**
. For organization-level teams, see
[Organization Teams](#organization-teams)
below.
### Create Team
1. Navigate to **Workspace Settings** > **Teams** tab.
2. Click **New Team**.
3. Enter a team name (Optional).
4. Click **Create Team**.
When a team is created, the creator is automatically added as its first member and designated as the **Team Owner**. Team Owners have full administrative privileges, including adding or removing members, renaming the team, and deleting it when necessary. Multiple owners can be assigned to a team, but each team must always have at least one owner.
### Add Members to a Team
In the **Teams** tab, select the team you want to manage, then follow these steps:
1. Click **Add Members**.
2. Use the toggle buttons to select existing workspace members to add. Members already part of the team are clearly indicated.
3. Click **Add Members** again to confirm your selection.
You can search by name or email to quickly locate users. Existing team members have their toggles disabled to avoid duplicate additions. Each member's workspace role is displayed beside their name for better context.
### Remove Members from a Team
In the **Teams** tab, select the team you want to manage, then follow these steps:
1. Locate the member you want to remove. Use the search bar if needed and open the **Actions** (three dots) menu beside their name.
2. Select **Remove Member**.
3. Confirm the action when prompted.
To remove **multiple members** at once:
1. Use the checkboxes to select the members you want to remove.
2. Click **Actions** > **Remove from Team** at the top of the member list.
3. Confirm the action when prompted.
### Manage Team Owners
A team can have multiple owners, but it must always have at least one.
To add or remove team owners:
1. In the **Teams** tab, select the team you want to manage.
2. Locate the member whose ownership status you want to change. Use the search bar if necessary and open the **Actions** (three dots) menu beside their name.
3. To grant ownership, select **Assign as Team Owner**. To revoke ownership, select **Remove as Team Owner**.
### Leave Team
Members can leave a team on their own if they no longer wish to be part of it (any team member can leave, not just owners — as long as at least one owner remains).
To leave a team you are a member of:
1. In the **Teams** tab, open team context menu by clicking the **Actions** (three dots) button beside the team name.
2. Click the **Leave Team** button from the dropdown menu.
3. Confirm the action when prompted.
### Rename Team
In the **Teams** tab, select the team you want to rename. Edit team name as needed, and your changes will be saved automatically.
### Delete Team
Only Team Owners can delete a team. Deleting a team will not remove its members from the workspace; it only dissolves the team grouping.
To delete a team:
1. In the **Teams** tab, open team context menu by clicking the **Actions** (three dots) button beside the team name.
2. Click the **Delete Team** button from the dropdown menu.
3. Confirm the action when prompted.
### Sub-teams
You can create teams within teams to match how your company is organized. For example, an "Engineering" team can have "Frontend" and "Backend" as sub-teams.
Sub-teams can be nested up to **4 levels deep**.
```
Engineering
├── Frontend
│ └── Design System
│ └── Icons ← maximum depth
└── Backend
```
#### Create a sub-team
1. In the **Teams** tab, click the **Actions** (three dots) menu next to the parent team.
2. Select **Create Sub-team**.
3. Enter a name for the sub-team.
4. Click **Create Team**.
Alternatively, click **New Team** and select a parent team from the **Parent team** dropdown. Enter a name for the team and click **Create Team**.
#### Move a team
You can move a team under a different parent, or make it a top-level team.
1. In the **Teams** tab, click the **Actions** (three dots) menu next to the team.
2. Select **Move Team**.
3. Pick the new parent team, or choose no parent to make it top-level.
4. Confirm the move.
Moving a team also moves all its sub-teams. The total depth after the move cannot exceed 4 levels.
#### Members in sub-teams
Adding someone to a parent team does **not** automatically add them to its sub-teams. You manage each team's members separately.
When you open a team's details, you'll see:
* **Direct members** — people you added to this team
* **Inherited members** — people from parent teams above, shown for reference with a label indicating which team they belong to
### How sub-teams affect permissions
| What | Direction | How it works |
| --------------------------------- | --------- | ---------------------------------------------------------------------------- |
| Workspace & base roles | Upward | Parent team members automatically get their sub-team's roles |
| Table, record & field permissions | Downward | Sub-team members are included by default; you can switch to "This team only" |
Sub-teams change how permissions work in two ways:
#### 1. Workspace & base roles flow upward
When you give a sub-team a role on a workspace or base, members of the **parent team also get that role** automatically. This way, managers in the parent team can always see what their sub-teams have access to.
**Example:** The "Frontend" sub-team has **Editor** access to Workspace X.
| Person | Team | Access to Workspace X |
| ------ | -------------------------------- | ------------------------------ |
| Alice | Frontend | Editor |
| Bob | Engineering (parent of Frontend) | Editor — gets it automatically |
| Carol | Backend (sibling, not parent) | No access |
This only works
**upward**
. Parent team members get the sub-team's roles, but sub-team members do
**not**
get the parent team's roles.
#### 2. Table, record & field permissions flow downward
When you grant a team access using **"Specific users or teams"** in [table visibility](/docs/product-docs/roles-and-permissions/table-permissions#table-visibility), [record permissions](/docs/product-docs/roles-and-permissions/table-permissions#table-record-permissions), or [field permissions](/docs/product-docs/roles-and-permissions/field-permissions), you can choose whether to include sub-team members or not.
After selecting a team, you'll see a segmented control next to the team name with two options:
| Option | Who gets access |
| ------------------------- | --------------------------------------------------- |
| **This team** | Only direct members of this team |
| **+ Sub-teams** (default) | Members of this team **and all sub-teams below it** |
{/*  */}
**Example:** The "Infrastructure" table is visible to the "Engineering" team.
With **"Include sub-teams"** (default):
| Person | Team | Can see "Infrastructure"? |
| ------ | ---------------------------- | ------------------------- |
| Alice | Engineering | Yes |
| Bob | Frontend (sub-team) | Yes |
| Carol | Design System (sub-sub-team) | Yes |
| Dave | Marketing | No |
With **"This team only"**:
| Person | Team | Can see "Infrastructure"? |
| ------ | ---------------------------- | ------------------------- |
| Alice | Engineering | Yes |
| Bob | Frontend (sub-team) | No |
| Carol | Design System (sub-sub-team) | No |
This toggle is available wherever you see the **"Specific users or teams"** option:
* **Table visibility** — who can see a table
* **Record permissions** — who can create or delete records
* **Field permissions** — who can edit a field
### Team roles
Every team member is either an **Owner** or a **Member**.
| Role | What they can do |
| ---------- | --------------------------------------------------------------------------- |
| **Owner** | Manage the team — rename, move, delete, add/remove people, create sub-teams |
| **Member** | Be part of the team and receive the workspace/base roles assigned to it |
* The person who creates a team is automatically its first Owner.
* A team can have multiple Owners but must always have at least one.
* Team roles (Owner/Member) are separate from workspace and base roles (Creator, Editor, Viewer, etc.).
### Assign roles to teams
You can give a team a role at the workspace or base level, just like you do for individual users. When a team gets a role, all its members receive that access.
Available roles for teams:
* **Creator** — full control except deletion
* **Editor** — add, edit, and delete records
* **Commenter** — view and comment on records
* **Viewer** — read-only access
* **No Access** — block access entirely
Teams
**cannot**
be given the
**Owner**
role. Only individual users can be workspace or base owners.
For step-by-step instructions:
* [Add a team to a workspace](/docs/product-docs/collaboration/workspace-collaboration#invite-teams-to-workspace-)
* [Add a team to a base](/docs/product-docs/collaboration/base-collaboration#invite-teams-to-base-)
### Effective role resolution
When someone belongs to one or more teams **and** has an individual role, NocoDB picks the one that applies using this order:
#### For a base
| Priority | Where the role comes from |
| ----------- | ---------------------------------------------------- |
| 1 (highest) | Role assigned directly to the user on this base |
| 2 | Highest role from any team assigned to this base |
| 3 | Role assigned directly to the user on the workspace |
| 4 | Highest role from any team assigned to the workspace |
| 5 (lowest) | No access |
#### For a workspace
| Priority | Where the role comes from |
| ----------- | ---------------------------------------------------- |
| 1 (highest) | Role assigned directly to the user on the workspace |
| 2 | Highest role from any team assigned to the workspace |
| 3 (lowest) | No access |
#### Rules to remember
* **Individual roles always win over team roles** at the same level.
* **Base-level roles win over workspace-level roles** — a role set on a specific base takes priority.
* **Highest team role wins** — if you're in two teams with different roles, you get the higher one. For example, Viewer + Editor = Editor.
* **"Inherit" at workspace level** means "use my team role." Any other workspace role overrides team roles.
* **"No Access" at workspace level blocks everything** — even team roles can't override it.
#### Examples
**Team role only**
Alice is in the "Marketing" team, which has **Editor** access on Workspace X. Alice has no individual role.
→ Alice gets **Editor** access on the workspace and all its bases.
**Individual role overrides team**
Bob is in "Marketing" (Editor on Workspace X), but Bob is also individually set as **Viewer** on Workspace X.
→ Bob gets **Viewer** — individual roles always take priority, even if less permissive.
**Multiple teams**
Carol is in "Marketing" (Viewer on Base A) and "Content" (Editor on Base A).
→ Carol gets **Editor** on Base A — the higher team role wins.
**Base-level override**
Dave is in "Engineering" (Editor on Workspace X). He's also individually set as **Creator** on Base B.
→ Dave gets **Creator** on Base B, **Editor** on all other bases.
**Sub-team role flowing upward**
"Frontend" is a sub-team of "Engineering." "Frontend" has **Editor** on Workspace X.
→ Frontend members get **Editor**.
→ Engineering members also get **Editor** — parent team members automatically receive sub-team roles.
### Best practices
* **Invite users with the "Inherit" role** at workspace level. This lets their access be fully controlled through teams. (Note: "No Access" at workspace level blocks all team roles.)
* **Match your org chart** — create top-level teams for departments and sub-teams for groups within them.
* **Put managers in parent teams** — they'll automatically get access to everything their sub-teams can see.
* **Use individual roles only for exceptions** — teams should handle the norm, individual assignments handle the edge cases.
* **Use clear team names** (e.g., `Eng - Backend`, `Ops - HR`) so it's easy to find and manage teams.
* **Review membership regularly** — remove people who've left or changed roles.
* **Add multiple team owners** — so things don't get stuck if one owner is unavailable.
***
## Organization Teams
Availability:
**Enterprise**
plan only (Cloud & On-premise)
Organization teams are scoped to the entire organization and can be assigned roles across any workspace within the org. They are created and managed from the **Admin Panel** > **Teams** section by the Org Admin.
Unlike workspace teams, org teams do not have a separate Team Owner / Team Member distinction. The **Org Admin** has full management control over all org-level teams — including creating, editing, deleting teams and managing their members.
Org teams appear in workspace member and team lists with an **ORG** badge. They are read-only at the workspace level — you cannot edit their membership from workspace settings, but you can assign them workspace or base roles just like workspace teams.
### Create an Org Team
1. Navigate to **Admin Panel** > **Teams**.
2. Click **+ New Team**.
3. Enter a team name.
4. Optionally, select a **Parent team** to create it as a sub-team.
5. Click **Create Team**.
### Manage an Org Team
Click the **Actions** (three dots) menu beside a team to:
* **Edit** – Open the team to manage its members and settings.
* **Add sub-team** – Create a nested sub-team under this team.
* **Move team** – Move the team under a different parent.
* **Delete team** – Remove the team from the organization.
### Add Members to an Org Team
1. In **Admin Panel** > **Teams**, click **Edit** on the team you want to manage.
2. Click **Add Members**.
3. Select one or more members from the organization's member list.
4. Click **Add Members** to confirm.
Members already part of the team are indicated and cannot be added again. You can search by name or email to quickly locate users.
### Sub-teams
Org teams support the same hierarchical structure as workspace teams, with sub-teams nested up to **4 levels deep**.
To create an org sub-team:
1. In **Admin Panel** > **Teams**, click the **Actions** (three dots) menu next to the parent team.
2. Select **Add sub-team**.
3. Enter a name and click **Create Team**.
Alternatively, click **+ New Team** and select a parent team from the **Parent team** dropdown.
Organization teams and workspace teams are separate hierarchies. An org team cannot be a child of a workspace team, and a workspace team cannot be a child of an org team.
### Assign Org Teams to Workspaces and Bases
Org teams can be assigned workspace-level or base-level roles, just like workspace teams. When an org team is given a role, all its members receive that access.
From a workspace's **Members** tab, org teams appear with an **ORG** badge. You can assign or change their role from this view, but you cannot edit the team's membership — that is managed from the Admin Panel.
Roles assigned to org teams follow the same [effective role resolution](#effective-role-resolution) rules as workspace teams.
### Org Teams vs Workspace Teams
| Aspect | Workspace Teams | Organization Teams |
| ------------------------- | -------------------------- | ------------------------------- |
| Plan required | Business+ | Enterprise |
| Scope | Single workspace | Entire organization |
| Managed from | Workspace Settings > Teams | Admin Panel > Teams |
| Managed by | Team Owners | Org Admin |
| Visible in workspace | Yes (native) | Yes (with ORG badge, read-only) |
| Sub-team depth | 4 levels | 4 levels |
| Members source | Workspace members | Org members |
| Can parent the other type | No | No |
Team names are scoped — they must be unique within their own scope (workspace or org), but the same name can exist in different scopes. For example, a team called "Support" can exist as an org team and also as a workspace team in two different workspaces, all independently.
### Best practices
* **Use org teams for cross-workspace access** — when teams need consistent roles across multiple workspaces, create an org team in the Admin Panel rather than duplicating workspace teams in each workspace.
* **Reserve workspace teams for project-specific groups** — if a team only needs access within a single workspace, a workspace team is simpler to manage.
***
# Workspace collaboration
URL: /docs/product-docs/collaboration/workspace-collaboration
This article explains how to invite members or teams to your workspace, manage their roles, and remove them when needed.
A comprehensive guide regarding roles and permissions can be accessed
[here](/docs/product-docs/roles-and-permissions)
Teams feature availability:
**Business**
plan onwards in cloud and On-premise
**Enterprise**
edition
## Invite Members to Workspace
1. Go to **Team & Settings** in the left minibar.
2. Open the **Members** tab.
3. Click **Add Member**.
4. Enter one or more email addresses (comma-separated).
5. Select a role for the invited member(s).
6. Click **Invite to Workspace**.
Any user can invite members to the workspace, but they can only assign a role to new members that is at most equal to their own role.
You have the capability to invite multiple members simultaneously by entering their email addresses, separated by commas.
## Invite Teams to Workspace ☁
NocoDB now allows inviting **Teams** to the workspace for simplified collaboration. Teams can be assigned workspace-level access roles, streamlining permissions for all their members.
1. Navigate to the `Team & Settings` page and open the `Members` tab.
2. Click on the `Add Teams` button.
3. From the dropdown, select one or multiple teams to add.
4. Choose the appropriate access role from the dropdown menu. Note that,
* Similar to individual members, you can only assign roles that are at most equal to your own role in the workspace.
* Teams can't be assigned the **Owner** role.
5. Click on the `Add Teams` button to complete the process.
When a team is invited to the workspace, all users under that team inherit the assigned workspace-level role unless overridden by a lower-level permission (explicit workspace role or base-level role).
To learn more about creating and managing teams, refer to the [Teams documentation](/docs/product-docs/collaboration/teams).
**Organization Teams**
(Enterprise only): Org-level teams also appear in the team selector with an
**ORG**
badge. These teams are managed from the
[Admin Panel](/docs/product-docs/cloud-enterprise-edition/admin-panel#teams)
and are read-only at the workspace level — you cannot edit their membership from workspace settings, but you can assign them workspace or base roles. Learn more about
[Organization Teams](/docs/product-docs/collaboration/teams#organization-teams)
.
## List Workspace Members and Teams
The `Members` tab displays all users and teams that have access to the workspace.
* Individual members appear with their email addresses.
* Teams are listed with their name and member count.
* Organization teams (Enterprise only) are displayed with an **ORG** badge, distinguishing them from workspace teams.
Members and teams list is accessible to all workspace members.
## Modify Roles for Members or Teams
Access permissions for both members and teams can be updated directly from the `Members` tab.
1. Click on the access dropdown next to the member or team.
2. Select a new role from the list of available options.
You can only assign roles that are at most equal to your own role in the workspace. Teams cannot be assigned the
**Owner**
role.
## Role Precedence
When a user has multiple role assignments through both team and individual access, NocoDB resolves the final permission using a clear precedence order.
* Individual explicit role takes precedence over team-assigned role.
* Base-level roles override workspace-level roles.
* In case of multiple team roles, the **highest** permission applies.
This ensures users always retain the most permissive access assigned at their lowest configured level.
To learn more about effective role resolution, refer to the [Teams effective role resolution documentation](/docs/product-docs/collaboration/teams#effective-role-resolution).
## Remove Members or Teams from Workspace
You can remove both members and teams from the workspace using the context menu.
1. Click on the vertical ellipses `⋮` beside the member or team entry.
2. Select the appropriate removal option — `Remove User` or `Remove Team`.
Only the workspace
**owner**
or
**creator**
can remove members or teams from the workspace.
## Best Practice
* Invite all users to the workspace first with the **Inherit** role. This will allow them to access workspaces based on their team or base-level roles.
* Use teams for departments or functional groups to manage roles efficiently.
* Adjust team-level permissions instead of managing roles individually for large workspaces.
Learn more [here](/docs/product-docs/collaboration/teams#best-practices).
***
# Dashboards
URL: /docs/product-docs/dashboards
Create and share dashboards with your team
The Dashboard feature in NocoDB enables you to visualize data from your tables using charts, graphs, and metric widgets. Dashboards help present key insights to stakeholders through an interactive, configurable interface.
Dashboards are currently in Beta and available on
**Plus**
and
**Business**
plans in Cloud.
## Getting Started
### Creating a Dashboard
1. Click on **Create New** in the left sidebar.
2. Select **Dashboard** from the dropdown.
3. Enter a name for your dashboard. (Optional, Defaults to "Dashboard")
4. Click **Create Dashboard** to open the dashboard editor.
5. Click on **Edit Dashboard** to start adding widgets.
### Managing Dashboards
Use the dashboard context menu to perform actions like:
* **Rename dashboard**: Change the dashboard name
* **Edit description**: Add or update the dashboard description. This description will appear on hover over the `i` icon in the dashboard header.
* **Duplicate dashboard**: Create a copy of the dashboard
* **Delete dashboard**: Remove the dashboard
### Sharing Dashboards
To share a dashboard publicly, click the **Share** button in the top navigation bar, enable the `Enable Public Viewing` option, and copy the generated link. Anyone with this link will be able to view the dashboard without requiring a NocoDB account.
Additional options include:
* Configuring a custom URL for your dashboard.
* Setting a password to control access.
Dashboard sharing works similarly to view sharing. Learn more about [sharing views](/docs/product-docs/views/share-view).
***
## Dashboard Layout
1. **Top Navigation Bar**: Navigation breadcrumbs and dashboard-level actions. Toggle between dashboard **View** and **Edit** modes. You can also **Share** the dashboard with team members.
2. **Widget Bar**: Toolbar at the top with available widget types to add to the dashboard.
3. **Dashboard Canvas**: Main area where widgets are arranged. NocoDB supports a flexible grid layout, allowing you to drag and drop widgets to position them as needed.
4. **Widget Configuration Panel**: Right panel for configuring selected widget properties.
## Widgets
NocoDB dashboards support various widget types to visualize data effectively. You can add widgets from the widget bar at the top of the dashboard editor.
The following widget types are available:
| Widget Type | Description |
| -------------------------------------------------------------------- | --------------------------------------- |
| **[Number](/docs/product-docs/dashboards/widgets/number)** | Displays KPIs and metric summaries |
| **[Pie Chart](/docs/product-docs/dashboards/widgets/pie-chart)** | Visualizes parts of a whole |
| **[Donut Chart](/docs/product-docs/dashboards/widgets/donut-chart)** | Pie chart variant with a hollow center |
| **[Text](/docs/product-docs/dashboards/widgets/text)** | Displays static text |
| **[iFrame](/docs/product-docs/dashboards/widgets/iframe)** | Embeds external web content |
| **[Bar Chart](/docs/product-docs/dashboards/widgets/bar-chart)** | Bar chart variant with a hollow center |
| **[Line Chart](/docs/product-docs/dashboards/widgets/line-chart)** | Line chart variant with a hollow center |
***
# Actions on Data sources
URL: /docs/product-docs/data-sources/actions-on-data-sources
Learn more about actions that can be performed on data sources in NocoDB.
## Edit Data Source parameters
* Open [Data Sources](/docs/product-docs/data-sources#accessing-data-sources) tab in the Base Settings homepage
* Click on the data source that you wish to edit
* Re-configure data source parameters as required. The following parameters can be edited:
1. Data source name
2. Database & Schema
3. Data source access permissions
* Click on `Submit` button to save the changes
To change database connection configuration parameters (like host, port, and such) use
[Edit connection](/docs/product-docs/integrations/actions-on-connection#edit)
option. Edit connection option is available only for the users with Workspace Creator+ permissions
## Remove data source
Open [Data Sources](/docs/product-docs/data-sources#accessing-data-sources) tab in the Base Settings homepage
1. Click on Actions button (three dots) against the data source that you wish to remove
2. Select `Remove` option from the dropdown
Removing a data source will not delete the external data source. It will only remove the data source from the current base
## Data source visibility
* Open [Data Sources](/docs/product-docs/data-sources#accessing-data-sources) tab in the Base Settings homepage
* Toggle radio button listed under `Visibility` column for the data source that you wish to hide/un-hide
## View visibility
View visibility is available only in Open-Source version of NocoDB
Open [Data Sources](/docs/product-docs/data-sources#accessing-data-sources) tab in the Base Settings homepage, select the data source that you wish to configure view visibility for and follow the steps below:
1. Select `View visibility` tab
2. You can see the list of views & tables available in the data source as rows & roles available as columns. Toggle checkboxes to enable/disable access to tables for specific roles.
3. Click on `Save` button to save the changes
## Relations
* Open [Data Sources](/docs/product-docs/data-sources#accessing-data-sources) tab in the Base Settings homepage
* Select the data source that you wish to access ERD (Relations view) for
* Click on `ERD View` tab
# Connect to a Data source
URL: /docs/product-docs/data-sources/connect-to-data-source
Learn how to connect to an external data-source (PG/MySQL) in NocoDB.
NocoDB recommends using
**MySQL version 5.7 or later**
and
**PostgreSQL version 14 or later**
for best compatibility and performance.
To connect an external Database as a new Data Source for NocoDB, follow the steps below:
1. Click on the Base name in the left sidebar to access the **Base homepage**
2. Click **Connect External Data** button
3. Provide a name to the data source
4. Select connection to pick credentials for the database
(a) Select connection from the list of available connections in the dropdown\
(b) Click on `+ New connection` button to create a new connection instead
5. Configure / Change database & schema details as required. If default database & schema details were provided during connection creation, these details will be pre-filled.
6. [Configure permissions](#configuring-permissions) for the data source
7. Click on `Test Database Connection` button to verify the connection
8. Click on `Add Source` button to save the data source
Option (4b) to create a new connection is available only if the user has the required permissions to create new connection (Workspace Creator+)
## Configuring Permissions
This section covers the settings available when configuring data source permissions. These settings determine the level of access and modifications allowed on the connected database.
NocoDB provides the following options for schema and data permissions:
### Allow Data Edit
This option when enabled, users can insert, update, and delete records from the tables. This provides the flexibility to manage the data directly from the NocoDB UI but should be used with caution to avoid unintentional changes to the records in the external data source. This level of access is ideal for administrative users who need to modify data directly.
By default, data editing is enabled
When data editing is disabled, users can still view the data and perform read-only operations such as filtering, sorting, and grouping. This ensures that users can access the data for analysis and reporting purposes without the risk of modifying the records.
Data editing can only be disabled when schema editing is also disabled
### Allow Schema Edit
This option enables users to modify the structure of the database schema. When enabled, users can create, modify, and delete tables, fields and relationships (links) within the connected datasource from NocoDB UI. This provides flexibility to adjust the database schema design as needed from UI.
NocoDB strongly advises against enabling the schema editing option unless absolutely necessary. Use with extreme caution, as improper changes can severely impact the data integrity and functionality of the connected data source.
By default, schema editing is disabled.
Even when schema editing is disabled, users can still
* add (augment) virtual columns such as Lookup, Rollup and Formula. These virtual columns do not alter the underlying schema of the connected data source.
* create views to customize the data presentation without modifying the original tables.
* create webhooks to trigger external actions based on specific events within the connected datasource.
* collaborate with other users by explicitly inviting them to the base or by sharing views.
# Data sources
URL: /docs/product-docs/data-sources
NocoDB Data-Source sync, access control & re-config
## Overview
NocoDB allows you to connect to external data sources and get a unified spreadsheet view of your data. Activities related to external data sources can be managed from `Data Sources` tab in `Base dashboard`.
`Data Sources` tab includes following functionalities
1. Connect / manage external data source
2. UI Access Control
3. Relations (ERD View)
4. Meta Sync
## Accessing `Data Sources`
1. Click on Base name in the left sidebar to access **Base homepage**
2. Select **Data Sources** tab
Learn more about **working with Data sources** in the following sections:
* [Connect to a Data source](/docs/product-docs/data-sources/connect-to-data-source)
* [Sync changes externally made to data source](/docs/product-docs/data-sources/sync-with-data-source)
* [Edit external database configuration parameters](/docs/product-docs/data-sources/actions-on-data-sources#edit-data-source-parameters)
* [Remove Data source](/docs/product-docs/data-sources/actions-on-data-sources#remove-data-source)
* [Hide Data source](/docs/product-docs/data-sources/actions-on-data-sources#data-source-visibility)
* [Relations within a data source](/docs/product-docs/data-sources/actions-on-data-sources#relations)
* [View visibility](/docs/product-docs/data-sources/actions-on-data-sources#view-visibility)
# Sync with Data source
URL: /docs/product-docs/data-sources/sync-with-data-source
Learn how to sync changes done in external data source with NocoDB.
To sync changes done in the external data source with NocoDB, Open [Data Sources](/docs/product-docs/data-sources#accessing-data-sources) tab in the Base Settings, select the data source you wish to sync metadata for, and follow the steps below:
1. Click on the `Meta Sync` tab
2. Click on the `Reload` button to refresh Sync state (Optional)
3. Any changes to the metadata identified will be listed in the `Sync State` column
4. Click on `Sync Now` button to sync the metadata changes
5. Once the sync is complete, you can see the updated state in the `Sync State` column
After the sync is complete, you can see the updated state in the `Sync State` column.\
Sync modal also marks `Tables metadata is in Sync` in the header.
# Updating Secrets
URL: /docs/product-docs/data-sources/updating-secret
Learn how to update secrets in NocoDB using the nc-secret-mgr package.
## Updating Secrets
To update a secret in NocoDB, you can use the `nc-secret-mgr` package. Follow the steps below to update a secret:
### Using the Command Line Interface (CLI)
1. Install the `nc-secret-mgr` package if you haven't already. You can do this by running the following command in your terminal:
```bash
npm install -g nc-secret-mgr
```
2. Once the package is installed, you can update a secret by running the following command:
```bash
NC_DB="pg://host:port?u=user&p=password&d=database" nc-secret-mgr update --prev --new
```
OR
```bash
NC_DB="pg://host:port?u=user&p=password&d=database" nc-secret-mgr
```
Replace `` with the name of the secret you used previously, and `` with the new value of the secret.
3. After running the command, the secret will be updated in NocoDB.
### Using Executables
Alternatively, you can use the `nc-secret-mgr` executable to update secrets.
1. Download the `nc-secret-mgr` executable from the [NocoDB Github](https://github.com/nocodb/nc-secret-mgr/releases/latest).
2. Run the executable using the following command:
```bash
NC_DB="pg://host:port?u=user&p=password&d=database" ./nc-secret-mgr-macos-arm64 update --prev --new
```
Replace `` with the name of the secret you used previously, and `` with the new value of the secret.
3. After running the command, the secret will be updated in NocoDB.
Note: All environment variables are supported, including `NC_DB`, `NC_DB_JSON`, `NC_DB_JSON_FILE`, `DATABASE_URL`, and `DATABASE_URL_FILE`. You can use any of these variables to specify your database connection. Alternatively, you can use the following equivalent parameters.
| Environment Variable | CLI Parameter |
| -------------------- | --------------------- |
| `NC_DB` | `--nc-db` |
| `NC_DB_JSON` | `--nc-db-json` |
| `NC_DB_JSON_FILE` | `--nc-db-json-file` |
| `DATABASE_URL` | `--database-url` |
| `DATABASE_URL_FILE` | `--database-url-file` |
# MCP Server
URL: /docs/product-docs/developer-resources/mcp
Connect NocoDB to Large Language Models (LLMs) via the Model Context Protocol (MCP).
The **Model Context Protocol (MCP) Server** lets you connect NocoDB with LLMs that support MCP, such as Claude, Cursor, or Windsurf. With this integration, LLMs can interact directly with your NocoDB base to create, query, update, and manage records.
## Desktop LLM Clients
Each MCP endpoint in NocoDB provides a secure URL that can be linked to an MCP-compatible client.
Once configured, the LLM can execute database operations in your workspace through natural language prompts.
MCP server exposes standard CRUD operations. These can be triggered conversationally, without writing SQL or scripts.
| Action | Purpose | Sample Prompt |
| ------ | -------------------- | ------------------------------------------------------------- |
| Create | Add new records | Create a task named ‘Review Documentation’ |
| Read | Look up information | Show me all projects with deadlines this week |
| Update | Change existing data | Mark the status of Project X as completed & re-assign to John |
| Delete | Remove records | Remove all tasks assigned to John |
NocoDB MCP supports only record-level operations and does not handle table, field, or other metadata changes.
### Server Configuration (NocoDB)
1. Click on the **Overview** button in the left sidebar.
2. Select the **Settings** tab.
3. Select the **Model Context Protocol**
4. Click on the **New MCP Endpoint** to create a new MCP config JSON for your base.
5. Provide a name for the MCP endpoint
6. Click **Create** to generate the MCP Config JSON.
7. Copy the generated JSON configuration. This will be used in your LLM client configuration.
### Client Configuration
#### Claude
1. Open **Claude Desktop Preferences** (`⌘+,`).
2. Under **Develop**, click **Edit Config**.
3. Insert the JSON block copied [here](#server-configuration-nocodb) as `claude_desktop_config.json`.
4. Save the file and restart Claude Desktop.
#### Cursor
1. Go to **Cursor Settings** (`⇧+⌘+J`).
2. Open the **MCP** tab and select **Add Custom MCP**.
3. Paste the JSON block copied [here](#server-configuration-nocodb). Save.
On success, you will see
`11 tools enabled`
below the MCP Server just installed. If you see an error, double-check the JSON configuration.
#### Windsurf
1. Open **Windsurf Settings** (`⌘+,`).
2. In the **Cascade** section > `Plugins (MCP Server)` > Click **Manage Plugins**
3. Paste the JSON block copied [here](#server-configuration-nocodb). Save.
### JSON Example
```json
{
"mcpServers": {
"NocoDB MCP": {
"command": "npx",
"args": [
"mcp-remote",
"https://your-domain.com/mcp/",
"--header",
"xc-mcp-token: "
]
}
}
}
```
Your MCP configurations generated above functions as a set of access credentials, granting full control over your NocoDB base. Ensure it remains confidential, never include it in source control, and store it only in secure, protected locations.
***
## Web based LLM Clients (OAuth)
Connect NocoDB to web-based LLM applications using OAuth, enabling seamless database access directly from the browser without requiring desktop client setup. This approach grants granular permission controls and eliminates the need for manual JSON configuration.
### Claude Web
OAuth-based integration allows Claude web users to access NocoDB databases through the connectors interface.
#### Setup Steps
1. Click [here](https://claude.ai/settings/connectors) to open Claude Web Settings in a new tab.
* Alternatively, navigate to **Settings** > **Connectors** from the Claude Web app.
2. Click **Add custom connector**.
3. In the "Add custom connector" dialog:
* Provide a connector name of your choice
* Enter the MCP endpoint URL: `https://app.nocodb.com/mcp`
* Click `Add`
4. NocoDB Connector will now be listed in "Disconnected" state. Click **Connect** to initiate the OAuth authorization flow (Opens in a new tab).
5. Authorize Access
* You will be asked to log in to your NocoDB account (if not already logged in)
* Select the workspace and base you want to connect
* Confirm the permissions Claude will have
* Access the selected base
* Read / create / update / delete records in the selected base
* Act on your behalf within the selected resources
* Click **Authorize** to grant access
With this, the NocoDB connector will move to "Connected" state in Claude Web. You can now interact with your NocoDB data through Claude web application.
On-prem enterprise users should replace
[https://app.nocodb.com](https://app.nocodb.com)
with their NocoDB instance URL
#### Configure Tool Permissions
By default, all tools are set to "Always ask permission" to ensure you have control over each operation Claude performs. You can modify these settings as needed.
Click [here](https://claude.ai/settings/connectors) to open Claude Web Settings in a new tab. Click **Configure** on the NocoDB connector to manage tool permissions. Set each tool's permission level using the dropdown menu:
* **Always ask permission** — Your approval is required every time Claude uses this tool
* **Allow unsupervised** — Claude can use this tool without requesting approval
To retrieve Workspace & Base information that this connector has access to, use the "Get Base Info" tool.
#### Using NocoDB Tools in Claude Web
Once configured, you can interact with your NocoDB data conversationally. For example:
* "Show me all projects with deadlines this week"
* "Create a task named 'Review Documentation'"
* "Mark the status of Project X as completed and reassign to John"
* "Provide details of our top 3 sponsors"
Claude will execute these requests using the enabled NocoDB tools, reading from and writing to your database based on the permissions you've granted.
OAuth authorization functions as a set of access credentials granting Claude control over your NocoDB base within the selected workspace. Only authorize access to bases and operations you trust Claude to perform on your behalf.
### ChatGPT
OAuth-based integration enables OpenAI web users (ChatGPT) to securely connect with NocoDB databases through the MCP connector, directly from their browser environment. This provides the same granular access control and eliminates the need for manual configuration or desktop client setup.
#### Prerequisites
Enable Developer Mode in ChatGPT settings to allow custom connector additions.
1. Open [ChatGPT Settings](https://chatgpt.com/#settings/Connectors) in a new tab.
* Alternatively, click your **Profile Icon** → **Settings** → **Settings** → **Apps & Connectors**).
2. Click **Advanced Settings** & enable **Developer Mode**.
#### Setup Steps
1. Open [ChatGPT Settings](https://chatgpt.com/#settings/Connectors) in a new tab.
* Alternatively, click your **Profile Icon** → **Settings** → **Settings** → **Apps & Connectors**).
2. Click **Create** button in top right corner of the **Connectors** modal.
3. In the "New connector" dialog:
* Provide a connector name of your choice. Optionally, add a description / icon.
* Enter the MCP Server URL: `https://app.nocodb.com/mcp`
* Check the box for **I trust this application**.
* Click `Create`
4. Authorize Access:
* Log in to your NocoDB account if prompted
* Select the workspace and base you want to connect
* Review and confirm the permissions being requested:
* Access to the selected base
* Read / create / update / delete records
* Act on your behalf within the selected resources
* Click **Authorize**
Once authorization completes, you will see a confirmation message in ChatGPT Web indicating the NocoDB connector is now connected.
For on-prem enterprise users, replace
`https://app.nocodb.com`
with your NocoDB instance URL.
#### Using NocoDB Tools in OpenAI Web
On the ChatGPT interface, start a new conversation and
* Click the **+** icon to open the "Tools" menu, enable `Developer Mode` if not already enabled.
* Click `More` to find and select the NocoDB connector you created. Toggle to enable it.
Once configured, you can query or update your NocoDB data conversationally. For example:
* “List all open support tickets assigned to me”
* “Add a new contact named ‘Alice Chen’ to the CRM base”
* “Update the status of Order #2456 to ‘Shipped’”
* “Summarize total revenue by month from the Sales base”
ChatGPT executes these actions using the connected NocoDB tools according to the permissions granted.
OAuth authorization provides ChatGPT controlled access to your NocoDB base within the selected workspace. Only authorize operations and bases you trust ChatGPT to manage on your behalf.
***
# Architecture overview
URL: /docs/product-docs/engineering/architecture
Simple overview of NocoDB architecture
By default, if `NC_DB` is not specified, then SQLite will be used to store your metadata. We suggest users to separate the metadata and user data in different databases.
| Project Type | Metadata stored in | Data stored in |
| -------------------------------------- | ------------------ | ----------------- |
| Create new base | NC\_DB | NC\_DB |
| Create new base with External Database | NC\_DB | External Database |
| Create new base from Excel | NC\_DB | NC\_DB |
# Releases & builds
URL: /docs/product-docs/engineering/builds-and-releases
NocoDB creates Docker and Binaries for each PR
## Builds of NocoDB
There are 3 kinds of docker builds in NocoDB
* Release builds [nocodb/nocodb](https://hub.docker.com/r/nocodb/nocodb) : built during NocoDB release.
* Daily builds [nocodb/nocodb-daily](https://hub.docker.com/r/nocodb/nocodb-daily) : built every 6 hours from Develop branch.
* Timely builds [nocodb/nocodb-timely](https://hub.docker.com/r/nocodb/nocodb-timely): built for every PR and manually triggered PRs.
Below is an overview of how to make these builds and what happens behind the scenes.
## Release builds
### How to make a release build ?
* Click [NocoDB release action](https://github.com/nocodb/nocodb/actions/workflows/release-nocodb.yml)
* You should see the below screen
* Change `Use workflow from` to `Branch: master`. If you choose the wrong branch, the workflow will be ended.
* Then there would be two cases - you can either leave target tag and pervious tag blank or manually input some values
* Target Tag means the target deployment version, while Previous Tag means the latest version as of now. Previous Tag is used for Release Note only - showing the file / commit differences between two tags.
### Tagging
The naming convention would be following given the actual release tag is `0.100.0`
* `0.100.0-beta.0` (first version of pre-release)
* `0.100.0-beta.1` (include bug fix changes on top of the previous version)
* `0.100.0-beta.2`(include bug fix changes on top of the previous version)
* and so on ...
* `0.100.0` (actual release)
* `0.100.1` (minor bug fix release)
* `0.100.2` (minor bug fix release)
### Case 1: Leaving inputs blank
* If Previous Tag is blank, then the value will be fetched from [latest](https://github.com/nocodb/nocodb/releases/latest)
* If Target Tag is blank, then the value will be Previous Tag plus one. Example: 0.90.11 (Previous Tag) + 0.0.1 = 0.90.12 (Target Tag)
### Case 2: Manually Input
Why? Sometimes we may mess up in NPM deployment. As NPM doesn't allow us to redeploy to the same tag again, in this case we cannot just use the previous tag + 1. Therefore, we need to use previous tag + 2 instead and we manually configure it.
* After that, click `Run workflow` to start
* You can see Summary for the overall job status.
* Once `release-draft-note` and `release-executables` is finished, then go to [releases](https://github.com/nocodb/nocodb/releases), edit the draft note and save as draft for time being.
* Example: Adding header, update content if necessary, and click `Auto-generate release notes` to include more info.
* Once `release-docker` is finished, then test it locally first. You'll be expected to see `Upgrade Available` notification in UI as we haven't published the release note. (the version is retrieved from there)
* Once everything is finished, then publish the release note and the deployment is considered as DONE.
### How does release action work ?
#### validate-branch
To check if `github.ref` is master. Otherwise, other branches will be not accepted.
#### process-input
To enrich target tag or previous tag if necessary.
#### pr-to-master
Automate a PR from develop to master branch so that we know the actual differences between the previous tag and the current tag. We choose master branch for a deployment base.
#### release-npm
Build frontend and backend and release them to NPM. The changes during built such as version bumping will be committed and pushed to a temporary branch and an automated PR will be created and merged to master branch.
Note that once you publish with a certain tag, you cannot publish with the same tag again.
#### release-draft-note
Generate a draft release note. Some actions need to be done after this step.
#### release-docker
Build docker image and publish it to Docker Hub. It may take around 15 - 30 mins.
#### close-issues
Open issues marked with label `Status: Fixed` and `Status: Resolved` will be closed by bot automatically with comment mentioning the fix is included in which version.
Example:
#### publish-docs
Publish Documentations
#### update-sdk-path
`nocodb-sdk` is used in frontend and backend. However, in develop branch, the value would be `file:../nocodb-sdk` for development purpose (so that the changes done in nocodb-sdk in develop will be included in frontend and backend). During the deployment, the value will be changed to the target tag. This job is to update them back.
#### sync-to-develop
Once the deployment is finished, there would be some new changes being pushed to master branch. This job is to sync the changes back to develop so that both branch won't have any difference.
## Daily builds
### What are daily builds ?
* NocoDB creates every 6 hours from develop branches and publishes as nocodb/nocodb-daily
* This is so that we can easily try what is in the develop branch easily.
### Docker images
* The docker images will be built and pushed to Docker Hub (See [nocodb/nocodb-daily](https://hub.docker.com/r/nocodb/nocodb-daily/tags) for the full list).
## Timely builds
### What are timely builds ?
NocoDB has github actions which creates docker and binaries for each PR! And these can be found as a **comment on the last commit** of the PR.
Example shown below
* Go to a PR and click on the comment.
* Click on the link to copy the docker image and run it locally.
This is to
* reduce pull request cycle time
* allow issue reporters / reviewers to verify the fix without setting up their local machines
### Docker images
When a non-draft Pull Request is created, reopened or synchronized, a timely build for Docker would be triggered for the changes only included in the following paths.
* `packages/nocodb-sdk/**`
* `packages/nc-gui/**`
* `packages/nocodb/**`
The docker images will be built and pushed to Docker Hub (See [nocodb/nocodb-timely](https://hub.docker.com/r/nocodb/nocodb-timely/tags) for the full list). Once the image is ready, GitHub bot will add a comment with the command in the pull request. The tag would be `-pr---`.
## Executables or Binaries
Similarly, we provide a timely build for executables for non-docker users. The source code will be built, packaged as binary files, and pushed to GitHub (See [nocodb/nocodb-timely](https://github.com/nocodb/nocodb-timely/releases) for the full list).
Currently, we only support the following targets:
* `node16-linux-arm64`
* `node16-macos-arm64`
* `node16-win-arm64`
* `node16-linux-x64`
* `node16-macos-x64`
* `node16-win-x64`
Once the executables are ready, GitHub bot will add a comment with the commands in the pull request.
NocoDB creates Docker and Binaries for each PR.
This is to
* reduce pull request cycle time
* allow issue reporters / reviewers to verify the fix without setting up their local machines
# Development Setup
URL: /docs/product-docs/engineering/development-setup
How to set-up your development environment
## Clone the repo
```bash
git clone https://github.com/nocodb/nocodb
# change directory to the project root
cd nocodb
```
## Install dependencies
```bash
# run from the project root
# this command will install the dependencies including sdk build
pnpm bootstrap
```
## Start Frontend
```bash
# run from the project root
pnpm start:frontend
# runs on port 3000
```
## Start Backend
```bash
# run from the project root
pnpm start:backend
# runs on port 8080
```
Any changes made to frontend and backend will be automatically reflected in the browser.
## Enabling CI-CD for Draft PR
CI-CD will be triggered on moving a PR from draft state to `Ready for review` state & on pushing changes to `Develop`. To verify CI-CD before requesting for review, add label `trigger-CI` on Draft PR.
## Accessing CI-CD Failure Screenshots
For Playwright tests, screenshots are captured on the tests. These will provide vital clues for debugging possible issues observed in CI-CD. To access screenshots, Open link associated with CI-CD run & click on `Artifacts`
# Playwright E2E testing
URL: /docs/product-docs/engineering/playwright
Overview to playwright based e2e tests
## How to run tests
All the tests reside in `tests/playwright` folder.
Make sure to install the dependencies (in the playwright folder):
```bash
pnpm --filter=playwright install
pnpm exec playwright install --with-deps chromium
```
### Run Test Server
Start the backend test server (in `packages/nocodb` folder):
```bash
pnpm run watch:run:playwright
```
Start the frontend test server (in `packages/nc-gui` folder):
```bash
NUXT_PAGE_TRANSITION_DISABLE=true pnpm run dev
```
### Running all tests
For selecting db type, rename `.env.example` to `.env` and set `E2E_DEV_DB_TYPE` to `sqlite`(default), `mysql` or `pg`.
headless mode(without opening browser):
```bash
pnpm run test
```
with browser:
```bash
pnpm run test:debug
```
For setting up mysql(sakila):
```bash
docker-compose -f ./tests/playwright/scripts/docker-compose-mysql-playwright.yml up -d
```
For setting up postgres(sakila):
```bash
docker-compose -f ./tests/playwright/scripts/docker-compose-playwright-pg.yml
```
### Running individual tests
Add `.only` to the test you want to run:
```js
test.only('should login', async ({ page }) => {
// ...
})
```
```bash
pnpm run test
```
## Concepts
### Independent tests
* All tests are independent of each other.
* Each test starts with a fresh project with a fresh sakila database(option to not use sakila db is also there).
* Each test creates a new user(email as `user@nocodb.com`) and logs in with that user to the dashboard.
Caveats:
* Some stuffs are shared i.e, users, plugins etc. So be catious while writing tests touching that. A fix for this is in the works.
* In test, we prefix email and project with the test id, which will be deleted after the test is done.
### What to test
* UI verification. This includes verifying the state of the UI element, i.e if the element is visible, if the element has a particular text etc.
* Test should verify all user flow. A test has a default timeout of 60 seconds. If a test is taking more than 60 seconds, it is a sign that the test should be broken down into smaller tests.
* Test should also verify all the side effects the feature(i.e. On adding a new field type, should verify field deletion as well) will have, and also error cases.
* Test name should be descriptive. It should be easy to understand what the test is doing by just reading the test name.
### Playwright
* Playwright is a nodejs library for automating chromium, firefox and webkit.
* For each test, a new browser context is created. This means that each test runs in a new incognito window.
* For assertion always use `expect` from `@playwright/test` library. This library provides a lot of useful assertions, which also has retry logic built in.
## Page Objects
* Page objects are used to abstract over the components/page. This makes the tests more readable and maintainable.
* All page objects are in `tests/playwright/pages` folder.
* All the test related code should be in page objects.
* Methods should be as thin as possible and its better to have multiple methods than one big method, which improves reusability.
The methods of a page object can be classified into 2 categories:
* Actions: Performs an UI actions like click, type, select etc. Is also responsible for waiting for the element to be ready and the action to be performed. This included waiting for API calls to complete.
* Assertions: Asserts the state of the UI element, i.e if the element is visible, if the element has a particular text etc. Use `expect` from `@playwright/test` and if not use `expect.poll` to wait for the assertion to pass.
## Writing a test
Let's write a test for testing filter functionality.
For simplicity, we will have `DashboardPage` implemented, which will have all the methods related to dashboard page and also its child components like Grid, etc.
### Create a test suite
Create a new file `filter.spec.ts` in `tests/playwright/tests` folder and use `setup` method to create a new project and user.
```js
import { test, expect } from '@playwright/test';
import setup, { NcContext } from '../setup';
test.describe('Filter', () => {
let context: NcContext;
test.beforeEach(async ({ page }) => {
context = await setup({ page });
})
test('should filter', async ({ page }) => {
// ...
});
});
```
### Create a page object
Since filter is UI wise scoped to a `Toolbar` , we will add filter page object to `ToolbarPage` page object.
```js
export class ToolbarPage extends BasePage {
readonly parent: GridPage | GalleryPage | FormPage | KanbanPage;
readonly filter: ToolbarFilterPage;
constructor(parent: GridPage | GalleryPage | FormPage | KanbanPage) {
super(parent.rootPage);
this.parent = parent;
this.filter = new ToolbarFilterPage(this);
}
}
```
We will create `ToolbarFilterPage` page object, which will have all the methods related to filter.
```js
export class ToolbarFilterPage extends BasePage {
readonly toolbar: ToolbarPage;
constructor(toolbar: ToolbarPage) {
super(toolbar.rootPage);
this.toolbar = toolbar;
}
}
```
Here `BasePage` is an abstract class, which used to enforce structure for all page objects. Thus all page object *should* inherit `BasePage`.
* Helper methods like `waitForResponse` and `getClipboardText` (this can be access on any page object, with `this.waitForResponse`)
* Provides structure for page objects, enforces all Page objects to have `rootPage` property, which is the page object created in the test setup.
* Enforces all pages to have a `get` method which will return the locator of the main container of that page, hence we can have focused dom selection, i.e.
```js
// This will only select the button inside the container of the concerned page
await this.get().querySelector('button').count();
```
### Writing an action method
This a method which will reset/clear all the filters. Since this is an action method, it will also wait for the `delete` filter API to return. Ignoring this API call will cause flakiness in the test, down the line.
```js
async resetFilter() {
await this.waitForResponse({
uiAction: async () => await this.get().locator('.nc-filter-item-remove-btn').click(),
httpMethodsToMatch: ['DELETE'],
requestUrlPathToMatch: '/api/v1/db/meta/filters/',
});
}
```
### Writing an assertion/verification method
Here we use `expect` from `@playwright/test` library, which has retry logic built in.
```js
import { expect } from '@playwright/test';
async verifyFilter({ title }: { title: string }) {
await expect(
this.get().locator(`[data-testid="nc-fields-menu-${title}"]`).locator('input[type="checkbox"]')
).toBeChecked();
}
```
## Tips to avoid flakiness
* If an UI action, causes an API call or the UI state change, then wait for that API call to complete or the UI state to change.
* What to wait out can be situation specific, but in general, is best to wait for the final state to be reached, i.e. in the case of creating filter, while it seems like waiting for the filter API to complete is enough, but after its return the table records are reloaded and the UI state changes, so its better to wait for the table records to be reloaded.
## Accessing playwright report in the CI
* Open `Summary` tab in the CI workflow in github actions.
* Scroll down to `Artifacts` section.
* Access reports which suffixed with the db type and shard number(corresponding to the CI workerflow name). i.e `playwright-report-mysql-2` is for `playwright-mysql-2` workflow.
* Download it and run `pnpm install -D @playwright/test && npx playwright show-report ./` inside the downloaded folder.
# Repository structure
URL: /docs/product-docs/engineering/repository-structure
Repository Structure
We use `Lerna` to manage multi-packages. We have the following [packages](https://github.com/nocodb/nocodb/tree/master/packages).
* `packages/nocodb-sdk`: API client sdk of nocodb.
* `packages/nc-gui`: NocoDB Frontend.
* `packages/nc-lib-gui`: The build version of `nc-gui` which will be used in `packages/nocodb`.
* `packages/nocodb`: NocoDB Backend, hosted in [NPM](https://www.npmjs.com/package/nocodb).
# i18n translation
URL: /docs/product-docs/engineering/translation
Contribute to NocoDB's i18n translation
* NocoDB supports 30+ foreign languages & community contributions are now simplified via [Crowdin](https://crowdin.com/).
## How to add / edit translations ?
### Using GitHub
* For English, make changes directly to [en.json](https://github.com/nocodb/nocodb/blob/develop/packages/nc-gui/lang/en.json) & commit to `develop`
* For any other language, use `crowdin` option.
### Using Crowdin
* Setup [Crowdin](https://crowdin.com) account
* Join [NocoDB](https://crowdin.com/project/nocodb) project
* Click the language that you wish to contribute
* Click the `Translate` button; this opens up `Crowdin Online Editor`
* Select string in `English` on the left-hand menu bar \[1]
* Propose changes \[2]
* Save \[3]
Note: Crowdin provides translation recommendation's as in \[4]. Click directly if it's apt
A GitHub Pull Request will be automatically triggered (periodicity- 6 hours). We will follow up on remaining integration work items.
#### Reference
Refer following articles to get additional details about Crowdin Portal usage
* [Translator Introduction](https://support.crowdin.com/crowdin-intro/)
* [Volunteer Translation Introduction](https://support.crowdin.com/for-volunteer-translators/)
* [Online Editor](https://support.crowdin.com/online-editor/)
## How to add a new language ?
#### GitHub changes
* Update enumeration in `enums.ts` \[packages/nc-gui/lib/enums.ts]
* Map JSON path in `a.i18n.ts` \[packages/nc-gui/plugins/a.i18n.ts]
#### Crowdin changes \[admin only]
* Open `NocoDB` project
* Click on `Language` on the home tab
* Select target language, `Update`
* Update array in `tests/playwright/tests/language.spec.ts`
## String Categories
* **General**: simple & common tokens (save, cancel, submit, open, close, home, and such)
* **Objects**: objects from NocoDB POV (project, table, field, view, page, and such)
* **Title**: screen headers (compact) (menu headers, modal headers)
* **Lables**: text box/ radio/ field headers (few words) (Labels over textbox, radio buttons, and such)
* **Activity**/ actions: work items (few words) (Create Project, Delete Table, Add Record, and such)
* **Tooltip**: additional information associated with work items (usually lengthy) (Additional information provided for activity)
* **Placeholder**: placeholders associated with various textboxes (Text placeholders)
* **Msg**
* Info: general/success category for everything
* Error: warnings & errors
* Toast: pop-up toast messages
> Note: string name should be in camelCase. Use above list as priority order in case of ambiguity.
# Writing unit tests
URL: /docs/product-docs/engineering/unit-testing
Overview to Unit Testing
## Unit Tests
* All individual unit tests are independent of each other. We don't use any shared state between tests.
* Test environment includes `sakila` sample database and any change to it by a test is reverted before running other tests.
* While running unit tests, it tries to connect to mysql server running on `localhost:3306` with username `root` and password `password` (which can be configured) and if not found, it will use `sqlite` as a fallback, hence no requirement of any sql server to run tests.
### Pre-requisites
* MySQL is preferred - however tests can fallback on SQLite too
### Setup
```bash
pnpm --filter=-nocodb install
# add a .env file
cp tests/unit/.env.sample tests/unit/.env
# open .env file
open tests/unit/.env
```
Configure the following variables
> DB\_HOST : host
> DB\_PORT : port
> DB\_USER : username
> DB\_PASSWORD : password
### Run Tests
```bash
pnpm run test:unit
```
### Folder Structure
The root folder for unit tests is `packages/nocodb/tests/unit`
* `rest` folder contains all the test suites for rest apis.
* `model` folder contains all the test suites for models.
* `factory` folder contains all the helper functions to create test data.
* `init` folder contains helper functions to configure test environment.
* `index.test.ts` is the root test suite file which imports all the test suites.
* `TestDbMngr.ts` is a helper class to manage test databases (i.e. creating, dropping, etc.).
### Factory Pattern
* Use factories for create/update/delete data. No data should be directly create/updated/deleted in the test.
* While writing a factory make sure that it can be used with as less parameters as possible and use default values for other parameters.
* Use named parameters for factories.
```ts
createUser({ email, password})
```
* Use one file per factory.
### Walk through of writing a Unit Test
We will create an `Table` test suite as an example.
#### Configure test
We will configure `beforeEach` which is called before each test is executed. We will use `init` function from `nocodb/packages/nocodb/tests/unit/init/index.ts`, which is a helper function which configures the test environment(i.e resetting state, etc.).
`init` does the following things -
* It initializes a `Noco` instance(reused in all tests).
* Restores `meta` and `sakila` database to its initial state.
* Creates the root user.
* Returns `context` which has `auth token` for the created user, node server instance(`app`), and `dbConfig`.
We will use `createProject` and `createProject` factories to create a project and a table.
```typescript
let context;
beforeEach(async function () {
context = await init();
project = await createProject(context);
table = await createTable(context, project);
});
```
#### Test case
We will use `it` function to create a test case. We will use `supertest` to make a request to the server. We use `expect`(`chai`) to assert the response.
```typescript
it('Get table list', async function () {
const response = await request(context.app)
.get(`/api/v1/db/meta/projects/${project.id}/tables`)
.set('xc-auth', context.token)
.send({})
.expect(200);
expect(response.body.list).to.be.an('array').not.empty;
});
```
We can also run individual test by using `.only` in `describe` or `it` function and the running the test command.
```typescript
it.only('Get table list', async () => {
```
#### Integrating the New Test Suite
We create a new file `table.test.ts` in `packages/nocodb/tests/unit/rest/tests` directory.
```typescript
import 'mocha';
import request from 'supertest';
import init from '../../init';
import { createTable, getAllTables } from '../../factory/table';
import { createProject } from '../../factory/project';
import { defaultColumns } from '../../factory/column';
import Model from '../../../../src/lib/models/Model';
import { expect } from 'chai';
function tableTest() {
let context;
let project;
let table;
beforeEach(async function () {
context = await init();
project = await createProject(context);
table = await createTable(context, project);
});
it('Get table list', async function () {
const response = await request(context.app)
.get(`/api/v1/db/meta/projects/${project.id}/tables`)
.set('xc-auth', context.token)
.send({})
.expect(200);
expect(response.body.list).to.be.an('array').not.empty;
});
}
export default function () {
describe('Table', tableTests);
}
```
We can then import the `Table` test suite to `Rest` test suite in `packages/nocodb/tests/unit/rest/index.test.ts` file(`Rest` test suite is imported in the root test suite file which is `packages/nocodb/tests/unit/index.test.ts`).
### Seeding Sample DB (Sakila)
```typescript
function tableTest() {
let context;
let sakilaProject: Project;
let customerTable: Model;
beforeEach(async function () {
context = await init();
/******* Start : Seeding sample database **********/
sakilaProject = await createSakilaProject(context);
/******* End : Seeding sample database **********/
customerTable = await getTable({project: sakilaProject, name: 'customer'})
});
it('Get table data list', async function () {
const response = await request(context.app)
.get(`/api/v1/db/data/noco/${sakilaProject.id}/${customerTable.id}`)
.set('xc-auth', context.token)
.send({})
.expect(200);
expect(response.body.list[0]['FirstName']).to.equal('MARY');
});
}
```
# Writing docs
URL: /docs/product-docs/engineering/writing-docs
Overview to writing docs
This article discusses some of the protocol and conventions to be followed while writing docs.
## Folder Structure
* Docs follow object-oriented approach. Each folder represents an object and each file represents procedures associated with that object.
* Each folder contains an `meta.json` file which contains the metadata for that object.
```
{
"title": "Engineering",
"icon": "terminal",
"pages": [
"architecture",
"repository-structure",
"development-setup",
"unit-testing",
"playwright",
"build-and-releases",
"translations",
"writing-docs"
]
}
```
## File Structure
* Add following metadata to the top of each file.
```
---
title: "Writing docs"
description: "Overview to writing docs"
tags: ['Engineering']
keywords: ['Engineering', Writing docs', 'Docs conventions']
---
```
* `title` is the title of the article that appears on the sidebar and on the top of the article.
* `description` is the description of the article that appears in search results.
* `tags` are the tags associated with the article. Tags are used to group articles together. For example, all articles with the tag `Workspaces` will be grouped together.
* `keywords` are the keywords associated with the article. Keywords are used to improve search results. For example, if the user searches for `Create workspace`, then the article with the keyword `Create workspace` will be displayed in the search results.
## Nomenclature
* Folder names & file name are
* in kebab-case.
* For example, `account-settings`.
* Only first letter of the folder/file name is capitalized. Second letter onwards, first letter is capitalized only if it is a proper noun.
## Tags
* First letter of each tag is capitalized.
* Tags usually are Objects or Actions. Add a tag only if we are sure that the tag will be used in multiple places. Example: 'Create' - we can have `Create project`, `Create user`, `Create API token` etc.
### Active Tags
Tags that are currently being used in the docs are listed below. See if you can reuse any of these tags before adding a new tag.
## Description
* Description should be crisp and to the point. Preferably one line.
* Refer to the description associated with the tag to get an idea of how the description should be.
* Descriptions appear in the search results (when searched by tags). So, it should be descriptive enough to give the user an idea of what the article is about.
## Images
* Annotated images should be placed in `img/v2` folder.
* For every annotated image, there should be a corresponding unannotated image in the `img/v2-unannotated` folder.
* Images are kept in the same folder structure as the docs.
* Use `Skitch` for annotations.
## Before you commit
* Use `pnpm run build` to build the docs.
* Ensure that the build is successful & there are no errors/warnings related to missing links, images, etc.
# Bulk Update
URL: /docs/product-docs/extensions/bulk-update
Update multiple records in a table at once
## Overview
The Bulk Update extension empowers users to modify multiple records across a selected table view simultaneously. Instead of editing each row one by one, you can define field-level updates and apply them to all visible records with a single action—saving time and reducing manual errors.
Bulk updates are irreversible. Ensure you review the changes before confirming the update.
## Updating Records
Follow these steps to update multiple records in a table:
1. Select the table and associated view you wish to update.
2. Click the **New Action** button.
3. Choose the **Field** you want to update.
4. Select an **Update Type**:
* **Set Value**: Set a specific value for the field.
* **Clear Value**: Clear the field value.
5. If you selected **Set Value**, provide the **Value** to be applied.
6. Click the **Update Records** button to apply the changes.
7. A confirmation dialog will display the number of fields and records to be updated. Review the details and click **Confirm Update** to proceed.
You can add multiple actions to update different fields in the table.
Bulk updates affect all records within the current view, including those not visible on the screen. Since views are just filtered representations of the same underlying data, any record that appears in multiple views will also reflect the update. These updates apply only to records in the selected view and do not impact records outside of it or in unrelated views.
## Managing Actions
The Update work items added are listed in the **Actions** section. You can:
* **Edit** an action by clicking on the action item in the list & making the necessary changes.
* **Delete** an action by clicking on the delete icon next to the action item.
* **Disable** an action by toggling the switch next to the action item. Disabling an action will prevent it from being applied to the records.
For any configured bulk update extension, you can reuse the **Update Records** button to repeat the batch update process. This is particularly useful when you need to apply the same changes across multiple records in the future.
# Data Exporter
URL: /docs/product-docs/extensions/data-exporter
Export data from NocoDB in various formats
## Overview
The `Data Exporter` extension is designed to simplify the process of exporting data from your NocoDB tables. With just a few clicks, you can effortlessly download CSV files for any specific table and view within your base. The download process is handled asynchronously in the background, ensuring that your application usage remains uninterrupted. Once your file is ready, you’ll receive a notification, allowing you to download the CSV into your local machine at your convenience.
## Exporting Data
Follow these steps to export data from your NocoDB tables:
1. Select the table and associated view you wish to export.
2. Configure optional settings for Separator and Encoding:
* Default separator: Comma `,`
* Other options: Semicolon `;`, Pipe `|` and `Tab`
3. Click the **Export** button.
4. Once the export is complete, the file will be listed in the **Recent Exports** section.
5. Click the **Download** button to save the CSV file to your local device.
Separator and Encoding configurations are only accessible from the expanded extension panel.
## Managing Exports
The files exported have a limited lifespan and are automatically removed after 6 hours. The files listed under the **Recent Exports** section are only visible to you and are not shared with other users. You can manage your exports by downloading or removing them as needed.
### Downloading Exports
1. In the Recent Exports section, locate the desired file.
2. Click the Download icon next to the file to save it to your device.
### Removing Exports
1. Locate it in the Recent Exports section.
2. Click the `x` icon to remove it from the list.
# Dedupe
URL: /docs/product-docs/extensions/dedupe
Identify and merge duplicate records in a table
## Overview
The Dedupe extension helps you identify and merge duplicate records in a table using one or more fields for grouping. Instead of manually scanning and comparing records, Dedupe detects groups of records with matching values across the selected fields and provides a guided interface to review, select, and merge them into a single primary record.
This extension is especially useful for maintaining clean datasets such as contacts, leads, or inventories where duplicate entries are common.
Merging duplicate records is irreversible. Once records are merged, deleted records cannot be restored.
***
## Finding Duplicate Records
Follow these steps to detect duplicate records:
1. Select the **Table** you want to scan for duplicates. Optionally, you can also select a specific **View** within that table to limit the scope of the records being analyzed.
2. Select one or more **Field(s)** to group records by. You can choose multiple fields from the dropdown to define more granular deduplication criteria.
3. Dedupe identifies groups where **two or more records** share the same values across all the selected fields.
4. Each group is presented for review one at a time.
***
## Resolving Duplicate Records
For each duplicate group, review and merge records as follows:
1. Select **one primary record** to keep.
2. If a record shown in the group is not actually a duplicate, **exclude** it. Excluded records are not merged and not deleted.
3. Optionally, for each field - click a value from any record to copy it into the primary record.
4. Once satisfied, proceed to merge the group.
When the merge is completed:
* The primary record is retained with its original primary key.
* Selected field values are copied into the primary record.
* All non-excluded duplicate records in the group are permanently deleted.
***
## Field Behavior During Merge
All editable fields are displayed except the grouping field(s) & system fields (e.g. `id`, `created_at`, `updated_at`). Virtual fields (Formula, Lookup, Rollup) are shown for reference as these cannot be edited directly. Record ID of the primary record is always retained. Modified timestamps are updated automatically.
When merging, field values are handled as follows:
* If you select a value from any record for a field, that value is copied into the primary record.
* If no value is selected for a field, the primary record's existing value remains unchanged.
***
## Group Review Actions
While reviewing duplicate groups, you can:
* **Skip group**
Move to the next duplicate group without making any changes.
* **Reset**
Clear all selections for the current group (primary record, field selections, exclusions) and start over.
You can skip a group before selecting a primary record, or reset even after making selections.
***
## Supported Field Types
**Supported for duplicate detection**
* Text, LongText, SingleLineText
* Number, Decimal, Currency, Percent, Duration, Rating
* Date, DateTime, Time, Year
* Phone, Email, URL
* SingleSelect, MultiSelect
* Checkbox
* Attachment
* JSON, Geometry
* User
* Links & LinkToAnotherRecord (LTAR): many-to-many, belongs-to-one
**Not supported**
* Links & LinkToAnotherRecord (LTAR): has-many, one-to-one
***
## Key Notes
* Duplicate detection supports **single-field or multi-field grouping**
* When multiple fields are selected, records must match on **all** selected fields to be grouped as duplicates
* At least **two matching records** are required per group
* Undo / Redo is not supported
* Deleted records cannot be restored
The Dedupe extension provides a controlled and efficient way to clean up duplicate data while giving you full visibility and control over what gets merged and removed.
***
# Extensions
URL: /docs/product-docs/extensions
Overview of the extensions available in NocoDB
The Extensions feature is available on NocoDB cloud and on-premise licensed deployments.
Extensions are modular components designed to expand and customize your experience with NocoDB. Functioning like plugins, extensions introduce new features and functionalities beyond the platform's core capabilities, allowing users to adapt NocoDB to suit unique requirements and workflows.
This section provides an overview of the Extensions framework, detailing how to install, manage, and utilize extensions to optimize your NocoDB base.
* [Extension Marketplace](#extensions-marketplace)
* [Adding Extensions](#adding-extensions)
* [Managing Extensions](#managing-extensions)
Extensions can be developed using JavaScript and Vue.js, offering a flexible approach to adding new features to your NocoDB instance. The ability to develop custom extensions will be available soon, allowing you to tailor NocoDB to meet specific needs and workflows. Stay tuned for more updates!
The Extensions side panel can be toggled using the `Extensions` button located in the top-right corner of the NocoDB interface.
## Extensions Marketplace
The Extensions Marketplace is a centralized hub where you can explore, discover, and install extensions to enhance your NocoDB experience.
The following extensions are currently available in the marketplace:
* [Data Exporter](/docs/product-docs/extensions/data-exporter)
* [Upload Data from CSV](/docs/product-docs/extensions/upload-data-from-csv)
* [URL Preview](/docs/product-docs/extensions/url-preview)
* [World Clock](/docs/product-docs/extensions/world-clock)
* [Page Designer](/docs/product-docs/extensions/page-designer)
* [Bulk Update](/docs/product-docs/extensions/bulk-update)
Note that, the ability to develop custom extensions is not supported currently.
## Adding Extensions
To add an extension to your NocoDB instance, open extensions side panel and follow these steps:
1. Click the `Add Extension` button in the Extensions side panel.
2. Click the `Add` button to add the extension to your NocoDB instance. You can also click on the extension card to view more details about the extension.
* The extensions installed are specific to the base and are not shared across workspace.
* Multiple instances of the same extension can be added to a base.
## Managing Extensions
After installing an extension, you can manage it using the following options:
### 1. Adjust Visibility
Use the `expand` icon to view the extension in full screen mode.
### 2. Reorder Extensions
Use the `drag-drop` icon to reorder the extensions in the side panel.
### 3. Additional Actions
Use the `More` button to perform the following actions:
* Rename extension
* Duplicate extension
* Clear data
* Delete extension
# Org Chart
URL: /docs/product-docs/extensions/org-chart
Display an organization chart based on your data
## Overview
The Org Chart extension in NocoDB allows you to visualize hierarchical data in the form of an organization chart. This extension is particularly useful for displaying relationships within teams, departments, or any other hierarchical structure based on your data.
# Page Designer
URL: /docs/product-docs/extensions/page-designer
Create printable and shareable layouts from your database records
## Overview
The **Page Designer** extension allows users to create printable and shareable (PDF) visual layouts from their database records. Common use cases include generating invoices, reports, certificates, and summaries—by combining text, images, and dynamic field data in a freeform design canvas.
This feature is ideal for teams who want to convert structured table data into branded, formatted documents directly within NocoDB.
## Key Features
* **Drag-and-drop Builder**: Add text, images, tables, and dividers to customize your page layout.
* **Record-specific Rendering**: Auto-populates fields dynamically from the selected record.
* **Supports Linked Records**: Render data from related tables in a tabular, list, or inline format.
* **Full Design Control**: Modify font, alignment, borders, colors, and more for each element.
* **Print & PDF Export**: Preview your design and export directly to PDF.
## How to Access
To get started:
1. Open **Page Designer** from the **Extensions** menu in your NocoDB instance.
2. Choose the target **table** and **view** from which records will be pulled.
3. Select a specific **record** to preview and design the layout interactively.
## Designing Your Page
The canvas on the left shows a preview of your document layout. Use the sidebar on the right to add and arrange elements.
### Add Elements
Add components to your layout by dragging them onto the canvas:
| Element | Description |
| --------- | ---------------------------------------------------- |
| 🅰️ Text | Add static or dynamic text (linked to table fields). |
| 🖼️ Image | Add image blocks, such as logos or banners. |
| ➖ Divider | Insert horizontal lines for visual separation. |
### Bind Field Data
Under **Field Elements**, you can drag and drop database fields onto the canvas. Once dropped into the canvas, these fields will auto-populate with values from the selected record. You can also format these fields using the sidebar options (font size, color, alignment, etc.).
##### Field Configuration
For most field types, you can configure:
| Setting | Description |
| ---------------- | --------------------------------------------------- |
| Font settings | Customize font family, size, line height, and color |
| Alignment | Set horizontal and vertical alignment |
| Border & Radius | Add borders and set corner radius |
| Background color | Set background color for the field |
### Linked Records
The **Linked Records** section allows you to display related table data using three formats:
* **Inline**: Display as plain text.
* **List**: Show entries in a vertical list.
* **Table** : Render fields from the related table as a structured table with columns and rows.
For linked records displayed in tabluar format, you can choose which fields to display and customize their visibility.
##### Table Configuration
| Column | Options |
| --------------------- | --------------------------------------------------- |
| Enable/Disable fields | Toggle visibility per field |
| Font settings | Customize font family, size, line height, and color |
| Table Header styling | Set separate font size and line height for headers |
| Background color | Set background color for the table |
## Record Preview
Use the **Record selector** in the sidebar to toggle between different records and preview how the design looks with real data.
## Page Settings
* **Page Name**: Customize the name of your page for easy reference. This name will be used when exporting or printing.
* **Print / Export**: Use the print icon in the top-right corner to generate PDFs or physical printouts.
## Key Use Cases
* 🧾 Invoices & Quotes
* 📄 Client Reports & Status Sheets
* 🎓 Certificates & Badges
* 📊 Internal Summaries for review meetings
## Limitations (Beta)
* The Page Designer is currently in **Beta**—minor rendering issues may occur in some browsers. Help us improve by reporting any bugs you encounter and any suggestions you have to improve the experience.
***
# Upload data from CSV
URL: /docs/product-docs/extensions/upload-data-from-csv
Import data from CSV files into NocoDB
## Overview
The `Upload data from CSV` extension in NocoDB allows users to import data from CSV files directly into existing tables. This tool enables you to efficiently add new records, update existing ones, and map CSV columns to NocoDB fields with precision.
## Importing Data
### Modes of Import
The Import CSV Extension supports two modes of data import:
**1. Add Records**: Import all records from the CSV file as new entries in the selected table. No existing records are modified.
**2. Merge Records**: Update existing records based on a designated **merge field** (a unique field used for matching) while optionally adding new records. The available options under this mode are:
* *Create New Records Only*
* Only adds new records from the CSV. Existing records are not updated. New records are identified based on the merge field specified.
* *Update Existing Records Only*
* Only updates records that already exist in the table based on the merge field. New records are not added.
* *Create and Update Records*
* Adds new records and updates existing ones as needed, based on the merge field.
**Merge Field:** The merge field is the key field used to match records in the CSV file with those in the NocoDB table for updating purposes. Typically, this is the Primary Key or another unique identifier. Composite keys are not supported.
**Field Mapping:** Easily map CSV columns to corresponding fields in the NocoDB table. You have the flexibility to import only the fields you need.
### Steps to Import
Follow these steps to import data from a CSV file into NocoDB:
1. Drag and drop or upload your CSV file into the Import CSV Extension area.
2. Select the table you want to import the data into. By default, current active table is selected.
3. Choose the mode of import:
* **Add Records** or
* **Merge Records** with one of the following **Import Types**:
* *Create New Records Only*
* *Update Existing Records Only*
* *Create and Update Records*
4. Set the **Merge Field** (for Merge Records mode): Select the field that will be used to match CSV records with existing table records.
5. **Use first record as header**: If the first row of the CSV file contains the column headers, enable this option to use them as the field names.
6. Map the columns from the CSV file to the corresponding fields in the NocoDB table.
7. Click the **Import** button to start the import process.
### Post-Import Summary
Once the import is complete, NocoDB will display a summary detailing:
* The number of new records added
* The number of existing records updated
* Any records left unchanged
This streamlined process ensures your data is imported accurately and efficiently.
# URL Preview
URL: /docs/product-docs/extensions/url-preview
Preview URLs in NocoDB
## Overview
The URL Preview extension in NocoDB allows you to preview URLs directly within your NocoDB instance. This feature is particularly useful when you need to quickly view the content of a URL without leaving your workspace. This extension enhances the data visualization capabilities of NocoDB by providing rich, contextual previews for supported online platforms and services.
## Previewing URLs
To preview a URL in NocoDB, just select a cell from the URL field. A preview of the URL content will be displayed in the extension sub-panel, allowing you to view the content without navigating away from your workspace.
## Supported Platforms
The URL Preview Extension currently supports the following platforms:
### 📽️ Media & Social
* YouTube
* Vimeo
* SoundCloud
* Spotify
* Twitter
* Dailymotion
* Behance
* TED
### 💼 Productivity & Collaboration
* Google Docs
* Google Sheets
* Google Slides
* Google Drive share links
* Loom share links
### 🧑💻 Design & Development
* GitHub (Gists)
* CodePen
* CodeSandbox (Embed url)
* JSFiddle
* StackBlitz
* Figma
* Notion
# World Clock
URL: /docs/product-docs/extensions/world-clock
Display multiple time zone clocks with in NocoDB
## Overview
The World Clock extension in NocoDB allows you to display multiple time zone clocks within your NocoDB instance. This feature is particularly useful when you need to track time across different regions or collaborate with team members in different time zones. The extension enhances the user experience by providing a visual representation of time zones, making it easier to manage global operations and schedules.
### Adding Clock
To add a clock, expand World clock extension, click `+ Add City` and select City from the dropdown available. You can add a maximum of 4 clocks per instance of an extension.
* **Clock Name**: Enter a name for the clock to identify it easily. It defaults to the selected City name.
* **Theme**: Choose one amongst the available themes for the clock display.
### Clock Display Settings
The following are the global settings that will be applied to all the clocks configured.
* **Clock Type**: Choose between **Analog**, **Digital**, or **Both** for the display format.
* **Show Numbers**: For analog clocks, you can additionally configure if hour numbers are to be displayed on the clock dial.
* **Time Format**: Choose between 12H and 24H format for the clock display.
# Actions on field
URL: /docs/product-docs/fields/actions-on-field
This article explains how to perform various actions on a field- like rename, change field type, default, field width, record height, show/hide.
## Fields context menu
Fields context menu can be accessed by clicking on the dropdown icon (🔽) next to the field name.\
### Edit
#### Rename field
1. Open the field context menu
2. Click on `Edit` option.
3. Enter new field name as required in the `Field Name` field.
4. Click on `Save Field` button.
#### Change field type
1. Open the field context menu
2. Click on `Edit` option.
3. Select new field type from the `Field Type` dropdown.
4. Click on `Save Field` button.
#### Change default value
1. Open the field context menu
2. Click on `Edit` option.
3. Enter new default value in the `Default Value` field. To disable, click on `x` icon.
4. Click on `Save Field` button.
### Change field width
To adjust the width of the field, hover over the field edge and drag to adjust the width.
### Hide field
1. Open the field context menu
2. Click on `Hide Field` option
* Hidden fields are not visible in the table view, but will still be accessible for Formulas, Sort, Filter, etc.
* To un hide a field, use `Toolbar > Fields` menu
* Fields can also be marked as hidden from `Toolbar > Fields` menu
### Set as Display value
1. Open the field context menu
2. Click on `Set as Display Value` option.
Refer to [Display Value](/docs/product-docs/fields/display-value) for more details.
### Sort Ascending
1. Open the field context menu
2. Click on `Sort Ascending` option.
### Sort Descending
1. Open the field context menu
2. Click on `Sort Descending` option.
### Duplicate field
1. Open the field context menu
2. Click on `Duplicate` option.
Duplicated field sans the data will be created with suffix `_copy` in its name & will be placed to the right of the original field.
### Insert after a field
1. Open the field context menu
2. Click on `Insert after` option.
New field will be created to the right of the original field.
### Insert before a field
1. Open the field context menu
2. Click on `Insert before` option.
New field will be created to the left of the original field.
### Delete field
**This action cannot be undone**
To delete a field, follow the steps below:
1. Open the field context menu by clicking on dropdown icon (🔽) .
2. Click on **Delete**.
3. Confirm the deletion by clicking on **Delete Field** on the confirmation modal.
### Add / edit field description
Field description can be added by clicking on the `Add Description` button on the field creation modal or by clicking on the `Edit Description` button from the field context menu.
Description for a field will be visible as a tooltip when hovering over the `info` icon next to the field name.
### Set field as unique
To set a field as unique, follow the steps below:
1. Open the field context menu by clicking on dropdown icon (🔽) .
2. Click on **Edit field**.
3. Toggle on the **Unique values only** option.
4. Click on **Save Field** button.
Note that, this feature is only available for certain field types like Single line text, Email, Number, etc. Find more details on setting a field as unique in [Unique Fields](/docs/product-docs/fields#unique-fields-) article.
# Display Value
URL: /docs/product-docs/fields/display-value
This article explains how to set the display value for a table and its significance.
The **Display Value** serves as the primary visual identifier for a record within a table. It helps users quickly recognize and associate records across views and linked tables. While it is often recommended to set a display value based on a field with unique identifiers (like a primary key), uniqueness is not enforced at the database level.
***
## Use of Display Value
* In the spreadsheet view, the display value is visually emphasized to make it easier to identify the record you’re working with.
* When creating **Links** between tables, the display value is shown in the **Linked Records** modal, making cross-table relationships more readable and intuitive.
**Example: Display Value highlighted in the Actor table**
**Example: Display Value shown in a Links field.**
The value shown in the **Link Records** modal is pulled from the related table's display value.
***
## Set Display Value
To set a field as the display value:
1. Click the dropdown icon (🔽) next to the desired field.
2. Select **Set as display value** from the menu.
***
## FAQ
**How is the Display Value determined for existing database tables?**
For tables connected from external databases, NocoDB automatically selects the display value based on the table structure. By default, it picks the first non-numeric field after the primary key. If no non-numeric field is found, it selects the next field after the primary key.
**Can I change the Display Value later?**
Yes. You can change the display value at any time by using the context menu on the target field. [Learn more →](/docs/product-docs/fields/display-value#set-display-value)
***
# Field summary
URL: /docs/product-docs/fields/field-summary-footer
Understanding the field summary bar in NocoDB!
The "Field Summary" provides quick calculations for chosen fields displayed in the footer of a table's grid view. These calculations offer quick insights into your data, such as total sums, averages, minimum, and maximum values. This section explains how to use & configure field summary to accurately compute these values.
## Overview
Field Summary is aggregated value computed by considering all the rows present in a grid view. The resulting values are displayed in the summary cells at the bottom of the field for easy reference. Filters configured on the grid, if any will affect the rows displayed & hence the summary as well.
Please note that it is not possible to reference these aggregated values directly in other parts of the table.
When a grid view is **shared publicly**, the summary is also visible to the viewers. Viewers of shared view can also modify the field summary configuration to suit their needs, but the changes are not saved (revert upon page refresh).
Summary configurations are grid **view specific**. Multiple grid views can be created for a table, and each grid view can have its own summary configuration.
## Configuring Field Summary
By default, the summary is disabled for all fields. To enable the summary for a field, follow these steps:
Navigate to the grid view of the table you wish to configure the field summary for.
1. Click on the cell of the field you wish to configure the summary for.
2. Select the desired summary type from the dropdown list.
Changes to the grid view immediately update the values displayed in the footer cells. To disable the summary for a field, click on the summary cell and select "None" from the dropdown list.
## Summary Types
Summary function types available for configuration depend on the field type. General functions listed below are available for most of the field types:
### General
* **Empty**: Count of empty cells in the field.
* **Filled**: Count of non-empty cells in the field.
* **Unique**: Count of unique values in the field.
* **Percent Empty**: Percentage of empty cells in the field.
* **Percent Filled**: Percentage of non-empty cells in the field.
* **Percent Unique**: Percentage of unique values in the field.
Apart from these general functions, specific functions are available for different field types:
### Numeric
* **Sum**: Sum of all numeric values in the field.
* **Minimum**: Minimum value in the field.
* **Maximum**: Maximum value in the field.
* **Average**: Average of all numeric values in the field.
* **Median**: Median of all numeric values in the field.
* **Standard Deviation**: Standard deviation of all numeric values in the field.
* **Range**: Range of all numeric values in the field.
### Date
* **Earliest Date**: Earliest date in the field.
* **Latest Date**: Latest date in the field.
* **Date Range**: Range of dates in the field.
* **Month Range**: Range of months in the field.
### Checkbox
* **Checked**: Count of checked checkboxes in the field.
* **Unchecked**: Count of unchecked checkboxes in the field.
* **Percent Checked**: Percentage of checked checkboxes in the field.
* **Percent Unchecked**: Percentage of unchecked checkboxes in the field.
### Attachment
* **Attachment Size**: Total size of attachments in the field.
Summary configuration is not available for `DB specific field` types.
# Fields
URL: /docs/product-docs/fields
This article discusses various field types that NocoDB offers.
Fields define the structure and type of data stored in each record of a table. They are the building blocks of your database, determining how information is entered, displayed, and interpreted. Whether you're capturing names, numbers, dates, selections, or calculated values—fields provide the necessary flexibility to model your data accurately.
This section will guide you through the different types of fields available, their configurations, and best practices for choosing the right field type based on your use case. By understanding how fields work, you can design more effective tables and ensure consistent, meaningful data across your workspace.
Among all fields in a table, two hold special significance: the **[primary key](/docs/product-docs/fields/primary-key)** and the **[display value](/docs/product-docs/fields/display-value)**. The **primary key** is a technical identifier that uniquely distinguishes each record and is essential for backend operations like updates, deletions, and maintaining data integrity. It is always unique and typically hidden from end users. On the other hand, the **display value** is a human-readable label—such as a name or title—used in the interface to help users quickly identify and associate records. While it’s recommended to use a field with unique values as the display value, strict uniqueness is not enforced. In essence, the primary key ensures consistent record management, while the display value improves usability and context.
## Create a Field
To add a new field to your table:
1. Click on the ➕ icon in the table header where you'd like to insert the new field.
2. In the **New Field** panel:
* Enter the field name (optional at first).
* Select the appropriate **field type** from the list (e.g., Single line text, Number, Lookup, etc.).
3. Configure additional settings such as default value and description as needed.
4. Unique constraints can be enabled for supported field types by checking the **Unique values only** option. More details can be found in the [Unique Fields](#unique-fields-) section below.
5. Click **Save Field** to finalize the creation.
You can edit the field name, type, default value, or description anytime using the field’s context menu.
Depending on the field type selected, additional options or configurations may be required—such as allowed values, precision, formulas, or linked table settings. Refer to the documentation for each field type for detailed guidance.
## Field Default Value
You can set a default value when creating a field. This value is automatically applied to new records created after the field is set. It does not affect existing records. The default can be a fixed value (e.g., "N/A", "Unknown") or, for some field types, a dynamic value such as the current date, time, or user ID. Refer [Set default value](/docs/product-docs/fields/actions-on-field#change-default-value) for more details on how to configure default values.
## Field Description
Adding a description to a field provides context and guidance for users interacting with the table. This is especially useful in collaborative environments where multiple users may access the same data. The description can include details about the field's purpose, expected values, or any specific instructions for data entry. It appears as a tooltip when users hover over `i` icon next to the field name in the table header. For more details, refer to [Add/Edit Field Description](/docs/product-docs/fields/actions-on-field#add--edit-field-description).
You can also search for fields using their names or descriptions. This helps quickly locate specific fields, especially in larger tables with many columns.
## Field Types
NocoDB offers a wide range of field types to help you structure your data effectively. From basic text and numeric fields to more advanced options like linked records, formulas, and custom types, each field serves a specific purpose. The table below provides an overview of all available field types along with brief descriptions to help you choose the right one for your use case.
| Field Type | Name | Description |
| ---------------- | ------------------------------------------------------------------------------------------------------- | -------------------------------------------------------- |
| **Text based** | [Single line text](https://nocodb.com/docs/product-docs/fields/field-types/text-based/single-line-text) | For short text entries like names or titles. |
| | [Long text](https://nocodb.com/docs/product-docs/fields/field-types/text-based/long-text) | Suitable for paragraphs or detailed notes. |
| | [Email](https://nocodb.com/docs/product-docs/fields/field-types/text-based/email) | Stores and validates email addresses. |
| | [Phone](https://nocodb.com/docs/product-docs/fields/field-types/text-based/phonenumber) | For storing phone numbers. |
| | [URL](https://nocodb.com/docs/product-docs/fields/field-types/text-based/url) | Stores website or web resource links. |
| **Numerical** | [Number](https://nocodb.com/docs/product-docs/fields/field-types/numerical/number) | Whole numbers, positive or negative. |
| | [Decimal](https://nocodb.com/docs/product-docs/fields/field-types/numerical/decimal) | Numbers with decimal precision. |
| | [Percentage](https://nocodb.com/docs/product-docs/fields/field-types/numerical/percent) | Represents numeric values as percentages. |
| | [Currency](https://nocodb.com/docs/product-docs/fields/field-types/numerical/currency) | Stores monetary values with currency symbol. |
| **Date & Time** | [Date](https://nocodb.com/docs/product-docs/fields/field-types/date-time-based/date) | Captures calendar dates. |
| | [Time](https://nocodb.com/docs/product-docs/fields/field-types/date-time-based/time) | Stores time of day. |
| | [Date and time](https://nocodb.com/docs/product-docs/fields/field-types/date-time-based/date-time) | Stores both date and time in one field. |
| | [Duration](https://nocodb.com/docs/product-docs/fields/field-types/date-time-based/duration) | Measures length of time (e.g., hours or days). |
| **Select based** | [Single select](https://nocodb.com/docs/product-docs/fields/field-types/select-based/single-select) | Allows choosing one option from a list. |
| | [Multi select](https://nocodb.com/docs/product-docs/fields/field-types/select-based/multi-select) | Allows selecting multiple options from a list. |
| **Link based** | [Links](https://nocodb.com/docs/product-docs/fields/field-types/links-based/links) | Creates relationships between tables. |
| | [Lookup](https://nocodb.com/docs/product-docs/fields/field-types/links-based/lookup) | Pulls data from linked records. |
| | [Rollup](https://nocodb.com/docs/product-docs/fields/field-types/links-based/rollup) | Aggregates values from related records. |
| **Custom types** | [Attachment](https://nocodb.com/docs/product-docs/fields/field-types/custom-types/attachment) | Upload and store files or images. |
| | [Barcode](https://nocodb.com/docs/product-docs/fields/field-types/custom-types/barcode) | Stores and displays barcodes. |
| | [QR-code](https://nocodb.com/docs/product-docs/fields/field-types/custom-types/QR-code) | Stores and displays QR codes. |
| | [Geometry](https://nocodb.com/docs/product-docs/fields/field-types/custom-types/geometry) | For geographic or spatial data. |
| | [GeoData](https://nocodb.com/docs/product-docs/fields/field-types/custom-types/geodata) | Stores latitude and longitude coordinates. |
| | [JSON](https://nocodb.com/docs/product-docs/fields/field-types/custom-types/json) | Stores structured data in JSON format. |
| | [Checkbox](https://nocodb.com/docs/product-docs/fields/field-types/custom-types/checkbox) | Boolean toggle for true/false values. |
| | [Rating](https://nocodb.com/docs/product-docs/fields/field-types/custom-types/rating) | Displays star-based or numeric rating. |
| | [Colour](https://nocodb.com/docs/product-docs/fields/field-types/custom-types/colour) | Displays colour swatch & corresponding Hex code. |
| **Identifier** | [UUID](https://nocodb.com/docs/product-docs/fields/field-types/identifier-types/uuid) | Auto-generates globally unique identifiers (UUID v4). |
| | [Auto Number](https://nocodb.com/docs/product-docs/fields/field-types/identifier-types/auto-number) | Auto-generates sequential numbers for each record. |
| **Formula** | [Formula](https://nocodb.com/docs/product-docs/fields/field-types/formula/formula) | Computes values using expressions based on other fields. |
***
## Unique Fields ☁
Feature available in Business and Enterprise plans.
Certain field types in NocoDB can be configured to enforce uniqueness, ensuring that no two records contain the same non-empty value for that field. This is especially useful for fields such as email addresses, usernames, or other identifiers that must remain distinct across records. When enabled, empty cells are permitted, while duplicate non-empty values are prevented. You can enable this behavior by selecting the **Unique values only** option in the field settings during field creation or editing. Once configured, NocoDB validates all new entries and updates to enforce the uniqueness constraint.
When a user attempts to enter a duplicate value in a unique field, NocoDB will display an error message and prevent the record from being saved until a unique value is provided.
Supported field types for uniqueness enforcement include:
* Single line text
* Email
* Phone number
* URL
* Number
* Decimal
* Currency
* Percent
* DateTime
* Date
* Time
- Enforcing uniqueness can impact performance on large datasets. Enable this option only when required by your application.
- Uniqueness constraints are supported only for tables created within NocoDB (NC-DB). Fields from external database tables do not support uniqueness constraints via NocoDB.
- When converting an existing field to a unique field, all existing values must already be unique; otherwise, the conversion will fail.
- Default values and uniqueness constraints are mutually exclusive. A field marked as unique cannot have a default value.
- Empty values are allowed in unique fields and do not violate the uniqueness constraint.
## Field Actions
Beyond selecting the right field type, you can also perform various actions to customize how fields behave and appear in your tables. These actions are accessible from the field’s context menu & toolbar menu and include:
* [Rename a field](/docs/product-docs/fields/actions-on-field#rename-field)
* [Change field type](/docs/product-docs/fields/actions-on-field#change-field-type)
* [Set default value](/docs/product-docs/fields/actions-on-field#change-default-value)
* [Adjust field width](/docs/product-docs/fields/actions-on-field#change-field-width)
* [Hide or unhide fields](/docs/product-docs/fields/actions-on-field#hide-field)
* [Set as display value](/docs/product-docs/fields/actions-on-field#set-as-display-value)
* [Sort by field (ascending/descending)](/docs/product-docs/fields/actions-on-field#sort-ascending)
* [Duplicate a field](/docs/product-docs/fields/actions-on-field#duplicate-field)
* [Insert new field before or after](/docs/product-docs/fields/actions-on-field#insert-before-a-field)
* [Delete a field](/docs/product-docs/fields/actions-on-field#delete-field)
* [Add or edit field description](/docs/product-docs/fields/actions-on-field#add--edit-field-description)
For step-by-step instructions and visuals, refer to the full guide on [Actions on Field](/docs/product-docs/fields/actions-on-field).
***
# Multi-field editor
URL: /docs/product-docs/fields/multi-fields-editor
Understanding use of multi-field editor in NocoDB!
NocoDB offers a handy tool for easily managing the fields within a table. With this tool, you can add, modify, rename, arrange, or hide fields efficiently. It's particularly useful when creating a new table structure or making changes to an existing one.
## Accessing the Multi-Field Editor
1. Navigate to the table you wish to edit
2. Click on `Details` in the navbar
3. Select `Fields` tab
## Adding fields
On the Multi-field editor page,
1. Click on `Add Field` button to add a new field.
2. Enter the field name and select the field type; configure default value (optional).
3. Field will be added to the end of the list. You can reorder the fields as needed. You can add / update multiple fields in one go & save all at once.
4. Click `Save changes` button to save the changes.
* You can add / update/ delete multiple fields & save changes in one go.
* Use `Restore` to discard edits to a particular field. Use `Reset` to discard all active changes on multi-field editor.
## Editing fields
On the Multi-field editor page,
1. Click on the field you wish to edit.
2. Make the necessary changes in the `Edit Field` modal. You can update the field name, type, default value, and other attributes.
3. Updates to the field are recorded in the fields list view. You can add / update multiple fields in one go & save all at once.
4. Click `Save changes` button to save the changes.
* You can add / update/ delete multiple fields & save changes in one go.
* Use `Restore` to discard edits to a particular field. Use `Reset` to discard all active changes on multi-field editor.
## Deleting fields
On the Multi-field editor page,
1. Hover over the field you wish to delete, select `...` icon to open context menu
2. Click on `Delete` option to delete the field.
3. Deletions in the table are recorded in the fields list view. You can delete multiple fields in one go & save all at once.
4. Click `Save changes` button to save the changes.
After all the changes are made, click `Save changes` button to save the changes.
* You can add / update/ delete multiple fields & save changes in one go.
* Use `Restore` to discard edits to a particular field. Use `Reset` to discard all active changes on multi-field editor.
## Reordering fields
On the Multi-field editor page, use `drag-drop` handle to drag and drop the fields to reorder them.
The changes will only be saved when you click `Save changes` button.
## Show / Hide fields
On the Multi-field editor page, use the `toggle` button next to the fields to show or hide them.
The changes will only be saved when you click `Save changes` button.
# Primary key
URL: /docs/product-docs/fields/primary-key
This article explains what a primary key is and how it is used in NocoDB.
A primary key is a special database table field designated to uniquely identify each table record. As it uniquely identifies an individual record of a table, it is used internally by NocoDB for all operations associated with a record
## Primary Key in NocoDB
Primary Key that gets defined / used in NocoDB depends on how underlying table was created. Summary is captured below
1. From UI, Create new table / Import from Excel / Import from CSV
1. An `ID` \[datatype: Integer] system field created by default during table creation is used as primary key
2. Additional system fields `created-at`, `updated-at` are inserted by default
2. Connect to existing external database
1. Existing `primary key` field defined for a table is retained as is; NocoDB doesn't insert a new ID field
2. Additional system fields `created-at`, `updated-at` are not inserted by default
3. Import from Airtable
1. Airtable record ID is marked as primary key for imported records, and is mapped to field `ncRecordId` \[datatype: varchar]
2. If a new record is inserted after migration & if ncRecordId field was omitted during record insertion - auto generated string will be inserted by NocoDB
3. Computed hash value for the entire record is stored in system field `ncRecordHash`
4. Additional system fields `created-at`, `updated-at` are not inserted by default
4. Create new table using SDK / API
1. No default primary key field is introduced by NocoDB. It has to be explicitly specified during table creation (using attribute `pk: true`)
### FAQ
**What if Primary Key was missing?**
In NocoDB, it's possible for a table to have no primary key—this can happen if the table is created externally or through the SDK/API without specifying one. While new records can still be added to such tables, updating or deleting them won’t be possible since there's no unique identifier to reference each record.
**Can I change the Primary Key to another field within tables?**
You can't update Primary Key from NocoDB UI. You can reconfigure it at database level directly & trigger `meta sync` explicitly.
***
# Getting started
URL: /docs/product-docs/getting-started
NocoDB is available in two variants: **self-hosted** and **cloud-hosted** (SaaS). This guide walks you through getting started with either option.
New to NocoDB? We recommend starting with the cloud-hosted option. New users can explore the platform's features on the
**free plan**
.
## Self Hosted
Self-hosting gives you full control over your data and infrastructure. You can run NocoDB on your own server or a cloud provider of your choice.
* [Installation](/docs/self-hosting/installation/auto-upstall)
* [Environment Variables](/docs/self-hosting/environment-variables)
* [Upgrading](/docs/self-hosting/upgrading)
## SaaS (Cloud Hosted)
### Sign up for a NocoDB account
1. Visit the [NocoDB website](https://www.nocodb.com).
2. Click on the **Start For Free** button in the top right corner.
3. Sign up using your Google account or email address.
4. Verify your account using the link sent to your email.
Once signed up, you'll land on the NocoDB dashboard with a default workspace ready to use.
### Build a Base
A base is your database — it contains tables, fields, and relationships. [Create a new base](/docs/product-docs/bases/create-base) or [import an existing one from Airtable](/docs/product-docs/bases/import-base-from-airtable).
#### Create Tables
Tables store your data in rows and columns, like a spreadsheet. [Add new tables](/docs/product-docs/tables/create-table) to your base, or [import from CSV, Excel, or JSON](/docs/product-docs/tables/create-table-via-import).
#### Add Fields
Fields are columns that hold a specific type of data — text, numbers, dates, attachments, and [more](/docs/product-docs/fields). Use the [multi-fields editor](/docs/product-docs/fields/multi-fields-editor) to add, edit, reorder, and configure fields in bulk.
#### Establish Relationships between Tables
Connect related data across tables using [Link To Another Record](/docs/product-docs/fields/field-types/links-based/link-to-another-record) fields. For example, link "Tasks" to a "Project" by creating an LTAR field in the "Projects" table that points to the "Tasks" table.
#### Add Records
[Add records manually](/docs/product-docs/records/create-record) or [upload data from CSV](/docs/product-docs/tables/import-data-into-existing-table) files.
#### Create views
Views let you display and interact with data in different layouts. [Create multiple views](/docs/product-docs/views/create-view) per table, each with its own fields, filters, and sort order. Available view types: [Grid](/docs/product-docs/views/view-types/grid), [Form](/docs/product-docs/views/view-types/form), [Gallery](/docs/product-docs/views/view-types/gallery), [Kanban](/docs/product-docs/views/view-types/kanban), [Calendar](/docs/product-docs/views/view-types/calendar), [Timeline](/docs/product-docs/views/view-types/timeline), [List](/docs/product-docs/views/view-types/list), and [Map](/docs/product-docs/views/view-types/map).
#### Connect your data sources
Already have data in an external database? [Connect your existing data sources](/docs/product-docs/data-sources) and work with them through NocoDB's spreadsheet interface.
### Collaborate with your team
[Invite team members to your workspace](/docs/product-docs/collaboration/workspace-collaboration) and [share bases with them](/docs/product-docs/collaboration/base-collaboration). [Assign roles and permissions](/docs/product-docs/roles-and-permissions) to control access at workspace, base, table, and field levels.
Want to share publicly? [Create a public link](/docs/product-docs/collaboration/share-base) or [embed your base](/docs/product-docs/collaboration/share-base#embeddable-frame) on your website.
### Automate your workflows
NocoDB provides multiple ways to automate repetitive tasks:
* **[Workflows](/docs/product-docs/automation/workflow)**: Build visual automations with triggers, actions, conditions, and loops
* **[Scripts](/docs/scripts)**: Write JavaScript to automate operations across tables, fields, and records
* **[Webhooks](/docs/product-docs/automation/webhook)**: Send notifications to external services on record changes
### Extend with dashboards and apps
* **[Dashboards](/docs/product-docs/dashboards)**: Create visual dashboards with chart widgets, numbers, text, and iframes
* **[Extensions](/docs/product-docs/extensions)**: Add functionality with Bulk Update, Data Exporter, Dedupe, Org Chart, Page Designer, and more
### Use AI to work faster
[NocoAI](/docs/product-docs/noco-ai) helps you create bases, tables, fields, views, filters, formulas, and select options using natural language.
### Create documents with NocoDocs
[NocoDocs](/docs/noco-docs) is a built-in document editor with rich text formatting, comments, AI writing assistance, and granular permissions.
# Keyboard shortcuts
URL: /docs/product-docs/getting-started/keyboard-shortcuts
## Quick Actions
`⌘` + `K` (or `Ctrl` + `K` on Windows) is a keyboard shortcut to quickly navigate between different workspace, table, view, or a menu items. For example, if you want to quickly navigate to the "API Tokens" page, you can open Quick Actions menu using ⌘+K, type "Token" in the search box and press enter.
This shortcut is often referred to as "Command-K". It's a great way to save time when you're navigating around NocoDB.
Command-K menu can also be accessed via the "Quick Actions" button in the top left corner of the screen.
To navigate within ⌘+K menu,
* Use `↑` `↓` to navigate between listed items
* Use `Enter` to select an item
* Use `Backspace` to move to parent menu
* Use `Esc` to close the menu
## Recent Views
Access recently visited views quickly using `⌘` + `L` (or `Ctrl` + `L` on Windows). Search results will be displayed in a modal window; click on the result to open the view.
To navigate within ⌘+L menu,
* Use `↑` `↓` to navigate between listed items
* Use `Enter` to select an item
* Use `Backspace` to move to parent menu
* Use `Esc` to close the menu
## Search in Docs
Quickly search through docs from within NocoDB UI using `⌘` + `J` (or `Ctrl` + `J` on Windows). Search results will be displayed in a modal window; click on the result to open the page in a new tab.
To navigate within ⌘+J menu,
* Use `↑` `↓` to navigate between listed items
* Use `Enter` to select an item
* Use `Backspace` to move to parent menu
* Use `Esc` to close the menu
## General shortcuts
| Key | Behaviour |
| ----------: | :---------------------------- |
| `alt` + `t` | Opens new table modal |
| `alt` + `c` | Opens new field modal |
| `alt` + `f` | Toggles fullscreen mode |
| `alt` + `i` | Opens share button modal |
| `⌘` + `k` | Opens Quick Actions modal |
| `⌘` + `l` | Opens Recent Views modal |
| `⌘` + `j` | Opens Search in Docs modal |
| `⌘` + `/` | Opens Keyboard shortcut modal |
## Grid view shortcuts
| Key | Behaviour |
| ----------------: | :----------------------------------------------------------------------------------- |
| `←` `→` `↑` `↓` | General cell navigation |
| `Delete` | Clear cell |
| `Space` | Expand current record |
| `Shift` + `Space` | Expand current cell |
| `Tab` | Move to next cell horizontally; if on last cell, move to beginning of next record |
| `Esc` | Exit cell EDIT mode |
| `Enter` | Switch cell in focus to EDIT mode; opens modal/picker if cell is associated with one |
| `⌘` + `↑` | Jump to first record in this field (in same page) |
| `⌘` + `↓` | Jump to last record in this field (in same page) |
| `⌘` + `←` | Jump to first field in this record |
| `⌘` + `→` | Jump to last field in this record |
| `⌘` + `c` | Copy cell contents |
| `⌘` + `v` | Paste copied contents |
| `alt` + `r` | Inserts new record in grid view |
| `alt` + `↑` | Jump to last page in this view (obsolete) |
| `alt` + `↓` | Jump to first page in this view (obsolete) |
| `alt` + `←` | Jump to previous page in this view (obsolete) |
| `alt` + `→` | Jump to next page in this view (obsolete) |
## Field type specific shortcuts
| Datatype | Key | Behaviour |
| :---------------------------: | ----------: | :--------------------------------- |
| Text & Numerical cells | `←` `→` | Move cursor to the left / right |
| | `↑` `↓` | Move cursor to the beginning / end |
| Single Select | `↑` `↓` | Move between options |
| | `Enter` | Select option |
| Multi Select | `↑` `↓` | Move between options |
| | `Enter` | Select / deselect option |
| Link | `↑` `↓` | Move between options |
| | `Enter` | Link current selection |
| Checkbox | `Enter` | Toggle |
| Rating | `<0 ~ Max>` | Enter number to toggle rating |
| Date / Time / DateTime / Year | `⌘` + `;` | Select today's date |
## Expanded form shortcuts
| Key | Behaviour |
| ------------: | :-------------------------------- |
| `⌘` + `Enter` | Save current expanded form item |
| `alt` + `→` | Switch to next record |
| `alt` + `←` | Switch to previous record |
| `alt` + `S` | Save current expanded form record |
| `alt` + `N` | Create a new record |
# License
URL: /docs/product-docs/getting-started/license
Understanding NocoDB’s Sustainable Use License (SUL) and Fair-Code principles.
As of **January 09, 2026** - NocoDB is transitioning from **AGPL-3.0** to a **Sustainable Use License (SUL)**, based on **[Fair-Code](https://faircode.io/) principles**.
👉 View the full license terms [here](https://github.com/nocodb/nocodb?tab=License-1-ov-file#readme)
This change is intended to:
* Keep NocoDB open and accessible
* Protect the work of maintainers and contributors
* Ensure long-term sustainability of the project
* Provide clear and predictable rules for commercial usage
## Fair-Code Philosophy
**Fair-Code** is a licensing philosophy that balances:
* Open access to source code
* Freedom to use, modify, and self-host
* Fair compensation when the software itself is monetized
Fair-code does **not** aim to restrict usage. Its goal is to prevent large-scale commercial exploitation where the software is monetized without supporting the people building it.
## Sustainable Use License (SUL)
The **Sustainable Use License** is one implementation of fair-code principles.
### SUL allows
* Free use for individuals and organizations
* Full access to source code
* Self-hosting without restrictions
* Modification for internal or product use
### SUL restricts
* Offering NocoDB itself as a paid or managed service
* Redistributing NocoDB as part of a commercial platform without a license
## Why This Change
### Sustainability
AGPL-3.0 permits commercial reuse at scale without ensuring ongoing support for maintainers. SUL enables continued investment in development, documentation, and support.
### Community Protection
The license protects contributors by ensuring that commercial value derived directly from NocoDB supports the ecosystem.
### Clear Commercial Boundaries
SUL clearly defines when commercial licensing is required, reducing ambiguity around SaaS and redistribution scenarios.
***
## Usage Rights
### Free Use (No Commercial License Required)
You may use NocoDB freely if you are:
* An individual developer
* A startup or enterprise using NocoDB internally
* Self-hosting NocoDB for internal tools or workflows
* Building an application or product that uses NocoDB internally
* Using NocoDB for education, research, or non-commercial purposes
Internal usage is permitted regardless of organization size.
***
### Commercial License Required
A commercial license is required if you:
* Offer NocoDB as a hosted or managed service
* Provide direct NocoDB access to external customers
* Resell or redistribute NocoDB as part of a paid offering
* Embed NocoDB in a platform where customers interact with NocoDB itself
If your business model monetizes **access to NocoDB**, a commercial license is required. If you need assistance determining your licensing needs, please contact the NocoDB team. Details [here](/docs/product-docs/getting-started/license#how-do-i-obtain-a-commercial-license)
***
## What Remains Unchanged
* Source code remains available
* Self-hosting remains supported
* Community contributions remain welcome
* APIs, integrations, and extensions remain open
This is **not** a move to closed source.
***
## Frequently Asked Questions
### Is NocoDB still open source?
NocoDB is **source-available under fair-code principles**. While SUL is not OSI-approved, it preserves transparency, extensibility, and community access.
### Can I self-host NocoDB for my company?
Yes. Internal self-hosting does not require a commercial license.
### Can I modify NocoDB’s source code?
Yes. You may modify NocoDB for internal use or as part of your product.
### What licenses are considered fair-code compatible?
The following licenses meet fair-code requirements and are commonly referenced in the ecosystem:
* **[Sustainable Use License (SUL)](https://github.com/n8n-io/n8n/blob/master/LICENSE.md?utm_source=chatgpt.com)**
* **[Business Source License (BSL)](https://mariadb.com/bsl11)**
* **[Commons Clause](https://commonsclause.com)** (with an OSI-approved license)
* **[Confluent Community License](https://www.confluent.io/confluent-community-license)**
* **[Elastic License 2.0 (ELv2)](https://www.elastic.co/licensing/elastic-license)**
* **[Server Side Public License (SSPL)](https://www.mongodb.com/licensing/server-side-public-license)**
### Which projects follow fair-code-compatible licenses?
Several well-known infrastructure and developer-tool projects use licenses aligned with fair-code principles, including:
* **[Airbyte](https://airbyte.com)** (Elastic License 2.0)
* **[CockroachDB](https://www.cockroachlabs.com)** (Business Source License)
* **[Elastic](https://www.elastic.co)** (Elastic License 2.0)
* **[HashiCorp](https://www.hashicorp.com)** (Business Source License)
* **[MongoDB](https://www.mongodb.com)** (Server Side Public License)
* **[n8n](https://n8n.io)** (Sustainable Use License)
* **[Sentry](https://sentry.io)** (Business Source License)
These projects follow a similar approach: open access for builders, with licensing required when the software itself is monetized.
### Why move away from AGPL-3.0?
AGPL-3.0 does not sufficiently address large-scale commercial redistribution. SUL provides clearer, more predictable rules while preserving openness and community access.
### How do I obtain a commercial license?
Contact the NocoDB team through official channels to discuss commercial licensing options.
* Use in-product support chat for inquiries.
* Request details over Email ([cs@nocodb.com](mailto:cs@nocodb.com)).
* Book a meeting via [Cal](https://cal.com/nocodb/sales).
## Summary
The Sustainable Use License ensures that NocoDB remains:
* Open and accessible for builders
* Fair to contributors and maintainers
* Sustainable for long-term development
For most users, **nothing changes**. For commercial redistribution, licensing ensures fairness and continued innovation.
***
# NocoDB terminologies
URL: /docs/product-docs/getting-started/terminologies
Familiarize yourself with key terms used across NocoDB.
## Layout
The layout below shows the main parts of NocoDB's user interface.
1. **Minibar**: The vertical bar on the far left with icons for quick access to Search, Workflows, Integrations, Help, and Settings.
2. **Sidebar**: Displays the base name (e.g., "Sales CRM"), a **Create New** button, and a tree of all tables and their views. Each table and view shows its icon for easy identification.
3. **Navbar**: The horizontal bar at the top showing the current breadcrumb path (Base > Table > View), along with tabs for **Data**, **Details**, and **Extensions**, and the **Share** button.
4. **Toolbar**: Located below the Navbar, provides tools for the current view — **Fields**, **Filter**, **Group**, **Sort**, **Colour**, row height, and search.
5. **View Area**: The central workspace displaying records in the selected view format (Grid, Form, Gallery, Kanban, Calendar, Timeline, List, or Map). In Grid view, data is shown in rows and columns with fields like Activity, Type, Date, Outcome, and Notes.
6. **Footbar**: The bottom bar showing the total record count and field aggregations (e.g., Filled, Min, Percent Filled) when configured.
## Terminologies
### Core Concepts
| Term | Description |
| ------------- | --------------------------------------------------------------------------------------------------------------------------------------------------------- |
| **Workspace** | Top-level organizational unit that contains one or more bases. Manages user access and permissions across all bases within it. |
| **Base** | A container for one or more related data sources, each comprising multiple tables. Think of a base as a project workspace for organizing structured data. |
| **Table** | Organizes data into rows (records) and columns (fields). Each table represents a distinct entity and can be linked to other tables through relationships. |
| **Field** | A named column within a table that holds values of a specific type (e.g., text, number, date). All records in a table share the same set of fields. |
| **Record** | A single entry in a table, represented as a row. Contains values across multiple fields. |
| **Cell** | The intersection of a row and a column. Holds the actual value of a field in a specific record. |
### Views
| Term | Description |
| ---------------------- | --------------------------------------------------------------------------------------------------------------------------------------------------------- |
| **View** | Defines how records in a table are displayed and interacted with. Each table can have multiple views with their own filters, sorts, and field visibility. |
| **Grid View** | Default spreadsheet-like view displaying data in rows and columns. |
| **Form View** | Presents fields as a form for data collection. Can be shared publicly. |
| **Gallery View** | Displays records as cards, useful for visual content like images or profiles. |
| **Kanban View** | Organizes records into columns based on a Single Select or User field, useful for tracking status or stages. |
| **Calendar View** | Displays records on a calendar based on a date field. |
| **Timeline View** | Shows records along a horizontal timeline based on date ranges. |
| **List View** | Hierarchical outline view that displays records organized through LTAR relationships. |
| **Map View** | Plots records on a map using a Geometry or GeoData field. |
| **Shared View** | A publicly accessible link to a view, optionally password-protected. |
| **Collaborative View** | A view shared across all base members, where changes to filters, sorts, or field visibility are visible to everyone. |
| **Locked View** | A view where the configuration (filters, sorts, field visibility) is locked and cannot be modified. |
| **Personal View** | A private view visible only to the user who created it. |
### Relationships & Computed Fields
| Term | Description |
| --------------------------------- | --------------------------------------------------------------------------------------------------------------------------- |
| **Link To Another Record (LTAR)** | A field type that creates a relationship between two tables, allowing records in one table to reference records in another. |
| **Lookup** | A field that retrieves and displays a value from a linked table via an LTAR relationship. |
| **Rollup** | A field that aggregates values (e.g., sum, count, average) from linked records in another table via an LTAR relationship. |
| **Formula** | A computed field whose value is derived from an expression involving other fields, operators, and built-in functions. |
### Automation & Integrations
| Term | Description |
| --------------- | ------------------------------------------------------------------------------------------------------------------------------------------------------- |
| **Webhook** | Sends data to a specified URL when a configured event occurs (e.g., record created, updated, or deleted), enabling integrations with external services. |
| **Workflow** | A visual automation that runs a sequence of actions in response to a trigger event, with support for conditions, loops, and delays. |
| **Script** | A JavaScript-based automation that can read and modify data across tables, fields, and records programmatically. |
| **Integration** | A configured connection to an external service or data source that NocoDB can interact with. |
| **Data Source** | An external database (e.g., PostgreSQL, MySQL) connected to a base, allowing NocoDB to read and write data directly. |
### Extensions & Features
| Term | Description |
| ------------- | ---------------------------------------------------------------------------------------------------------------------------------- |
| **Dashboard** | A visual canvas for building charts and widgets that summarize data from your tables. |
| **Extension** | An add-on app that provides additional functionality such as Bulk Update, Data Exporter, Dedupe, Org Chart, or Page Designer. |
| **NocoDocs** | Built-in document editor with rich text formatting, comments, AI writing assistance, and granular permissions. |
| **NocoAI** | AI-powered assistant that helps create bases, tables, fields, views, filters, formulas, and select options using natural language. |
| **NocoSync** | Syncs data from external tools like GitHub, GitLab, Bitbucket, and Linear into NocoDB tables. |
### Roles & Permissions
| Term | Description |
| -------------------- | ---------------------------------------------------------------------------------------------------------------------------- |
| **Workspace Owner** | The user who created the workspace. Has full administrative privileges including managing members, roles, and billing. |
| **Workspace Member** | A user with access to the workspace. Can be assigned roles such as Owner, Creator, Editor, Commenter, or Viewer. |
| **Base Owner** | The member who created the base or was assigned the owner role. Has full control over the base configuration and data. |
| **Base Member** | A user with access to a base, assigned a role that defines their permissions (Owner, Creator, Editor, Commenter, or Viewer). |
### UI Elements
| Term | Description |
| ------------------- | ---------------------------------------------------------------------------------------------------------------------------------------------- |
| **Expanded Record** | A detailed view of a single record, showing all fields and their values in a panel or modal. |
| **Modal** | A UI overlay for a specific task such as editing a record or confirming an action. Blocks access to the rest of the interface until dismissed. |
# Actions on connection
URL: /docs/product-docs/integrations/actions-on-connection
Learn how to perform actions (edit, duplicate, delete) on a connection in NocoDB.
## List
To list all the connections in NocoDB, follow the steps below:
1. Select the **Integrations** menu in the left sidebar.
2. Click on the **Connections** tab
Connections list provides a consolidated view of all the connections in this workspace. The details include
* Connection name, as specified during creation
* Connection type, i.e., the integration type \[Example: PG, MySQL]
* Date added, specifies the date when this connection was created
* Added by, specifies the user who created this connection
* Usage, depends on the type of the integration
* for database type integrations, this would specify the number of data sources using this connection
Note that, there is no ownership concept for connections in NocoDB. All the connections created in a workspace are accessible to all eligible users in that workspace.
* Users with Workspace Creator+ permissions can create, edit, duplicate, and delete connections
* Users with Base Creator+ permissions can create data sources using these connections
## Edit
To edit a connection in NocoDB, Open the [Connections list](#list) and follow the steps below:
* Click on the Connection you want to edit
* Modify the required details in the subsequent modal
* **Test connection** if applicable
* Applicable if you have updated the connection details for a database integration
* Click on the **Update connection** button to save the changes
## Duplicate
To duplicate a connection in NocoDB, Open the [Connections list](#list) and follow the steps below:
1. Click on the Action menu (three dots) against the Connection you want to duplicate
2. Select the **Duplicate** option from the dropdown
Duplicated base will be created with the same connection details as the original connection - with connection name for the duplicated entry suffixed with **\_copy**.
## Delete
To delete a connection in NocoDB, Open the [Connections list](#list) and follow the steps below:
1. Click on the Action menu (three dots) against the Connection you want to delete
2. Select the **Delete** option from the dropdown
3. Click on the **Delete** button in the subsequent modal to confirm deletion
Note that, deleting a database connection **will remove all the associated data sources using this connection** from all the bases in this workspace.
# Connect to an Integration
URL: /docs/product-docs/integrations/create-connection
Learn how to create a new connection in NocoDB.
Users with Workspace Owner or Workspace Creator roles can create a new connection in NocoDB. To create a new connection, follow the steps below:
1. Click on the `Integrations` menu in the left minibar.
2. From the list, click on the integration you want to connect to
3. In the subsequent modal, provide required details. Please refer to the integration-specific documentation for more details.
* [PostgreSQL](#postgresql)
* [MySQL](#mysql)
Connection to an integration thus created will be listed in the `Connections` tab under the `Integrations` menu.
Note that, there is no ownership concept for connections in NocoDB. All the connections created in a workspace are accessible to all eligible users in that workspace.
* Users with **Workspace Creator+** permissions can create, edit, duplicate, and delete connections
* Users with **Base Creator+** permissions can create data sources using database connections
## Database Integrations
### PostgreSQL
This section covers the details required to create a new PostgreSQL connection in NocoDB.
1. **Connection Name**: Name for this connection for display on NocoDB UI
2. Key in following database connection configuration details
* **Host Address**: Hostname of the PostgreSQL server
* **Port Number**: Port number of the PostgreSQL server, default is 5432
* **Username**: Username to connect to the PostgreSQL server, default is "postgres"
* **Password**: Password to connect to the PostgreSQL server
* \[Optional] **Database**: Name of the PostgreSQL database to connect to
* \[Optional] **Schema Name**: Name of the schema to connect to
:::info
Note, Database name & Schema name are optional fields when creating a connection. If provided, these details will be filled in by default when creating a new data source using this connection.
:::
3. **Connection parameters**: required if any, can be added as Key-Value pairs
4. **SSL Mode**: This step is required if the connection required is TLS/MTLS for MITM protection. Toggle to enable SSL for the connection & select the SSL mode
* **Client Certificate**: Upload the client certificate file
* **Client Key**: Upload the client key file
* **Root CA**: Upload the Root CA file
5. **Test Database Connection**: Click to verify the connection
6. **Create Connection**: Click to save the data source
The connection thus created will be listed in the `Connections` tab under the `Integrations` menu.
You can autofill the connection details if you have a connection URL.
The entire connection parameters can be viewed in JSON form by clicking on the **Advanced Options** and edited as required by database server type.
**Example**: When SSL mode set to "Required-Identity," if the server certificate's common name (cname) differs from the actual DNS/IP used for connection, the connection will fail. To resolve, add "servername" property with same cname value under the SSL section. Additional details are available at [knex configuration options](https://knexjs.org/guide/#configuration-options).
### MySQL
This section covers the details required to create a new MySQL connection in NocoDB.
1. **Connection Name**: Name for this connection for display on NocoDB UI
2. Key in following database connection configuration details
* **Host Address**: Hostname of the MySQL server
* **Port Number**: Port number of the MySQL server, default is 3306
* **Username**: Username to connect to the MySQL server, default is "root"
* **Password**: Password to connect to the MySQL server
* \[Optional] **Database**: Name of the MySQL database to connect to
Database name is optional when creating a connection. If provided, it will be filled in by default when creating a new data source using this connection
3. **Connection parameters**: required if any, can be added as Key-Value pairs
4. **SSL Mode**: This step is required if the connection required is TLS/MTLS for MITM protection. Toggle to enable SSL for the connection & select the SSL mode
* **Client Certificate**: Upload the client certificate file
* **Client Key**: Upload the client key file
* **Root CA**: Upload the Root CA file
5. **Test Database Connection**: Click to verify the connection
6. **Create Connection**: Click to save the data source
The connection thus created will be listed in the `Connections` tab under the `Integrations` menu.
You can autofill the connection details if you have a connection URL.
The entire connection parameters can be viewed in JSON form by clicking on the **Advanced Options** and edited as required by database server type.
**Example**: When SSL mode set to "Required-Identity," if the server certificate's common name (cname) differs from the actual DNS/IP used for connection, the connection will fail. To resolve, add "servername" property with same cname value under the SSL section. Additional details are available at [knex configuration options](https://knexjs.org/guide/#configuration-options).
***
## Communication Integrations
### Twilio
This section covers the details required to create a new Twilio integration in NocoDB.
1. **Integration Name:**
Enter a name for this integration as it should appear in the NocoDB UI
2. **Authentication Type:**
Select **API credentials** as the authentication method.
3. **Account SID:**
Enter your Twilio **Account SID**.
This can be obtained from the [Twilio Console](https://console.twilio.com/) under **Account Info**.
4. **Auth Token**
Enter your Twilio **Auth Token**, available in the [Twilio Console](https://console.twilio.com/) under **Account Info**.
Ensure this value is stored securely.
5. **Test Connection**
Click **Test connection** to verify that the provided credentials are valid and that NocoDB can connect to Twilio.
6. **Create Integration**
Click **Create integration** to save the connection.
Once created, the Twilio integration will be listed in the `Connections` tab under the `Integrations` menu and can be used across eligible features that support Twilio.
For trial Twilio accounts, messaging and calls are limited to verified phone numbers, as enforced by Twilio.
**References**
* [Twilio Console](https://console.twilio.com/)
* [Twilio Documentation](https://www.twilio.com/docs/)
***
# Integrations
URL: /docs/product-docs/integrations
Overview of the integrations available in NocoDB
**Integrations** enable seamless connectivity between NocoDB and external platforms. This helps consolidate your data scattered across multiple silos into one common platform.
You can add multiple instances of an integration within a single workspace, with each instance referred to as a **Connection**. Once established, these connections allow you to utilize data from the integrated platforms in your NocoDB base. If applicable, changes made in NocoDB can also be synchronized back to the external platforms.
Currently, NocoDB supports integrations with databases such as *MySQL* and *PostgreSQL*, with additional integrations planned for the future. If you have a specific integration in mind, please let us know by submitting your request using "**Request Integration**" option in the `Integrations` menu.
* In Cloud hosted solutions, Integrations menu will be accessible for Workspace Owners & Workspace Creators.
* In Self-hosted solutions (OSS), Integrations menu will be accessible for Organization Admins & Organization Creators.
All activities related to integrations and their connections can be efficiently managed from the `Integrations` menu, conveniently located in the left sidebar.
Learn more about working with integrations in the following sections:
* [Create a new connection](/docs/product-docs/integrations/create-connection)
* [Edit connection](/docs/product-docs/integrations/actions-on-connection#edit)
* [Delete connection](/docs/product-docs/integrations/actions-on-connection#delete)
# Create Base using AI
URL: /docs/product-docs/noco-ai/create-base
Quickly generate a fully-structured base using natural language prompts with NocoAI
This feature is available only on NocoDB Cloud. It is not supported in self-hosted or on-premise deployments.
## Overview
NocoAI lets you instantly generate a complete base — including tables, views, fields, and relationships — just by describing your needs in natural language. Perfect for non-technical users, fast prototyping, and workflow automation.
***
## Steps to Create a Base Using AI
1. Click **Create Base**
From the left sidebar, click **+ Create Base**.
2. Choose **Build Base with AI**
In the dialog, select **✨ Build Base with AI** to use AI-powered base generation.
3. Select a **Use Case** *(Optional)*
Choose a predefined use case to auto-fill a sample prompt.
4. OR **Write Your Own Prompt**
You can edit the suggested prompt or enter your own.
For example:
> Streamline the hiring process by managing candidate applications, scheduling interviews, and tracking hiring outcomes.
5. Add **Additional Context** *(Optional)*
Provide more details like organization name, industry, and audience to help tailor AI results.
6. Click **Suggest Tables & Views**
NocoAI will analyze your prompt and generate the recommended schema.
7. **Review** Tables and Views
You’ll see all suggested tables and their associated views.
8. **Review Relationships** using ERD
Switch to the **Relationship Diagram** tab to view an auto-generated ERD (Entity Relationship Diagram).
9. Click **Create Base**
Once you’re happy with the structure, click **Create Base** to finalize and start using it.
## Tips for Better AI Suggestions
* **Be clear and specific**\
Avoid vague descriptions like “make a project tracker.” Instead, try:
> Track multiple projects with assigned team members, tasks, deadlines, and project status updates.
* **Mention key entities and relationships**\
Include what you want to manage and how they relate.
> Each candidate can apply to multiple job openings and be scheduled for multiple interviews.
* **Add extra context**\
Use fields like **Industry** or **Audience** to help guide the AI.
* **Start simple, refine later**\
You can edit the prompt and regenerate suggestions if needed.
***
## Next Steps
Now that your base is created, explore additional NocoAI capabilities:
* AI-assisted **[View Suggestions](/docs/product-docs/noco-ai/create-view)**
* AI-assisted **Field Suggestions**
* Prompt-based **Formula Generation**
* Smart **Select Option** predictions
Let AI do the heavy lifting, so you can focus on what matters.
# Create Fields using AI
URL: /docs/product-docs/noco-ai/create-field
Automatically generate relevant fields for your tables using NocoAI.
This feature is available only on NocoDB Cloud. It is not supported in self-hosted or on-premise deployments.
## Overview
With NocoAI, you can instantly generate a set of fields for your table by describing the kind of data you want to manage. Whether you're setting up a simple list or a complex workflow, NocoAI helps you get started with the right fields in seconds.
***
## Steps to Create Fields Using AI
Open any existing table where you want to add fields.
1. Open **+ Add Field** modal
In the table header, click the **+** button to the right of the field list.
2. Use **NocoAI Suggestions**
In the field creation dialog, select **✨ Use NocoAI** to get AI-powered suggestions.
3. Choose from Suggested Fields
NocoAI will analyze your table name, existing fields, and related context to recommend relevant fields. You can edit field names, types, and options as needed.
4. Click **Create \[X] Fields**
Select the ones you need and confirm to add them to your table.
***
## Tips for Better AI Suggestions
* **Name your table clearly**
For example, use "Job Applications" instead of "Table 1" to help NocoAI make better field recommendations.
* **Think in terms of attributes**
Consider what information each record should store.
*Example*: A “Candidate” table may need Full Name, Email, Phone, Resume, Status, and Applied Date.
* **Leverage existing fields**
NocoAI takes into account your current setup to avoid duplicates and suggest only what's missing.
* **Use it iteratively**
You can always run field suggestions multiple times as your table evolves.
***
## Example Scenarios
Here are examples of what NocoAI might suggest based on table name:
| Table Name | Suggested Fields |
| ------------------ | ------------------------------------------------------ |
| `Leads` | Name, Email, Source, Status, Last Contacted |
| `Tasks` | Title, Due Date, Priority, Assigned To, Status |
| `Job Applications` | Candidate Name, Resume, Email, Phone, Application Date |
***
## What's Next
Now that your fields are ready, you can:
* Use **[NocoAI View Suggestions](/docs/product-docs/noco-ai/create-view)** to visualize data more effectively
* Create **[Formulas using AI](/docs/product-docs/noco-ai/create-formula)** to automate calculations and logic
Let NocoAI take care of the structure — so you can focus on your workflow.
# Filter Records using AI
URL: /docs/product-docs/noco-ai/create-filter
Use natural language to filter your table data with NocoAI.
This feature is available only on NocoDB Cloud. It is not supported in self-hosted or on-premise deployments.
## Overview
With **NocoAI**, you can now describe what data you want to see in plain English, and have the right filter conditions applied automatically. Instead of manually configuring filter operators, values, and conditions, simply type a description like *"Show high priority tasks due this week"* and NocoAI will set up the filters for you.
This is perfect for quickly narrowing down records, exploring data without remembering filter syntax, or letting non-technical users build complex filter conditions effortlessly.
***
## Steps to Filter Records Using AI
1. Open the **Filter** menu
Click the **Filter** button in the toolbar above your table to open the filter panel.
2. **Describe** what you want to see
At the top of the filter panel, you'll see an AI-powered text input with a ✨ icon. Type a natural-language description of the records you want to see.
*Example*:
> Show high priority tasks that are due this week
3. Press **Enter** or click **Send**
NocoAI will analyze your table's structure and generate the appropriate filter conditions.
4. **Filters are applied automatically**
The generated filters appear in the filter panel and are applied to your view immediately — no extra confirmation needed.
***
## Supported Actions
NocoAI understands your intent and can perform three types of filter actions:
| Action | When it's used | Example prompt |
| ----------- | --------------------------------------------- | ----------------------------------------- |
| **Add** | Append new filters to existing ones | "Also show rows where Status is Done" |
| **Replace** | Remove all current filters and apply new ones | "Show only rows where Score is above 80" |
| **Clear** | Remove all existing filters | "Remove all filters" or "Show everything" |
***
## Supported Filter Types
NocoAI can generate filters for a wide range of field types:
| Field Type | Example Prompts |
| ----------------------------------------------- | ------------------------------------------------------------- |
| **Text** (SingleLineText, Email, URL) | "Title contains meeting", "Title is either A or B" |
| **Number** (Number, Decimal, Currency, Percent) | "Price is greater than 100", "Score between 50 and 80" |
| **SingleSelect / MultiSelect** | "Status is either Todo or In progress", "Tags include urgent" |
| **Date / DateTime** | "Due this week", "Created after 2025-01-01", "Modified today" |
| **Checkbox** | "Show only checked items", "Where completed is unchecked" |
| **Rating** | "Rating is 4 or above" |
NocoAI also understands **AND** vs **OR** logic:
* "Priority is High and Status is not Done" → AND conditions
* "Title is either Alpha or Beta" → OR conditions
***
## Tips for Better AI Filters
* **Use exact field names when possible**
NocoAI matches against your table's column names. Using exact names produces more accurate results.
*Example*: If your column is called "Due Date", say *"Due Date is this week"* instead of *"due soon"*.
* **Be specific about values**
For select fields, use exact option values.
*Example*: *"Status is In progress"* works better than *"status is active"* if your options are `Todo`, `In progress`, `Done`.
* **Use keywords for clear/replace**
To remove filters, say *"clear filters"*, *"remove all filters"*, *"show everything"*, or *"reset"*.
To replace existing filters entirely, start with *"show only ..."* or *"instead show ..."*.
* **Start simple, then refine**
You can add filters incrementally. Start with *"Status is Todo"*, then follow up with *"also where Priority is High"*.
* **Match filter type with field type**
Make sure your condition aligns with the field type. Example: Using a filter like *"Price \< 50"* will not work if the Price field is a text field. Numeric comparisons only work on number-based fields.
## Example Prompts and Outcomes
| Prompt | Generated Filters |
| --------------------------------- | ------------------------------------------------- |
| "Show high priority tasks" | Priority `is equal` High |
| "Title is either Alpha or Beta" | Title `is equal` Alpha `OR` Title `is equal` Beta |
| "Status is Todo or In progress" | Status `is any of` Todo, In progress |
| "Due this week" | Due Date `is within` next week |
| "Items with no status" | Status `is blank` |
| "Remove all filters" | All existing filters cleared |
| "Show only rows where Score > 80" | Existing filters replaced with Score `>` 80 |
## What's Next
Now that you can filter records with AI, explore more NocoAI capabilities:
* Create **[Views using AI](/docs/product-docs/noco-ai/create-view)** to set up useful views for your data
* Create **[Fields using AI](/docs/product-docs/noco-ai/create-field)** to auto-generate relevant columns
* Generate **[Formulas using AI](/docs/product-docs/noco-ai/create-formula)** to automate calculations
Let NocoAI handle the filter logic while you focus on your data.
***
# Generate Formulas using AI
URL: /docs/product-docs/noco-ai/create-formula
Use natural language prompts to generate formulas with NocoAI.
This feature is available only on NocoDB Cloud. It is not supported in self-hosted or on-premise deployments.
## Overview
Writing formulas can be complex and time-consuming. With **NocoAI**, you can now describe the logic you need in plain English, and have a formula generated for you automatically.
This is perfect for non-technical users, power users who want to speed up formula creation, or anyone looking to avoid syntax errors.
***
## Steps to Generate Formulas Using AI
1. Add a **Formula Field**
In your table, add field and select **Formula** as the type.
2. Click **Formula Helper**
Inside the formula editor, click **✨ Formula Helper** to open the prompt-based generation interface.
3. **Describe** the Logic in Natural Language
Write a simple prompt explaining what the formula should do.
*Example*:
> Show "✅ Done" if Status is "Completed", else show "⏳ In Progress".
4. Review and click **Generate**
NocoAI will generate the formula based on your prompt in the formula editor. You can review and modify if needed.
5. Click **Save**
Once you're happy with the result, save the field.
***
## Tips for Better Formula Suggestions
* **Be precise in your prompt**
Mention exact field names and values where possible.
*Example*:
> Calculate number of days between Start Date and End Date.
* **Use conditional phrases**
Help the AI understand intent.
*Example*:
> If Priority is "High" and Status is not "Completed", show "⚠️ Urgent".
* **Refer to data types clearly**
Indicate if you’re working with dates, numbers, checkboxes, or text.
*Example*:
> Add 7 days to the Created Date.
***
## Example Prompts and Outcomes
| Prompt | Resulting Formula (Example) |
| -------------------------------------------------- | ------------------------------------------------- |
| If Status is "Done", show "✅", else show "⏳" | `IF({Status} = "Done", "✅", "⏳")` |
| Show the number of days between Start and End Date | `DATETIME_DIFF({End Date}, {Start Date}, "days")` |
| If Due Date is past today, mark as "Overdue" | `IF({Due Date} < TODAY(), "Overdue", "")` |
| Combine First Name and Last Name into one field | `CONCAT({First Name}, " ", {Last Name})` |
***
## What’s Next
Once your formula field is ready, you can:
* Use **[NocoAI View Suggestions](/docs/product-docs/noco-ai/create-view)** to visualize data based on these formulas
* Create **[Fields using AI](/docs/product-docs/noco-ai/create-field)** to automatically generate relevant fields for your table
NocoAI simplifies complex logic so you can stay focused on building great workflows!
# Create Options using AI
URL: /docs/product-docs/noco-ai/create-options
Automatically generate field options for select fields using NocoAI.
This feature is available only on NocoDB Cloud. It is not supported in self-hosted or on-premise deployments.
## Overview
When working with **Single Select** or **Multi Select** fields, you can now let **NocoAI** suggest relevant options based on your field name and table context. This helps reduce manual work and ensures meaningful, consistent values.
***
## Steps to Create Options Using AI
1. Add a **Single Select** or **Multi Select** Field
Click the + icon in the top-right corner of the field header in your table, then select either 'Single Select' or 'Multi Select'. Provide a clear and descriptive field name that reflects the type of options required.
2. Click **Auto Suggest**
Inside the field configuration modal, click the **✨ Auto Suggest** button to fetch option suggestions.
3. **Review** Suggested options
NocoAI will analyze your field name and table context to generate a list of relevant options. You can add, remove, or edit the suggested values before saving.
4. Click **Save Field**
Finalize your configuration to add the field and its options to your table.
***
## Tips for Better AI Suggestions
* **Use a descriptive field name**
Example: Instead of "Type", use "Application Status" or "Task Priority".
* **Set table context**
The more specific your table name and existing fields are, the better the suggestions.
*Example*: In a table named “Tasks”, a field called “Priority” will likely suggest: `Low`, `Medium`, `High`.
* **Apply business terms**
Use industry-appropriate terminology in your field name to guide the AI.
*Example*: For a field called “Candidate Stage”, suggestions might include: `Applied`, `Screened`, `Interviewed`, `Hired`.
***
## Example Use Cases
| Table | Field Name | Suggested Options |
| ------------ | ------------------ | -------------------------------------------------- |
| `Tasks` | Priority | Low, Medium, High, Critical |
| `Candidates` | Application Status | Applied, Shortlisted, Interviewed, Hired, Rejected |
| `Projects` | Phase | Initiation, Planning, Execution, Closure |
| `Feedback` | Sentiment | Positive, Neutral, Negative |
***
## What’s Next
Now that your select fields are powered with meaningful options, you can:
* Create **[Views using AI](/docs/product-docs/noco-ai/create-view)** to visualize data based on these options
* Use **[Formulas using AI](/docs/product-docs/noco-ai/create-formula)** to derive insights based on selected values
Let NocoAI handle the heavy lifting while you focus on building smarter workflows.
# Create Tables using AI
URL: /docs/product-docs/noco-ai/create-table
Use NocoAI to auto-generate tables and relationships based on natural language prompts.
This feature is available only on NocoDB Cloud. It is not supported in self-hosted or on-premise deployments.
## Overview
With NocoAI, you can automatically generate tables — including their fields and relationships — just by describing your system in plain language. Ideal for getting started quickly with a new database structure or adding new modules to an existing base.
***
## Steps to Create Tables Using AI
1. Open \*\* Create Table\*\* modal
From the left sidebar, Click **+ Create New**, select **Table**
2. Select **Use NocoAI**\
In the dialog, click on **✨ Use NocoAI** to begin the AI-assisted process.
3. Choose a Suggestion Mode
* **Auto Suggested**: NocoAI provides a set of suggested tables based on your current schema and context.
* **Use Prompt**: *(Coming Soon)* Describe what tables you want in your own words.
4. Click **Create \[X] Tables**\
Select the tables you want from the list and click **Create**.
***
***
## Tips for Better AI Suggestions
* **Use meaningful table names in your base**\
The AI looks at existing names and structures to recommend relevant tables.
* **Think in entities**\
Imagine the business objects you want to manage (e.g., Candidates, Applications, Feedback, Agencies) and how they connect.
* **Preview and refine**\
If the suggestions aren't accurate, use the **Suggest More** button to regenerate.
* **Add new modules incrementally**\
You can trigger NocoAI for different parts of your app — e.g., one time for recruiting, another for feedback — to build your schema progressively.
***
## What's Next
Once your tables are created:
* Use **[NocoAI View Suggestions](/docs/product-docs/noco-ai/create-view)** to generate meaningful views
* Create **[Fields using AI](/docs/product-docs/noco-ai/create-field)** to automatically generate relevant fields for each table
NocoAI gives you a head start — you can customize everything further to meet your needs.
# Create Views using AI
URL: /docs/product-docs/noco-ai/create-view
Learn how to auto-generate useful views for your table using NocoAI.
This feature is available only on NocoDB Cloud. It is not supported in self-hosted or on-premise deployments.
## Overview
You can now let **NocoAI** intelligently suggest useful views for your table, helping you get started faster and more efficiently.
***
## Steps to Create Views using AI
1. Click on **+ Create View** in the left sidebar.
2. Select **Use NocoAI** from the dropdown.
3. In the popup, go with:
* **Auto Suggested**: Choose from automatically generated view suggestions.
* **Use Prompt**: Manually describe what kind of views you need. (*Coming soon!*)
4. Click **Create \[X] views** to add them to your table.
You can also access this feature from the **Use NocoAI** button in the view creation modal.
***
## Tips for Better AI Suggestions
When using the **Auto Suggested** option, NocoAI analyzes your table's data and structure to provide relevant view suggestions. Here are some tips to get the most out of this feature:
* **Be descriptive**: Clearly state how you want the data grouped or filtered.
*Example*: “Show candidates grouped by status” or “Create a gallery view of job listings.”
* **Mention layout preferences**: Indicate the desired layout if any — Grid, Kanban, Calendar, etc.
* **Use data cues**: Reference field names or data patterns.
*Example*: “List interviews scheduled this week” or “Show recently updated resumes.”
***
## Example Prompts for "Use Prompt" Tab
* "Show candidates grouped by status in a Kanban view."
* "Create a calendar view for upcoming interviews."
* "List job openings that have more than 5 applicants."
* "Gallery of candidate profiles with photos and resumes."
***
Start leveraging NocoAI to create powerful views in just a few clicks!
# NocoAI
URL: /docs/product-docs/noco-ai
Smarter Apps, Instantly Built with AI
NocoAI is available on cloud deployments of NocoDB. It is currently not supported on self-hosted or on-premise installations.
NocoAI brings intelligent automation and AI-powered assistance to the heart of NocoDB. Designed to reduce manual setup and enhance productivity, NocoAI helps you build, extend, and manage your bases using natural language — no technical expertise required.
## Key Features
* **[Prompt-Based Schema Generation](/docs/product-docs/noco-ai/create-base)** : Build a complete base — including tables, fields, and views — by describing your needs in plain language.
* **[Table Recommendations](/docs/product-docs/noco-ai/create-table)** : Get suggestions for additional tables that align with your existing schema and use case.
* **[Field Recommendations](/docs/product-docs/noco-ai/create-field)** : Receive relevant field suggestions based on the context of the table you're editing.
* **[View Recommendations](/docs/product-docs/noco-ai/create-view)**
Enhance visibility with recommended views tailored to your table’s content.
* **[Select Options Recommendations](/docs/product-docs/noco-ai/create-options)** : When creating single or multi-select fields, NocoAI suggests logical values based on the field name.
* **[Prompt-Based Formula Generation](/docs/product-docs/noco-ai/create-formula)** : Generate complex formulas by describing the logic you need.
## Use Cases
NocoAI is designed for teams of all sizes and skill levels:
* **Non-technical users** can create databases without needing schema knowledge or coding.
* **Product teams** accelerate prototyping and iteration with AI-assisted schema suggestions.
* **Operations managers** get instant view recommendations to streamline workflows.
* **Data teams** automate calculated fields and reduce setup time.
Whether you're building a CRM, project tracker, or content calendar — NocoAI helps you go from idea to working database in seconds.
***
## Roadmap
NocoAI is just getting started. Upcoming enhancements will include:
* Natural language querying
* AI-driven automations
* Text generation
* Advanced recommendations across records and apps
***
## Get Started
To explore NocoAI, open any base or start a new one in NocoDB and look for the NocoAI features in the sidebar, table settings, or formula editor.
Have feedback or ideas? Share them with the NocoDB team using support chat to help shape the future of AI-powered databases.
# NocoSync
URL: /docs/product-docs/noco-sync
Bring external data into NocoDB effortlessly with automated syncs from tools your teams already use.
Available on NocoDB Cloud Business plan onwards and Self-Hosted Enterprise Edition.
**NocoSync** is a built-in integration layer in NocoDB that allows you to bring data from external systems directly into your workspace. It keeps your NocoDB tables continuously updated by syncing records from third-party platforms, eliminating the need for manual imports or custom scripts.
Current release introduces support for the **Ticketing** category, enabling you to connect with platforms such as **GitHub, GitLab, Bitbucket, Zendesk, Linear, Freshdesk, and Chatwoot**. Once connected, NocoSync pulls tickets, issues, conversations and related metadata into NocoDB, allowing teams to centralize reporting, automate workflows, and unlock insights across tools.
Additional sync categories—such as **CRM** (Customer Relationship Management), **HRIS** (Human Resources Information System, Accounting), **Accounting**, **ATS** (Application Tracking System) and **File Storage**—will be added in future releases, expanding the types of systems you can bring into NocoDB.
NocoSync runs on a simple setup, supports scheduled syncs, and ensures high reliability, so your workspace always reflects the most recent data from your external sources. It is designed to be flexible, scalable, and accessible to both technical and non-technical users.
***
## How Sync Works
NocoSync is designed around **predefined schemas** for each category, such as Ticketing, ensuring a consistent structure across all supported sources. When a sync is configured, NocoSync automatically creates multiple tables (such as *Ticket*, *User*, *Comment*, and *Team* in case of Ticketing). All required relationships between these tables are generated automatically, mirroring the hierarchy and linkages of the connected source system.
Sync table fields created by NocoSync are **read-only**, as the sync operates strictly one-way—from the source system into NocoDB. Fields that originate from the external source are marked with a flash icon (⚡) and cannot be removed, and sync tables themselves cannot be deleted. While schemas for each sync category are predefined, the actual fields available may vary by source. Different platforms use different naming conventions or may not expose all fields. NocoSync intelligently maps available fields from the source to the predefined schema to maintain consistency.
Users can extend sync tables by adding their own **custom fields** as needed. Beyond the read-only limitations on synced fields, sync tables behave like regular NocoDB tables. They can be shared with collaborators, used in views, and linked to other tables.
Currently, each sync category supports one external source at a time. When multi-source support is introduced, NocoDB will act as a **Unified API** layer across all connected systems, allowing you to query, analyze, and build on top of data coming from multiple platforms through a single, consistent interface. This will significantly simplify integrations and expand the power of NocoSync across complex environments.
Standard operations on Sync fields such as filtering, sorting, grouping, and searching are fully supported. You can create views, dashboards, and reports using synced data just like with any other NocoDB table.
***
## Sync Types
NocoSync provides two sync modes to **manage how data is fetched** from external platforms. These modes help you balance performance, accuracy, and API usage based on your operational needs.
### **Incremental Sync**
Incremental sync fetches only the records that have been created or updated since the last successful sync. This ensures faster sync cycles, minimal load on the external source, and reduced API consumption—making it the recommended option for routine, scheduled syncs. Incremental sync works by tracking timestamps or version markers provided by the source system.
### **Full Sync**
Full sync re-imports the entire dataset from the external source during each run. This mode is helpful in scenarios where historical data needs correction, or the source system does not reliably provide incremental change information. While full sync ensures complete data accuracy, it requires more time and can be resource-intensive—especially for large datasets. It is best used occasionally or in combination with incremental sync.
## Sync Trigger
NocoSync allows you to control when data synchronization should occur through two trigger modes: **manual** and **scheduled**.
### **Manual Sync**
Manual sync lets you trigger the synchronization process on demand. This option is useful when you want immediate updates—such as after making configuration changes, testing a new integration, or verifying data after modifying fields or relationships. Manual sync gives you full control without waiting for the next scheduled run.
### **Scheduled Sync**
Scheduled sync automates data updates at regular intervals, ensuring your NocoDB tables stay current without manual intervention. Scheduled sync currently supports two frequencies:
* **Hourly** – Runs once every hour, suitable for active systems where data changes frequently.
* **Daily** – Runs once every 24 hours, ideal for less dynamic datasets or reporting-focused use cases.
***
## Source Record Delete Handling
NocoSync provides control over how record deletions from the external source are reflected inside NocoDB. This setting helps you decide whether to maintain records for historical visibility or keep your tables strictly aligned with the source system.
### **Ignore**
When set to *Ignore*, NocoDB **retains the record** even if it is deleted at the source. Instead of removing it, NocoSync marks the record to indicate that it has been deleted in the external system. This mode is useful when you want to preserve full history, maintain reporting continuity, or avoid breaking dependencies with linked records.
### **Delete**
When set to *Delete*, NocoDB removes records in sync tables when they are deleted at the source. This option keeps your NocoDB tables fully synchronized and consistent with the external platform.
***
## Add new Sync
To add a new NocoSync integration to your base, follow these steps:
1. Open `Sync` tab from base overview page.
2. Click on the `+ New Sync` button.
3. Sync **Setup** : General configurations
* Sync name: Provide a name for your sync integration.
* [Sync type](/docs/product-docs/noco-sync#sync-types): Choose between **Incremental** or **Full** sync modes.
* [Sync trigger](/docs/product-docs/noco-sync#sync-trigger): Select either **Manual** or **Scheduled** sync. If scheduled, choose the desired frequency.
* [On delete](/docs/product-docs/noco-sync#source-record-delete-handling): Choose between **Ignore** or **Delete** to define how deletions from the source are managed.
4. Sync **Setup** : Category & Sync scope
* Select the **Ticketing** category.
* Choose to sync **All Tables** or **Select Tables** from the predefined schema. For Ticketing, essential tables like Ticket and User are always included.
5. Click on the `Next` button.
6. Sync **Source**
* Select the external platform you want to connect with.
* Optionally, provide a suitable name for the integration.
* Authenticate and authorize NocoDB to access your data on the selected platform. This involves creating a new connection or selecting an existing one for the integration source. Generate API tokens or OAuth credentials as required by the platform.
* Additional configuration options may appear based on the selected source, such as specifying repositories for Git-based platforms or selecting specific projects for ticketing systems.
7. Click on the `Next` button.
8. Sync **Review**
* Review all configurations made in the previous steps.
* If everything looks good, click on the `Create Sync` button to finalize the setup.
9. Logs appear displaying progress of the initial sync. Once complete, the sync tables will be available in your base.
The initial sync may take some time depending on the volume of data being imported. Subsequent syncs will be faster, especially when using incremental mode.
Currently, NocoSync supports adding one sync integration per category in a base. Multi-source support will be introduced in future releases.
***
## Edit Sync
To edit an existing NocoSync integration, open sync tab from base overview page and follow these steps:
1. Click on the sync you want to edit.
2. Modify the desired configurations in the sync setup or sync source steps. Note that, some fields like Sync category & Sync scope cannot be changed after creation.
3. Click on the `Update Sync` button to apply the changes.
## Delete Sync
To delete an existing NocoSync integration, open sync tab from base overview page and follow these steps:
1. Click on `Actions` button corresponding to the sync you want to delete.
2. Select `Delete Sync` from the dropdown menu.
3. Confirm the deletion in the prompt. This will remove the sync integration and all associated sync tables from your base.
Deleting a sync integration is irreversible and will permanently remove all associated sync tables and data from your base. Ensure you have backed up any important information before proceeding.
***
# Ticketing
URL: /docs/product-docs/noco-sync/ticketing
Bring ticketing data from popular platforms into NocoDB with automated syncs.
Available on NocoDB Cloud Business plan onwards and Self-Hosted Enterprise Edition.
Ticketing Sync enables you to import issues, tickets, comments, users, and team information from external platforms. It follows a predefined schema that standardizes ticketing data across systems, ensuring consistency even when naming conventions or field availability differ between sources.
Current supported sources include:
* GitHub
* GitLab
* Zendesk
* Linear
* Freshdesk
* Bitbucket
* Chatwoot
You may choose to sync **all tables** in the Ticketing schema or **only specific tables**. Syncing all tables provides full context and complete relationships, while syncing selected tables helps reduce sync time and resource usage based on your workflow needs.
***
## Available Tables
Each table is mapped to a well-defined set of fields to maintain a unified structure. NocoSync also includes relational fields that connect these tables as required. Ticket and User tables are essential and always included, while Comment and Team tables are optional.
### **Ticket**
Represents a ticket, issue, case, or task from the source platform.
**Key fields include:**
* **Description** – Summary or full content of the ticket.
* **Ticket Number** – Unique identifier from the source system.
* **Due Date** – Target completion date.
* **Priority** – Indicates urgency such as Low, Medium, High, or platform-specific values.
* **Status** – Current stage (Open, In Progress, Closed, etc.).
* **Tags** – Labels or metadata applied to the ticket.
* **Ticket Type** – Category such as Bug, Feature, Task, Case, etc.
* **URL** – Direct link to the ticket in the source app.
* **Is Active?** – Indicates whether the ticket is currently active.
* **Completed At** – Timestamp when the ticket was closed or resolved.
This table includes links to **Users**, **Teams**, and **Comments**, depending on the structure available in the connected source.
### **User**
Represents individuals associated with the ticketing system—such as creators, reporters, agents, assignees, or contributors.
**Key fields include:**
* **Email** – Email associated with the user.
* **URL** – Profile link to the user in the external system.
Users are linked to **Tickets** and **Comments** where applicable.
### **Comment**
Stores discussion entries, updates, or notes related to Tickets.
**Key fields include:**
* **Body** – Full comment text.
* **URL** – Link to the comment in the source system.
Comments are relationally connected to both **Tickets** and **Users**.
### **Team**
Represents groups, departments, or squads defined in the external platform.
**Key fields include:**
* **Description** – Summary or name of the team.
* **Members** – Users associated with the team.
Teams may be associated with **Tickets** or **Users**, depending on source capabilities.
***
## Metadata Fields
Each synced table in the Ticketing category includes a set of metadata fields that track the lifecycle, state, and origin of every record. These fields provide transparency into how data flows from the external source into NocoDB and play an essential role in traceability, debugging, and audit requirements.
These metadata fields are automatically managed by NocoSync and are read-only.
* **RemoteID**
Unique identifier of the record in the external source system.
* **RemoteCreatedAt**
Timestamp of when the record was originally created in the source.
* **RemoteUpdatedAt**
Timestamp of the most recent update made in the source.
* **RemoteDeleted**
Indicates whether the record has been deleted in the source platform.
This is used especially when the delete behaviour is set to **Ignore**.
* **RemoteDeletedTime**
Timestamp of when the record was deleted in the source, if applicable.
* **RemoteRaw**
Stores the raw payload received from the provider for that record.
Useful for troubleshooting, verification, or advanced integrations.
* **RemoteNamespace**
Identifies the origin project, workspace, or repository depending on the provider.
This is valuable for multi-project setups in GitHub, GitLab, Bitbucket, Zendesk groups, etc.
* **RemoteSynchedAt**
Last timestamp when NocoDB synced this specific record.
* **SyncConfigID**
Internal reference to the sync configuration used for this record.
* **SyncRunID**
Identifies the specific sync execution run that last updated this record.
* **SyncProvider**
Indicates which external service (GitHub, GitLab, Zendesk, etc.) the record originated from.
***
## Source Specific Details
Each supported ticketing platform has unique characteristics and field mappings. Below are some source-specific details to consider when configuring your Ticketing sync.
### GitHub
GitHub integration lets you bring issues, pull requests, and related project activity directly into your NocoDB workspace. Connect your GitHub account, pick the repositories you want to track, and NocoSync keeps your tables updated with the latest data.
After selecting GitHub as the sync source, you can:
* **Connect using an existing GitHub integration**
Authenticate once and reuse the connection across multiple syncs. Both OAuth and Personal Access Token methods are supported.
* **Choose one or more repositories**
Pull data from any repo you manage or collaborate on. You can select multiple repositories to consolidate issues and PRs in a single NocoDB base.
* **Include closed issues (optional)**
Sync both open and closed issues to maintain a complete project history. Closed issues are marked accordingly in the Ticket table.
* **Sync pull requests (optional)**
Bring in PRs alongside issues to track code reviews, merges, and engineering workflows. PRs are represented as tickets with a distinct type.
***
### GitLab
GitLab integration lets you sync project activity—issues, merge requests, comments, and more—directly into your NocoDB workspace.
After selecting GitLab as your sync source, you can:
* **Connect using an existing GitLab integration**
Authenticate once and reuse the connection across multiple projects and syncs. Alternatively, you can set up a new connection using OAuth or Personal Access Token methods.
* **Provide a GitLab Project ID**
Point the sync to any GitLab project you manage or contribute to. NocoDB validates and fetches data from that project automatically.
[Find the Project ID](https://docs.gitlab.com/user/project/working_with_projects/#find-the-project-id)
* **Include closed issues (optional)**
Sync both open and closed issues to maintain a complete historical record of progress, decisions, and resolutions.
* **Include merge requests (optional)**
Pull in merge requests alongside issues to track reviews, approvals, and code changes within your workspace.
***
### Zendesk
Zendesk integration brings your support operations into NocoDB, enabling teams to analyze tickets, measure response trends, and connect customer support data with internal workflows. With NocoSync, your Zendesk tickets stay continuously updated in a structured, queryable format.
Once you select Zendesk as your sync source, you can:
* **Connect using an existing Zendesk integration**
Authenticate once and reuse the connection for multiple sync configurations.
* **Define your integration name**
Label the sync clearly for your workspace, especially when managing multiple Zendesk accounts or environments.
* **Include closed tickets (optional)**
Sync both open and closed tickets to maintain a complete historical view of customer conversations, resolutions, and team performance.
Zendesk as a source helps centralize customer support insights—making it easier to audit ticket history, build dashboards, correlate support patterns with product issues, and drive proactive decision-making across teams.
***
### Linear
Linear sync brings your product, engineering, and project workflows directly into NocoDB—making it easy to analyze issues, track delivery patterns, and build custom reporting on top of your Linear data.
When setting up a Linear sync, you can:
* **Select your Linear connection**
Authenticate once and reuse the connection across different sync configurations.
* **Specify a team key**
Provide the Linear team identifier (e.g., *ENG*) to pull issues from a specific team. This helps maintain clear separation of data when working across multiple teams or departments. To find your team key, go to Linear → Settings → Teams → select your team → copy the Team Identifier (e.g., ENG).
* **Configure issue inclusion options**
* **Include canceled issues**
Sync canceled issues to maintain a complete historical timeline of project changes and prioritization decisions.
* **Include completed issues**
Sync completed issues for richer analytics on delivery timelines, resolutions, and sprint outcomes.
Linear as a source helps centralize product and engineering operations—allowing teams to correlate progress with other tools, audit issue lifecycle data, and build custom dashboards that reflect true project execution.
***
### Freshdesk
Freshdesk integration allows you to sync your customer support tickets, agents, and conversations directly into NocoDB. This enables your team to analyze support trends, measure performance, and connect customer data with internal workflows.
When configuring a Freshdesk sync, you can:
* **Connect using an existing Freshdesk integration**
Authenticate once and reuse the connection for multiple sync configurations. You can also set up a new connection using your Freshdesk domain and API key.
* **Include closed tickets (optional)**
Sync both open and closed tickets to maintain a complete historical view of customer interactions and resolutions.
***
### Bitbucket
Bitbucket integration enables you to sync issues, pull requests, and related project activity directly into your NocoDB workspace. This allows your team to track development progress, analyze issue trends, and build custom reports.
When setting up a Bitbucket sync, you can:
* **Connect using an existing Bitbucket integration**
Authenticate once and reuse the connection across multiple syncs. Both OAuth and App Password methods are supported.
* **Choose one or more repositories**
Pull data from any repository you manage or collaborate on. You can select multiple repositories to consolidate issues and pull requests in a single NocoDB base.
* **Include closed issues (optional)**
Sync both open and closed issues to maintain a complete project history. Closed issues are marked accordingly in the Ticket table.
* **Sync pull requests (optional)**
Bring in pull requests alongside issues to track code reviews, merges, and engineering workflows. Pull requests are represented as tickets with a distinct type.
***
### Chatwoot
Chatwoot integration allows you to sync conversations, messages, users, and teams directly into NocoDB. This enables your team to analyze customer interactions, measure response trends, and connect communication data with internal workflows.
When configuring a Chatwoot sync, you can:
* **Connect using an existing Chatwoot integration**
Authenticate once and reuse the connection for multiple sync configurations. You can also set up a new connection using your Chatwoot instance URL and API key.
* **Include resolved conversations (optional)**
Sync both open and resolved conversations to maintain a complete historical view of customer interactions and resolutions.
***
# Actions on record
URL: /docs/product-docs/records/actions-on-record
Learn how to perform actions (edit, duplicate, delete, etc) on a record in NocoDB.
## Keyboard navigation within Grid view
A selected cell can be in one of the following states:
1. `Select` state : A single click on the cell selects the cell. When in this state, arrow keys can be used to navigate to adjacent cells.
2. `Edit` state : A double click on the cell puts the cell in edit state. Cursor can be moved within the cell using arrow keys.
* Double-click on a cell to put it in edit state directly.
* From Select state, press `Enter` key to enter edit state.
* Press `Esc` key to exit edit state.
* From Edit state, press `Enter` key to save the changes.
Edit state for some cells will be a picker. For example, a cell with `Single Select` field type will have a picker with options to choose from. In such cases, arrow keys can be used to navigate between options.
### Keyboard shortcuts for cell navigation
| Key | Behaviour |
| --------------: | :----------------------------------------------------------------------------------- |
| `⌘` `↑` | Jump to first record in this field (in same page) |
| `⌘` `↓` | Jump to last record in this field (in same page) |
| `⌘` `C` | Copy cell contents to clipboard |
| `⌘` `V` | Paste clipboard contents to cell |
| `Enter` | Switch cell in focus to EDIT mode; opens modal/picker if cell is associated with one |
| `Esc` | Exit cell EDIT mode |
| `Delete` | Clear cell |
| `Space` | Expand current record |
| `←` `→` `↑` `↓` | General cell navigation : left, right, top, bottom |
| `Tab` | Move to next cell horizontally; if on last cell, move to beginning of next record |
### Update Record
You can start editing by any of the following methods
* Double-click on cell to edit
* Click on cell and start typing (this way it will clear the previous content)
* Click on cell and press enter to start editing
And it will automatically save on blur event or if inactive.
### Bulk Update Records ☁
You can bulk update records by
1. Selecting multiple records that you wish to update together and then
2. Right-click on the index field area (first column on the grid view) and then select `Bulk Update records` option from the context menu. This will open `Bulk update` modal.
On the bulk update modal,
3. `Fields area` : Select the fields that you want to update.
4. `Selected fields area` : Enter the new value for the selected fields.
5. Click on the `Bulk Update all` button
6. A confirmation dialog will be displayed. Click on `Confirm` to update the records.
**This action cannot be undone**
You can drag drop required fields from the
`Fields area`
to the
`Selected fields area`
& vice versa. You can update multiple fields at a time.
### Delete Record (Single)
Right-click on record and then from the cell context menu, select `Delete Record` option.
### Delete Record (Bulk)
Select multiple records by using the checkbox in first column and then `Delete Selected Records` options from the right click context menu.
### Drag and Drop to reorder records
You can reorder records by dragging and dropping them to the desired position. Use the drag icon on the left side of the record to drag and drop.
* Bulk record drag-drop reordering is not supported currently.
* Drag-drop is not supported in Group-by view currently.
# Create record
URL: /docs/product-docs/records/create-record
Learn how to create a record in NocoDB.
A new record can be added by using the `New Record` button in the bottom left corner of the grid view. Default behaviour of this button is to add a new empty record at the end of the grid view. Fields for a record can be populated by clicking on the cell and entering the value.
* An empty record can also be added by using `+` icon in the last record of the grid view.
* When on last record, `Enter` key can be used to add a new empty record to the grid view.
NocoDB also provides convenience of a form to populate fields in a record. To add a new record using a form,
1. Click on the up-arrow in `New Record` button; this expands options for adding a new record.
2. Select `New Record - Form` option. This will reconfigure default behaviour of `New Record` button to add a new record using a form.
To revert back to default behaviour of
`New Record`
button, click on the up-arrow in
`New Record`
button and select
`New Record - Grid`
option
### Insert Anywhere
You can insert a new record anywhere in the grid view by using right-click context menu. Click on any record and select from `Insert above` or `Insert below` options. A new empty record will be added above or below the selected record.
### Related topics
* [Expanded record view](/docs/product-docs/records/expand-record)
# Expanded record
URL: /docs/product-docs/records/expand-record
Learn how to expand a record & work with it in NocoDB.
## Overview
`Expanded record` allows you to edit a record data using a form layout. Apart from record information, it also consists of the activity feed such as user comments or record revision history (audit).
## Expanding a Record
To expand a record in a grid view, click on `expand` icon that appears on the first column (index column) on hover over a record.
Shortcut : Use space bar on any cell to expand associated record.
### Edit record
Expanded form displays all the fields of a record enabled for display in a form layout.
1. You can edit the record data by clicking on the field and entering the value.
2. `Show hidden fields`: Click on `Show hidden fields` button to display all the fields of a record.
3. Click on `Save` button to save the changes. Close the expanded form by clicking on `X` button in the top right corner of the form to discard the changes.
4. Navigate to next/previous record using `Next`/`Previous` button in the top left corner of the form.
Any changes made to the links field (link/unlink) will be saved automatically
## Record Audit
In an expanded form,
1. Click on `Audit` tab
2. A list of all the changes made to the record will be displayed
* You can only view the audit log. You cannot edit or delete the audit log.
* Audit log is only available in Self-hosted version currently
## Record Comment
The Comments feature allows you to collaborate directly within records by leaving comments, making it easier to discuss and track changes. You can also receive [notifications](/docs/product-docs/collaboration/notifications) for updates, ensuring everyone stays informed in real time.
@mentions & comments resolve feature is only supported in cloud hosted / self-hosted enterprise plans
### Add Comment
In an expanded form,
1. Click on `Comments` tab
2. A list of all the comments made to the record will be displayed
3. Click on input box at the bottom to add a new comment, and press `Enter` to save
### Edit Comment
In comments list of an expanded form,
1. Click on `Edit` icon on the right side of the comment
2. Edit the comment and
3. Click on `Save` icon OR Press `Enter` to save the changes
You can only edit your own comments. Changes to comments are also recorded in the audit log.
## Record Actions
### Copy Record URL
In an expanded form, click `Copy Record URL` to share the record form to other authorized users.
### Duplicate record
Using context menu (`...`) in the top right corner of the expanded form, you can duplicate the record. Duplicated record will not be saved by default. You can edit the record and save it.
### Delete record
Using context menu (`...`) in the top right corner of the expanded form, you can delete the record.
On the confirmation dialog, click on `Delete` button to delete the record.
## Record view modes
Modern data collaboration requires more than just viewing and editing records—it demands flexible interfaces tailored to specific tasks. Whether you're entering structured data, reviewing files, or engaging in team discussions, having the right record view enhances both productivity and clarity.
This article introduces three powerful modes for interacting with individual records:
* **Field Mode** for structured data entry and editing
* **File Preview Mode** for visually inspecting attachments
* **Discussion Mode** for seamless collaboration and context-rich conversations
Each mode is purpose-built to help you focus on what matters most, ensuring your workflows remain efficient, intuitive, and collaborative.
### Field Mode
Field Mode is designed for editing and viewing all field values of a record. It provides a structured, form-like layout where each field is displayed clearly with its label and value.
### File Preview Mode ☁
File Preview Mode is only available in cloud hosted / self-hosted enterprise plans
File Preview Mode prioritizes visual file content by displaying attachments front and center. It’s perfect for image-heavy or document-centric records.
1. **Configure attachment field** : File preview mode by default uses first attachment field in the table to display the file. If there are multiple attachment fields, you can choose which one to display by selecting the desired field from the dropdown in the top left corner of the record viewer panel.
2. **Navigate through files** : File preview mode picks up the first file attachment in the record and displays it prominently. If there are multiple attachments, you can hover over left side panel to see a list of all files. Clicking on any file will open it.
3. **Add more files** : You can also add new files directly from this view. Just click on the `+ Add file` icon in the bottom left corner of the file preview panel to upload a new file.
#### Supported files
File Preview Mode supports a wide range of media types:
##### 📄 Pdf
##### 🖼️ Image Files
```
.jpeg, .jpg, .png, .gif, .svg, .bmp, .ico, .webp, .avif, .heif, .heifs, .heic, .heic-sequence
```
##### 🔊 Audio Files
```
.mp3, .flac, .wav, .m4a
```
##### 🎞️ Video Files
```
.webm, .mpg, .mp2, .mpeg, .ogg, .mp4, .m4v, .avi, .wmv, .mov, .qt, .flv, .mkv, .3gp, .3g2, .vob, .ts, .mp4a
```
### Discussion mode ☁
Discussion Mode is only available in cloud hosted / self-hosted enterprise plans
Discussion Mode brings conversations into context. It shows all comments and threads related to a specific record, fostering collaboration and communication.
### Switching between modes
To switch between modes, select a record and look for the mode switcher in the top-right corner of the record viewer panel. Click the icons to toggle between views.
# Records
URL: /docs/product-docs/records
Learn how to create, import, and manage records in NocoDB.
Records in NocoDB are fundamental components within a database, serving as individual entries or data points within a table. Each default table in NocoDB is meticulously organized into a structured grid of records, fields (columns), and cells. These records constitute the backbone of data storage and retrieval within NocoDB, encapsulating a diverse range of information types, including text, numerical values, dates, file attachments, and even links to other records, either within the same table or across different tables. This versatile approach allows users to create highly customizable databases tailored to their specific data management needs, all centered around the concept of records.
In essence, a record can be envisaged as a horizontal collection of data within a NocoDB table, each record representing a distinct piece of information. These records play a pivotal role in organizing, categorizing, and presenting data in a comprehensible and efficient manner, offering users a structured and organized platform for data management.
You can perform a variety of actions to efficiently manage your data. To get started, you can [create a new record](/docs/product-docs/records/create-record) to input essential information. If you need to make updates to an existing record, you can [modify it](/docs/product-docs/records/actions-on-record#update-record) or even perform a [bulk update](/docs/product-docs/records/actions-on-record#bulk-update-records--) for multiple records simultaneously. For records that are no longer needed, you have the option to [delete](/docs/product-docs/records/actions-on-record#delete-record-single) or [duplicate](/docs/product-docs/records/expand-record#duplicate-record) them with ease. When you're working with records, you can also benefit from our expanded form for a more detailed view, complete with a [record change log](/docs/product-docs/records/expand-record#record-audit) to track all modifications and a feature to [write comments](/docs/product-docs/records/expand-record#record-comment) for more context and collaboration. Additionally, you can [share records](/docs/product-docs/records/expand-record#copy-record-url) quickly by generating a shareable URL.
In this section, we'll explore the various aspects of records in NocoDB, equipping you with the knowledge to effectively manage your own data.
## Related topics
* [Create Record](/docs/product-docs/records/create-record)
* [Modify an existing Record](/docs/product-docs/records/actions-on-record#update-record)
* [Bulk Update Records](/docs/product-docs/records/actions-on-record#bulk-update-records--)
* [Delete Record](/docs/product-docs/records/actions-on-record#delete-record-single)
* [Duplicate Record](/docs/product-docs/records/expand-record#duplicate-record)
* [Working with records using an expanded form](/docs/product-docs/records/expand-record)
* [Record change log](/docs/product-docs/records/expand-record#record-audit)
* [Writing comments for a record](/docs/product-docs/records/expand-record#record-comment)
* [Share Record](/docs/product-docs/records/expand-record#copy-record-url)
* [Record Templates](/docs/product-docs/records/record-templates)
# Record Templates
URL: /docs/product-docs/records/record-templates
Learn how to create and use record templates in NocoDB to quickly add records with pre-filled values.
Record Templates is available only in cloud-hosted and self-hosted enterprise plans.
Record Templates allow you to define reusable sets of pre-filled field values for a table. When you use a template, NocoDB creates a new record with all the values you defined — including linked records up to three levels deep. This is useful when you frequently create records that share common field values, eliminating the need to fill in the same information repeatedly.
## Manage Templates
The `Manage Templates` modal lets you view, create, edit, enable/disable, and delete all record templates across every table in the current base.
To open the modal, click the up-arrow on the `New Record` button at the bottom of the grid view and select `Manage Templates`.
When no templates have been created yet, the modal displays an empty state with a prompt to create your first template.
Once templates exist, the modal displays a table with the following columns:
* **Enabled** — Toggle to enable or disable a template. Disabled templates are hidden from the add-new-row menu but remain available in the manager.
* **Name** — Template name (must be unique per table).
* **Table** — The table this template belongs to.
* **Sub Records** — Number of linked sub-records (blueprints) defined in the template.
* **Added On** — Date the template was created.
* **Usage** — Number of times the template has been used.
* **Actions** — Use (`+`), Edit, or Delete the template.
You can search templates by name using the search bar, and filter templates by table using the table filter dropdown.
## Create a template
1. Open the `Manage Templates` modal.
2. Click the `Create Template` button.
3. Select the **table** for the template using the table selector dropdown at the top left.
4. Enter a **template name**. The name must be unique within the table.
5. Fill in the desired default values for the fields you want pre-populated when the template is used. Leave fields empty to have them remain blank.
6. Optionally, configure linked record fields to include sub-records (see [Sub-records](#sub-records-blueprints) below).
7. Click `Create Template` to save.
## Edit a template
1. Open the `Manage Templates` modal.
2. Click the context menu (`⋮`) on the template row and select `Edit`.
3. Modify the template name, field values, or linked record configuration as needed.
4. Click `Save Template` to apply changes.
## Delete a template
1. Open the `Manage Templates` modal.
2. Click the context menu (`⋮`) on the template row and select `Delete`.
3. Confirm the deletion in the dialog that appears.
## Use a template
There are two ways to create a new record from a template:
### From the Manage Templates modal
Click the **Use** (`+`) action button next to any template in the manager. A new record will be created in the corresponding table with all the template's pre-filled values.
### From the Add New Row menu
1. Click the up-arrow on the `New Record` button at the bottom of the grid view.
2. Select a template from the list. Only **enabled** templates for the current table are shown.
3. A new record is created with the template's pre-filled values.
## Sub-records (Blueprints)
Record templates can include **sub-records** for linked record fields (Link to Another Record). When a template is used, NocoDB will automatically create the linked records alongside the main record.
Sub-records support nesting up to **3 levels deep**. For example, a `Project` template could include linked `Task` records, each of which could include linked `Subtask` records.
To add sub-records to a template:
1. While creating or editing a template, click `+ New
Record` below a linked record field.
2. Fill in the desired field values for the sub-record. A banner at the bottom confirms you are editing a sub-record that will be created and linked each time the template is used.
3. You can add further nested sub-records in the same way, up to 3 levels.
## Enable / Disable a template
Use the toggle in the **Enabled** column of the Manage Templates modal to enable or disable a template. Disabled templates:
* Are **not shown** in the add-new-row template dropdown.
* Remain visible in the Manage Templates modal and can be re-enabled at any time.
## Related topics
* [Create Record](/docs/product-docs/records/create-record)
* [Expanded Record](/docs/product-docs/records/expand-record)
* [Community Edition vs Enterprise Edition](/docs/product-docs/cloud-enterprise-edition/community-vs-paid-editions)
# Field Permissions
URL: /docs/product-docs/roles-and-permissions/field-permissions
Learn about working with field permissions in NocoDB.
Available on NocoDB Cloud from the
**Plus**
plan onwards, and in
**Self-hosted Enterprise**
editions.
Field permissions in NocoDB allow you to control who can edit values in specific fields in a table. This feature is particularly useful for managing sensitive data or ensuring that only authorized users can modify certain information.
## Enabling Field Permissions
To configure field permissions for a specific table:
1. Access field context menu from the field header.
2. Select **Edit field permissions**.
3. Use the dropdowns to control who can edit the field.
## Permission Levels
You can assign different levels of access to each field. The available options are:
| Option | Who gets access |
| ------------------ | -------------------------------------------------------------------- |
| **Editors & up** | Members with **Editor**, **Creator**, or **Owner** roles *(default)* |
| **Creators & up** | Members with **Creator** or **Owner** roles |
| **Specific users** | Selected members or teams |
| **Nobody** | No one can edit this field |
By default, users with **Editor** role and above can edit data in all fields in a table.
* Select **Creators & up** to prevent editors from editing values in this field.
* Select **Nobody** to disable editing values for all users in this field.
* Choose **Specific users** to allow only selected members or teams to edit this field.
Only members and teams with
**Editor**
,
**Creator**
, or
**Owner**
roles can be selected for specific access configuration.
### **Additional Notes on Field Permissions**
* Field permissions **do not control field visibility** — users with access can still view all field data, but their ability to edit values in specific fields depends on the configured permissions.
* Permissions are applied at the **field level**, affecting all records in the table for that specific field. They cannot be configured for individual or selected records.
* Field permissions operate **independently** of table permissions. You can configure field permissions without enabling table permissions, and vice versa.
* Field permissions also apply to **API calls** and **shared forms**, restricting the ability to modify field values through these interfaces.
* Field permissions can be set for all field types except the following, as these are **calculated or system fields** and cannot be edited directly:
* *Formula*, *Rollup*, *Lookup*, *Created By*, *Last Updated By*, *Created At*, *Last Updated At*, *Button*, *QR Code*, *Barcode*
* For **Link to Another Record (LTAR)** fields, only the source table’s LTAR field permission determines editability (add/remove links). The related table’s LTAR permissions are not considered.
* *Example:* If **Country** has many **Cities**, and a user has permission to edit the LTAR field in the **Country** table, they can add or remove links to **City** records from the **Country** table — even if they lack edit permission for the **City** table’s corresponding LTAR field.
## Permissions Overview
Permissions overview provides a quick summary of the current table & field permissions in a consolidated tabular view.
To access the permissions overview:
1. Go to base homepage (Click `Overview` in the sidebar).
2. Click the **Permissions** tab.
Subsequently, you can select the table for which you want to view the permissions overview. The overview will display field permissions in addition to table permissions, allowing you to see who can create or delete records in each table, as well as which fields are editable and by whom.
`Permissions overview` can also be accessed from the table / field permission configuration modal.
# Roles & permissions
URL: /docs/product-docs/roles-and-permissions
Learn about roles and permissions in NocoDB.
In NocoDB, roles define what users or teams can do at three levels — **Organization**, **Workspace**, and **Base**.
They govern access control, ensuring that members and teams have appropriate privileges based on their responsibilities.
Teams feature availability:
**Business**
plan onwards in cloud and On-premise
**Enterprise**
edition
NocoDB follows a hierarchical structure:
```
Organization (Enterprise only)
└── Workspace
└── Base
```
Organization-level roles govern who can manage the org, its members, and org-wide teams. Workspace and base roles control what users can do with data and collaboration features. These two layers are independent — a user's org role does not affect their workspace or base permissions, and vice versa.
## Organization-level Roles
Availability:
**Enterprise**
plan only (Cloud & On-premise)
An Organization sits at the top of the NocoDB hierarchy, grouping one or more Workspaces under a single administrative unit. On **Cloud**, an organization is automatically created when a workspace is upgraded to the Enterprise plan. On **On-premise** Enterprise, a single default organization is created automatically for the instance.
All users within an organization are **Org Members**. Each org member is assigned one of three roles:
### **Org Viewer**
* Can access workspaces and bases they have been invited to.
* Cannot create new workspaces.
* Cannot manage org-level settings, members, or teams.
### **Org Creator**
* Has the same access as an Org Viewer, plus the ability to **create new workspaces** within the organization.
* Cannot manage org membership — only the Org Admin can invite or remove users from the organization.
### **Org Admin**
* Has complete access to the organization, including all workspaces and bases.
* Can manage org members (invite, remove, change roles), configure SSO and SCIM, manage domains, manage billing, update org settings (name, logo), and create and manage org-level teams.
* Has access to the [Admin Panel](/docs/product-docs/cloud-enterprise-edition/admin-panel).
Currently, each organization supports a single Org Admin — the user who creates the organization (or whose workspace is upgraded to Enterprise) is automatically assigned this role. Support for multiple Org Admins per organization is planned for a future release.
Org roles are separate from workspace and base roles. For example, a user can be an
**Org Viewer**
but a
**Workspace Creator**
— their org role does not restrict their workspace-level permissions.
### Removing an Org Member
When a member is removed from the organization, the removal cascades — the user is also removed from all workspaces, bases, and teams within that organization. Only the Org Admin can remove members from the organization.
## Workspace & Base Roles
You can assign the following roles at the workspace or base level:
* Owner
* Creator
* Editor
* Commenter
* Viewer
* No Access
& a special role "Inherit" discussed below.
If a role is assigned at the base level, it takes precedence over the workspace-level role. Roles are hierarchical — higher roles include all permissions of the roles below them, allowing flexibility and clarity in managing access across your workspace and bases. Details about each role and their permissions are provided below.
### Role Assignment
Roles define access privileges in NocoDB and can be assigned at two levels — **Workspace** and **Base**.
When a member or team is invited to a workspace with a specific role (for example, **Editor**), they automatically receive that level of access across all bases within the workspace, unless overridden at the base level.
Base owners or creators can further refine permissions at the base level to meet specific collaboration needs.
This dual-level role structure provides granular control, balancing workspace-wide consistency with base-specific customization.
Workspace-level roles do not automatically grant access to **Private Bases**. Members must be explicitly invited to a Private Base to gain access, regardless of their workspace role. Learn more about Priavte Bases in the [Private Bases documentation](/docs/product-docs/bases/private-base).
The following sections detail each role and its associated permissions.
### **Owner**
* Assigned automatically to the person who creates a workspace or base.
* Has full administrative privileges, including the ability to delete the workspace or base.
* Only **individual members** can be assigned the Owner role. **Teams** cannot be assigned this role.
### **Creator**
* Has full control over the workspace or base except for deletion privileges, which are exclusive to the Owner.
* Can manage users, schema, automations, and all data operations.
* Suitable for administrators and key project leads.
### **Editor**
* Can add, edit, and delete records within tables.
* Cannot modify the schema, such as adding or removing tables, fields, or relationships.
* Has access to toolbar features like **Filter**, **Sort**, and **Group By** for managing data views.
* Ideal for contributors responsible for day-to-day data management.
### **Commenter**
* Can view records and leave comments on existing entries.
* Cannot edit, delete, or add records.
* **Toolbar access** (Filter, Sort, Group By) is not available.
* Best suited for reviewers or collaborators providing feedback.
### **Viewer**
* Has read-only access to records and comments.
* Cannot make any data changes or leave comments.
* **Toolbar access** (Filter, Sort, Group By) is not available.
* Ideal for external stakeholders who need view-only access.
### **No Access**
* Revokes access entirely to a workspace or base.
* When applied at the workspace level, the user or team cannot access any bases within it.
* When applied at the base level, it restricts access to that base only.
### **Inherit**
"Inherit" is a special role that allows users to derive their permissions based on team assignments within a workspace. It functions as follows:
* At the **workspace** level, allows users to derive their role from team assignments within the workspace.
* At the **base** level, adopts the role defined at the workspace level.
* Offers flexibility in managing roles across multiple bases within a workspace.
* Note: The Inherit role cannot be directly assigned at the workspace level.
If a user is invited to a workspace with the **Inherit** role and then added to a team with the **Viewer** role, the user will have **Viewer** access across all bases within that workspace.
If the user is invited to the workspace with the **No Access** role and later added to a team with the **Editor** role, the user will still have **No Access** in all bases within that workspace.
The **Inherit** role is the only explicit role that allows role derivation from team assignments. For all other roles, explicit workspace roles take precedence over corresponding team roles.
At base level, if a user is assigned the **Inherit** role, their effective role will be determined by their workspace-level role or team-derived role, following the effective role resolution rules outlined below.
## Effective Role Resolution
Organization-level roles do not participate in workspace or base role resolution. Org roles govern access to the Admin Panel and org-scoped operations only. Workspace and base access is resolved independently using the rules below.
Effective permissions for a user at base level are determined by combining explicit (individual) assignments and team-derived assignments using the following precedence rules:
1. Explicit individual role at Base (highest precedence)
2. Best (most permissive) role among Team roles assigned at Base
3. Explicit individual role at Workspace level other than "Inherit"
4. Best (most permissive) role among Team roles assigned at Workspace
5. No-access (default)
**Notes**
* An explicit individual assignment always overrides any team-derived role at the same level.
* Lower-level roles (Base) override higher-level roles (Workspace) when an explicit assignment exists at the lower level.
* When multiple team roles apply, the system chooses the most permissive role (for example, between Viewer and Editor it will choose Editor).
**Base hierarchy**:
`Individual Base role` > `Team Base role` > `Individual Workspace role` > `Team Workspace role` > `No Access`
**Workspace hierarchy**:
`Individual Workspace role` > `Team Workspace role` > `No Access`
When a user belongs to multiple teams, their Team role is determined by the highest (most permissive) role among all their team assignments.
## Roles for Teams
Teams function as a collective access unit for easier management. When a team is assigned a workspace or base role:
* All team members inherit that role automatically.
* Individual user roles can override team-assigned roles if explicitly set.
* A team can be invited at both workspace and base levels for broader or limited access.
* Teams **cannot** be assigned the **Owner** role.
* Teams **cannot** be assigned the **Inherit** role at the workspace level.
If a team is invited at the workspace level, all its members receive that workspace role unless an individual or base-level role provides different access.
Learn more about Teams & Collaboration here
* [Teams documentation](/docs/product-docs/collaboration/teams)
* [Workspace collaboration](/docs/product-docs/workspaces/workspace-collaboration)
* [Base collaboration](/docs/product-docs/bases/base-collaboration)
***
### Workspace level permissions
The individual who creates the workspace is automatically designated as a Workspace owner.
A workspace can have only one Owner. Access to bases within that workspace is granted to members based on their roles
within the parent workspace. When a member becomes part of a workspace, the role at the workspace level is
automatically applied to them for all bases in that workspace, unless a specific exception is configured
to override at base level.
| Task | Owner | Creator | Editor | Commenter | Viewer |
| ---------------------------------------------- | :---: | :-----: | :----: | :-------: | :----: |
| Invite member to workspace (\***1**) | ✔️ | ✔️ | ✔️ | ✔️ | ✔️ |
| Manage member access to workspace (\***2**) | ✔️ | ✔️ | ✔️ | ✔️ | ✔️ |
| Remove member access from workspace (\***3**) | ✔️ | ✔️ | ✔️ | ✔️ | ✔️ |
| View members in workspace | ✔️ | ✔️ | ✔️ | ✔️ | ✔️ |
| Create a new base | ✔️ | ✔️ | ✔️ | ✔️ | ✔️ |
| Access existing bases at assigned roles | ✔️ | ✔️ | ✔️ | ✔️ | ✔️ |
| Delete Workspace | ✔️ | ️ | | | |
| Billing & upgrade options | ✔️ | ️ | | | |
(\***1**) Members can invite others at or below their own role.
(\***2**) Members can manage access for others at or below their own role.
(\***3**) Members can remove others at or below their own role.
### Base level permissions
#### Collaboration
| Task | Owner | Creator | Editor | Commenter | Viewer |
| ----------------------------------------- | :---: | :-----: | :----: | :-------: | :----: |
| Invite member to base (\***1**) | ✔️ | ✔️ | ✔️ | ✔️ | ✔️ |
| Manage member access to base (\***2**) | ✔️ | ✔️ | ✔️ | ✔️ | ✔️ |
| Remove member access from base (\***3**) | ✔️ | ✔️ | ✔️ | ✔️ | ✔️ |
| View members in a base | ✔️ | ✔️ | ✔️ | ✔️ | ✔️ |
| Share base | ✔️ | ✔️ | | | |
| Share view | ✔️ | ✔️ | | | |
(\***1**) Members can invite others at or below their own role.
(\***2**) Members can manage access for others at or below their own role.
(\***3**) Members can remove others at or below their own role.
#### Table & view operations
| Task | Owner | Creator | Editor | Commenter | Viewer |
| ----------------------------------- | :---: | :-----: | :----: | :-------: | :----: |
| Add / modify / delete table | ✔️ | ✔️ | | | |
| Add / modify / delete fields | ✔️ | ✔️ | | | |
| Add / modify / delete views | ✔️ | ✔️ | | | |
| Add / modify / delete view sections | ✔️ | ✔️ | ✔️ | ️ | ️ |
| Hide / un-hide / reorder fields | ✔️ | ✔️ | ✔️ | ️ | ️ |
| Add / modify / delete sort | ✔️ | ✔️ | ✔️ | ️ | ️ |
| Add / modify / delete filters | ✔️ | ✔️ | ✔️ | ️ | ️ |
| Add / modify / delete group-by | ✔️ | ✔️ | ✔️ | ️ | ️ |
| Add / modify / delete row colour | ✔️ | ✔️ | ✔️ | ️ | ️ |
| Add / modify / delete cell colour | ✔️ | ✔️ | ✔️ | ️ | ️ |
#### Record operations
| Task | Owner | Creator | Editor | Commenter | Viewer |
| ------------------------------ | :---: | :-----: | :----: | :-------: | :----: |
| Add / modify / delete record | ✔️ | ✔️ | ✔️ | | |
| View & add comment on a record | ✔️ | ✔️ | ✔️ | ✔️ | |
| View record | ✔️ | ✔️ | ✔️ | ✔️ | ✔️ |
| Manage record-level security | ✔️ | ✔️ | | | |
Record visibility can be further refined using
[Record-Level Security](/docs/product-docs/roles-and-permissions/record-level-security)
policies, which allow you to control which records each role, team, or user can access within a table.
#### Automations & advanced
| Task | Owner | Creator | Editor | Commenter | Viewer |
| ------------------------------- | :---: | :-----: | :----: | :-------: | :----: |
| Add / modify / delete Webhook | ✔️ | ✔️ | | | |
| ERD (Project & Table relations) | ✔️ | ✔️ | ✔️ | ✔️ | ✔️ |
| API Snippet | ✔️ | ✔️ | ✔️ | ✔️ | ✔️ |
| API Token | ✔️ | ✔️ | ✔️ | ✔️ | ✔️ |
# Record-Level Security
URL: /docs/product-docs/roles-and-permissions/record-level-security
Define filter-based policies to control which records each role, team, or user can access in a table.
Record-Level Security (RLS) lets you define **filter-based policies** that control which records each role, team, or user can see within a table. Unlike table or field permissions that govern entire tables or columns, RLS operates at the **record level** — ensuring users only see the data relevant to them.
Available in NocoDB Cloud
**Enterprise**
plan and on self-hosted
**Enterprise**
plans.
**When to use RLS:**
* Sales reps should only see their own deals
* Regional managers should see records for their team's territory
* Support agents should only access tickets assigned to them
* Department heads should see records across their team hierarchy
## Enabling Record-Level Security
1. Open the table where you want to configure RLS.
2. Click the `⋯` icon next to the table name in the sidebar and select **Record-Level Security**.
The RLS management panel opens, where you can create and manage policies for this table.
Only base
**Owners**
and
**Creators**
can configure Record-Level Security policies.
## Key Concepts
### Policy Types
RLS uses two types of policies:
* **Default Policy** *(optional)* — A fallback policy that applies when no scoped policy matches the current user. Each table can have at most one default policy. If no default policy is configured, unmatched users can see all records.
* **Scoped Policies** — Policies that target specific roles, users, or teams. A table can have multiple scoped policies.
### Default Policy Behaviors
The default policy defines what happens when a user doesn't match any scoped policy:
| Behavior | Effect |
| ------------- | ---------------------------------------------------- |
| **Show all** | All records are visible — no filtering applied |
| **Deny all** | No records are visible — complete access denial |
| **Condition** | Apply filter conditions to determine visible records |
When no RLS policies are configured on a table, all records are visible to all users (equivalent to "Show all").
### Subjects
Each scoped policy is applied to one or more **subjects** — the roles, users, or teams the policy targets:
| Subject type | Description |
| ------------ | -------------------------------------------------------- |
| **Role** | A base-level role: Viewer, Commenter, Editor, or Creator |
| **User** | A specific individual member of the base |
| **Team** | A team group, with configurable hierarchy scope |
For team subjects, you can choose the hierarchy scope:
* **Self only** — The policy applies only to direct members of the selected team.
* **Self and descendants** *(default)* — The policy applies to members of the selected team and all its sub-teams.
### Filter Conditions
Policies use the standard NocoDB filter builder to define conditions. Only records matching the filter conditions are visible to users who match the policy's subjects.
Filters support all standard operators (equals, contains, greater than, etc.) and can reference any field in the table. You can also build nested filter groups using AND/OR logic.
### Policy Resolution Order
When a user requests data from a table with RLS enabled, NocoDB evaluates policies in the following order:
1. **Check scoped policies** — If the user matches one or more scoped policies (by role, user ID, or team membership), those policies' filters are combined using **OR** logic and applied.
2. **Fall back to default policy** — If no scoped policy matches, the default policy behavior is applied (show all, deny all, or condition-based filtering).
3. **No policies configured** — If no RLS policies exist on the table, all records are visible.
RLS filters are combined with any existing view filters using **AND** logic. This means a record must satisfy both the view filter and the RLS policy filter to be visible.
## Managing Policies
### Creating a Default Policy
1. Open the RLS panel for the table.
2. Click **Add Default Policy**.
3. Choose the default behavior:
* **Show all** — All records visible to unmatched users.
* **Deny all** — No records visible to unmatched users.
* **Condition** — Define filter conditions for unmatched users.
4. If you selected **Condition**, configure the filter conditions using the filter builder.
### Creating a Scoped Policy
1. Open the RLS panel for the table.
2. Click **Add Policy**.
3. Enter a **policy name** (e.g., "Sales reps see own deals").
4. In the **Apply To** section, select the subjects this policy targets:
* Choose from **Roles**, **Members** (users), or **Teams**.
* You can select multiple subjects of different types.
* For teams, choose the hierarchy scope (self only or self and descendants).
5. Configure the **filter conditions** that determine which records are visible.
6. Save the policy.
### Enabling and Disabling Policies
Each policy has an **enable/disable toggle**. Disabled policies are ignored during evaluation — they remain configured but do not affect record visibility.
### Editing and Deleting Policies
* To **edit** a policy, click the edit icon next to it in the policy list. Modify the name, subjects, or filter conditions as needed.
* To **delete** a policy, click the delete icon and confirm the deletion.
## Example: Sales Pipeline
Consider a "Sales Pipeline" table tracking deals across a sales organization:
| Field | Type | Description |
| ----------- | ---------------- | ------------------------------------------------------------------- |
| Deal Name | Single line text | Name of the deal |
| Value | Currency | Deal value |
| Stage | Single select | Pipeline stage (Lead, Qualified, Proposal, Closed Won, Closed Lost) |
| Assigned To | Email | Email of the assigned sales rep |
| Region | Single select | Sales region (North, South, East, West) |
**Goal:** Sales reps see only their own deals. Regional sales managers see deals in their region. Everyone else is blocked by default.
### Policy 1: Default Policy — Deny All
Create a default policy with behavior set to **Deny all**. This ensures that any user who doesn't match a scoped policy cannot see any records.
### Policy 2: Sales Reps See Own Deals
| Setting | Value |
| ----------- | ---------------------------------------------- |
| Policy name | Sales reps – own deals |
| Apply to | Role: **Editor** |
| Filter | `Assigned To` **is equal** `alice@company.com` |
Sales reps (with Editor role) see only the deals assigned to them. Create a separate policy per rep, or assign them by user subject.
### Policy 3: Regional Managers See Team Deals
| Setting | Value |
| ----------- | ------------------------------------------------- |
| Policy name | Managers – regional deals |
| Apply to | Team: **North Sales Team** (self and descendants) |
| Filter | `Region` **is equal** `North` |
Members of the North Sales Team (and its sub-teams) see all deals in the North region. Create similar policies for other regions as needed.
### How It Works
* **Alice** (Editor role, Assigned To: [alice@company.com](mailto:alice@company.com)) — Matches Policy 2. Sees only deals where `Assigned To = alice@company.com`.
* **Bob** (member of North Sales Team) — Matches Policy 3. Sees all deals where `Region = North`.
* **Carol** (VP of Sales, Creator role, not matched by any scoped policy) — Since Creators are not subjects in any scoped policy, the default policy applies. Carol sees no records. To give Carol full access, either add Creator as a subject in a scoped policy with a "show all" condition, or change the default policy to **Show all** and restrict others instead.
* **Dave** (Viewer role, not in any sales team) — No scoped policy matches. Default policy applies: **Deny all**. Dave sees nothing.
When using a
**Deny all**
default policy, remember to create scoped policies for every role or team that needs access, including senior roles like Creator.
## Notes and Limitations
* **Permissions required** — Only base **Owners** and **Creators** can create, edit, or delete RLS policies.
* **Per-table limit** — There is a configurable limit on the number of scoped policies per table (the default policy does not count toward this limit).
* **Fail-closed** — If an error occurs during policy evaluation, access is denied. This ensures that records are never exposed due to a system error.
* **API and views** — RLS policies apply across all views of the table and to API calls. Records filtered out by RLS are not accessible through any interface.
* **Table visibility first** — RLS is evaluated only after [table visibility](/docs/product-docs/roles-and-permissions/table-permissions#table-visibility). If a table is hidden from a user, RLS does not apply — the table is simply inaccessible.
* **View filter interaction** — RLS filters combine with view filters using AND logic. A record must pass both the view filter and the RLS policy filter to be visible.
* **Real-time updates** — Policy changes take effect immediately for all connected users.
***
**Related topics**
* [Roles & Permissions](/docs/product-docs/roles-and-permissions)
* [Table Permissions](/docs/product-docs/roles-and-permissions/table-permissions)
* [Field Permissions](/docs/product-docs/roles-and-permissions/field-permissions)
# Table Permissions
URL: /docs/product-docs/roles-and-permissions/table-permissions
Learn about working with table permissions in NocoDB.
Table permissions in NocoDB allow you to control **what users can see** and **what actions they can perform** within a table. Visibility determines whether a table exists for a user, while record permissions allow you to define who can create or delete records in that table.
Table Permissions are available on NocoDB Cloud from the
**Plus**
plan onwards, and on self-hosted
**Enterprise**
editions.
## Table Visibility
Table Visibility determines whether a table and its views are discoverable and accessible to a user within a base. When a table is visible, the user can access and interact with it according to their assigned roles & permissions. When a table is not visible, it is treated as non-existent for that user.
Only
**Base Owners**
can configure table visibility settings.
Information below lists down various visibility options:
| Option | Who can see the table |
| --------------------------- | -------------------------------------------------------- |
| **Creators & up** | Members with **Creator** or **Owner** roles |
| **Editors & up** | Members with **Editor**, **Creator**, or **Owner** roles |
| **Specific users or teams** | Only selected members or teams |
| **Everyone** | All members of the base *(default)* |
Note:
* By default, all tables are visible to everyone in the base.
* Table visibility is evaluated before checking record permissions. If a table is not visible to a user, they cannot access it or perform any actions within it, regardless of their record permissions.
* Hidden tables will be excluded from APIs, Automations, Scripts & Extensions that list or access tables.
### Configuring Visibility
To configure the visibility of a specific table:
1. Click the `⋯` icon next to the table name in the sidebar.
2. Select **Edit table permissions**.
3. Use the dropdown menus against **Who can see this table?** to define visibility.
4. If you select **Specific users or teams**, choose the members or teams who should have access to the table.
Note that, only Base Owners can modify table visibility settings. Other members will not see this option in the menu.
### Visibility Notes
**Shared bases and shared views**
Table visibility affects shared access. Only tables with the visibility option set to **Everyone** are accessible in a shared base or shared view.
**Relational fields**
When a table is hidden from a user, relational fields linking to that table will list only the **display values** of the linked records. Based on their role (Editor+), the user may still link or unlink records from the source table, but cannot open or access the linked records themselves. Lookup and Rollup fields continue to function and display values from the hidden table, without granting visibility or access to that table.
Edit modal for relational fields linking to hidden tables would display table & view names as "Private Table" and "Private View" respectively.
**Duplicating bases**
When duplicating a base, only the tables visible to the duplicating user are copied to the new base. Tables hidden from that user are excluded from the duplicated base. Hence, relational fields linking to hidden tables will also be excluded. Formula fields referencing such relational fields may display errors due to missing references.
## Table Record Permissions
Table Record Permissions determine what actions a user can perform on records within a table. When permissions are granted, users can create or delete records according to their assigned roles and configured access levels. When permissions are restricted, those actions are disabled, while the table and its records may still remain visible to the user.
### Configuring Record Permissions
To configure record access permissions for a specific table:
1. Click the `⋯` icon next to the table name in the sidebar.
2. Select **Edit table permissions**.
3. Use the dropdown menus to define who can:
* Create records
* Delete records
#### Permission Levels
You can assign different access levels for each action (create or delete record). The available options are:
| Option | Who gets access |
| --------------------------- | -------------------------------------------------------------------- |
| **Editors & up** | Members with **Editor**, **Creator**, or **Owner** roles *(default)* |
| **Creators & up** | Members with **Creator** or **Owner** roles |
| **Specific users or teams** | Selected members or teams |
| **Nobody** | No one can perform this action |
By default, members with the **Editor** role and above can create and delete records in a table.
* Choose **Creators & up** to restrict these actions to creators and owners.
* Choose **Nobody** to disable record creation or deletion entirely.
* Choose **Specific users or teams** to grant access only to selected members or teams.
Only members and teams with
**Editor**
,
**Creator**
, or
**Owner**
roles can be selected for specific access configuration.
### Record Permission Notes
* Table permissions **do not control record visibility** — users with access can still view all records. However, their ability to create or delete records depends on the configured permissions.
* Permissions are applied at the **table level** and affect all records within that table. They cannot be defined for individual records or specific subsets.
* Table permissions function **independently** of field permissions; each can be configured separately.
* Table permissions also apply to:
* Record creation or deletion via **APIs**, and
* Record creation through **shared forms**.
## Permissions Overview
The permissions overview provides a consolidated summary of table and field permissions across the base.
To access the permissions overview:
1. Go to the base homepage (click **Overview** in the sidebar).
2. Click the **Permissions** tab.
Select the table you want to review. The overview displays both table and field permissions, showing who can see the table, create records, delete records, and the visibility of each field within that table.
You can also open the **Permissions overview** directly from the table or field permission configuration modal.
***
# Upload & Download
URL: /docs/product-docs/table-operations/download
NocoDB offers users the ability to export data from the spreadsheet grid in a variety of formats. This feature can be used in conjunction with the **Filter** and **Sort** feature to further refine your data.
## Download Data
To export data as CSV from NocoDB, follow these steps:
1. Click `:` icon in the toolbar to access the table additional operation's menu.
2. Choose the **Download** option.
3. Select the **CSV** as file format.
## Upload Data
To upload data into NocoDB, you can import CSV files directly into your tables. For more information on how to upload data, refer [here](/docs/product-docs/tables/import-data-into-existing-table).
## FAQ
* **I'm having trouble exporting data—it says the pop-up window is blocked.**
This is a browser-specific issue, not related to NocoDB. If you're using Chrome, follow these [instructions](https://support.google.com/chrome/answer/95472?hl=en\&co=GENIE.Platform%3DDesktop) to unblock pop-ups.
***
# Hide & reorder fields
URL: /docs/product-docs/table-operations/field-operations
Learn how to hide and reorder fields in NocoDB.
Use the **Fields** button in the toolbar to manage
* field visibility
* field order
* cover image in Gallery and Kanban views.
* show / hide system fields
* add new field
* add lookup field using existing relational fields
## Show / hide fields
To show or hide fields, open the `Fields` menu and toggle the switch next to each field name.
For better customization, create multiple grid views with different sets of visible fields.
## Rearranging fields
To rearrange field positions, open the `Fields` menu and drag fields using the `⋮⋮` (drag icon) next to each field name.
## Show / hide system fields
By default, system fields are hidden — you can enable them by selecting **Show system fields**.
In Gallery and Kanban views, this option appears as
**Edit Cards**
in the toolbar.
## Change cover field
In Gallery and Kanban views, you can change the cover field by clicking `Cover image` field in the `Edit Cards` menu. Only fields of type Attachment can be used as cover fields. You can also use the Settings button in the same menu to adjust image display properties like `Fit image` or `Cover image`.
## Add new field
To add a new field, click the `+ New Field` button at the bottom of the `Fields` menu. This opens the field creation modal where you can select the field type and configure its properties.
## Add lookup field using existing relational fields
To add a lookup field based on an existing relational field, click relational field in the `Fields` menu. This opens a modal where you can select the target field to create a lookup field. Click `Add n lookup field(s)` to complete the process.
## Hide field labels ☁
This feature is available on NocoDB Cloud and Enterprise plans.
In **Gallery** and **Kanban** views, you can hide field labels (headers) shown inside each record tile/card. This helps create a cleaner, more compact card layout—especially useful when cards are used for visual scanning.
**Steps**
Open the **Gallery** or **Kanban** view.
1. Click the **More options (⋮)** menu in the view toolbar.
2. Select **Hide field header** / **Show field header** to toggle the setting.
Once enabled, field names (labels) are hidden and only field values are shown on the record tiles/cards.
This setting is view-specific and applies only to Gallery and Kanban views. Grid view is not affected.
Use this option along with field reordering and cover image settings to design compact, dashboard-friendly cards.
***
# Filtering records
URL: /docs/product-docs/table-operations/filter
Learn how to filter records in NocoDB.
Filters help you narrow down and organize data based on specific conditions. NocoDB supports:
* **Nested filters**: Combine multiple conditions across different fields.
* **AND / OR logic**: Choose how filters are grouped.
Use filters to focus only on the records that matter to you.
You can also
[create filters using natural language with NocoAI](/docs/product-docs/noco-ai/create-filter)
. Just describe what data you want to see, and AI will set up the filter conditions for you.
## Add or edit filters
1. Click the **Filter** button in the toolbar.
2. Choose **Add filter** or **Add filter group**.
3. Set up each filter by selecting a **Field**, **Operation**, and (if needed) a **Value**.
4. To refine results further, combine multiple filters using **AND** or **OR** logic.
### Group filters
You can group multiple filters together using a `Filter Group` to build complex, nested conditions. This allows you to combine filters using either `AND` or `OR` logic, enabling more precise control over your data. To create a filter group, click the `Filter` button in the toolbar and choose `+ Add filter group`. Within a group, you can add individual filters or even nest additional groups.
## Delete filters
NocoDB supports upto 5 levels of nested filter groups.
To remove a filter, click on the trash / bin icon located to the right of the respective filter.
## Filter by current user ☁
This feature is available in NocoDB Cloud and NocoDB Enterprise Edition.
You can filter records based on the currently logged-in user using the **Current User** option when configuring filters on **User fields** and their derivatives (such as `createdBy` and `updatedBy`). This is especially useful for creating views that show only the records relevant to the user viewing them.
When a dynamic **Current User** filter is applied, the toolbar shows an **@** icon next to the filter count as an indicator.
**Current User**
filters do not apply in publicly shared views. If no other filters are present, the shared view will display no records.
## Toggle filters ☁
This feature is available on the Plus plan and above in NocoDB Cloud and NocoDB Enterprise Edition.
Toggle filters let you temporarily enable or disable individual filters without deleting them. This is useful when you want to quickly compare filtered and unfiltered views, or try different combinations of conditions without rebuilding them each time.
Each filter row includes a **checkbox** on the left side. Unchecking it disables the filter — the condition is preserved but no longer applied to the view. The toolbar badge shows a count in the format **enabled/total** (e.g., `2/5`) when some filters are disabled, so you always know how many are active.
Toggle filters work with both individual filters and filter groups. When a filter group is disabled, all filters within that group are also disabled. Disabled filters remain saved in the view and can be re-enabled at any time.
## Pinned filters ☁
This feature is available on the Plus plan and above in NocoDB Cloud and NocoDB Enterprise Edition.
Pinned filters give you quick, one-click access to frequently used filters directly from the toolbar — without needing to open the filter menu. A pinned filter appears as a compact pill in the toolbar showing the field name and current value. Clicking the pill opens a dropdown where you can search and change the value instantly.
### Pin a filter
1. Click the **Filter** button in the toolbar and locate the filter you want to pin.
2. Click the **Pin** icon to the right of the filter row.
3. The filter appears as a pill in the toolbar, ready for quick access.
To unpin a filter, click the **Pin** icon again on the filter row — it will be highlighted for pinned filters.
### Using pinned filters
Clicking a pinned filter pill opens a dropdown panel directly in the toolbar. From here you can search for values, select or deselect options, and changes are applied to the view immediately. The dropdown also includes a **Clear value** option to reset the filter.
Each pill includes a **toggle icon** to quickly enable or disable the filter without opening the filter menu.
### Negated operators
When a pinned filter uses a negated operator (e.g., **is not**, **is not any of**), the pill displays a **diagonal strikethrough line** over the selected values. This visual cue makes it easy to distinguish between inclusive and exclusive filters at a glance.
### Supported field types
Pinned filters are supported for the following field types:
* **Single Select**
* **Multi Select**
* **User**
* **Created By**
* **Last Modified By**
### Limitations
You can pin up to
**3 filters**
per view.
Only one filter per field can be pinned at a time — if a field already has a pinned filter, additional filters on the same field cannot be pinned. Filter groups cannot be pinned; only individual filters support pinning.
Pinned filters are not available for editor roles in collaborative or locked views. In personal views, editors have full access to pin and interact with pinned filters.
## Filters for editor role
In **collaborative and locked views**, editors have limited control over filters. Filters configured by creators are displayed as **read-only** — editors can see them but cannot modify, delete, toggle, or pin them. Editors can add their own filters, but these are **temporary** and do not persist across page refreshes. The toolbar badge reflects the combined count of both persisted (creator) and temporary (editor) filters.
In **personal views**, editors have full control — they can create, edit, delete, toggle, and pin filters just like creators.
## Enabling NULL and EMPTY filters
By default, filters like `is null`, `is not null`, `is empty`, and `is not empty` are hidden in the filter menu. To use them explicitly, go to [Base settings](/docs/product-docs/bases/actions-on-base#base-settings) and enable **Show NULL and EMPTY filter**.
Before enabling the setting:
After enabling it, you’ll see additional options like `is null` and `is empty`, which let you filter out cells with `NULL` or empty values.
Alternatively, you can use **is blank** and **is not blank** filters to handle both NULL and EMPTY values in a simplified way.
# Full Screen
URL: /docs/product-docs/table-operations/full-screen
Learn how to use the Full Screen mode in NocoDB for an enhanced data viewing experience.
The **Fullscreen Mode** button, available in the toolbar, allows you to expand any view area to occupy the entire screen. This helps you focus on your data by hiding navigation menus and other interface elements.
### Enable Fullscreen Mode
To enable fullscreen, click the **Enter Fullscreen** button on the toolbar.
Once activated, the grid view will stretch to cover the entire workspace area.
### Exit Fullscreen Mode
To exit fullscreen, click the **Exit Fullscreen** button that appears in the same position.
This feature is especially useful when working with large datasets, as it maximizes screen space for better visibility and navigation.
# Grouping records
URL: /docs/product-docs/table-operations/group-by
Learn how to group records in NocoDB.
Grouping records in NocoDB helps you organize data by categories using **Groups** and **Subgroups**. You can group records by up to **three levels**, making it easier to analyze and navigate complex datasets.
## Add or edit groups
1. Click **Group By** in the toolbar.
2. Select the field to group records by.
3. (Optional) Sort the groups in ascending or descending order.
4. (Optional) Use `+ New Subgroup` to create a subgroup within the selected group.
You can add up to
**three levels of grouping**
to further refine your data view.
## Delete groups
1. Click **Group By** in the toolbar.
2. Click the 🗑 icon next to the group you want to remove.
To return to the standard grid view, remove all configured groups.
## Group level field aggregations
You can perform aggregations on fields at each group level. This allows you to summarize data within each group, such as calculating totals or averages.
# Table operations
URL: /docs/product-docs/table-operations
Learn how to work with filters, sort, group by, and more in NocoDB.
The toolbar provides a set of tools to interact with the data in the table. The toolbar is located at the top of the view area.
### Available Tools
* [Hide & Reorder Fields](/docs/product-docs/table-operations/field-operations)
* [Filter](/docs/product-docs/table-operations/filter)
* [Sort](/docs/product-docs/table-operations/sort)
* [GroupBy](/docs/product-docs/table-operations/group-by)
* [Row height](/docs/product-docs/table-operations/row-height)
* [Quick Search](/docs/product-docs/table-operations/search)
* [Full Screen](/docs/product-docs/table-operations/full-screen)
* [Download](/docs/product-docs/table-operations/download)
For a visual guide on how to use the toolbar and its features, check out this video:
# Colouring records
URL: /docs/product-docs/table-operations/record-colouring
Learn how to colour records and individual fields in NocoDB.
In NocoDB Cloud, row colouring is available on the Plus plan and higher, while cell colouring is available on the Business plan and higher. In Self-hosted deployments, both row colouring and cell colouring are available only with the Enterprise License.
In NocoDB, you can apply colours to records in a table to visually distinguish them based on specific criteria. This feature is particularly useful for highlighting important information or categorizing records. Record colouring is available for Grid, Gallery, Kanban & Calendar views.
When using conditions-based colouring, you can choose between two colouring modes:
* **Row colouring** — applies colour to the entire record (available on Plus plan and higher)
* **Cell colouring** — applies colour to a specific field within the record (available on Business plan and higher)
Colouring is applied at view level; hence, configuring colour in one view will not affect the same record in another view.
## Add record colour
You can access the record colouring options by clicking the `Colour` button in the toolbar of any table view.
You can colour your records based on
1. Single select field
2. Conditions
### Based on single select field
To colour records based on a single select field, follow these steps:
1. Click the `Colour` button in the toolbar.
2. Select the `Using Single select field` option.
3. Choose the single select field you want to use for colouring records from the dropdown menu.
When colouring records using a single select field, each record inherits the colour associated with its selected option in that field. Records without a value in the selected field will not be coloured. This behaviour is predefined and cannot be customized.
Row colouring by default applies a left border to the records in the table view. You can additionally apply background colour to the records by toggling the `Background colour` option.
### Based on conditions
To colour records based on conditions, follow these steps:
1. Click the `Colour` button in the toolbar.
2. Select the `Using Conditions` option.
3. Choose the colour you want to apply from the colour picker.
4. Select the colouring mode — `Row` or `Cell` — from the dropdown next to the colour picker.
5. If you selected `Cell`, choose the target field from the field dropdown that appears.
6. Configure the conditions for colouring as required.
{/* 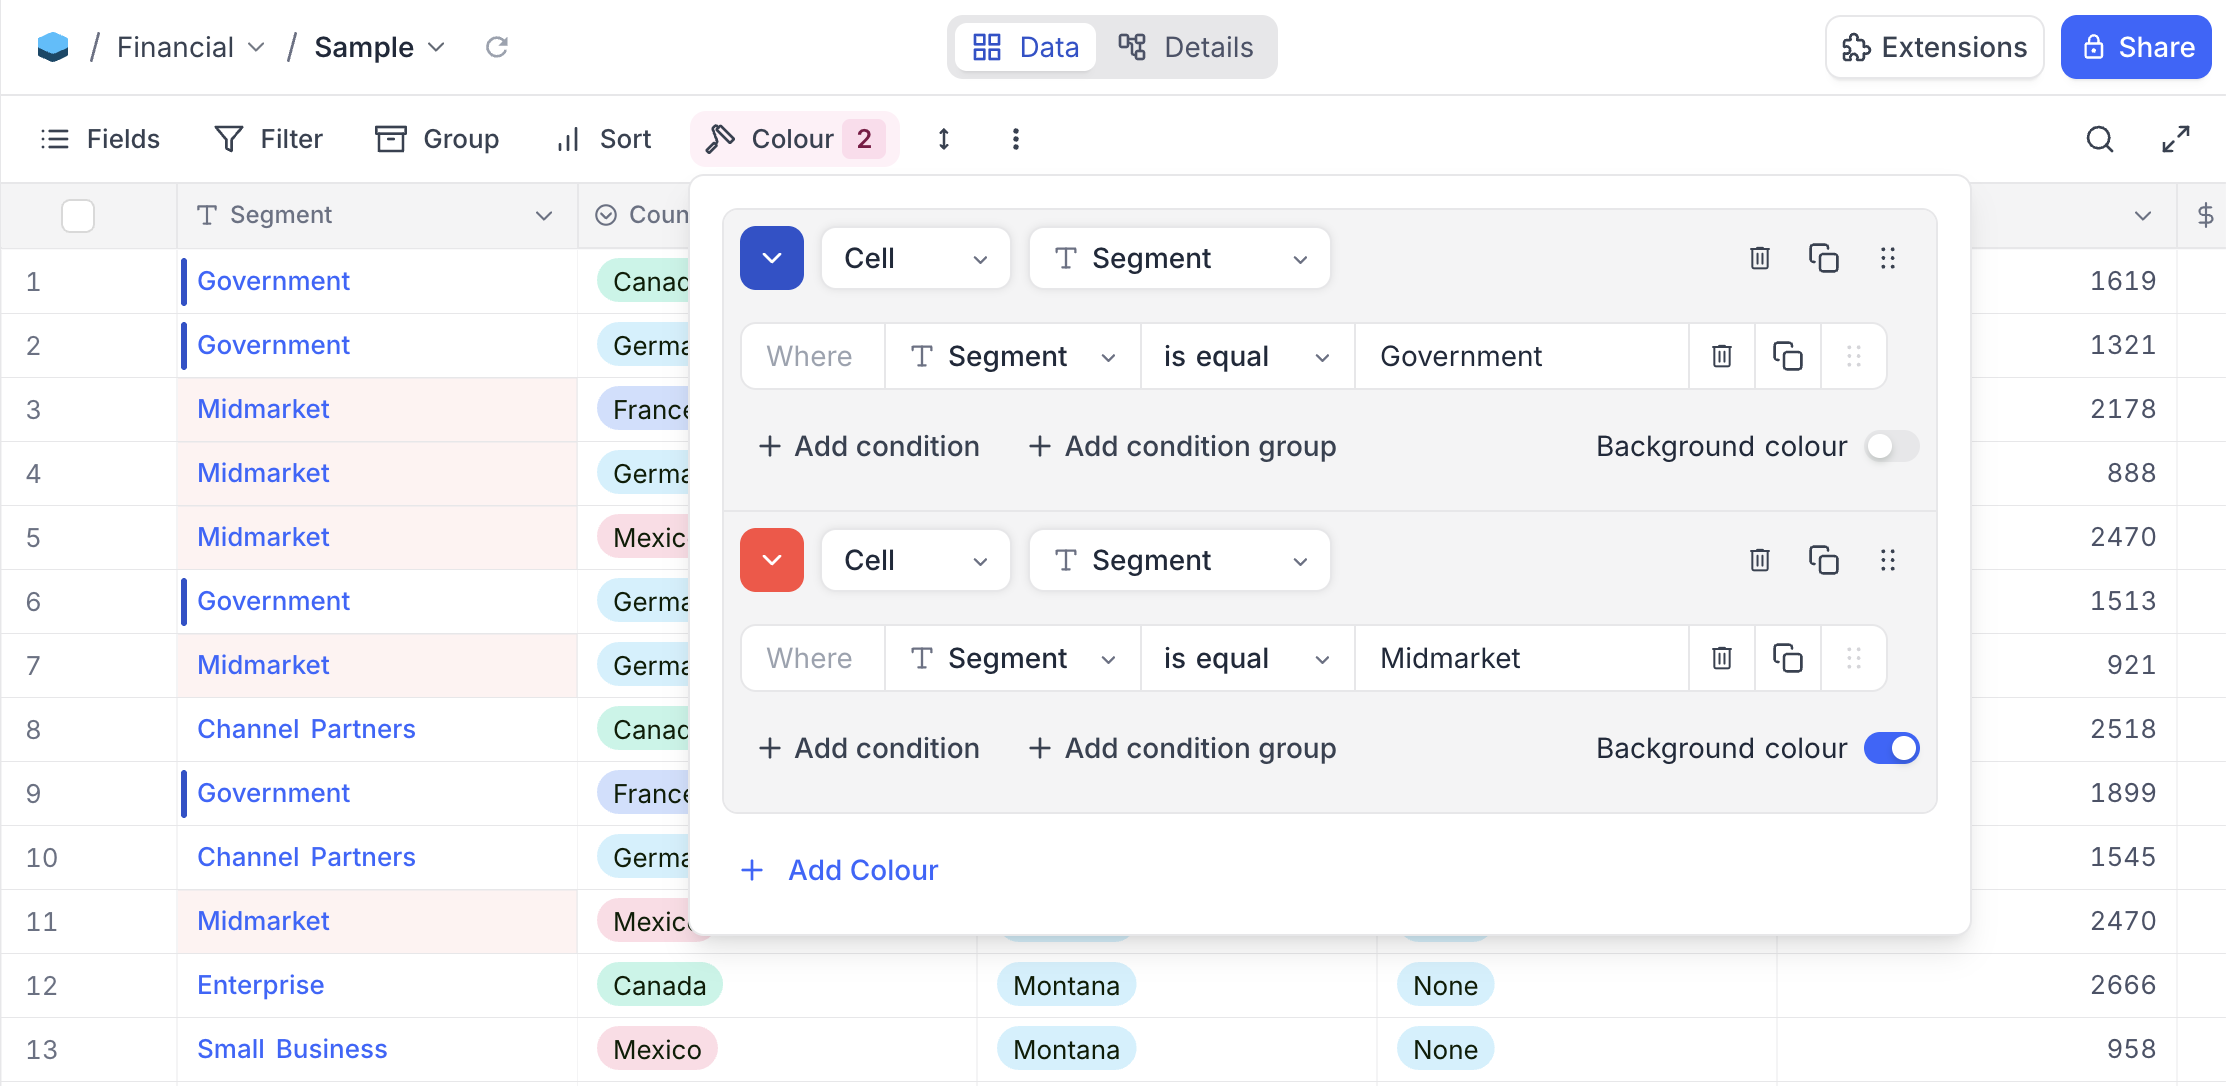 */}
You can add multiple conditions to colour records based on different criteria. The conditions are evaluated in the order they are added, and the **first matching condition will determine the colour** applied to the record or cell.
#### Row colouring
When the colouring mode is set to `Row`, the colour is applied to the entire record. This is the default mode.
Row colouring by default applies a left border to the records in the table view. You can additionally apply background colour to the records by toggling the `Background colour` option.
#### Cell colouring
Cell colouring requires the Business plan or higher.
When the colouring mode is set to `Cell`, the colour is applied only to the specific field you select. This is useful when you want to draw attention to a particular field value without colouring the entire row.
To configure cell colouring:
1. Select `Cell` from the colouring mode dropdown next to the colour picker.
2. Choose the target field from the field selector that appears.
3. Configure the conditions and toggle the `Background colour` option as needed.
When background colour is enabled, the selected field's cell is highlighted with the chosen colour. When background colour is disabled, a vertical colour indicator bar appears on the left edge of the field.
{/*  */}
{/*  */}
Cell colouring is available only in Grid view.
#### Combining row and cell colouring
You can configure both row and cell colouring conditions within the same view. Each condition can independently be set to either `Row` or `Cell` mode. When both row and cell colouring apply to the same record, the cell colour takes precedence over the row colour for the targeted field, while the remaining fields display the row colour.
{/*  */}
## Modify record colour
* For record colouring based on single select field, you can modify the colour associated with each option in the single select field by using edit-field option.
* For record colouring based on conditions, you can modify the conditions, colouring mode (`Row` or `Cell`), target field, and the associated colours as required from the dropdown menu that appears when you click the `Colour` button in the toolbar.
Note that, it's not possible to have different colour for single select field options in different views. The colour associated with each option in the single select field is consistent across all views where that field is used for colouring records.
## Remove record colour
You can remove the colouring applied to records in a table view by following these steps:
### Single select field case
* Click the `Colour` button in the toolbar.
* Remove conditions one by one by clicking the `delete` button next to each condition.
### Conditions case
* Click the `Colour` button in the toolbar.
* Click "Remove colouring" button from the dropdown.
***
# Record height
URL: /docs/product-docs/table-operations/row-height
Learn how to adjust the height of records in NocoDB.
NocoDB offers users the flexibility to adjust the display height of records within the spreadsheet grid to four distinct levels: **Short** (the default setting), **Medium**, **Tall**, and **Extra**. This feature proves valuable when working with extensive text fields and multi-select fields, as it enables users to present a greater amount of content within each cell.
### Short
### Medium
### Tall
### Extra
***
# Search
URL: /docs/product-docs/table-operations/search
Learn how to search for records in NocoDB.
NocoDB provides a quick search feature in the toolbar that helps you locate records efficiently across large datasets. You can search by a specific field or across all fields, and combine this with filters to narrow down the results further.
To use search:
1. Click the **Search** button in the toolbar.
2. (Optional) Select the **Field** to search within.
3. Enter your search term in the search bar.
# Sorting records
URL: /docs/product-docs/table-operations/sort
Learn how to sort records in NocoDB.
Sorting enables you to arrange your data alphabetically (A → Z) or (Z → A) for text based types and in ascending or descending order for numerical types. NocoDB supports nested sorting, allowing you to select fields and the order in which to apply nested sorting.
### Add or edit sort
1. Click the `Sort` button in the toolbar menu.
2. Choose the `Field` to sort by.
3. Configure the sorting `Direction` : ascending or descending
4. Use `+ Add Sort Option` to add additional fields for sorting.
The field listed at the top is used for
**primary sorting**
, followed by other fields in
**top-down order**
for secondary and tertiary sorting.
### Delete sort
* Click the `Sort` button in the toolbar.
* Click on the trash / bin icon to the right of the sort you wish to delete.
***
# Actions on table
URL: /docs/product-docs/tables/actions-on-table
Learn how to rename, duplicate, and delete a table in NocoDB.
## Rename table
1. Click the `...` (ellipsis) next to the table name in the left sidebar and select `Rename table` from the context menu.
* Alternatively, double-click on the table name in the left sidebar to make it editable.
2. Enter the new name for the table in the input field that appears. Use the `Enter` key to confirm the new name or click outside the input field to save changes.
## Change table icon
1. Click the current table icon next to the table name in the left sidebar.
2. Choose a new icon from the available options.
## Duplicate table
1. Click the `...` (ellipsis) next to the table name in the left sidebar and select `Duplicate table`.
2. (Optional) In the dialog:
* Use **Include data** to copy the table with or without its records.
* Use **Include views** to copy it with or without its saved views.
3. Click **Duplicate Table**.
A new table will be created based on your selected options.
**Additional notes**
* Duplicate table will be created in the same base as the original table
* Duplicate table will carry suffix ` Copy` in its name.
* Duplicate table option is not available for `External DB` bases
## Delete table
**This action cannot be undone**
1. Click the `...` (ellipsis) next to the table name in the left sidebar and select `Delete table`.
2. In the confirmation dialog, click `Delete Table` to confirm.
## Add / edit table description
Table description can be added by clicking on the `Add Description` button on the table creation modal or by clicking on the `Edit Description` button from the table context menu. Description for a table will be visible as a tooltip when hovering over the `info` icon next to the table name in the left sidebar.
## Table permissions
Table permissions are available in NocoDB cloud- Plus plan onwards and Self hosted Enterprise plans
Table permissions in NocoDB let you control who can create or delete records in each table. Find more details [here](/docs/product-docs/roles-and-permissions/table-permissions)
## Find table ID
Each table in NocoDB has a unique ID (prefixed with `m`, short for *model*) that identifies it within a base.
You can find the table ID in the URL when viewing a table.
Example:
```
https://app.nocodb.com/#/wqd7e84kkpg8169/pqh6trao813gar7/mxo5v3uj1l1xjpz
```
In this example, the table ID is: `mxo5v3uj1l1xjpz`
You can also copy the table ID by clicking the `...` (ellipsis) next to the table name and selecting **Copy Table ID**.
**Usage**: Table IDs are commonly used in API calls, scripting, and integrations where you need to reference a specific table.
***
# Create table via import
URL: /docs/product-docs/tables/create-table-via-import
Learn how to create a table in NocoDB via import from CSV, Excel or JSON.
## Import table from CSV / Excel / JSON
### Accessing import modal
There are two ways to access import modal:
#### 1. From the base dashboard
#### 2. From the base context menu
### Importing file
To import a file, follow the steps below:
1. There are two ways to upload source file:
* **Upload** : Upload from local directory. Either click 'browse file' or drag and drop file.
* **Add from URL** : Specify the URL of the file.
2. (*optional*) Select character encoding. By default, it is set to `UTF-8`.
3. (*optional*) Configure [Advance Settings](#advanced-settings)
4. Click on `Import` button.
5. (*optional*) Specify the table name. By default, the file name will be used as the table name.
6. (*optional*) Select the columns from the CSV to be included in the table. By default, all fields are included.
7. (*optional*) Modify the field name. By default, the field name is the same as the column name in the CSV.
8. Click on `Import` button to start importing the file.
Additional notes
* Multiple files can be imported at once.
* Supported file formats: CSV, Excel, JSON
* Maximum file size: 5 MB
* All fields are imported by default as `Single line text`. Field type as required can be changed after file is imported.
* By default, the first field will be chosen as Display Value.
### Advanced Settings
* **Use first record as header**: Enabled by default. If selected, the first record in the spreadsheet will be treated as the header record and its contents will be used as field names.
* **Import data**: Enabled by default. If selected, all data will be imported; otherwise, only the table will be created.
***
# Create table
URL: /docs/product-docs/tables/create-table
Learn how to create a table in NocoDB.
## Create a new table
To create a table from scratch:
1. Click **+ Create New** in the left sidebar.
2. From the dropdown, select **Table**.
3. (Optional) Provide a name for the table in the modal that appears.
4. (Optional) Use **Add Description** to include additional context or details.
5. Click **Create Table** to complete the setup.
## Creating table Using AI
This feature is available only on NocoDB Cloud. It is not supported in self-hosted or on-premise deployments.
NocoAI can provide a set of suggested tables based on your current schema and context. The tables thus created will include relevant fields and will be linked to existing tables where applicable. This allows you to quickly expand your database structure without manually defining each table and its relationships.
For more details on how to use this feature, refer to the [NocoAI documentation](/docs/product-docs/noco-ai/create-table).
***
# Date Dependencies
URL: /docs/product-docs/tables/date-dependency
Define which records are dependent on others. When you reschedule a record, dependent records are automatically rescheduled.
**Plan availability:**
Cloud — Business and above · On-Premise — Enterprise Scale and above
Date dependencies let your project schedule update itself. When one record shifts, every record that depends on it automatically adjusts — no manual updates needed.
For example: if a design phase runs a week late, the development and QA records that follow it will automatically move forward to stay in sequence.
{/* 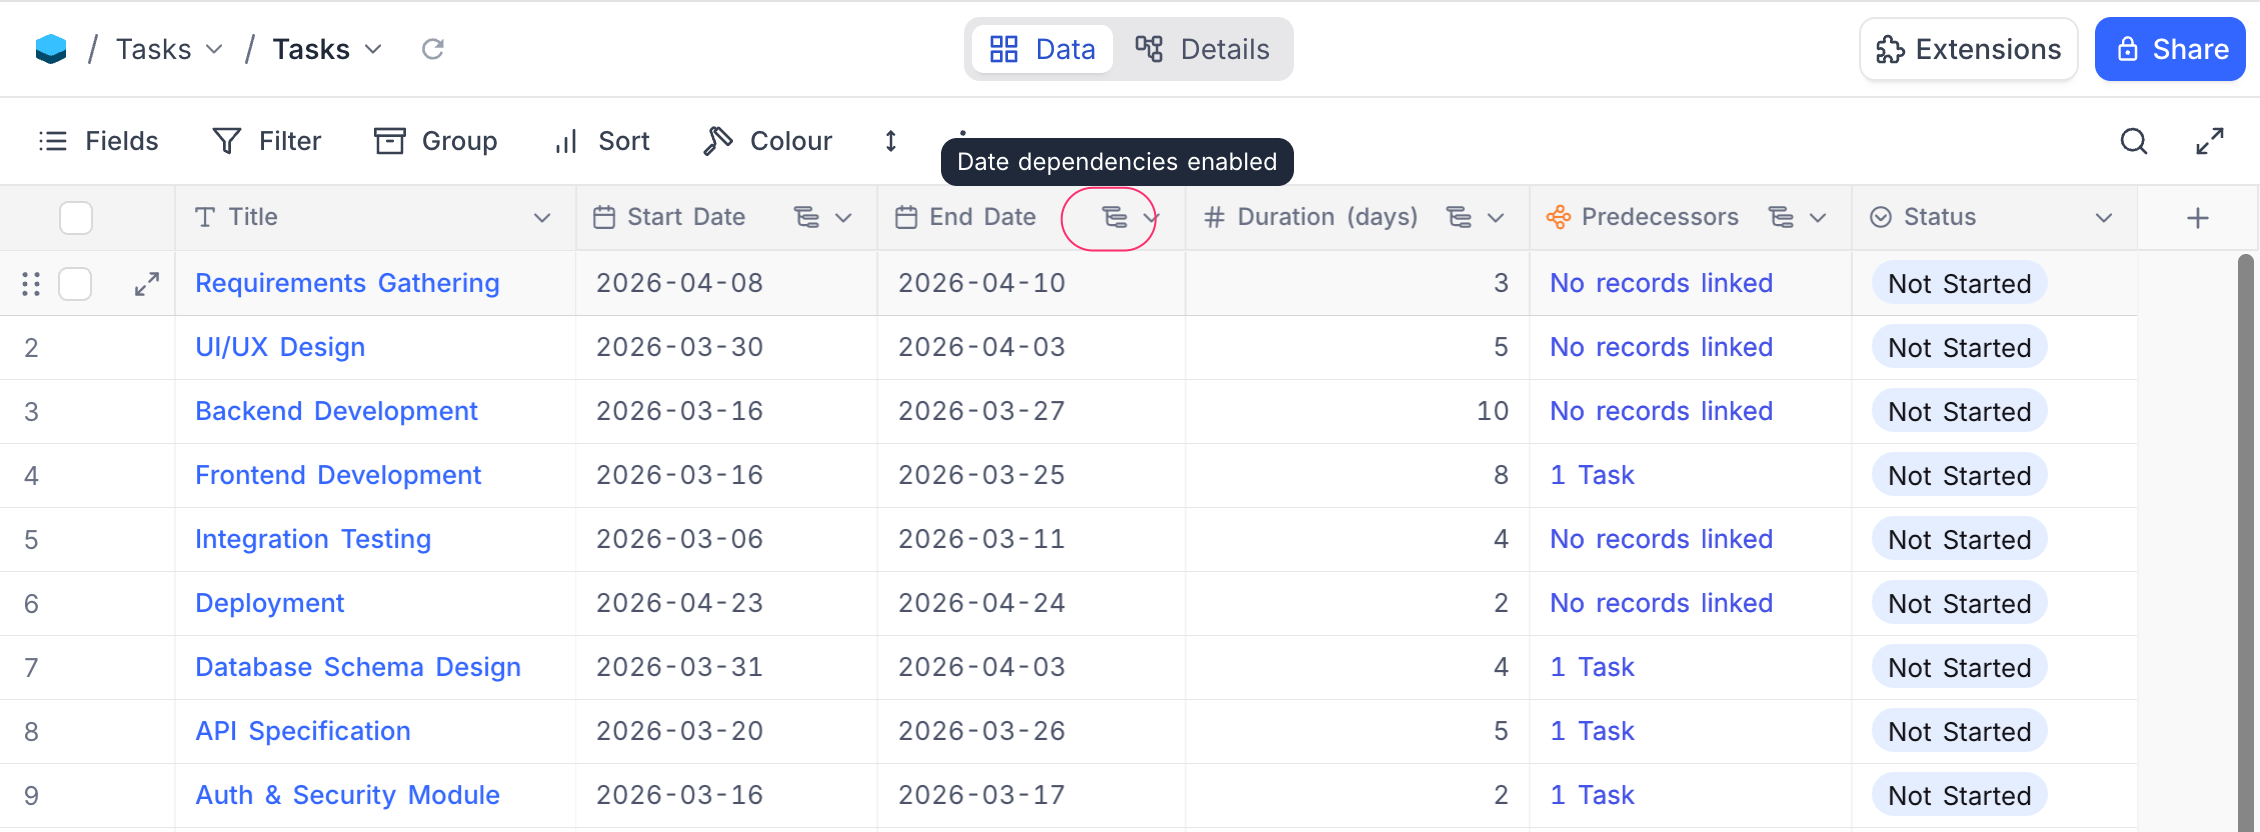 */}
### Requirements
Your table needs the following fields before you can enable date dependencies:
| Field | Type | Purpose |
| ---------------- | ------------------------------------------------------------ | ----------------------------------------------------------------------------------------------------------------------------------------------------------------------------------------- |
| Start Date | Date | When the record begins |
| End Date | Date | When the record ends |
| Duration | Number or Duration | How many days the record lasts. A Number field stores days directly; a Duration field is internally converted to days. Optional — NocoDB can calculate duration from start and end dates. |
| Predecessor Link | Link (self-referencing Has-Many, One-to-Many, or One-to-One) | Which record must happen before this one. Optional — only needed if you want records to cascade automatically. |
The
**Predecessor Link**
field is a self-referencing link field (Has-Many, One-to-Many, or One-to-One) that points back to the same table — it creates a relationship between records. For example, if "Development" depends on "Design", you'd link "Design" as the predecessor of "Development".
### Setting up date dependencies
1. Click `...` next to the table name in the left sidebar.
2. Select **Date Dependencies**.
The dialog opens with date dependencies disabled.
3. Toggle **Enable Date Dependencies** on.
4. Select your **Start Date** and **End Date** fields from the dropdowns.
5. Optionally, select a **Duration** field (Duration or Number type).
6. Optionally, select a **Predecessor Link** field to enable automatic cascading across records.
7. Click **Save**.
Start Date and End Date must be different fields.
### Include weekends
By default, date calculations include all calendar days (weekends included). Turn off **Include weekends** to skip Saturdays and Sundays in every calculation.
When **Include weekends** is turned off:
* **Duration** counts only business days (Mon–Fri). A record spanning Monday to Friday = 5 days, not 7.
* **End Date** skips weekends. A record starting Monday with a 6-day duration ends on the following Monday (skipping Saturday and Sunday).
* **Cascading** places dependent records on the next business day — never on a Saturday or Sunday.
### How fields stay in sync within a record
Once enabled, NocoDB keeps the date fields in sync whenever you edit a record:
| You change… | NocoDB auto-updates… |
| -------------- | ------------------------------------------- |
| **Start Date** | End Date moves to keep the same duration |
| **End Date** | Duration recalculates to match the new span |
| **Duration** | End Date adjusts to the new length |
When all three fields are present, Start Date and End Date take priority and duration is recalculated.
Duration counting is **inclusive** — a record from Jan 1 to Jan 10 has a duration of 10 days (both start and end dates are counted). A duration of **0** is valid and represents a same-day task where start and end dates are equal.
All calculations respect the **Include weekends** setting.
### Row propagation
When you set a Predecessor Link field, NocoDB can automatically shift dependent records to keep your timeline consistent. Cascading works in **both directions**:
* **Forward** — when a predecessor's dates change, successors shift later to avoid overlap.
* **Backward** — when a successor is moved earlier and collides with its predecessor, the predecessor shifts earlier to make room.
Row propagation (cascade updates across linked records) is only supported on
**PostgreSQL**
and
**MySQL 8+**
data sources. On other databases, only within-record field sync applies.
#### Scheduling mode
Choose how linked records respond when dates change:
| Mode | What happens |
| ------------ | -------------------------------------------------------------------------------------------------- |
| **Off** | No automatic rescheduling across linked records. Only within-record field sync applies. |
| **Flexible** | Only adjust when dates overlap or violate the gap. If there's already enough space, nothing moves. |
| **Strict** | Always snap to the exact gap — no slack allowed. Records shift even when there's no overlap. |
##### Flexible vs Strict — example
Consider two records with **End → Start** connection and **Gap = 2 days**:
```
Before — gap is 9 days (well above the required 2):
Design: ████████████
Development: ████████████
Jan 1 Jan 10 Jan 20 Jan 29
←── 9 days ──→
```
Now you move Design's End Date to **Jan 14**:
```
Flexible — gap shrinks to 5, still ≥ 2, so nothing moves:
Design: ████████████████
Development: ████████████
Jan 1 Jan 14 Jan 20 Jan 29
←─ 5 days ─→ ✓ no violation
```
```
Strict — snaps to exact gap of 2, Development shifts:
Design: ████████████████
Development: ████████████
Jan 1 Jan 14 Jan 17 Jan 26
←2→
```
Put simply: **Flexible** only prevents overlap, **Strict** enforces the exact spacing at all times.
#### Connection type
Choose how predecessor and successor records relate to each other:
| Type | Meaning | Example |
| ----------------- | ----------------------------------------- | ----------------------------------------------------------- |
| **End → Start** | Successor starts after predecessor ends | Design ends → Development begins. Most common. |
| **Start → Start** | Successor starts after predecessor starts | Design begins → QA monitoring begins alongside it. |
| **End → End** | Successor ends after predecessor ends | Development ends → Documentation wraps up at the same time. |
| **Start → End** | Successor ends after predecessor starts | Setup must be done before the event kicks off. |
##### Connection type examples
The examples below use **Strict** mode with **Gap = 0** to show how each connection type works. The predecessor is **Design** (Jan 1 – Jan 10, 10 days).
**End → Start** — Development starts the day after Design ends:
| Record | Start Date | End Date | Duration |
| ----------- | ---------- | -------- | -------- |
| Design | Jan 1 | Jan 10 | 10 days |
| Development | **Jan 11** | Jan 20 | 10 days |
If Design's End Date moves to Jan 15, Development shifts to start on **Jan 16**.
**Start → Start** — Development starts the same day as Design:
| Record | Start Date | End Date | Duration |
| ----------- | ---------- | -------- | -------- |
| Design | Jan 1 | Jan 10 | 10 days |
| Development | **Jan 1** | Jan 10 | 10 days |
If Design's Start Date moves to Jan 5, Development shifts to start on **Jan 5**.
**End → End** — Development ends the same day as Design:
| Record | Start Date | End Date | Duration |
| ----------- | ---------- | ---------- | -------- |
| Design | Jan 1 | Jan 10 | 10 days |
| Development | Jan 1 | **Jan 10** | 10 days |
If Design's End Date moves to Jan 15, Development shifts so it ends on **Jan 15** (Start Date adjusts to Jan 6 to maintain duration).
**Start → End** — Development ends the same day as Design starts:
| Record | Start Date | End Date | Duration |
| ----------- | ---------- | --------- | -------- |
| Design | Jan 1 | Jan 10 | 10 days |
| Development | Dec 23 | **Jan 1** | 10 days |
If Design's Start Date moves to Jan 5, Development shifts so it ends on **Jan 5** (Start Date adjusts to Dec 27 to maintain duration).
Note that
**End → Start**
is the only connection type with a +1 offset — the successor starts the
*day after*
the predecessor ends. All other types align dates to the
*same day*
. Use the
**Gap (days)**
setting to add spacing between records for any connection type.
#### Gap (days)
Set a minimum buffer between records. For example, with **End → Start** connection type:
* **Gap = 0** — the successor starts the day right after the predecessor ends.
* **Gap = 3** — there's a 3-day buffer between the predecessor ending and the successor starting.
When **Include weekends** is turned off, gap days count only business days.
### Examples
#### Basic cascade (Strict, End → Start, Gap = 0)
Three records in sequence — **Design → Development → QA**:
```
Before:
Design: ██████████
Development: ██████████
QA: ██████████
Jan 1 Jan 10 Jan 20 Jan 30
```
Design overruns — you move its End Date to **Jan 20**. NocoDB shifts the rest automatically:
```
After — cascade ripples forward:
Design: ████████████████████
Development: ██████████
QA: ██████████
Jan 1 Jan 20 Jan 30 Feb 9
```
Each successor keeps its original duration and the sequence stays intact.
#### Backward cascade (Strict, End → Start, Gap = 0)
Same three records. You move **Development** backward so it starts on **Jan 5** — colliding with Design which ends Jan 10:
```
Before:
Design: ██████████
Development: ██████████
QA: ██████████
Jan 1 Jan 10 Jan 20 Jan 30
```
```
You move Development to Jan 5 — it now overlaps Design:
Design: ██████████
Development: ██████████
Jan 5 Jan 14
↑ collision!
```
NocoDB pushes Design earlier to make room:
```
After — Design shifts backward:
Design: ██████████
Development: ██████████
QA: ██████████
Dec 26 Jan 4 Jan 5 Jan 14 Jan 21 Jan 30
```
Design keeps its original duration and shifts backward so Development can start on Jan 5 without overlap.
#### Working days cascade
Same setup but with **Include weekends** turned off. Design ends on **Friday Jan 10**:
| Record | Start Date | End Date | Duration |
| ----------- | --------------- | ----------- | -------- |
| Design | Mon, Jan 6 | Fri, Jan 10 | 5 days |
| Development | **Mon, Jan 13** | Fri, Jan 17 | 5 days |
Development starts on **Monday** — the next business day — not Saturday.
### Automations and webhooks
When NocoDB automatically reschedules dependent records, any automations or webhooks configured on the table will fire for those updated records — so you can notify your team, update a connected tool, or trigger any follow-up action.
### Things to know
* Each table supports one date dependency configuration.
* Start Date and End Date must be **Date** fields (not DateTime).
* Duration must be a **Duration** or **Number** field.
* The Predecessor Link must be a self-referencing link field (**Has-Many**, **One-to-Many**, or **One-to-One**).
* **Include weekends** applies everywhere — both within-record field sync and cascading across records.
* Row propagation (cascade across linked records) is only supported on **PostgreSQL** and **MySQL 8+** data sources.
* When dependent records are automatically rescheduled, they are briefly highlighted with a **light yellow background** in the grid to indicate which records were modified. The highlight fades after about 2 seconds.
* Fields that are part of an active date dependency configuration are marked with a small icon in their column header. Hovering the icon shows a **"Date dependencies enabled"** tooltip.
* If you delete a **Start Date** or **End Date** field that is referenced by a date dependency configuration, the configuration is automatically **deactivated**. Deleting a Duration or Predecessor Link field clears only that field reference — the configuration may remain active.
* Cascade-propagated row updates are logged as a distinct **cascade update** in the audit trail, so you can distinguish them from manual edits.
* **Sibling records are not re-propagated.** When a record is moved backward and its predecessor is pushed earlier, other successors of that predecessor (sibling records) are not automatically re-evaluated. Only the direct chain — predecessors upward and successors downward from the edited record — is adjusted. To update sibling records, edit any one of them to trigger a fresh cascade.
### FAQs
**What's the difference between Flexible and Strict?**
**Flexible** only moves records when they would overlap or violate the gap — if there's already enough space, nothing changes. **Strict** always enforces the exact gap you've set, moving records even when there's no overlap.
**What if two records depend on each other in a loop?**
NocoDB detects circular dependencies and stops the cascade safely. No records will be updated in a loop.
**Do automations fire when dates are rescheduled automatically?**
Yes — any automations or webhooks on the table fire for all records that are updated as part of a cascade.
**What does "Include weekends" do?**
When turned on (default), all calendar days including weekends are counted. When turned off, Saturdays and Sundays are skipped in all date calculations — duration counts only Mon–Fri, end dates land on weekdays, and rescheduled records never start on a weekend.
**Which databases support row propagation?**
Cascade propagation across linked records requires **PostgreSQL** or **MySQL 8+**. On other databases (SQLite, etc.), only within-record field sync (Start Date / End Date / Duration calculations) is available.
# Upload data into a table
URL: /docs/product-docs/tables/import-data-into-existing-table
Learn how to upload data into an existing table in NocoDB.
## Import data from CSV / Excel
### Accessing import modal
1. Click on `⋮` context menu from the toolbar.
2. Select `Upload` from the dropdown menu.
3. Select `CSV` / `Excel` option.
### Importing file data
1. Select file to upload
There are two ways to upload source file:
* **Upload** : Upload from local directory. Either click 'browse file' or drag and drop file.
* **Add from URL** : Specify the URL of the file.
2. (*optional*) Select character encoding. By default, it is set to `UTF-8`.
3. Advanced Settings : **Use first record as header**
* Enabled by default. If selected, the first record in the spreadsheet will be treated as the header record and its contents will be used as field names.
4. Click on `Upload files` button.
5. **Mapping Fields** (Optional)
* You can reconfigure the mapping by utilizing the dropdown menu that appears when you click on the destination field.
* Existing field names are listed under **NocoDB field** (column to the right), while new fields identified from the import file are listed under **Field** (column to the left).
* NocoDB automatically maps field names in the import file based on the NocoDB field names.
6. **Exclude fields** (Optional)
* Uncheck checkbox to exclude a field from being imported.
7. **Allow create missing select field options** (Optional)
* If enabled, NocoDB will create new options for select fields that are not already present in the table.
8. **Initiate Import**
* Click on the `Upload` button to commence the file import process.
On completion, the imported data will be appended to the existing table.
***
# Tables
URL: /docs/product-docs/tables
Learn how to create, import, and manage tables in NocoDB.
Tables are where your data lives in NocoDB — made up of **records** (rows) and **fields** (columns). Each base can have multiple tables, and you can link them to create relationships between datasets.
NocoDB tables function like spreadsheets, with added flexibility:
* View data as a grid, kanban board, gallery, or calendar.
* Perform operations like sorting, filtering, and aggregation.
You can:
* [Create a new table](/docs/product-docs/tables/create-table)
* [Import a table from CSV, Excel, or JSON](/docs/product-docs/tables/create-table-via-import)
* [Import data into an existing table](/docs/product-docs/tables/import-data-into-existing-table)
* [Rename](/docs/product-docs/tables/actions-on-table#rename-table), [duplicate](/docs/product-docs/tables/actions-on-table#duplicate-table), or [delete a table](/docs/product-docs/tables/actions-on-table#delete-table)
Use tables to organize your data your way — flexible, powerful, and easy to manage.
***
# Actions on view
URL: /docs/product-docs/views/actions-on-view
Learn how to delete, rename, duplicate a a view in NocoDB.
## View context menu
The view context menu provides a set of tools to interact with the view. The view context menu can be accessed by clicking on the ellipsis symbol (`...`) located next to view in the left sidebar.
## Rename view
1. Click on the ellipsis symbol (`...`) next to view name located in the left sidebar.
2. Click on the `Rename` option from the view context menu.
3. Enter the desired new view name into the provided field.
4. Use `Enter` key to finalize the renaming process.
## Change view icon
1. Click on the existing view icon to the left of the view name in the left sidebar.
2. Select the desired icon from the list of available options.
## Duplicate view
1. Click on the ellipsis symbol (`...`) next to view name located in the left sidebar.
2. Click on the `Duplicate` option from the view context menu.
3. Enter the desired new view name into the provided field.
4. Click on the `Duplicate View` button in the confirmation dialog.
## Delete view
**This action cannot be undone**
1. Click on the ellipsis symbol (`...`) next to view name located in the left sidebar.
2. Click on the `Delete` option from the view context menu.
3. Click on the `Delete View` button in the confirmation dialog.
## Lock / Unlock view
Locked views prevent members from modifying view configurations. To lock a view, change the permission type to `Locked` from the view context menu. To unlock a view, change the permission type back to `Collaborative`.
You can also add a custom message to inform members why the view is locked. This message is visible to all members when they attempt to unlock the view.
Locked views in sidebar appears with a `lock` icon next to the view name.
## Personal Views ☁
Personal Views are available in NocoDB Cloud and Self-hosted Enterprise editions.
Personal Views give exclusive control over view configurations to the owner, while other members have read-only access to view configurations. To assign a view as Personal View, change the permission type to `Personal` from the view context menu. To revert back to Collaborative or Locked view, change the permission type accordingly.
You can also assign or change the owner of a Personal View from the left sidebar view context menu.
Personal view in sidebar appears with a `user` icon next to the view name.
## Add / edit view description
View description can be added by clicking on the `Add Description` button on the view creation modal or by clicking on the `Edit Description` button from the view context menu.
Description for a view will be visible as a tooltip when hovering over the `info` icon next to the view name.
## Copy another view's configuration ☁
Cloud / On-Premises Enterprise Feature
You can copy view configurations from another view to quickly apply the same settings to your current view. This is useful when you want to replicate filters, sorting, field visibility, and other configurations across multiple views.
**Steps to copy view configuration**
1. Click on the vertical ellipsis symbol `⋮` in the toolbar.
2. Select **"Copy another view's configuration"** from the view context menu.
3. In the modal dialog, select the source view from the **Select view to copy from** dropdown. All the views available in the current table will be listed here.
4. Check the **configuration(s)** you want to copy:
* Field visibility - Copy which fields are visible/hidden
* Field order - Copy the column arrangement
* Column width - Copy column width settings
* Row height - Copy row height settings
* Filter condition - Copy applied filters
* Group - Copy grouping settings
* Sort - Copy sorting settings
* Row coloring - Copy row color settings
5. Click **"Copy configuration"** to apply the selected settings to your current view.
Selective "Copy from another view" menu option is also available for various toolbar items like Filter, Group and Sort. This opens up the same copy configuration modal with the respective configuration option pre-selected. You can then choose to copy additional configurations as needed.
Note that,
* When copying configurations, the system will only apply settings that are compatible with the current view type. Incompatible settings will be disabled in the copy configuration modal.
* Only views from the same table can be selected as source views for copying configurations.
## Views filtered by `Current User` ☁
NocoDB allows you to filter views based on the currently logged-in user. This is particularly useful for creating personalized views that display records relevant to the user currently logged in. Find more details on how to filter by current user in the [Filtering records by current user](/docs/product-docs/table-operations/filter#filter-by-current-user-) section.
## URL based record filtering
NocoDB enables users to dynamically filter records using query parameters directly in the URL. This is useful when creating sharable views or automating filtered data access in embedded dashboards or internal workflows.
**Basic Syntax**
Filtering is controlled using the `where` query parameter in the following format:
```plaintext
?where=(,,)
```
**Example**
```plaintext
https:///#/workspaceId/baseID/tableID?where=(country,eq,France)
https:///#/workspaceId/baseID/tableID/viewID?where=(country,eq,France)
```
This filters records where the field `country` is equal to `France`.
### Supported Operators
List of supported operators for filtering across various data types are listed below
* [Comparison Operators](/docs/product-docs/developer-resources/rest-apis#comparison-operators)
* [Comparison Sub Operators](/docs/product-docs/developer-resources/rest-apis#comparison-sub-operators)
* [Logical Operators](/docs/product-docs/developer-resources/rest-apis#logical-operators)
### Combining Filters
Multiple conditions can be joined using logical operators:
* `~and` → logical AND
* `~or` → logical OR
**Example**
```plaintext
?where=((country,eq,France)~or(country,eq,Germany))
```
This retrieves records where `country` is either France or Germany.
```plaintext
?where=((country,eq,France)~and(status,eq,Active))
```
This retrieves records where both conditions are true.
***
Conditions can be grouped using nested parentheses to form complex logic:
```plaintext
?where=(((country,eq,France)~or(country,eq,Germany))~and(status,eq,Active))
```
### Filter Precedence: Toolbar vs URL
Toolbar filters take precedence over URL filters
This means:
* Filters applied manually via the **Filter** menu are evaluated first.
* Then, the URL query parameter filters (`?where=...`) are applied on top of the results.
**Visual Indicator**: As shown in the screenshot below, the toolbar clearly lists both types of filters:
* The user-applied filter: `Segment is equal to Government`
* The URL-applied filter: `Country is equal to France` (listed under **URL Filters**)
### Additional Notes
* Field names must be exact (case-sensitive).
* URL values must be URL-encoded if they include spaces or special characters.
# Create view
URL: /docs/product-docs/views/create-view
Learn how to create a new view in NocoDB.
## Create new view
1. Click on `+ New View` button below `table name`.
2. Select view type from the dropdown modal.
3. Fill view name in the pop-up modal.
* For Kanban view, select the `Single select` field to be used as the Kanban field.
* For Calendar view, select the `Date` OR `DateTime` field to be used as the Calendar field.
* For Map view, select the `GeoData` field to be used as the Mapped By field.
* For Timeline view, select the `Date`, `DateTime`, `CreatedTime`, or `LastModifiedTime` field to be used as the start date. Optionally, add an end date field.
4. Click on `Create View` button.
# View
URL: /docs/product-docs/views
Learn about Views in NocoDB.
Views in NocoDB allow you to customize how your data is displayed while maintaining independent control over sorting, filtering, and field visibility. Each view retains its own configuration, ensuring that changes made to one view do not affect any others.
This flexibility enables users to organize and visualize data efficiently, providing tailored perspectives for different workflows or team members.
A View represents data from a table. Any updates made to records in one view are reflected across all other views of the same table.
## Supported View Types
1. [Grid View](/docs/product-docs/views/view-types/grid)
2. [Form View](/docs/product-docs/views/view-types/form)
3. [Gallery View](/docs/product-docs/views/view-types/gallery)
4. [Kanban View](/docs/product-docs/views/view-types/kanban)
5. [Calendar View](/docs/product-docs/views/view-types/calendar)
6. [List View](/docs/product-docs/views/view-types/list) ☁
7. [Map View](/docs/product-docs/views/view-types/map) ☁
8. [Timeline View](/docs/product-docs/views/view-types/timeline) ☁
View the video below for a quick overview of NocoDB Views:
## View Permission Types
Permissions can be applied to each view. By default, all views are **Collaborative**. To view or modify a view’s permission type, open the **View Toolbar Menu** as shown below.
All views within a base are visible to every member. Only the ability to edit or modify view configurations can be controlled through view permission type settings.
View configurations include the following items in the toolbar:
* Field visibility
* Field order
* Field width
* Filters
* Sorts
* Groups
* Row Colors
* Row Height
Toolbar access is determined by the member's role. Members with **Editor**, **Creator**, or **Owner** roles have toolbar access by default. Members with **Commenter** or **Viewer** roles do not have toolbar access.
### Collaborative Views (Default)
By default, views are set to **Collaborative**, allowing members with edit permissions or higher to modify view configurations. In this mode, all members with toolbar access can modify view configurations such as field visibility, order, filters, sorts, groups, colors, and row height.
### Locked Views
In a **Locked View**, view configurations cannot be edited until the view is unlocked. Members can read data but cannot modify view settings or content. This mode is ideal for sharing consistent data presentations with others while preventing accidental changes.
Learn more about [Locking and Unlocking Views](/docs/product-docs/views/actions-on-view#lock--unlock-view).
### Personal Views ☁
Personal Views are available in NocoDB Cloud and Self-hosted Enterprise editions.
**Personal Views** give exclusive control over view configurations to the owner, while other members have read-only access to view configurations. This mode is similar to Locked Views but allows only the view owner to make configuration changes.
* The owner can reassign ownership or convert the view to **Collaborative** or **Locked**.
* The base owner or creator also retains the ability to manage ownership and lock status.
* For older views without an assigned owner, ownership defaults to the base owner.
Learn more about [Personal Views](/docs/product-docs/views/actions-on-view#personal-views-).
***
## Organizing Views with Sections ☁
As the number of views in a table grows, you can group related views into collapsible **[View Sections](/docs/product-docs/views/view-sections)** in the left sidebar. Sections act as folders — they help you organize views by purpose (e.g., "Reports", "Data Entry", "Team Views") without affecting the data or configuration of the views inside them.
View Sections are available on the
**Business**
plan and above in NocoDB Cloud and Self-hosted Enterprise editions.
## General Notes
* When a table is opened, the default view displayed is the first common (non-personal) view, which can be either **Collaborative** or **Locked**.
* Each table must contain at least one common (non-personal) grid view. The last remaining common view cannot be deleted or converted into a personal view.
* The field display order for linked records is determined by the first common (non-personal) grid view of the source table.
***
# Share view
URL: /docs/product-docs/views/share-view
Learn how to share a view publicly in NocoDB.
Sharing a specific view of a table becomes highly valuable when you need to collaborate with individuals outside your organization who need access to specific sections of your database. This shared view provides a read-only perspective, accessible to anyone, regardless of their workspace affiliation. You have control over which data fields and records are visible to these external viewers, ensuring that any sensitive data remains hidden. Furthermore, if you decide to make changes to the visible fields or records within the view, the shared link will promptly reflect these adjustments, updating in real-time.
## Generate Share View
1. Click `Share` button on the top right of the toolbar
2. Toggle `Enable public viewing` to create shared view link
3. Click `Copy` button to copy the link to clipboard
### Share view options
### Custom URL
You can customize the URL of the shared view by entering a custom URL in the input field. The custom URL should be unique and should not contain special characters from the set (`/`, `?`, `#`). If the custom URL is already taken, you will be prompted to enter a different custom URL.
To enable custom URL,
1. Click on the `Custom URL` toggle
2. Enter the custom URL in the input field
3. Click on the `Save` button to save the changes
Note that, the custom URL is case-sensitive.
#### Password protection
You can enable `Restrict access with a password` if you want a password-protected view
#### Download options
You can toggle `Allow Download` button to enable or disable download CSV/XLSX options in the shared view link
### Share Form View Options
Form view has additional customizations for shared view. You can enable/disable the following options for shared form view:
1. `Survey mode`: This option when enabled, will display the form in survey mode.
2. `RTL Orientation`: This option when enabled, will display the form in RTL orientation.
3. `Themes`: You can select a theme for the form from the dropdown.
## Access Share View
To access the shared view, please follow the steps below:
Click on the `Shared View URL`. If the URL is password-protected, you will be prompted to enter the password to unlock it. Please input the required password to proceed.
Once the password is successfully entered and authenticated, you will gain access to the shared view.
In the event that the URL is not password-protected, you will be directed to the shared view directly, without the need for a password.
Users with the shared view link can only view the data and cannot make any changes to the view or its content. Records and fields in the shared view will be updated in real-time as changes are made to the original view. Users accessing shared view can apply filters and sort records as per their requirements.
Filters & sorts applied to shared view will not be persisted. These filters & sorts will be reset when the shared view is accessed again.
***
# View sections
URL: /docs/product-docs/views/view-sections
Learn how to organize views into collapsible sections in NocoDB.
View Sections are available on the
**Business**
plan and above in NocoDB Cloud and Self-hosted Enterprise editions.
View Sections allow you to organize your views into collapsible folders within the left sidebar. As the number of views in a table grows, sections help you group related views together, making it easier to navigate and manage your workspace. For example, you could create sections like "Reports", "Data Entry", or "Team Views" to keep things tidy.
## Create a section
There are two ways to create a new section:
### From the Create View menu
1. Click the `+ Create View` button in the left sidebar, below the table name.
2. Click the `Section` option at the bottom of the dropdown menu.
3. A new section is created with a default name (e.g., "View section"). You can immediately rename it by double-clicking on the section name.
### From the Move to menu
1. Right-click on a view or click the ellipsis symbol (`...`) next to a view name to open the view context menu.
2. Hover over `Move to...` to open the submenu.
3. Click `New section` to create a new section and automatically move the selected view into it.
Each new section is automatically assigned a unique name. If "View section" already exists, subsequent sections are named "View section 2", "View section 3", and so on.
## Rename a section
1. Double-click on the section name in the left sidebar to enter edit mode.
2. Type the new name.
3. Press `Enter` to save, or press `Escape` to cancel.
Alternatively, you can rename a section from the context menu:
1. Click the ellipsis symbol (`...`) on the section header.
2. Select `Rename section`.
3. Type the new name and press `Enter`.
Section names must be unique within a table. If you enter a name that already exists, an error message is displayed.
## Move views into a section
1. Click the ellipsis symbol (`...`) next to the view you want to move, or right-click on the view name.
2. Hover over `Move to...` in the context menu.
3. Select the target section from the submenu.
The submenu displays all existing sections. You can also:
* Click `New section` to create a new section and move the view into it in a single step.
* Click `Remove from section` (visible only when the view is already in a section) to move the view back to the top level.
## Remove a view from a section
1. Click the ellipsis symbol (`...`) next to the view name inside a section.
2. Hover over `Move to...` in the context menu.
3. Click `Remove from section`.
The view is moved back to the top-level view list, outside of any section.
## Expand and collapse sections
Sections are collapsible, allowing you to hide views you are not currently working with.
* Click on a **section header** to toggle it between expanded and collapsed states.
* When collapsed, views inside the section are hidden from the sidebar (except the currently active view, which always remains visible).
### Expand all / Collapse all
To quickly expand or collapse every section at once:
1. Click the ellipsis symbol (`...`) on any section header.
2. Select `Expand all` or `Collapse all`.
Your expand/collapse preferences are saved per table in your browser and persist across sessions.
## Change section icon colour
Each section displays a folder icon whose colour can be customized.
1. Click the ellipsis symbol (`...`) on the section header to open the context menu.
2. A colour palette is displayed under `Icon colour`.
3. Click on any colour to apply it, or click the `More colours` option to pick a custom colour.
## Reorder sections
You can drag and drop sections to rearrange their order in the sidebar.
1. Click and hold a section header.
2. Drag it to the desired position among other sections.
3. Release to drop it in place.
{/*  */}
## Delete a section
**This action cannot be undone.**
1. Click the ellipsis symbol (`...`) on the section header.
2. Click `Delete section`.
3. A confirmation dialog appears, informing you that views inside the section will be moved to the top level.
4. Click `Delete` to confirm.
Deleting a section does
**not**
delete the views inside it. All views are automatically moved back to the top-level view list.
## Default section
When at least one section exists in a table, a virtual **Default** section is automatically displayed at the bottom of the section list. This section contains all views that have not been assigned to any section. The Default section cannot be renamed, deleted, or reordered, but it can be expanded and collapsed like any other section.
***
## Notes
* View Sections are an organizational tool — they do not affect the data or configuration of the views inside them.
* Sections are scoped to individual tables. Each table has its own independent set of sections.
* All members of a workspace can see sections. Only members with **Editor** permissions or above can create, rename, reorder, or delete sections.
* When a section is collapsed, the currently active view remains visible in the sidebar regardless of which section it belongs to.
# Actions on workspace
URL: /docs/product-docs/workspaces/actions-on-workspace
Learn how to rename or delete a workspace in NocoDB.
## Rename workspace
1. Click on the workspace name in the sidebar to open workspace settings.
2. Open the **Settings** tab.
3. Under **Workspace Appearance**, update the **Name** field.
4. Click **Save** to apply changes.
## Delete workspace
Permanently deletes the workspace and all its bases, tables, and data.
**This action is irreversible.**
This will permanently remove the workspace and all its contents.
Only the
**workspace owner**
can delete a workspace.
1. Click on the workspace name in the sidebar to open workspace settings.
2. Open the **Settings** tab.
3. Under **Danger Zone**, click **Delete Workspace**.
4. Confirm by entering the workspace name in the dialog.
## Leave workspace
If you no longer need access to a workspace, you can leave it. You will not be able to access the workspace unless re-invited.
1. Click on the workspace name in the sidebar to open workspace settings.
2. Open the **Settings** tab.
3. Under **Danger Zone**, click **Leave Workspace**.
## Find workspace ID
Each workspace has a unique ID displayed on the **Settings** tab next to the workspace name. The ID is also visible in the URL when viewing a workspace.
Example:
```
https://app.nocodb.com/w7kjha1w/...
```
In this example, the workspace ID is `w7kjha1w`.
# Subscription & billing
URL: /docs/product-docs/workspaces/billing
Manage your NocoDB subscription, change plans, and access billing information easily.
NocoDB offers flexible pricing and simple subscription management through the billing dashboard.
## Billing dashboard
Access the billing dashboard by clicking the workspace name in the sidebar and selecting the **Billing** tab.
The dashboard shows:
* **Current Plan** and renewal date
* **Next invoice** amount and date
* **Billed users** count
* **Records** — usage against plan limit
* **Storage used** — attachments storage against plan limit
* **Webhook calls** — usage against monthly limit
* **API calls** — usage against monthly limit
* **Past Invoices** — date, plan, total, status, and download link
## Change your plan
1. Click the workspace name in the sidebar and open the **Billing** tab.
2. Click **Upgrade Workspace**.
3. Select the desired plan and follow the prompts to confirm.
Upgrades take effect immediately. Downgrades apply at the end of your billing cycle.
## Manage subscription
Click **Manage Subscription** on the billing dashboard to open the Stripe billing portal. From there you can:
* Update your card details
* View upcoming payments
* Add or change your payment method
* Cancel your subscription
## Download invoices
1. Scroll to the **Past Invoices** section on the billing dashboard.
2. Click **View invoice** next to the invoice you want.
3. A PDF copy will open in a new tab.
## Cancel plan
1. Click the workspace name in the sidebar and open the **Billing** tab.
2. Click **Manage Subscription** to open the Stripe billing portal.
3. Click **Cancel subscription** and confirm when prompted.
Your workspace remains on the current plan until the end of the billing period. After cancellation, it switches to the Free plan automatically.
Alternatively, you can downgrade directly:
1. From the **Billing** tab, click **Upgrade Workspace**.
2. Select **Choose Free**.
3. Click **Proceed** and follow the prompts.
For assistance, contact the [Support team](mailto:support@nocodb.com).
# Create workspace
URL: /docs/product-docs/workspaces/create-workspace
Learn how to create a workspace in NocoDB
When you sign up for NocoDB, a default workspace is automatically created for you. You can [rename this workspace](/docs/product-docs/workspaces/actions-on-workspace#rename-workspace) or create additional ones as needed.
The ability to create additional workspaces depends on your subscription plan. Refer to the
[pricing page](https://nocodb.com/pricing)
for details.
## Create a workspace
1. Click **+ New Workspace** at the bottom of the sidebar.
2. Enter a name for your workspace.
3. Click **Create Workspace**.
Once created, you become the **owner** of the workspace. You can then [create bases](/docs/product-docs/bases/create-base) and [invite collaborators](/docs/product-docs/workspaces/workspace-collaboration) to work with you.
# Workspaces
URL: /docs/product-docs/workspaces
Overview of workspaces in NocoDB.
Workspaces in NocoDB help organize and manage your data collaboratively. Each workspace can contain one or more bases, bringing together related tables, views, and other elements under a unified structure. You can control access by assigning roles to workspace members, enabling secure and efficient teamwork.
You can [invite team members](/docs/product-docs/workspaces/workspace-collaboration) to collaborate, [assign roles](/docs/product-docs/workspaces/workspace-collaboration#modify-roles-for-members-or-teams) to control access, and [rename](/docs/product-docs/workspaces/actions-on-workspace#rename-workspace) or [delete](/docs/product-docs/workspaces/actions-on-workspace#delete-workspace) workspaces as needed.
A default workspace is provided for all users. The ability to create additional workspaces depends on your subscription plan. Refer to the
[pricing page](https://nocodb.com/pricing)
for details on plan-specific features.
## Workspace overview
The sidebar lists all workspaces you have access to. Click a workspace name to view its bases, members, integrations, billing, audits, and settings.
# Workspace audit logs
URL: /docs/product-docs/workspaces/workspace-audit
Learn how to access and use audit logs to track workspace activity in NocoDB.
This article covers
**workspace-level**
audit logs. For
**record-level**
logs (e.g., changes to individual records), refer to the
[record audit section](/docs/product-docs/records/expand-record#record-audit)
.
Audit logs are available only in the
**Enterprise Edition**
, both for self-hosted and cloud deployments.
The **Audit Logs** feature in NocoDB provides a comprehensive, time-stamped record of user activity across your workspace. It enables workspace owners to monitor key actions, ensuring transparency, traceability, and accountability.
## Accessing audit logs
Only **workspace owners** can access audit logs.
To view them:
1. Click on the workspace name in the sidebar to open workspace settings.
2. Select the **Audits** tab.
***
## Audit log details
The audit list displays the following columns:
* **User**: Name and email of the user who performed the action
* **Timestamp**: Time of the event (e.g., “3h ago”)
* **Base**: Name and ID of the base involved
* **Event**: Type of action performed (e.g., *View Field Update*, *Table Create*)
* **IP Address**: IP of the user who performed the action
Click a log entry to view the **Audit Details** panel, which includes the performer, IP address, OS and browser info, base, event type, and the full event payload in JSON format.
***
## Logged events
| Category | Events |
| ----------------------------- | ---------------------------------------------------------------------------------------------------------------------------- |
| **Data** | Insert, Update, Delete, Bulk Insert/Update/Delete/All Delete/All Update, Cascade Update, Link, Unlink, Import, Export |
| **User & Auth** | Sign Up, Sign In, Sign In Failed, Sign Out, Invite, Email Verify, Profile Update, Password Change/Reset/Forgot |
| **Workspace** | Create, Update, Delete, Rename, Member Invite/Update/Remove, Team Invite/Update/Remove |
| **Base** | Create, Update, Delete, Rename, Duplicate, Member Invite/Update/Resend, Team Invite/Update/Remove, Shared Base Create/Delete |
| **Table** | Create, Update, Delete, Rename, Duplicate |
| **Field** | Create, Update, Rename, Delete, Duplicate, Form Field Update, View Field Create/Update |
| **View** | Create, Update, Delete, Rename, Duplicate, Filter Create/Update/Delete, Sort Create/Update/Delete |
| **Shared View** | Create, Update, Delete |
| **Webhook** | Create, Update, Delete, Filter Create/Update/Delete |
| **Source** | Create, Update, Delete, Rename |
| **Integration** | Create, Update, Delete |
| **Dashboard** | Create, Update, Delete, Duplicate, Shared Dashboard Create/Update/Delete |
| **Widget** | Create, Update, Delete, Duplicate, Filter Create/Update/Delete |
| **Script** | Create, Update, Delete, Duplicate |
| **Workflow** | Create, Update, Delete, Duplicate |
| **Document (NocoDocs)** | Create, Update, Delete, Comment Create/Update/Delete |
| **Permission** | Create, Update, Delete |
| **RLS** | Policy Create, Update, Delete |
| **Record Template** | Create, Update, Delete, Use |
| **Date Dependency** | Update, Delete |
| **API Token** | Create, Update, Delete |
| **Snapshot** | Create, Delete, Restore |
| **Team** | Create, Update, Delete, Move, Member Add/Update/Remove |
| **SCIM** *(Enterprise)* | User Provision, Update, Deactivate, Reactivate, Delete |
| **Airtable Import** | Import, Import Error |
| **Org Users** *(Self-hosted)* | Invite, Resend Invite |
***
## Filtering logs
Use the filter bar at the top of the **Audits** tab to narrow results by:
* **User**
* **Base**
* **Event** type
* **Range** — All Time, Last 24H, Past Week, Past Month, Past Year, or Custom Date Range
# Workspace collaboration
URL: /docs/product-docs/workspaces/workspace-collaboration
This article explains how to invite members or teams to your workspace, manage their roles, and remove them when needed.
A comprehensive guide regarding roles and permissions can be accessed
[here](/docs/product-docs/roles-and-permissions)
Teams feature availability:
**Business**
plan onwards in cloud and On-premise
**Enterprise**
edition
## Invite Members to Workspace
1. Click on the workspace name in the sidebar to open workspace settings.
2. Open the **Members** tab.
3. Click **Add Members**.
4. Enter one or more email addresses.
5. Select a role from the dropdown — **Creator**, **Editor**, **Commenter**, or **Viewer**.
6. Click **Invite to Workspace**.
Any user can invite members to the workspace, but they can only assign a role that is at most equal to their own role.
## Invite Teams to Workspace ☁
Teams can be invited to a workspace for simplified collaboration, with a workspace-level role assigned to all team members.
1. Click on the workspace name in the sidebar to open workspace settings.
2. Open the **Members** tab.
3. Click **Add Teams**.
4. Select one or more teams from the dropdown.
5. Choose a role for the selected teams.
6. Click **Add Teams** to confirm.
Teams cannot be assigned the
**Owner**
role. You can only assign roles that are at most equal to your own role.
When a team is invited, all users under that team inherit the assigned workspace-level role unless overridden by an explicit workspace role or base-level role.
To learn more about creating and managing teams, refer to the [Teams documentation](/docs/product-docs/collaboration/teams).
## List Workspace Members and Teams
The **Members** tab displays all users and teams that have access to the workspace.
* Individual members appear with their name, email, role, and date joined.
* Teams are listed with their name, member count, and assigned role.
The members list is accessible to all workspace members.
## Modify Roles for Members or Teams
Access permissions for both members and teams can be updated from the **Members** tab.
1. Click on the role dropdown next to the member or team.
2. Select a new role — **Creator**, **Editor**, **Commenter**, **Viewer**, **No Access**, or **Inherit** (inherits role from workspace-level team).
You can only assign roles that are at most equal to your own role in the workspace.
## Role Precedence
When a user has multiple role assignments through both team and individual access, NocoDB resolves the final permission using a clear precedence order.
* Individual explicit role takes precedence over team-assigned role.
* Base-level roles override workspace-level roles.
* In case of multiple team roles, the **highest** permission applies.
This ensures users always retain the most permissive access assigned at their lowest configured level.
To learn more about effective role resolution, refer to the [Teams effective role resolution documentation](/docs/product-docs/collaboration/teams#effective-role-resolution).
## Remove Members or Teams from Workspace
You can remove both members and teams from the workspace using the actions menu.
1. Click on the vertical ellipsis `⋮` in the **Actions** column beside the member or team.
2. Select **Remove member** or **Remove team**.
Only the workspace
**owner**
or
**creator**
can remove members or teams from the workspace.
## Best Practice
* Invite all users to the workspace first with the **Inherit** role. This will allow them to access workspaces based on their team or base-level roles.
* Use teams for departments or functional groups to manage roles efficiently.
* Adjust team-level permissions instead of managing roles individually for large workspaces.
Learn more [here](/docs/product-docs/collaboration/teams#best-practices).
***
# SSO FAQs
URL: /docs/product-docs/account-settings/authentication/FAQs
Frequently asked questions about Single Sign-On (SSO) in NocoDB.
## Why do I see the error "SSO is not configured for this domain" when trying to sign in?
This error means that the email address you are using does not belong to a domain that has been verified and configured for SSO in your workspace settings. Only users with email addresses under your verified domain(s) can sign in via SSO. For example, if you've verified `example.com`, only users with emails like `user@example.com` will be allowed to sign in through the SSO page.
## How do I verify my domain for SSO?
**For NocoDB Cloud (Both Business and Enterprise Plans):**
1. Access the domain verification section:
* **Business Plan**: Navigate to **Workspace Settings** > **Authentication** > **Domain Verification**
* **Enterprise Plan**: Navigate to **Account Settings** > **Authentication** > **Domain Verification**
2. Enter your domain (e.g., `example.com`)
3. Copy the TXT record provided by NocoDB
4. Add the TXT record to your domain’s DNS via your registrar/DNS provider.
5. Wait for DNS propagation (this may take a few minutes to several hours)
6. Click **Verify** button in NocoDB to confirm domain ownership
**For NocoDB Self-hosted/On-prem:** Domain verification is not required. Configure SSO providers directly without DNS verification.
## Do I need to verify my domain when setting up SSO (e.g., Google OAuth)?
**For NocoDB Cloud (Both Business and Enterprise Plans):** Yes. In addition to configuring Google OAuth or other SSO providers, you must also verify your domain in the SSO settings. This is done by adding your domain and verifying it by adding the provided TXT record to your DNS. Only after domain verification will users from that domain be able to sign in via SSO.
**For NocoDB Self-hosted/On-prem:** Domain verification is not required. You can configure SSO providers without verifying your domain via DNS.
## When should I verify my domain?
Domain verification should be completed **before** configuring any SSO providers (Google OAuth, SAML, OIDC) for Cloud users (both Business and Enterprise plans). This ensures that:
1. Only users with email addresses from your verified domain can access the workspace
2. SSO providers are properly configured with domain restrictions
3. The authentication flow works correctly for your organization's users
If you try to configure SSO without domain verification, you may encounter errors or users from unverified domains may not be able to sign in.
## Why does domain verification fail even after adding the TXT record?
DNS propagation can take time to complete. After adding the TXT record to your domain's DNS settings:
* **Typical propagation time**: 5-30 minutes
* **Maximum propagation time**: Up to 24-48 hours (rare)
* **Check propagation**: Use online DNS lookup tools to verify the TXT record is visible
* **Retry verification**: If verification fails, wait a few minutes and try again
If verification fails after 24 hours, ensure the TXT record was added correctly. If issues persist, contact your DNS provider.
## Why do I get a redirection/callback URL or URI error when setting up SSO?
This error usually means that the Redirect URL (sometimes called Callback URL or Redirect URI) configured in your identity provider does not exactly match the one provided by NocoDB. Common reasons include:
* Typo or extra spaces in the URL/URI
* Using HTTP instead of HTTPS (or vice versa)
* Not including the full path as required
* Registering the wrong environment (e.g., using a local URL for production)
* Forgetting to update the Redirect URL after changing your NocoDB domain
**Solution:** Always copy and paste the exact Redirect URL/URI provided by NocoDB into your identity provider's configuration. Any mismatch will result in an error during authentication.
## How do API tokens work with SSO-enabled workspaces?
When a workspace is configured to enforce Single Sign-On (SSO), API access is restricted to tokens generated through an authenticated SSO session. Please find additional details here: [API Tokens with SSO](/docs/product-docs/account-settings/api-tokens#api-token-access-with-sso-enabled-workspaces).
# Google OAuth
URL: /docs/product-docs/account-settings/authentication/google-oauth
Learn about different methods available for authentication with NocoDB.
NocoDB offers a functionality that allows users to connect with Google OAuth 2.0, enabling them to log into their NocoDB accounts using their Google authentication credentials. This article provides a step-by-step guide to integrating Google OAuth 2.0 with NocoDB.
For users on
**Business plan**
, the SSO configuration menu is available under
**Workspace Settings**
.
Refer
[here](/docs/product-docs/account-settings/authentication#business-plan)
for more details.
**Domain Verification Required (Cloud Plans)**
\
\
Before configuring Google OAuth, your domain must be verified in NocoDB (applies to both Business and Enterprise plans).
Only users with email addresses from verified domains can sign in via SSO.
See
[Domain Verification](/docs/product-docs/account-settings/authentication#domain-verification)
for details.
## Accessing Google OAuth Settings
Accessing **NocoDB Google OAuth** section depends on your plan:
* **Cloud version**: Go to `Workspace Settings` > `Authentication` > `Google OAuth`
* **On-prem version**: Go to `Account Settings` > `Authentication` > `Google OAuth`
## Steps to Configure Google OAuth
1. **Verify your domain** (Cloud plans only) :
* See [Domain Verification](/docs/product-docs/account-settings/authentication#domain-verification).
2. Copy `Redirect URL` from [NocoDB Google OAuth](#accessing-google-oauth-settings) section
3. Go to [Google Cloud Console](https://console.cloud.google.com/) and create a new project.
4. **Configure the OAuth consent screen**
* Navigate to **APIs & Services** > **OAuth consent screen**
* Provide app details and select user access type
* Add authorized domains where NocoDB is hosted
* Click **Create**
5. **Generate OAuth credentials**
* Go to **APIs & Services** > **Credentials**
* Click **Create Credentials** > **OAuth Client ID**
* Select **Web application** as the application type
6. **Set up application details**
* **Authorized JavaScript origins**: Enter your app domain (e.g., `https://app.nocodb.com`)
* **Authorized Redirect URIs**: Paste the Redirect URL copied from step 2
7. **Create credentials and copy values**
* Click **Create**
* Copy the **Client ID** and **Client Secret** from the generated OAuth 2.0 Client ID
8. **Add credentials to NocoDB**
* Paste the **Client ID** and **Client Secret** into the respective fields in [NocoDB Google OAuth](#accessing-google-oauth-settings) section
For more common questions and troubleshooting, see our
[SSO FAQ](/docs/product-docs/account-settings/authentication/FAQs)
.
***
# Authentication & SSO
URL: /docs/product-docs/account-settings/authentication
Learn about different methods available for authentication with NocoDB.
This section provides an overview about different mechanisms available for authentication in NocoDB.
# Email and password based
This is the default form based authentication mechanism available in NocoDB. Users can sign up using email and password and then login using the same credentials.
# Single Sign On (SSO)
For SSO Access - please reach
[**out to sales team**](https://cal.com/nocodb/sales)
SSO is a session and user authentication service that permits a user to use one set of login credentials to access multiple applications. The service authenticates the end user for all the applications the user has been given rights to and eliminates further prompts when the user switches applications during the same session.
SSO functionality is achieved by establishing a connection with an identity provider (IdP), which serves as a repository for managing users digital identities within the digital or cloud-based ecosystem. Through the use of protocols like the Security Assertion Markup Language (SAML 2.0), such as in the case of NocoDB, SSO facilitates the secure exchange of authentication data between the identity provider and the service providers.
Once SSO is enabled for a workspace, API access is restricted to tokens generated after signing in via the configured identity provider (IdP). Tokens created before SSO was enabled will no longer work for that workspace and must be regenerated through an SSO-authenticated session.
[Know more](/docs/product-docs/account-settings/api-tokens#api-token-access-with-sso-enabled-workspaces)
.
### Google OAuth
Google OAuth, short for Open Authorization, is a widely used and standardized protocol that facilitates secure authentication and authorization processes, particularly in the context of web and mobile applications. Developed by Google, OAuth enables users to grant third-party applications limited access to their resources without exposing their credentials. This authorization framework is based on token-based authentication, where users can log in using their Google credentials, and developers can obtain an access token to interact with Google APIs on the user's behalf.
Please follow the details in the article to integrate with [Google OAuth](/docs/product-docs/account-settings/authentication/google-oauth)
### Security Assertion Markup Language (SAML)
The Security Assertion Markup Language (SAML) stands as a critical protocol in the realm of secure authentication and authorization processes. Developed to enable Single Sign-On (SSO) functionality, SAML facilitates the exchange of authentication and authorization data between an identity provider (IdP) and a service provider (SP). This XML-based protocol ensures the secure transfer of user identity information, allowing individuals to access multiple applications and services with a single set of credentials. SAML operates on a trust model, wherein the identity provider asserts the user's identity to the service provider, which, in turn, grants or denies access based on the provided assertions.
Please follow the details in the article below to integrate with various popular SAML providers.
1. [Okta](/docs/product-docs/account-settings/authentication/saml-sso/okta)
2. [Auth0](/docs/product-docs/account-settings/authentication/saml-sso/auth0)
3. [Ping Identity](/docs/product-docs/account-settings/authentication/saml-sso/ping-identity)
4. [Active Directory](/docs/product-docs/account-settings/authentication/saml-sso/azure-ad)
5. [Keycloak](/docs/product-docs/account-settings/authentication/saml-sso/keycloak)
### OpenID Connect (OIDC)
The OpenID Connect (OIDC) protocol is a modern authentication layer built on top of the OAuth 2.0 framework, designed to address user authentication and authorization challenges in web and mobile applications. OIDC provides a standardized and secure way for applications to verify the identity of end-users. Leveraging JSON Web Tokens (JWTs), OIDC enables the exchange of user identity information between the identity provider (IdP) and the Service provider, typically a web application.
Please follow the details in the article below to integrate with various popular OIDC providers.
1. [Okta](/docs/product-docs/account-settings/authentication/oidc-sso/okta)
2. [Auth0](/docs/product-docs/account-settings/authentication/oidc-sso/auth0)
3. [Ping Identity](/docs/product-docs/account-settings/authentication/oidc-sso/ping-identity)
4. [Active Directory](/docs/product-docs/account-settings/authentication/oidc-sso/azure-ad)
## Accessing the SSO Configuration Menu
The location of the **SSO configuration menu** varies depending on your plan.
* If you're on the **Business plan**, you can access SSO settings from the **Workspace Settings**.
* For **Enterprise plan** users, the SSO menu is available under the **Admin Panel**.
Please follow the steps relevant to your plan to locate and configure SSO.
### Business Plan
To access the SSO configuration menu in the Business plan, navigate to the **Workspace Settings**. Here, you can manage your SSO settings, including adding new identity providers and configuring existing ones.
Alternatively, you can directly access the SSO configuration screen using the URL:
`https://app.nocodb.com/#/workspaceID/settings?tab=sso`
### Enterprise Plan
For users on the Enterprise plan, the SSO configuration menu is located in the **Account Settings**. This allows for more advanced SSO configurations and management options across the entire organization.
1. Click on the user icon in the bottom left corner of the NocoDB interface.
2. Select **Account Settings** from the menu.
3. Navigate to the **Single Sign-on (SSO)** tab.
Alternatively, you can directly access the SSO configuration screen using the URL:
`https://your-domain/#/account/authentication`
### Domain Verification
For **NocoDB Cloud** users (both Business and Enterprise plans), domain verification is required before configuring SSO providers. This ensures that only users with email addresses from your verified domain can access the workspace through SSO.
**Domain Verification Process:**
1. Access the domain verification section:
* **Business Plan**: Navigate to **Workspace Settings** > **Authentication** > **Domain Verification**
* **Enterprise Plan**: Navigate to **Account Settings** > **Authentication** > **Domain Verification**
2. Enter your domain (e.g., `example.com`)
3. Copy the TXT record provided by NocoDB
4. Add the TXT record to your domain’s DNS via your registrar/DNS provider.
5. Wait for DNS propagation (this may take a few minutes to several hours)
6. Click **Verify** button in NocoDB to confirm domain ownership
Once verified, only users with email addresses under your verified domain(s) will be able to sign in via SSO. For example, if you've verified `example.com`, only users with emails like `user@example.com` will be allowed to sign in through the SSO page.
**On-premise deployments**
do not require domain verification. Configure SSO providers directly without DNS verification.
## SCIM Provisioning
SCIM provisioning is available on
**Enterprise**
plans.
SCIM (System for Cross-domain Identity Management) v2.0 enables automatic user and group provisioning from your identity provider to NocoDB. When configured alongside SSO, SCIM automates the full identity lifecycle — from onboarding (creating organization members) to offboarding (deactivating access) — without manual intervention.
SCIM is configured from the **Admin Panel** by the Org Admin. NocoDB supports SCIM provisioning with Okta and Azure AD (Entra ID). For a detailed overview of SCIM features and configuration, see the [SCIM Provisioning guide](/docs/product-docs/account-settings/authentication/scim).
***
# SCIM
URL: /docs/product-docs/account-settings/authentication/scim
Learn how to configure SCIM v2.0 for automatic user and group provisioning in NocoDB.
SCIM provisioning is available on
**Enterprise**
plans. Please reach
[**out to sales team**](https://cal.com/nocodb/sales)
for access.
## Overview
SCIM (System for Cross-domain Identity Management) is an open standard protocol (v2.0) that automates the exchange of user and group identity information between your identity provider (IdP) and NocoDB. Instead of manually adding and removing users from your organization, SCIM lets your IdP handle it automatically.
With SCIM provisioning enabled, your identity provider can:
* **Create users** — automatically add users to your NocoDB organization when they're assigned in the IdP
* **Update users** — sync profile changes (display name, email, etc.) from the IdP to NocoDB
* **Deactivate users** — soft-delete organization members when they're unassigned or deactivated in the IdP
* **Manage groups** — create, update, and delete org-level teams in NocoDB that mirror your IdP group structure
SCIM provisioning handles
**identity lifecycle management**
(who has access). It is complementary to SSO (SAML/OIDC), which handles
**authentication**
(how users sign in). For best results, configure both SSO and SCIM with the same identity provider.
## Enabling SCIM in NocoDB
### Prerequisites
* An **Enterprise** NocoDB organization (cloud or on-premise)
* **Org Admin** access in NocoDB
* Admin access to your identity provider (Okta, Azure AD / Entra ID, etc.)
* SSO configured with the same IdP (recommended, not required)
### Step 1: Navigate to SCIM settings
1. Open the **Admin Panel** from the user menu in the bottom-left corner of the NocoDB interface
2. Select **SCIM** from the sidebar menu
### Step 2: Enable SCIM provisioning
Click the **Configure** button in the SCIM Provisioning section. NocoDB will generate the SCIM endpoint URL and a provisioning token, and automatically enable provisioning.
### Step 3: Copy the SCIM endpoint and token
Once SCIM is configured, you'll see the following details:
* **SCIM Endpoint URL** — the base URL for all SCIM API calls (e.g., `https://app.nocodb.com/api/v3/meta/orgs/{orgId}/scim/v2`)
* **Bearer Token** — a bearer token used to authenticate SCIM requests
The bearer token is shown
**only once**
when first generated. Copy it immediately and store it securely. If you lose it, you can regenerate it, but the previous token will be invalidated.
### Step 4: Configure your identity provider
Use the SCIM Endpoint URL and Provisioning Token to configure SCIM in your IdP. NocoDB supports SCIM provisioning with Okta and Azure AD (Entra ID). Refer to your identity provider's documentation for SCIM application configuration steps.
### Step 5: Assign users and groups
In your IdP, assign users and/or groups to the NocoDB SCIM application. The IdP will then push these assignments to NocoDB via the SCIM API.
## How it works
### User provisioning
When a user is assigned to the NocoDB application in your IdP, the IdP sends a SCIM `POST /Users` request. NocoDB creates an organization member with the configured [default role](#default-role-for-new-users) (Org-Viewer by default). Once provisioned, org members can be:
* Invited into **org-level teams**
* Assigned roles at the **workspace** or **base** level
* Added to **workspace teams**
Org Admins can change the org role from within NocoDB at any time.
If a user is **unassigned** or **deactivated** in the IdP, NocoDB soft-deletes the organization member. The user's data and contributions are preserved, but they lose access to the organization and all its workspaces.
If a previously deactivated user is **re-assigned** in the IdP, NocoDB reactivates their organization membership with the current [default role](#default-role-for-new-users) (not their previous role). Any workspace, base, or team memberships the user held before deactivation are **not** automatically restored — the user must be re-invited to each workspace and base individually to regain access.
### Group provisioning
SCIM groups map to **org-level Teams** in NocoDB. When a group is pushed from the IdP, NocoDB creates a corresponding organization team with a `SCIM` badge and "Identity Provider" shown as the creator. Members of the IdP group are automatically added to the NocoDB team.
Changes to group membership in the IdP (adding or removing members) are synced to NocoDB in real time via SCIM PATCH operations.
### SCIM-managed vs. manually-created users
Users provisioned through SCIM are marked as **SCIM-managed** with a blue `SCIM` badge in the User Management list. Key differences:
* SCIM-managed users' lifecycle (activation/deactivation) is controlled by the IdP
* Org roles can still be changed by the Org Admin within NocoDB
* Manually created users are unaffected by SCIM operations
* SCIM-managed users cannot be removed directly from NocoDB — removal must be done from your identity provider
## Managing SCIM
### Toggling provisioning
You can **pause** SCIM provisioning without deleting the configuration by toggling the SCIM switch in the Admin Panel > SCIM settings. When paused, NocoDB will reject incoming SCIM requests until provisioning is re-enabled.
### Default role for new users
The default role determines the org-level role assigned to SCIM-provisioned users. You can configure this from the SCIM settings page using the **Default Role for New Users** dropdown. Available options:
| Role | Description |
| --------------- | ------------------------------------------------------------------------------------------- |
| **Org-Viewer** | Can access workspaces and bases they are invited to; cannot create new workspaces (default) |
| **Org-Creator** | Same as Org-Viewer, plus can create new workspaces within the organization |
### Regenerating the token
If the provisioning token is compromised or lost:
1. Go to **Admin Panel** > **SCIM**
2. Click the **Regenerate** button next to the provisioning token
3. Copy the new token and update it in your IdP configuration
Regenerating the token immediately invalidates the previous token. Your IdP will fail to sync until you update it with the new token.
### Disabling SCIM
To completely remove SCIM provisioning:
1. Go to **Admin Panel** > **SCIM**
2. Click **Remove** in the danger zone section
3. Confirm the deletion
Disabling SCIM stops all provisioning but does
**not**
remove SCIM-managed users from the organization. They remain as regular organization members.
# Actions on script
URL: /docs/product-docs/automation/scripts/actions-on-script
Learn how to rename, duplicate and delete a script in NocoDB.
### Rename Script
To duplicate a Script
* Use `...` actions button to the right of the script name in the Scripts list
* Select `Renamne`
### Duplicate Script
To duplicate a Script
* Use `...` actions button to the right of the script name in the Scripts list
* Select `Duplicate`
A copy of the script will be created with a suffix ` - Copy`
### Delete Script
To delete a Script
* Use `...` actions button to the right of the script name in the Scripts list
* Select `Delete`
### Print/Export Script Logs to PDF
Export your script execution results to PDF.
**To export:**
* Run your script to generate output
* Click the **Print** button in the toolbar
* Select page size (Letter, Legal, or A4) and orientation (Portrait or Landscape)
* Click **Generate PDF**
* Save as PDF or print from the browser dialog
**Note:** The Print button is disabled until you run the script at least once.
## Additional Resources
The following resources can help you get started with NocoDB scripts:
* [Script Documentation](/docs/scripts)
* [Script Examples](/docs/scripts/examples/find-and-replace)
* [Script API Reference](/docs/scripts/api-reference/base)
# Create script
URL: /docs/product-docs/automation/scripts/create-script
Learn how to create a script in NocoDB.
To create your first script, you can either
* From the sidebar, click on the `Create New` button and select `New Script`
* From the base homepage, select `All Scripts` tab and click on the `+ Create Empty Script` button
## Layout
1. All scripts are listed in the `Automations` section accessible from the left sidebar. You can also view the scripts in the `All Scripts` tab on the base homepage.
2. Central area is the script **editor** where you can write and run your JavaScript code.
3. The right sidebar is the **execution area** where you can see the output of your script, view logs, and manage script settings.
4. Use the `settings` icon in the top-right corner to configure script settings. Use the `Run` button to execute your script. Use the `Print` button to export script output to PDF.
5. Access quick links to documentation, support, and settings from the bottom-right corner.
## Additional Resources
The following resources can help you get started with NocoDB scripts:
* [Script Documentation](/docs/scripts)
* [Script Examples](/docs/scripts/examples/find-and-replace)
* [Script API Reference](/docs/scripts/api-reference/base)
# Scripts
URL: /docs/product-docs/automation/scripts
Overview of the scripts feature in NocoDB
The Scripts feature is currently in beta release & is available on NocoDB cloud and on-premise licensed deployments.
NocoDB Scripts is a powerful automation engine that allows you to write JavaScript code to interact with your NocoDB bases. Scripts enable you to automate workflows, perform complex operations, transform data, and integrate with external services - all without leaving the NocoDB interface.
### Key Features
* **JavaScript Environment**: Write and run JavaScript code directly in NocoDB
* **Database Access**: Query tables and views, create, update, and delete records
* **User Interaction**: Collect input from users with interactive prompts
* **External Integration**: Connect to third-party services via HTTP requests
* **Visual Output**: Display results in formatted tables, markdown, and more
* **TypeScript Support**: Enjoy code completion and type checking in the script editor
## Additional Resources
The following resources can help you get started with NocoDB scripts:
* [Script Documentation](/docs/scripts)
* [Script Examples](/docs/scripts/examples/find-and-replace)
* [Script API Reference](/docs/scripts/api-reference/base)
# Actions on webhook
URL: /docs/product-docs/automation/webhook/actions-on-webhook
Learn how to enable/disable, duplicate and delete webhooks.
### Enable/disable Webhook
To disable a Webhook
* Open `Webhook` tab to find list of webhooks created
* Toggle `Activate` button to enable/disable
### Edit Webhook
To edit a Webhook
* Open `Webhook` tab to find list of webhooks created
* Click on webhook to be edited
* This will open up the webhook configuration page, which is similar to the page used for [creating webhook](/docs/product-docs/automation/webhook/create-webhook). Reconfigure the webhook as required
* Click on `Save` button to save the changes
### Duplicate Webhook
To duplicate a Webhook
* Open `Webhook` tab to find list of webhooks created
* Click on `...` actions button associated with the webhook to be duplicate
* Select `Duplicate`
A copy of the webhook will be created (disabled by default) with a suffix `copy`
### Delete Webhook
To delete a Webhook
* Open `Webhook` tab to find list of webhooks created
* Click on `...` actions button associated with the webhook to be deleted
* Select `Delete`
### Webhook Logs ☁
This feature is only available in the paid plans, in both cloud & self-hosted.
Webhook logs in NocoDB provide a detailed record of webhook execution attempts, including request payloads, response status, and error messages (if any). These logs help in monitoring webhook activity, debugging failures, and verifying successful deliveries. Logs can be accessed from the webhook configuration panel for each webhook.
# Create webhook
URL: /docs/product-docs/automation/webhook/create-webhook
Learn how to create a webhook in NocoDB.
import { Tab, Tabs } from 'fumadocs-ui/components/tabs';
### Accessing webhook page
1. Click on table for which webhook needs to be configured on the left sidebar
2. Open `Details` tab in topbar,
3. Click on `Webhooks` tab
4. Click `Add New Webhook`
### Configuring webhook
1. **Name the webhook** - Give a clear & descriptive name.
2. Select the **Trigger Source** type :\
Trigger Source type **View** and **Field** are only available in the cloud & self-hosted enterprise plans.
* **Record** - Triggers when a record is inserted, updated, or deleted, or for all actions if “Send me everything” is selected.
* **View** - Triggers when a view is created, updated, or deleted, or for all actions if “Send me everything” is selected.
* **Field** - Triggers when a field is created, updated, or deleted, or for all actions if “Send me everything” is selected.
* **Manual Trigger / Button Trigger** - Trigger runs when a user manually clicks a webhook configured button.
3. Select **Trigger Event** type : Refer table [here](#trigger-source-and-event) for available events for each source
4. \[Optional] **Trigger based on condition** : details [here](#webhook-with-conditions)
Conditions are only applicable for Record trigger source events
* Specify the condition for which webhook should be triggered
* You can select multiple conditions
* If no condition is selected, webhook will be triggered for all records
5. \[Optional] **Trigger for updates in specific fields** : details [here](#webhook-on-field-changes-)
This is only applicable for Record `After Update` event.
* Select the fields for which webhook should be triggered.
* If no field is selected, any field update will trigger webhook
6. \[Optional] **Trigger only when specific form submitted**: details [here](#webhook-on-specific-form-submission-)
This is only applicable for Record `After Insert` event.
* Select the form for which webhook should be triggered.
7. **Webhook Action** : Select the action to be performed when webhook is triggered. Action can be one of the following:
* **HTTP Request** : Send an HTTP request to a specified URL. You can configure the HTTP method, headers, parameters, and body of the request.
* **Method & URL** : Specify the endpoint that the webhook will call when triggered. You can choose from the following HTTP methods: GET, POST, PUT, DELETE, PATCH, and HEAD.
* **Headers & Parameters** : Configure Request headers & parameters
* **Body** : Configure request body. You can use [handlebar syntax](https://handlebarsjs.com/guide/#simple-expressions) to access and manipulate the data easily. For example, `{{ json event }}` will give you the complete event data (default behaviour if body not configured).
* **Run Script** : Run a custom script using NocoDB's built-in scripting engine. You can write JavaScript code to perform various actions when the webhook is triggered.
* **Script** : Select the script to be executed when the webhook is triggered. You can create and manage scripts in the `Scripts` tab in the left sidebar.
8. \[Optional] Click **Test** webhook button to verify if parameter are configured appropriately (with sample payload)
9. Click **Create Webhook** button to complete webhook creation
### Trigger Source and Event
Webhooks in NocoDB can be configured based on the source of the trigger and the type of event. The table below outlines the available combinations:
Trigger Source type
**View**
and
**Field**
are only available in the cloud & self-hosted enterprise plans.
| **Trigger Source** | **Trigger Event** | **Description** |
| ------------------ | ------------------ | ---------------------------------------------------------- |
| Record | Send Me Everything | Triggers on any record insert, update, or delete operation |
| | After Insert | Triggers after one or more records are inserted |
| | After Update | Triggers after one or more records are updated |
| | After Delete | Triggers after one or more records are deleted |
| View | Send Me Everything | Triggers on any view create, update, or delete operation |
| | After Create | Triggers after a view is created |
| | After Update | Triggers after a view is updated |
| | After Delete | Triggers after a view is deleted |
| Field | Send Me Everything | Triggers on any field create, update, or delete operation |
| | After Create | Triggers after a field is created |
| | After Update | Triggers after a field is updated |
| | After Delete | Triggers after a field is deleted |
| Button Trigger | — | Triggers when a button field is clicked |
For more details on using **Button Trigger** webhooks with the **Button** field, see the [Button field documentation](/docs/product-docs/fields/field-types/custom-types/button).
***
### Run Script action ☁
This feature is only available in the paid plans, in both cloud & self-hosted.
The **Run Script** action enables you to execute custom JavaScript code directly within NocoDB whenever a webhook is triggered. It is ideal for use cases where data needs to be processed or transformed internally. When triggered, the associated script runs within NocoDB’s secure scripting engine and automatically receives an `event` object (see example below) containing the webhook context, such as record creation, update, or deletion details.
```javascript
/*
Update record on trigger; This script updates the 'Department' and 'Employment Status' fields when a new record is inserted. Note the usage of `cursor.row` to access the record that triggered the webhook.
*/
const record = cursor.row;
// Exit if no record found (safeguard)
if(!record) {
return
}
// Get the table
const table1 = base.getTable("Employee")
// Update the record
await table1.updateRecordAsync(record.id, {
"Department": "New Hire",
"Employment Status": "Active"
})
```
Refer to the [Scripts documentation](/docs/scripts#getting-started) for detailed guide on creating and managing scripts. Note that, scripts that seek explicit user input (such as `input.textAsync()`) cannot be used in webhook context, since webhooks run in the background without user interaction.
### Webhook with conditions
Webhooks (record trigger related) in NocoDB can be configured to trigger only when specific conditions are met. For example, you may choose to trigger a webhook only when the `Status` field is set to `Complete`. You can define multiple conditions using logical operators like `AND` or `OR`—such as triggering the webhook on record update only when `Status` is `Complete` **and** `Priority` is `High`.
A webhook will only be triggered if the condition transitions from **not met** to **met** during a record event. For instance (for above example), if the original record has `Status = Complete` and `Priority = Low`, and you update it to `Priority = High`, the webhook will trigger—since the condition was not met before but is met after the update. However, if a record already satisfies the condition (`Status = Complete` and `Priority = High`) and you update unrelated fields, the webhook will not be triggered.
**In short**, a webhook is triggered only when the condition changes from **false** (old record) to **true** (new record).
Conditions are not applicable for Manual Trigger webhook.
### Webhook on field changes ☁
This feature is only available in the paid plans, in both cloud & self-hosted.
For **After Update** event, you can configure webhook to trigger only when **certain fields are updated**. For example, trigger webhook only when `Status` is updated. You can also configure multiple fields.
### Webhook on specific form submission ☁
This feature is only available in the paid plans, in both cloud & self-hosted.
For **After Insert** event, you can configure webhook to trigger only when a **specific form is submitted**. For example, if you have multiple forms for a table, you can choose to trigger webhook only when `Form A` is submitted.
### Webhook with custom payload
Custom payload lets you fully control the body a webhook sends when an event is triggered. You can send the entire event object, a specific field, a compact row summary, or transform rows into arrays/objects that downstream services expect.
NocoDB exposes the current event as `event` inside custom payload. These are processed with [Handlebars-like expressions](https://handlebarsjs.com/guide/#simple-expressions) and a built-in `json` helper ([examples below](#examples)).
#### Example event object
This is the sample event generated by NocoDB after a record is inserted.
```json
{
"type": "records.after.insert",
"id": "0698517a-d83a-4e72-bf7a-75f46b704ad1",
"version": "v3",
"data": {
"table_id": "m969t01blwprpef",
"table_name": "Table-2",
"view_id": "vwib3bvfxdqgymun",
"view_name": "Table-2",
"rows": [
{
"Id": 1,
"Tags": "Sample Text",
"CreatedAt": "2024-04-11T10:40:20.998Z",
"UpdatedAt": "2024-04-11T10:40:20.998Z"
}
]
}
}
```
In custom payload, you will typically access paths such as `event.data.table_name` or `event.data.rows.[0].Tags`.
#### Adding a custom payload
To add a custom payload, open your webhook in NocoDB's UI and follow these steps:
1. Click on the **Body** tab
2. Enter your template using Handlebars expressions and the `json` helper.
3. Create/update Webhook or use the **Test Webhook** action to verify rendering.
Some applications require specific headers to process webhook payloads correctly. For example, if you're sending JSON data, ensure you include the appropriate
`Content-Type`
header in your webhook configuration (commonly
`application/json`
).
The `json` helper is used to safely serialize values into valid JSON, whether they’re strings, objects, or arrays. It ensures proper quoting and escaping, preventing common errors with quotes, newlines, or special characters. For example, `{{ json event }}` outputs the full event object, while `{{ json event.data.rows.[0].Title }}` safely inserts a single field as a JSON string. This makes it the most reliable way to embed dynamic values in webhook payloads.
Handlebars expressions allow you to dynamically access and manipulate data within templates, similar to how the json helper works for serialization. You can reference fields using dot or bracket notation, iterate over arrays with `{{#each ...}}`, and conditionally include content with `{{#if ...}}`. Learn more about using Handlebars expressions in [Handlebars documentation](https://handlebarsjs.com/guide/#simple-expressions).
#### Examples
Here are some common payload templates you can use as a starting point:
1. **Full event object:**
Sends the complete event data as JSON
```text
{
"event": {{ json event }}
}
```
2. **Single field value:**
Sends just the `Title` field of the first row
```text
{
"content": {{ json event.data.rows.[0].Title }}
}
```
3. **Compact row summary:**
Sends all fields of the first row as a JSON object
```text
{
"row": {{ json event.data.rows.[0] }}
}
```
4. **All rows as array:**
Sends all rows in the event as a JSON array
```text
{
"rows": {{ json event.data.rows }}
}
```
5. **Custom object with metadata:**
Sends an object with table name, row count, and all rows
```text
{
"table": {{ json event.data.table_name }},
"count": {{ json event.data.rows.length }},
"rows": {{ json event.data.rows }}
}
```
6. **Custom text with field value:**
Sends a simple message including the `Title` field
```text
{
"message": "New record created with title: {{ event.data.rows.[0].Title }}"
}
```
7. **Handlebar logic example:**
Sends different payloads based on whether rows exist
```text
{{#if event.data.rows.length}}
{
"hasRows": true,
"rows": {{ json event.data.rows }}
}
{{else}}
{
"hasRows": false
}
{{/if}}
```
8. **Multiple rows with formatting:**
Sends all rows with only `Id` and `Title`, formatted as a JSON array
```text
{
"records": [
{{#each event.data.rows}}
{{#if @first}}{{else}},{{/if}}
{
"Id": {{ Id }},
"Title": {{ json Title }}
}
{{/each}}
]
}
```
***
### Webhook response sample
#### Record trigger
```bash
{
"type": "records.after.insert",
"id": "c245c528-8759-4e10-b7d5-e2626dd7c321",
"version": "v3",
"data": {
"table_id": "mbmppjnstflsqq1",
"table_name": "Features",
"rows": [
{
"Id": 4,
"CreatedAt": "2025-05-07 17:18:37+00:00",
"UpdatedAt": null,
"Title": "Task-2",
"Status": "Ongoing",
"Priority": "Low"
}
]
}
}
```
```bash
{
"type": "records.after.update",
"id": "f5e6a827-fb37-4a04-8cd9-be7831f9d897",
"version": "v3",
"data": {
"table_id": "mbmppjnstflsqq1",
"table_name": "Features",
"previous_rows": [
{
"Id": 3,
"CreatedAt": "2025-05-07 17:18:33+00:00",
"UpdatedAt": null,
"Title": null,
"Status": null,
"Priority": null
}
],
"rows": [
{
"Id": 3,
"CreatedAt": "2025-05-07 17:18:33+00:00",
"UpdatedAt": "2025-05-07 17:18:37+00:00",
"Title": "Task-1",
"Status": "Complete",
"Priority": "High"
}
]
}
}
```
```bash
{
"type": "records.after.delete",
"id": "4cad2ff8-9ee6-4889-8c85-9969361a1df0",
"version": "v3",
"data": {
"table_id": "mbmppjnstflsqq1",
"table_name": "Features",
"rows": [
{
"Title": "Task-2",
"Id": 2,
"Status": "Ongoing",
"Priority": "Low"
},
{
"Title": "Task-1",
"Id": 3,
"Status": "Complete",
"Priority": "High"
}
]
}
}
```
#### View trigger
```bash
{
"type": "view.after.create",
"id": "2f62c921-4dcc-4f37-8e3d-fd3612aaf269",
"version": "v3",
"data": {
"table_id": "ma334932sjnwp3e",
"table_name": "AllTypes",
"views": [
{
"id": "vw45okb4letthls6",
"table_id": "ma334932sjnwp3e",
"title": "Grid-1",
"type": "grid",
"lock_type": "collaborative",
"created_at": "2025-09-22 06:51:13+00:00",
"updated_at": "2025-09-22 06:51:13+00:00",
"description": "Grid view sample description",
"created_by": "usq6o3vavwf0twzr",
"fields": [
{
"field_id": "cc5i4wkzktyqedh",
"show": true
},
{
"field_id": "ct41ytilwlxf7u3",
"show": true
},
{
"field_id": "cmbcaa8aoxtpdr9",
"show": true
}
],
"options": {
"row_height": "short"
}
}
]
}
}
```
```bash
{
"type": "view.after.update",
"id": "08faf0d1-6c02-4f66-8851-2e6405c6c76b",
"version": "v3",
"data": {
"table_id": "ma334932sjnwp3e",
"table_name": "AllTypes",
"previous_views": [
{
"id": "vw45okb4letthls6",
"table_id": "ma334932sjnwp3e",
"title": "Grid-1",
"type": "grid",
"lock_type": "collaborative",
"created_at": "2025-09-22 06:51:13+00:00",
"updated_at": "2025-09-22 06:51:13+00:00",
"description": "",
"created_by": "usq6o3vavwf0twzr",
"fields": [
{
"field_id": "cc5i4wkzktyqedh",
"show": true
},
{
"field_id": "ct41ytilwlxf7u3",
"show": true
}
],
"options": {
"row_height": "short"
}
}
],
"views": [
{
"id": "vw45okb4letthls6",
"table_id": "ma334932sjnwp3e",
"title": "Grid-1 Renamed",
"type": "grid",
"lock_type": "collaborative",
"created_at": "2025-09-22 06:51:13+00:00",
"updated_at": "2025-09-22 07:08:29+00:00",
"description": "",
"created_by": "usq6o3vavwf0twzr",
"fields": [
{
"field_id": "cc5i4wkzktyqedh",
"show": true
},
{
"field_id": "ct41ytilwlxf7u3",
"show": true
}
],
"options": {
"row_height": "short"
}
}
]
}
}
```
```bash
{
"type": "view.after.delete",
"id": "af6a6298-91e9-4642-a729-93fb0eae9d61",
"version": "v3",
"data": {
"table_id": "ma334932sjnwp3e",
"table_name": "AllTypes",
"views": [
{
"id": "vw45okb4letthls6",
"table_id": "ma334932sjnwp3e",
"title": "Grid-1 Renamed",
"type": "grid",
"lock_type": "collaborative",
"created_at": "2025-09-22 06:51:13+00:00",
"updated_at": "2025-09-22 07:08:29+00:00",
"description": "",
"created_by": "usq6o3vavwf0twzr",
"fields": [
{
"field_id": "cc5i4wkzktyqedh",
"show": true
},
{
"field_id": "ct41ytilwlxf7u3",
"show": true
}
],
"options": {
"row_height": "short"
}
}
]
}
}
```
#### Field trigger
```bash
{
"type": "field.after.create",
"id": "2e97d383-1d94-48d7-8214-3a7fd013c801",
"version": "v3",
"data": {
"table_id": "ma334932sjnwp3e",
"table_name": "AllTypes",
"fields": [
{
"id": "cqxah2exzt1lxbz",
"table_id": "ma334932sjnwp3e",
"title": "Financial Quarter",
"type": "SingleSelect",
"default_value": "'Q1'",
"system": false,
"options": {
"choices": [
{
"title": "Q1",
"color": "#cfdffe",
"id": "shs9oq0ddo1ecnq"
},
{
"title": "Q2",
"color": "#d0f1fd",
"id": "s65lkpm9822w8t7"
},
{
"title": "Q3",
"color": "#c2f5e8",
"id": "swg8jzbgh99t36f"
},
{
"title": "Q4",
"color": "#ffdaf6",
"id": "s9duce07erlzq5n"
}
]
},
"description": "Specifies quarter in which this task is required to be included."
}
]
}
}
```
```bash
{
"type": "field.after.update",
"id": "6a4c9326-0bdc-4920-9089-6340394340b4",
"version": "v3",
"data": {
"table_id": "ma334932sjnwp3e",
"table_name": "AllTypes",
"previous_fields": [
{
"id": "cqxah2exzt1lxbz",
"table_id": "ma334932sjnwp3e",
"title": "Financial Quarter",
"type": "SingleSelect",
"default_value": "'Q1'",
"system": false,
"options": {
"choices": [
{
"title": "Q1",
"color": "#cfdffe",
"id": "shs9oq0ddo1ecnq"
},
{
"title": "Q2",
"color": "#d0f1fd",
"id": "s65lkpm9822w8t7"
},
{
"title": "Q3",
"color": "#c2f5e8",
"id": "swg8jzbgh99t36f"
},
{
"title": "Q4",
"color": "#ffdaf6",
"id": "s9duce07erlzq5n"
}
]
},
"description": "Specifies quarter in which this task is required to be included."
}
],
"fields": [
{
"id": "cqxah2exzt1lxbz",
"table_id": "ma334932sjnwp3e",
"title": "Financial Quarter",
"type": "SingleSelect",
"default_value": "'Quarter-1'",
"system": false,
"options": {
"choices": [
{
"title": "Quarter-1",
"color": "#cfdffe",
"id": "shs9oq0ddo1ecnq"
},
{
"title": "Quarter-2",
"color": "#d0f1fd",
"id": "s65lkpm9822w8t7"
},
{
"title": "Quarter-3",
"color": "#c2f5e8",
"id": "swg8jzbgh99t36f"
},
{
"title": "Quarter-4",
"color": "#ffdaf6",
"id": "s9duce07erlzq5n"
}
]
},
"description": "Specifies quarter in which this task is required to be included."
}
]
}
}
```
```bash
{
"type": "field.after.delete",
"id": "8b2b293f-a926-4280-b116-493ac197ba10",
"version": "v3",
"data": {
"table_id": "ma334932sjnwp3e",
"table_name": "AllTypes",
"fields": [
{
"id": "cqxah2exzt1lxbz",
"table_id": "ma334932sjnwp3e",
"title": "Financial Quarter",
"type": "SingleSelect",
"default_value": "'Quarter-1'",
"system": false,
"options": {
"choices": [
{
"title": "Quarter-1",
"color": "#cfdffe",
"id": "shs9oq0ddo1ecnq"
},
{
"title": "Quarter-2",
"color": "#d0f1fd",
"id": "s65lkpm9822w8t7"
},
{
"title": "Quarter-3",
"color": "#c2f5e8",
"id": "swg8jzbgh99t36f"
},
{
"title": "Quarter-4",
"color": "#ffdaf6",
"id": "s9duce07erlzq5n"
}
]
},
"description": "Specifies quarter in which this task is required to be included."
}
]
}
}
```
#### Manual trigger
```bash
{
"type": "records.manual.trigger",
"id": "551a2010-d658-4185-a050-cf3fca56a5a9",
"version": "v3",
"data": {
"table_id": "mzo4r3zrbcph43i",
"table_name": "Features",
"rows": [
{
"Id": 1,
"Title": "dstala",
"CreatedAt": "2024-08-12 11:56:15+00:00",
"UpdatedAt": "2024-08-12 11:56:48+00:00",
"Button": {
"type": "url",
"label": "Button",
"url": "https://github.com/dstala"
},
}
]
}
}
```
#### Discord Webhook
Discord webhook can be configured to send messages to a Discord channel. Discord request body should contain content, embeds or attachments, otherwise request will fail. Below is an example of Discord webhook payload. More details can be found [here](https://birdie0.github.io/discord-webhooks-guide/discord_webhook.html)
```json
{
"content": "Hello, this is a webhook message",
"embeds": [
{
"title": "Webhook",
"description": "This is a webhook message",
"color": 16711680
}
]
}
```
To send complete event data to Discord, use below payload
```
{
"content" : {{ json ( json event ) }}
}
```
One can also customize the payload as per the requirement. For example, to send only the `Title` field to Discord, use below payload. Note that, the value of `content` is what that will get displayed in the Discord channel.
```
{
"content": "{{ event.data.rows.[0].Title }}"
}
```
## Environment Variables
In self-hosted version, you can configure the following environment variables to customize the webhook behavior.
* NC\_ALLOW\_LOCAL\_HOOKS: Allow localhost based links to be triggered. Default: false
Find more about environment variables [here](/docs/self-hosting/environment-variables)
# Webhook
URL: /docs/product-docs/automation/webhook
Learn how to create, modify and delete webhooks.
NocoDB supports webhooks to notify external systems in real time whenever records are created, updated, or deleted within a table. This allows seamless integration with third-party services by triggering automated workflows or syncing data changes as they happen.
Webhooks in NocoDB are **configured per table** and can be tailored with custom payloads, headers, and event-specific triggers to fit diverse automation needs.
This article discusses **Webhook v3**, which is the latest version of webhooks in NocoDB. It includes a new user interface and additional features compared to the previous version. For more information on the differences between webhook v2 and v3, please refer to the [Webhook v2 vs v3](/docs/product-docs/automation/webhook/webhook-v2-vs-v3) article.
[Webhook v2](/docs/product-docs/automation/webhook-v2-deprecated)
will be deprecated in the future. While it will continue to function for a limited period, all new features and enhancements are exclusive to webhook v3. Users are strongly encouraged to migrate to webhook v3 for continued support and access to the latest functionality.
#### Related Topics
* [Create Webhook](/docs/product-docs/automation/webhook/create-webhook)
* [Disable Webhook](/docs/product-docs/automation/webhook/actions-on-webhook#enabledisable-webhook)
* [Modify Webhook](/docs/product-docs/automation/webhook/actions-on-webhook#edit-webhook)
* [Duplicate Webhook](/docs/product-docs/automation/webhook/actions-on-webhook#duplicate-webhook)
* [Delete Webhook](/docs/product-docs/automation/webhook/actions-on-webhook#delete-webhook)
* [Webhook Logs](/docs/product-docs/automation/webhook/actions-on-webhook#webhook-logs-)
* [Webhook v2 vs v3](/docs/product-docs/automation/webhook/webhook-v2-vs-v3)
* [Upgrade to v3](/docs/product-docs/automation/webhook/webhook-v2-vs-v3#upgrade-to-webhook-v3)
# Webhook v2 vs v3
URL: /docs/product-docs/automation/webhook/webhook-v2-vs-v3
Discover the key differences between webhook v2 and v3 in NocoDB, including event model, payload enhancements, and new features.
NocoDB’s webhook system has evolved significantly in version 3, introducing a more streamlined structure, richer payloads, and enhanced configuration capabilities. This update reflects feedback from real-world usage and aims to simplify integration while giving users more control over what triggers a webhook.
Below is a detailed comparison of key changes between webhook v2 and v3.
### **Unified Event Model for Record Operations**
In webhook v2, separate events were defined for individual and bulk operations—such as
* record.create, records.bulkCreate,
* record.update, records.bulkUpdate, and
* record.delete, records.bulkDelete.
This added complexity for consumers who needed to handle multiple event types for similar actions. Webhook v3 consolidates these into a simplified event model: **after insert, after update and after delete**. These events now apply uniformly to both single and bulk record operations.
### **Versioning in Webhook Payloads**
Starting with v3, the webhook response includes a version identifier in the payload. This enables client systems to reliably parse and process webhook data based on the expected schema, and future-proof integrations as NocoDB continues to evolve its webhook capabilities.
### **Enhanced Payload for Bulk Insert Operation**
Previously in webhook v2, the payload for bulk insert operations contained only the count of records that were inserted. This limited the ability to audit or react to specific insertions.
In v3, "After insert" webhook payload (unified for single insertion & bulk) includes the actual inserted records as an array. This enhancement allows integrators to trace exactly which records were inserted and take action accordingly—such as syncing insertions with external systems or logging for compliance.
### **New "Send Everything" Trigger Option**
Webhook v3 introduces a **"Send everything"** trigger in the UI. This option allows users to configure a webhook that triggers on any change to records within a table—without having to specify individual event types. It's particularly useful when external systems need to stay in sync with all changes, regardless of whether they are inserts, updates, or deletes.
### **Field-Level Change Monitoring**
Another key improvement in webhook v3 is the ability to configure **field-specific triggers**. This feature enables webhooks to fire only when certain fields are changed. For example, a webhook can be set to trigger only when the `Status` or `Priority` field is updated—helping reduce noise and streamline automation logic.
## Summary
| Feature | Webhook v2 | Webhook v3 |
| ----------------------- | --------------------------------- | ---------------------------------- |
| Event Model | Separate events for bulk & single | Unified after insert/update/delete |
| Payload Version | Not available | Included in every webhook payload |
| Bulk Insert Payload | Only count of records | Full array of inserted records |
| Send Everything Trigger | Not available | Supported |
| Field Change Monitoring | Not supported | Supported |
## Upgrade to webhook v3
If there are webhook v2 webhooks in your NocoDB instance, you will see a notification in the webhook list view. You can select the webhook that you want to upgrade to v3 and click on the **Upgrade** button. This will take you to the upgrade page where you can see the differences between the v2 and v3 webhook response. You can then click on the **Upgrade** button to upgrade the webhook to v3.
# Actions on webhook
URL: /docs/product-docs/automation/webhook-v2-deprecated/actions-on-webhook
Learn how to enable/disable, duplicate and delete webhooks.
This article refers to the legacy version of webhooks in NocoDB. Refer to [Webhook v3](/docs/product-docs/automation/webhook) for the latest features and improvements.
### Enable/disable Webhook
To disable a Webhook
* Open `Webhook` tab to find list of webhooks created
* Toggle `Activate` button to enable/disable
### Edit Webhook
To edit a Webhook
* Open `Webhook` tab to find list of webhooks created
* Click on webhook to be edited
* This will open up the webhook configuration page, which is similar to the page used for [creating webhook](/docs/product-docs/automation/webhook-v2-deprecated/create-webhook). Reconfigure the webhook as required
* Click on `Save` button to save the changes
### Duplicate Webhook
To duplicate a Webhook
* Open `Webhook` tab to find list of webhooks created
* Click on `...` actions button associated with the webhook to be duplicate
* Select `Duplicate`
A copy of the webhook will be created (disabled by default) with a suffix ` - Copy`
### Delete Webhook
To delete a Webhook
* Open `Webhook` tab to find list of webhooks created
* Click on `...` actions button associated with the webhook to be deleted
* Select `Delete`
# Create webhook
URL: /docs/product-docs/automation/webhook-v2-deprecated/create-webhook
Learn how to create a webhook in NocoDB.
import { Tab, Tabs } from 'fumadocs-ui/components/tabs';
This article refers to the legacy version of webhooks in NocoDB. Refer to [Webhook v3](/docs/product-docs/automation/webhook) for the latest features and improvements.
## Create Webhook
### Accessing webhook page
1. Click on table for which webhook needs to be configured on the left sidebar
2. Open `Details` tab in topbar,
3. Click on `Webhooks` tab
4. Click `Add New Webhook`
### Configuring webhook
1. Name of the webhook
2. Select the event for which webhook needs to be triggered
| Trigger | Details |
| ---------------------------- | ------------------------------------------- |
| After Record Insert | After a single record is inserted |
| After Record Update | After a single record is updated |
| After Record Delete | After a single record is deleted |
| After Multiple Record Insert | After bulk records are inserted |
| After Multiple Record Update | After bulk records are updated |
| After Multiple Record Delete | After bulk records are deleted |
| Manual Trigger | Manually trigger webhook using button field |
3. Method & URL: Configure the endpoint to which webhook needs to be triggered. Supported methods are GET, POST, DELETE, PUT, HEAD, PATCH
4. Headers & Parameters: Configure Request headers & parameters (optional)
5. Condition: Only records meeting the configured criteria will trigger webhook (optional)
6. Test webhook (with sample payload) to verify if parameter are configured appropriately (optional)
7. Save the webhook
For more information on **Manual Trigger** webhook & its use with **Button** field, refer [here](/docs/product-docs/fields/field-types/custom-types/button)
### Webhook with conditions
In case of webhook with conditions, only records meeting the configured criteria will trigger webhook. For example, trigger webhook only when `Status` is `Complete`. You can also configure multiple conditions using `AND` or `OR` operators. For example, trigger webhook only when `Status` is `Complete` and `Priority` is `High`.
Webhook will be triggered only when the configured condition wasn't met before the record was updated. For example, if you have configured webhook with condition `Status` `is` `Complete` and `Priority` `is` `High` and you update the record with `Status` `Complete` and `Priority` `Low` to `High`, webhook will be triggered. However, if you update any other fields of the record with `Status` `Complete` and `Priority` `High`, webhook won't be triggered.
In summary, webhook will be triggered only when `Condition(old-record) = false` and `Condition(new-record) = true`.
Conditions are not applicable for Manual Trigger webhook
### Webhook response sample
```bash
{
"type" : "records.after.insert",
"id": "9dac1c54-b3be-49a1-a676-af388145fa8c",
"data": {
"table_id": "md_xzru7dcqrecc60",
"table_name": "Film",
"view_id": "vw_736wrpoas7tr0c",
"view_name": "Film",
"records": [
{
"FilmId": 1011,
"Title": "FOO",
"Language": {
"LanguageId": 1,
"Name": "English"
},
}
]
}
}
```
```bash
{
"type": "records.after.update",
"id": "6a6ebfe4-b0b5-434e-b5d6-5212adbf82fa",
"data": {
"table_id": "md_xzru7dcqrecc60",
"table_name": "Film",
"view_id": "vw_736wrpoas7tr0c",
"view_name": "Film",
"previous_records": [
{
"FilmId": 1,
"Title": "ACADEMY DINOSAUR",
"Description": "A Epic Drama of a Feminist in The Canadian Rockies",
"Actor List": [
{
"ActorId": 10,
"FirstName": "CHRISTIAN"
}
],
}
],
"records": [
{
"FilmId": 1,
"Title": "ACADEMY DINOSAUR (Edited)",
"Actor List": [
{
"ActorId": 10,
"FirstName": "CHRISTIAN"
}
],
}
]
}
}
```
```bash
{
"type": "records.after.delete",
"id": "e593079f-70e5-4965-8944-5ff7aeed005c",
"data": {
"table_id": "md_xzru7dcqrecc60",
"table_name": "Film",
"view_id": "vw_736wrpoas7tr0c",
"view_name": "Film",
"records": [
{
"FilmId": 1010,
"Title": "ALL-EDITED",
"Language": {
"LanguageId": 1,
"Name": "English"
},
}
]
}
}
```
```bash
{
"type": "records.after.bulkInsert",
"id": "f8397b06-a399-4a3a-b6b0-6d1c0c2f7578",
"data": {
"table_id": "md_xzru7dcqrecc60",
"table_name": "Film",
"view_id": "vw_3fq2e9q8drkblw",
"view_name": "GridView",
"records_inserted": 2
}
}
```
```bash
{
"type": "records.after.bulkUpdate",
"id": "e983cea5-8e38-438e-96a0-048751f6830b",
"data": {
"table_id": "md_xzru7dcqrecc60",
"table_name": "Film",
"view_id": "vw_3fq2e9q8drkblw",
"view_name": "Sheet-1",
"previous_records": [
[
{
"FilmId": 1005,
"Title": "Q",
"Language": {
"LanguageId": 1,
"Name": "English"
},
},
{
"FilmId": 1004,
"Title": "P",
"Language": {
"LanguageId": 1,
"Name": "English"
}
}
]
],
"records": [
[
{
"FilmId": 1005,
"Title": "Q-EDITED",
"Language": {
"LanguageId": 1,
"Name": "English"
}
},
{
"FilmId": 1004,
"Title": "P-EDITED",
"Language": {
"LanguageId": 1,
"Name": "English"
}
}
]
]
}
}
```
```bash
{
"type": "records.after.bulkDelete",
"id": "e7f1f4e5-7052-4ca2-9355-241ceb836f43",
"data": {
"table_id": "md_xzru7dcqrecc60",
"table_name": "Film",
"view_id": "vw_3fq2e9q8drkblw",
"view_name": "Sheet-1",
"records": [
[
{
"FilmId": 1022,
"Title": "x",
"Language": {
"LanguageId": 1,
"Name": "English"
},
},
{
"FilmId": 1023,
"Title": "x",
"Language": {
"LanguageId": 1,
"Name": "English"
},
}
]
]
}
}
```
```bash
{
"type": "records.manual.trigger",
"id": "551a2010-d658-4185-a050-cf3fca56a5a9",
"data": {
"table_id": "mzo4r3zrbcph43i",
"table_name": "Features",
"rows": [
{
"Id": 1,
"Title": "dstala",
"CreatedAt": "2024-08-12 11:56:15+00:00",
"UpdatedAt": "2024-08-12 11:56:48+00:00",
"Button": {
"type": "url",
"label": "Button",
"url": "https://github.com/dstala"
},
}
]
}
}
```
### Webhook with custom payload ☁
This feature is only available in the paid plans, in both cloud & self-hosted
In the enterprise edition, you can set up a personalized payload for your webhook. Just head to the `Body` tab to make the necessary configurations. Users can utilize [handlebar syntax](https://handlebarsjs.com/guide/#simple-expressions), which allows them to access and manipulate the data easily.
Use `{{ json event }}` to access the event data. Sample response is as follows
```json
{
"type": "records.after.insert",
"id": "0698517a-d83a-4e72-bf7a-75f46b704ad1",
"data": {
"table_id": "m969t01blwprpef",
"table_name": "Table-2",
"view_id": "vwib3bvfxdqgymun",
"view_name": "Table-2",
"rows": [
{
"Id": 1,
"Tags": "Sample Text",
"CreatedAt": "2024-04-11T10:40:20.998Z",
"UpdatedAt": "2024-04-11T10:40:20.998Z"
}
]
}
}
```
The custom payload feature is only available in the enterprise edition
#### Discord Webhook
Discord webhook can be configured to send messages to a Discord channel. Discord request body should contain content, embeds or attachments, otherwise request will fail. Below is an example of Discord webhook payload. More details can be found [here](https://birdie0.github.io/discord-webhooks-guide/discord_webhook.html)
```json
{
"content": "Hello, this is a webhook message",
"embeds": [
{
"title": "Webhook",
"description": "This is a webhook message",
"color": 16711680
}
]
}
```
To send complete event data to Discord, use below payload
```
{
"content" : {{ json ( json event ) }}
}
```
One can also customize the payload as per the requirement. For example, to send only the `Title` field to Discord, use below payload. Note that, the value of `content` is what that will get displayed in the Discord channel.
```
{
"content": "{{ event.data.rows.[0].Title }}"
}
```
## Environment Variables
In self-hosted version, you can configure the following environment variables to customize the webhook behavior.
* NC\_ALLOW\_LOCAL\_HOOKS: Allow localhost based links to be triggered. Default: false
Find more about environment variables [here](/docs/self-hosting/environment-variables)
# Webhook v2 (deprecated)
URL: /docs/product-docs/automation/webhook-v2-deprecated
Learn how to create, modify and delete webhooks.
This article refers to the legacy version of webhooks in NocoDB. Refer to [Webhook v3](/docs/product-docs/automation/webhook) for the latest features and improvements.
You can employ webhooks to notify external systems whenever there are additions, updates, or removals of records within NocoDB. This feature allows you to receive instantaneous notifications for any changes made to your database through NocoDB. NocoDB also offers webhooks for bulk endpoints for creating, updating, or deleting multiple records simultaneously.
Note that, Webhooks currently are specific to associated table.
* [Create Webhook](/docs/product-docs/automation/webhook-v2-deprecated/create-webhook)
* [Disable Webhook](/docs/product-docs/automation/webhook-v2-deprecated/actions-on-webhook#enabledisable-webhook)
* [Modify Webhook](/docs/product-docs/automation/webhook-v2-deprecated/actions-on-webhook#edit-webhook)
* [Duplicate Webhook](/docs/product-docs/automation/webhook-v2-deprecated/actions-on-webhook#duplicate-webhook)
* [Delete Webhook](/docs/product-docs/automation/webhook-v2-deprecated/actions-on-webhook#delete-webhook)
# Actions on workflow
URL: /docs/product-docs/automation/workflow/actions-on-workflow
Learn how to rename, duplicate and delete a workflow in NocoDB.
### Rename Workflow
To rename a workflow:
* Use `...` actions button next to the workflow name in the Workflows list
* Select `Rename workflow`
* Enter a new name and confirm
### Duplicate Workflow
To duplicate a workflow:
* Use `...` actions button next to the workflow name in the Workflows list
* Select `Duplicate workflow`
A copy of the workflow is created with a prefix `Copy of`.
### Delete Workflow
To delete a workflow:
* Use `...` actions button next to the workflow name in the Workflows list
* Select `Delete workflow`
* Confirm deletion
> Deleted workflows cannot be restored.
### Enable or Disable Workflow
A workflow when enabled will execute its triggers and actions as configured. Workflow can be enabled or disabled as needed using the toggle button in the workflow toolbar.
### Execution Logs
NocoDB provides detailed logs for each workflow execution to help monitor and debug workflows.
To view logs:
* Open the workflow
* On the toolbar, click on the **Logs** tab
* Select a run to view trigger input, node execution status, and outputs
**Execution list**: View all workflow runs with status and timestamps.
**Execution summary**: Overview of selected run with trigger details and overall status.
**Node execution details**: View input, output, and status for each node in the workflow. Select a node to see detailed information.
***
# Create workflow
URL: /docs/product-docs/automation/workflow/create-workflow
Learn how to create a workflow in NocoDB.
### Accessing workflow page
Workflow's in NocoDB are base specific. To create a new workflow, open the desired base and
1. From base **Overview** page, click on the **Create Empty Workflow** button.
* Alternatively, Click **Create New** in the left sidebar and select **Workflow**.
2. Specify a name for the workflow and click **Create Workflow**.
* Optionally, provide a description to explain the workflow's purpose.
You will land on the workflow editor page to configure the workflow.
* **Workflow list** : View all workflows in the base in the left sidebar
* **Toolbar** : Access workflow actions and settings
* **Editor** canvas : Design the workflow by adding and connecting nodes
* **Sidebar** : Configure selected node properties
***
### Configuring workflow
NocoDB Workflow builder provides a visual interface to design automation logic using interconnected nodes. To configure a workflow, follow these steps:
1. **Name the workflow:**
Provide a clear and descriptive name to identify the workflow easily. Optionally, add a description to explain its purpose.
2. **Select Trigger:**
Choose how the workflow should be initiated & configure additional node specific settings (resource & conditions) as required. There can be only one trigger node per workflow. Supported trigger types include:
* **Record trigger** – Runs when a record is created, updated, or deleted
* **Manual trigger** – Runs when triggered manually by a user
* **Scheduled trigger** – Runs at specified time intervals
3. **Add Action nodes:**
Define what happens when the workflow is triggered. You can chain multiple action nodes to perform sequential operations. Common action nodes include:
* **Create / Update Record** – Modify data in a table
* **Send Notification** – Notify users via supported channels
4. **Include Flow control nodes:**
\[Optional] Add flow control nodes to manage execution logic, such as:
* **If / else** – Conditional branching based on field values or runtime data
* **Iterate** – Loop through a list of items and perform actions for each item
5. **Test workflow:**
Use **Test Step** to validate individual nodes to verify correct configuration and expected behavior.
6. **Publish workflow:**
Once satisfied with the configuration, use toggle button in the toolbar to enable the workflow & click **Publish** to save changes. An enabled workflow will run automatically when triggered.
***
# Workflow
URL: /docs/product-docs/automation/workflow
Learn about automation workflows in NocoDB.
**Workflows** in NocoDB enable you to automate repetitive tasks and streamline your processes. By setting up workflows, you can trigger actions based on specific events or conditions within your base. Each automation starts with a trigger and executes one or more actions, optionally controlled by flow logic such as if / else condition or an iteration.
Workflows are currently in
**beta**
release & are available on NocoDB Cloud and on-premise licensed deployments.
A workflow consists of the following building blocks:
1. **Trigger node** – Defines `when` the automation runs
2. **Action nodes** – Defines `what` happens when the automation runs
3. **Flow nodes** – Defines `how` actions are executed (conditional logic, iteration)
## Trigger Node
A **Trigger** determines when an automation starts. Each automation must have exactly one trigger.
### When manually triggered
Runs the automation only when triggered manually by a user.
Useful for testing workflows or running one-off operations.
### At scheduled time
Runs the automation on a fixed schedule.
**Use cases**
* Daily or weekly reports
* Periodic data cleanup
* Scheduled reminders
### When record created
Triggers when a new record is added to a selected table.
**Use cases**
* Send notifications for new entries
* Auto-create related records
* Initialize default values
### When record updated
Triggers when an existing record is modified.
**Use cases**
* React to status changes
* Sync updates across tables
* Notify stakeholders on field changes
### When record deleted
Triggers when a record is removed from a table.
**Use cases**
* Cleanup dependent records
* Log deletions
* Notify administrators
### When form submitted
Triggers when a form view connected to a table is submitted.
**Use cases**
* Lead capture workflows
* Support request handling
* Survey response processing
### When record enters a view
Triggers when a record appears in a specific view for the first time. The view’s filters define the trigger condition.
**Use cases**
* Workflow stages
* Approval pipelines
* Task readiness detection
### When record matches conditions
Triggers when a record meets defined conditions. The conditions can be based on any field values in the record.
**Use cases**
* Rule-based automations
* SLA breaches
* Conditional alerts
## Action Nodes
Actions define what the automation does after the trigger fires. Multiple actions can be chained together. Actions execute sequentially in the order they are connected.
### Record Actions
#### Create record
Creates a new record in a specified table. The fields of the new record can be set using static values or data from previous actions.
**Use cases**
* Create follow-up tasks
* Insert audit logs
* Sync data across tables
#### Update record
Updates one or more fields in an existing record. The fields to update can be set using static values or data from previous actions.
**Use cases**
* Change status fields
* Set computed values
* Mark records as processed
#### Find record
Finds a single record matching specified criteria. The found record or its ID can be used in subsequent actions.
**Use cases**
* Locate related records
* Fetch data for later actions
#### List records
Retrieves multiple records that match defined filters. The resulting list can be used in flow nodes like **Iterate**.
**Use cases**
* Batch operations
* Iteration using flow nodes
#### Delete record
Deletes a record from a table. ID of the record to delete can be specified using static values or data from previous actions.
**Use cases**
* Data cleanup
* Lifecycle enforcement
## Communication Actions
### Send an email
Sends an email using configured email settings.
**Use cases**
* Notifications
* Alerts
* User confirmations
### Send message
Sends a message to an external messaging service (for example, Slack).
**Use cases**
* Team notifications
* Operational alerts
* Workflow updates
## Flow Nodes
Flow nodes control how actions are executed within an automation. They enable conditional branching and iteration over records.
### If / else
Adds conditional branching to the workflow. Based on the evaluation of a condition, it directs execution to either the **If** branch or the **Else** branch. The condition can be based on data from previous actions.
**Behavior**
* Evaluates a condition
* Executes actions in the **If** branch when condition is true
* Executes actions in the **Else** branch when condition is false
**Use cases**
* Approval logic
* Conditional notifications
* Business rule enforcement
### Iterate
Repeats a set of actions for each item in specified list data (for example, records from **List records** action).
**Behavior**
* Accepts array output from previous action
* Executes child actions once per array item
**Use cases**
* Bulk updates
* Batch notifications
* Record-by-record processing
## Execution Order
1. Trigger fires
2. Actions execute top-to-bottom
3. Flow nodes control branching or repetition
4. Automation completes once all paths finish execution
5. Logs are recorded for auditing
***
# Bar Chart
URL: /docs/product-docs/dashboards/widgets/bar-chart
Configure bar chart widgets to compare values across categories in your dashboard
The **Bar Chart** widget in NocoDB dashboards allows you to compare values across different categories. It is especially useful for highlighting trends, distributions, or comparisons between groups.
## Title & Description
* **Title**: Enter a title for the bar chart widget. This will be displayed prominently at the top of the widget.
* **Description**: Optionally, add a description to provide context or details about the data being visualized. This will appear below the title.
## Data Source
* **Table**: Select the table from which you want to pull data for the bar chart.
* **Records**: Choose which records to include:
* **All Records**: Displays all records from the selected table.
* **Records from a view**: Uses records from a specific view, allowing you to apply existing filters and sorts.
* **Specific Records**: Apply custom filters to select only certain records.
## Display
### X-axis
* **Field**: Select the field whose values will be shown as categories along the X-axis (e.g., Product, Region, Status).
* **Sort By**: Choose the criteria to sort categories:
* **xAxis Value**: Sorts based on the label values.
* **yAxis Value**: Sorts based on the numeric values plotted.
* **Order**: Select Default, Ascending, or Descending order.
* **Include empty records**: Optionally, include categories that do not have values.
* **Include others**: Toggle to combine small or excess categories into an “Others” group for better readability.
### Y-axis
* **Fields**: Choose the field(s) that determine the bar lengths. You can add multiple fields for comparison.
* **Field Summary**: Displays the **Sum, Average, Min, or Max** of a numeric field.
* **Start at zero**: Ensures the Y-axis always begins at zero, which improves accuracy in comparing bar heights.
## Appearance
Customize the look of the chart to improve readability and alignment with your dashboard:
* **Size**: Choose the chart size (Small, Medium).
* **Show value in chart**: Displays numeric values directly on the bars.
* **Show count in legend**: Adds record counts in the legend alongside category names.
# Donut Chart
URL: /docs/product-docs/dashboards/widgets/donut-chart
Configure donut chart widgets to visualize data distribution in your dashboard
The **Donut Chart** widget in NocoDB dashboards is a variant of the pie chart that features a hollow center, allowing for additional information or metrics to be displayed. It is particularly useful for showing how different segments contribute to a whole while providing space for supplementary details.
## Title & Description
* **Title**: Enter a title for the donut chart widget. This will be displayed prominently at the top of the widget.
* **Description**: Optionally, add a description to provide context or details about the data being visualized. This will appear below the title.
## Data Source
* **Table**: Select the table from which you want to pull data for the donut chart. This is the primary source of records for the visualization.
* **Record**: Select records from the chosen table to be included in the donut chart. You can choose from:
* **All Records**: Displays all records in the selected table.
* **Records from a view**: Allows you to filter records based on a specific view, enabling focused visualizations. You need to select a view from the dropdown.
* **Specific Records**: Apply filters to select specific records for the donut chart. This is useful for showing data based on certain criteria. You can add multiple filters to refine the selection.
## Display
* **Category Field**: Select the field that will be used to determine the segments of the donut chart. This field should contain categorical data that you want to visualize.
* **Order**: Choose how the segments are ordered in the donut chart. You can order them by:
* **Default**: Segments are displayed in the order they appear in the data.
* **Ascending**: Segments are sorted in ascending order based on their values.
* **Descending**: Segments are sorted in descending order based on their values.
* **Include empty records**: Optionally, you can choose to include records that do not have a value for the selected category field. This can help in visualizing segments that may otherwise be omitted due to missing data.
* **Value Field**: Choose the field that will determine the size of each segment in the donut chart. This field should contain numerical data that represents the value for each category.
* **Record Count**: Displays the count of records for each category.
* **Field Summary**: Shows the sum, average, minimum, maximum, or count of a specific field across the selected records. Available options vary based on the field type.
## Appearance
You can customize the appearance of the donut chart to enhance its visual appeal and clarity. The following options are available:
* **Size**: Adjust the size of the donut chart to fit your dashboard layout. You can choose from small or medium sizes.
* **Legend Orientation**: Choose the orientation of the legend that displays the category names and their corresponding colors. Options include:
* **Right**: Places the legend to the right of the donut chart.
* **Bottom**: Places the legend below the donut chart.
* **Left**: Places the legend to the left of the donut chart.
* **Top**: Places the legend above the donut chart.
* **Show Percentage in chart**: Enable this option to display the percentage contribution of each segment within the donut chart. This provides additional context for understanding the data distribution.
* **Show Count in Legend**: Enable this option to display the count of records for each category in the legend. This helps in understanding the number of records represented by each segment.
# iFrame
URL: /docs/product-docs/dashboards/widgets/iframe
Embed external content securely inside your dashboard using the iFrame widget
The **iFrame** widget in NocoDB allows you to embed external web pages, applications, or dashboards directly inside your NocoDB dashboard. This is useful for integrating third-party tools, live reports, charts, or any web resource you want to monitor alongside your database data.
## Configuration
* **URL**
Enter the web page URL you want to embed.
> ⚠️ Only a limited set of **whitelisted domains** are supported. If the URL does not belong to a whitelisted domain, it cannot be embedded.
* **Parameters**
You can pass query parameters to control the embedded page. For example:
```
https://app.nocodb.com/sharedViewID?disableTopbar=true&disableToolbar=false
```
## NocoDB iFrame Whitelist
The following domains are whitelisted for embedding in NocoDB iFrames.
| Analytics & Business Intelligence | Automation & Workflow | Calendar & Scheduling |
| --------------------------------- | --------------------- | --------------------- |
| datawrapper.de | make.com | cal.com |
| looker.com | n8n.io | calendly.com |
| metabase.com | zapier.com | tidycal.com |
| powerbi.microsoft.com | | |
| tableau.com | | |
| Cloud Storage & File Sharing | Communication & Collaboration | Database & Data Management |
| ---------------------------- | ----------------------------- | -------------------------- |
| dropbox.com | loom.com | airtable.com |
| google.com | mural.co | getgrist.com |
| | pitch.com | nocodb.com |
| | sli.do | |
| | slido.com | |
| Design & Prototyping | Developer Tools & Code | Diagramming & Mind Mapping |
| -------------------- | ---------------------- | -------------------------- |
| canva.com | codepen.io | dbdiagram.io |
| figma.com | codesandbox.io | diagrams.net |
| framer.com | gist.github.com | draw\.io |
| invisionapp.com | github.com | gliffy.com |
| marvelapp.com | gitlab.com | lucid.co |
| penpot.app | jsfiddle.net | lucidchart.com |
| sketch.com | postman.com | mindmeister.com |
| zeplin.io | replit.com | miro.com |
| | swagger.io | tldraw\.com |
| | val.town | whimsical.com |
| Documentation & Knowledge Management | Forms & Surveys | Media & Entertainment |
| ------------------------------------ | ---------------- | --------------------- |
| atlassian.com | forms.gle | instagram.com |
| descript.com | jotform.com | pinterest.com |
| gitbook.com | surveymonkey.com | spotify.com |
| notion.so | tally.so | vimeo.com |
| obsidian.md | typeform.com | youtu.be |
| scribehow\.com | | youtube.com |
| slab.com | | |
| Project Management |
| ------------------ |
| asana.com |
| basecamp.com |
| clickup.com |
| coda.io |
| linear.app |
| monday.com |
| trello.com |
> **Note**: All domains include both the root domain and wildcard subdomains (e.g., `example.com` and `*.example.com`) in the whitelist configuration.
## Use Cases
* Embedding analytics dashboards (e.g., Metabase, Grafana, Superset).
* Displaying Google Docs, Sheets, or Slides within NocoDB.
* Showing interactive charts or visualizations from allowed external apps.
* Integrating custom internal tools from whitelisted domains.
# Widgets
URL: /docs/product-docs/dashboards/widgets
Add and configure widgets to visualize data in your dashboard
The dashboard editor provides a flexible canvas where you can arrange widgets. You can drag and drop widgets to position them as needed.
NocoDB dashboards support the following widget types:
| Widget Type | Description |
| -------------------------------------------------------------------- | -------------------------------------- |
| **[Number](/docs/product-docs/dashboards/widgets/number)** | Displays KPIs and metric summaries |
| **[Bar Chart](/docs/product-docs/dashboards/widgets/bar-chart)** | Compares values across categories |
| **[Line Chart](/docs/product-docs/dashboards/widgets/line-chart)** | Shows trends over time |
| **[Pie Chart](/docs/product-docs/dashboards/widgets/pie-chart)** | Visualizes parts of a whole |
| **[Donut Chart](/docs/product-docs/dashboards/widgets/donut-chart)** | Pie chart variant with a hollow center |
| **[Text](/docs/product-docs/dashboards/widgets/text)** | Displays static information |
| **[iFrame](/docs/product-docs/dashboards/widgets/iframe)** | Embeds external web content |
### Adding Widgets
Click on Edit Dashboard to enter the dashboard editor. Then, use the widget toolbar at the top to add widgets. You can either click on the widget type in the toolbar or drag and drop it onto the dashboard canvas.
### Configuring Widgets
Once a widget is added, you can configure its properties using the right panel. Each widget type has specific configuration options, such as:
* **Data Source**: Select the table and records to visualize.
* **Display Options**: Customize labels, colors, and formatting.
Refer to widget specific notes to learn more about available options for widget configuration.
### Arranging Widgets
You can drag and drop widgets to rearrange them on the dashboard canvas. NocoDB supports a flexible grid layout, allowing you to position widgets as needed.
### Resizing Widgets
To resize a widget, hover over its right-corner until the resize cursor appears. Click and drag to adjust the widget size. Widget specific restrictions apply. Some widgets can be only resized horizontally.
### Deleting Widgets
To remove a widget, click on 3-dot menu in the widget header and select **Delete widget**.
### Duplicating Widgets
To create a copy of a widget, click on the 3-dot menu in the widget header and select **Duplicate widget**. This is useful for creating similar widgets with minor variations.
***
# Line Chart
URL: /docs/product-docs/dashboards/widgets/line-chart
Configure line chart widgets to visualize trends and comparisons over time or categories in your dashboard
The **Line Chart** widget in NocoDB dashboards allows you to visualize trends and comparisons across categories or time. It is especially useful for tracking changes, identifying patterns, and comparing multiple metrics simultaneously.
## Title & Description
* **Title**: Enter a title for the line chart widget. This will be displayed prominently at the top of the widget.
* **Description**: Optionally, add a description to provide context or details about the data being visualized. This will appear below the title.
## Data Source
* **Table**: Select the table from which you want to pull data for the line chart.
* **Records**: Choose which records to include:
* **All Records**: Displays all records from the selected table.
* **Records from a view**: Uses records from a specific view, allowing you to apply filters and sorts.
* **Specific Records**: Apply custom filters to select only certain records.
## Display
### X-axis
* **Field**: Select the field whose values will be shown along the X-axis (e.g., Date, Product, Category).
* **Sort By**: Choose how categories are sorted:
* **xAxis Value**: Sorts based on the label values.
* **yAxis Value**: Sorts based on the numeric values plotted.
* **Order**: Select Default, Ascending, or Descending.
* **Include empty records**: Optionally include categories that have no values.
* **Include others**: Toggle to group smaller categories into an “Others” bucket.
### Y-axis
* **Fields**: Choose the field(s) to plot on the Y-axis. You can add multiple fields to display multiple lines in the chart.
* **Record Count**: Shows the number of records for each category.
* **Field Summary**: Displays the **Sum, Average, Min, or Max** of a numeric field.
* **Start at zero**: Ensures the Y-axis always begins at zero for consistency.
## Appearance
Customize how the chart is displayed for clarity and readability:
* **Size**: Adjust the chart size (Small, Medium).
* **Legend Orientation**: Choose where to display the legend (Top, Bottom, Left, Right).
* **Show count in legend**: Enable to display record counts in the legend.
* **Plot data points**: Enable to highlight data points on the line.
* **Smooth lines**: Enable to display smoothed curves instead of jagged lines.
# Number
URL: /docs/product-docs/dashboards/widgets/number
Configure number widgets to display key metrics in your dashboard
The section here details various configuration options available for the **Number** widget in NocoDB dashboards. This widget is designed to display key performance indicators (KPIs) and metric summaries in a clear, concise format.
## Title & description
* **Title**: Enter a title for the number widget. This will be displayed prominently at the top of the widget.
* **Description**: Optionally, add a description to provide context or details about the metric being displayed. This will appear below the title.
## Data source
* **Table**: Select the table from which you want to pull data for the number widget. This is the primary source of records for the metric.
* **Record**: Select records from the chosen table to be included in the metric calculation. You can choose from:
* **All Records**: Displays the total count of records in the selected table.
* **Records from a view**: Allows you to filter records based on a specific view, enabling focused metrics. You need to select a view from the dropdown.
* **Specific Records**: Apply filters to select specific records for the metric. This is useful for showing metrics based on certain criteria. You can add multiple filters to refine the selection.
## Display
* **Record Count**: Displays the total number of records in the selected source.
* **Field Summary**: Shows the sum, average, minimum, maximum, or count of a specific field across the selected records. Available options vary based on the field type.
## Appearance
**Number Format**: Choose how the number is displayed, such as:
* **Default**: Standard numeric format.
* **Filled**: Displays the number with a filled background.
* **Coloured Text**: Uses color to highlight the number, making it stand out.
# Pie Chart
URL: /docs/product-docs/dashboards/widgets/pie-chart
Configure pie chart widgets to visualize data distribution in your dashboard
The **Pie Chart** widget in NocoDB dashboards allows you to visualize data distribution across categories. It is particularly useful for showing how different segments contribute to a whole.
## Title & Description
* **Title**: Enter a title for the pie chart widget. This will be displayed prominently at the top of the widget.
* **Description**: Optionally, add a description to provide context or details about the data being visualized. This will appear below the title.
## Data Source
* **Table**: Select the table from which you want to pull data for the pie chart. This is the primary source of records for the visualization.
* **Record**: Select records from the chosen table to be included in the pie chart. You can choose from:
* **All Records**: Displays all records in the selected table.
* **Records from a view**: Allows you to filter records based on a specific view, enabling focused visualizations. You need to select a view from the dropdown.
* **Specific Records**: Apply filters to select specific records for the pie chart. This is useful for showing data based on certain criteria. You can add multiple filters to refine the selection.
## Display
* **Category Field**: Select the field that will be used to determine the segments of the pie chart. This field should contain categorical data that you want to visualize.
* **Order**: Choose how the segments are ordered in the pie chart. You can order them by:
* **Default**: Segments are displayed in the order they appear in the data.
* **Ascending**: Segments are sorted in ascending order based on their values.
* **Descending**: Segments are sorted in descending order based on their values.
* **Include empty records**: Optionally, you can choose to include records that do not have a value for the selected category field. This can help in visualizing segments that may otherwise be omitted due to missing data.
* **Value Field**: Choose the field that will determine the size of each segment in the pie chart. This field should contain numerical data that represents the value for each category.
* **Record Count**: Displays the count of records for each category.
* **Field Summary**: Shows the sum, average, minimum, maximum, or count of a specific field across the selected records. Available options vary based on the field type.
## Appearance
You can customize the appearance of the pie chart to enhance its visual appeal and clarity. The following options are available:
* **Size**: Adjust the size of the pie chart to fit your dashboard layout. You can choose from small or medium sizes.
* **Legend Orientation**: Choose the orientation of the legend that displays the category names and their corresponding colors. Options include:
* **Right**: Places the legend to the right of the pie chart.
* **Bottom**: Places the legend below the pie chart.
* **Left**: Places the legend to the left of the pie chart.
* **Top**: Places the legend above the pie chart.
* **Show Percentage in chart**: Enable this option to display the percentage contribution of each segment within the pie chart. This provides additional context for understanding the data distribution.
* **Show Count in Legend**: Enable this option to display the count of records for each category in the legend. This helps in understanding the number of records represented by each segment.
# Text
URL: /docs/product-docs/dashboards/widgets/text
Configure text widgets to add static textual content to your dashboard
The section here details various configuration options available for the **Text** widget in NocoDB dashboards. This widget is designed to display descriptive content, instructions, notes, or disclaimers, helping you add context or guidance alongside your data visualizations.
## Content
Type the text you want to display. This can be:
* Instructions for dashboard users
* Explanatory notes for data insights
* Compliance or legal disclaimers
* Motivational or status updates for teams
You can choose between two content modes:
* **Markdown**: Write using markdown syntax for headings, lists, links, images, blockquotes, code, and tables. Find more details about supported markdown syntax in the [Markdown Guide](/docs/product-docs/fields/field-types/text-based/rich-text#formatting-options).
* **Text**: Use the inline editor for direct styling.
## Formatting
Use the inline editor to style your text:
* **Bold**, *Italic*, and underline for emphasis.
* Horizontal alignment (**left**, **center**, **right**).
* Vertical alignment (**top**, **middle**, **bottom**).
## Appearance
Customize how the text is presented in the widget:
Appearance options are available only when the content mode is set to **Text**.
* **Font**: Choose from available font families.
* **Weight**: Set text thickness (e.g., Light, Medium, Bold).
* **Size**: Adjust the font size to suit your layout.
* **Line Height**: Control spacing between lines for better readability.
* **Text Color**: Select any color to highlight your content.
***
# Accessing APIs
URL: /docs/product-docs/developer-resources/rest-apis/accessing-apis
How to access NocoDB APIs with Auth or API token?
## API Tokens
NocoDB APIs can be authorized by using API Tokens. API tokens allow us to integrate seamlessly with 3rd party apps. See [API Tokens Management](/docs/product-docs/account-settings/api-tokens) for more.
## Swagger UI
You can interact with the API's resources via the Swagger UI. For more details, see [Swagger APIs Doc](/docs/product-docs/bases/actions-on-base#rest-apis)
# REST APIs
URL: /docs/product-docs/developer-resources/rest-apis
NocoDB REST API Overview
NocoDB provides a comprehensive set of REST APIs that allow you to interact programmatically with your data, metadata, and workspace resources. These APIs make it possible to integrate NocoDB with external applications, automate workflows, build custom tools, or manage your bases at scale.
Whether you want to query records, update fields, manage tables, or retrieve metadata, NocoDB exposes clear and consistent API surfaces designed for both simple and advanced use cases. This document outlines the available API types, explains how to construct endpoints, and guides you through locating the required IDs for making requests.
Use this reference as your starting point for building reliable, API-driven integrations with NocoDB.
* [Data APIs](https://data-apis-v3.nocodb.com/)
* [Meta APIs](https://meta-apis-v3.nocodb.com/)
Collaboration related Meta APIs are available on NocoDB Cloud Business+ plans and Self-hosted Enterprise plans. View & Script related Meta APIs are available on NocoDB Cloud and Self-hosted Enterprise plans.
When querying using v3 apis, see [v3 Where Clause](/docs/product-docs/developer-resources/rest-apis#v3-where-query-parameter) for a slight difference between the two version's where clause.
## Finding Your API IDs
Before making API calls, you'll need to identify and copy the relevant IDs required for constructing your endpoints. This section walks you through locating each essential identifier.
### Workspace ID
**Workspace ID** is an alphanumeric identifier prefixed with `w` (representing *workspace*) that uniquely identifies your workspace in NocoDB. It appears in the URL bar when viewing any base within the workspace.
You can also find it in the workspace context menu (accessible by clicking the workspace icon in the minibar). Click the ID to copy it to your clipboard.
Workspace ID can also be retrieved from Workspace settings page.
### Base ID
**Base ID** is required for metadata APIs and administrative operations. It uniquely identifies a specific database (or base) within your workspace.
The Base ID is an alphanumeric identifier prefixed with `p` (representing *project*), visible in the URL when accessing any table or base-level settings. You can also find it in the base context menu (chevron next to the base name) in the left sidebar, where you can click the ID to copy it to your clipboard.
### Table ID
**Table ID** is the most commonly used identifier and is required for all data API calls. It uniquely identifies a specific table within your base.
The Table ID is an alphanumeric string prefixed with `m` (representing *model*), visible in the URL immediately after the Base ID when viewing a table. You can also find it in the table context menu (three dots next to the table name) in the left sidebar. Click the ID to copy it to your clipboard.
### View ID
**View ID** is used for view-specific API operations, such as fetching records from a particular view. It uniquely identifies a specific view within a table.
The View ID is an alphanumeric string prefixed with `v` (representing *view*), visible in the URL when a specific view is open. You can also find it in the view context menu (three dots next to the view name) in the left sidebar. Click the ID to copy it to your clipboard.
View ID can also be retrieved from view toolbar > more actions (3 dots) menu
### Field ID
**Field ID** is used for field-specific API operations, such as updating field properties. It uniquely identifies a specific column within a table.
The Field ID is an alphanumeric string prefixed with `c` (representing *column*), visible in the URL when viewing or editing a field’s settings. You can also find it in the field context menu (chevron next to the field name) in the field header bar. Click the ID to copy it to your clipboard.
Field ID can also be retrieved from `Details` > `Fields` editor
### Record ID
**Record ID** is used for record-specific API operations, such as retrieving or updating an individual record. It uniquely identifies a specific row within a table.
By default, the Record ID is a numeric value starting from 1. You can display the **ID** field (which corresponds to the Record ID) by opening the **Fields** menu in the toolbar and enabling **Show System Fields**.
You can also find it in the URL when viewing a specific record (expanded record view).
You can also access the Record ID in formulas by selecting **ID** from the list of available fields in the formula editor or by using the `RECORD_ID()` function.
### User ID
**User ID** is used for user-specific API operations, such as retrieving user details. It uniquely identifies a specific user within your workspace or organization.
The User ID is an alphanumeric string prefixed with `u` (representing *user*). You can find it on either the **Workspace Members** page or the **Base Members** page by clicking the three dots menu next to a user’s name. Click the ID to copy it to your clipboard.
### Data Source ID
For external data sources connected to NocoDB (such as Postgres or MySQL), the **Data Source ID** is additionally required to perform data API operations.
The Data Source ID is an alphanumeric string that uniquely identifies the connected data source. You can find it in the context menu by clicking the three dots next to the data source name in the left sidebar. Click the ID to copy it to your clipboard.
You can also find it in the Data Source settings page.
## Rate Limits
NocoDB APIs are rate-limited to ensure fair usage and optimal performance for all users. The default rate limit is set to **5 requests per second per user**. These limits are the same across all plans.
If these limits are exceeded, the API will return a 429 status code (Too Many Requests). You’ll need to wait 30 seconds before sending additional requests.
NocoDB may adjust these limits or introduce additional rate tiers based on pricing plans to maintain optimal service performance.
## Query params
| **Name** | **Alias** | **Use case** | **Default value** | **Example value** |
| ------------------------------ | -------------------------- | ------------------------------------------------------------ | ----------------- | ----------------------------------------------------------------------------------------------------------------------------------------------------------------- |
| [where](#comparison-operators) | [w](#comparison-operators) | Complicated where conditions | | `(colName,eq,colValue)~or(colName2,gt,colValue2)` [Usage: Comparison operators](#comparison-operators) [Usage: Logical operators](#logical-operators) |
| limit | l | Number of rows to get (SQL limit value) | 10 | 20 |
| offset | o | Offset for pagination (SQL offset value) | 0 | 20 |
| sort | s | Sort by column name, Use `-` as a prefix for descending sort | | column\_name |
| fields | f | Required column names in result | \* | column\_name1,column\_name2 |
| shuffle | r | Shuffle the result for pagination | 0 | 1 (Only allow 0 or 1. Other values would see it as 0) |
## Comparison Operators
| Operation | Meaning | Example |
| --------- | --------------------------------------------------------------- | -------------------------------- |
| eq | equal | (colName,eq,colValue) |
| neq | not equal | (colName,neq,colValue) |
| not | not equal (alias of neq) | (colName,not,colValue) |
| gt | greater than | (colName,gt,colValue) |
| ge | greater or equal | (colName,ge,colValue) |
| lt | less than | (colName,lt,colValue) |
| le | less or equal | (colName,le,colValue) |
| is | is | (colName,is,true/false/null) |
| isnot | is not | (colName,isnot,true/false/null) |
| in | in | (colName,in,val1,val2,val3,val4) |
| btw | between | (colName,btw,val1,val2) |
| nbtw | not between | (colName,nbtw,val1,val2) |
| like | like | (colName,like,%name) |
| nlike | not like | (colName,nlike,%name) |
| isWithin | is Within (Available in `Date` and `DateTime` only) | (colName,isWithin,sub\_op) |
| allof | includes all of | (colName,allof,val1,val2,...) |
| anyof | includes any of | (colName,anyof,val1,val2,...) |
| nallof | does not include all of (includes none or some, but not all of) | (colName,nallof,val1,val2,...) |
| nanyof | does not include any of (includes none of) | (colName,nanyof,val1,val2,...) |
## Comparison Sub-Operators
The following sub-operators are available in the `Date` and `DateTime` columns.
| Operation | Meaning | Example |
| --------------- | ----------------------- | --------------------------------- |
| today | today | (colName,eq,today) |
| tomorrow | tomorrow | (colName,eq,tomorrow) |
| yesterday | yesterday | (colName,eq,yesterday) |
| oneWeekAgo | one week ago | (colName,eq,oneWeekAgo) |
| oneWeekFromNow | one week from now | (colName,eq,oneWeekFromNow) |
| oneMonthAgo | one month ago | (colName,eq,oneMonthAgo) |
| oneMonthFromNow | one month from now | (colName,eq,oneMonthFromNow) |
| daysAgo | number of days ago | (colName,eq,daysAgo,10) |
| daysFromNow | number of days from now | (colName,eq,daysFromNow,10) |
| exactDate | exact date | (colName,eq,exactDate,2022-02-02) |
For `isWithin` in `Date` and `DateTime` columns, the different set of sub-operators are used.
| Operation | Meaning | Example |
| ---------------- | ----------------------- | -------------------------------------- |
| pastWeek | the past week | (colName,isWithin,pastWeek) |
| pastMonth | the past month | (colName,isWithin,pastMonth) |
| pastYear | the past year | (colName,isWithin,pastYear) |
| nextWeek | the next week | (colName,isWithin,nextWeek) |
| nextMonth | the next month | (colName,isWithin,nextMonth) |
| nextYear | the next year | (colName,isWithin,nextYear) |
| nextNumberOfDays | the next number of days | (colName,isWithin,nextNumberOfDays,10) |
| pastNumberOfDays | the past number of days | (colName,isWithin,pastNumberOfDays,10) |
## Logical Operators
| Operation | Example |
| --------- | -------------------------------------------------------------------- |
| \~or | (checkNumber,eq,JM555205)\~or((amount,gt,200)\~and(amount,lt,2000)) |
| \~and | (checkNumber,eq,JM555205)\~and((amount,gt,200)\~and(amount,lt,2000)) |
| \~not | \~not(checkNumber,eq,JM555205) |
## v3 Where Query Parameter
When calling v3 data api, the where clause has a slight difference with the previous versions. It allows values to be wrapped with quotes (double quotes, single quotes, or backticks) to safely use special characters that might otherwise break older version `where` clauses. This is particularly useful for strings containing commas, parentheses, or other delimiters.
**Example:** Searching for a phrase with special characters:
`("My Field", like, "Let's come home, and go straight to bed")`
**Another Example:** Searching for a value that includes a comma:
`("Product Name", eq, "Laptop, 15-inch")`
**Example:** Using single quotes for a value:
`(City, eq, 'New York')`
### Usage on v2 API
The v3 `where` clause can also be utilized when using the v2 API by prepending the `where` clause with an `@` sign. This allows you to leverage the advanced capabilities of the v3 `where` clause even in v2 API calls.
**Example:** Using a v3 `where` clause to check for non-blank titles in a v2 API call:
`@("Title", not, blank)`
**Another Example:** Combining multiple conditions with special characters in a v2 API call:
`@("Description", like, "High-performance, water-resistant")`
# Upload via API
URL: /docs/product-docs/developer-resources/rest-apis/upload-via-api
Upload files locally present or from public remote URL via API
Sample code to upload files via API is listed below.
Assumes `http://localhost:8080/` as the base URL for the API calls.
## Upload local file (single)
### Javascript
```javascript
const axios = require('axios');
const FormData = require('form-data');
const fs = require('fs');
(async () => {
// API Token for uploading the file
// Reference : https://docs.nocodb.com/account-settings/api-tokens/#create-api-token
const apiToken = 'YOUR_API_TOKEN';
// Base URL for the API
const baseURL = 'https://app.nocodb.com';
// Table ID
// Table ID of your table can be retrieved from the URL (OR) by using table context menu
const tableID = 'YOUR_TABLE_ID';
// Read the image file
const photoStream = fs.createReadStream('./photo.png');
// Create form data
const formData = new FormData();
formData.append('file', photoStream);
// Define headers for uploading the file
const uploadHeaders = {
'xc-token': apiToken,
...formData.getHeaders(),
};
// Upload the file
const uploadResponse = await axios.post(`${baseURL}/api/v2/storage/upload`, formData, {
headers: uploadHeaders,
});
// Create a new row in the database
const response = await axios.post(`${baseURL}/api/v2/tables/${tableID}/records`, {
// Example field data
"Title": "New Name",
// Pass the uploaded file data; file is field name here & its type is "Attachment"
"file": uploadResponse.data,
}, {
headers: {
'xc-token': apiToken,
'Content-Type': 'application/json',
},
});
})().catch(err => {
console.log(err);
});
```
### Bash
```bash
#!/bin/bash
# Required configuration
API_TOKEN="YOUR_API_TOKEN"
BASE_URL="https://app.nocodb.com"
TABLE_ID="YOUR_TABLE_ID" # e.g., m7wp2q8n4d9w4kp
FILE_PATH="./upload/photo.png" # Path to file to upload
FIELD_NAME="File" # Name of attachment field
TITLE_FIELD="Title" # Optional: a text field
TITLE_VALUE="New Name" # Optional: text value
# Step 1: Upload the file
echo "Uploading file..."
UPLOAD_RESPONSE=$(curl -s -X POST "${BASE_URL}/api/v2/storage/upload" \
-H "xc-token: ${API_TOKEN}" \
-F "file=@${FILE_PATH}")
echo "Upload response: $UPLOAD_RESPONSE"
# Step 2: Create the record with uploaded file
echo "Creating record..."
CREATE_RESPONSE=$(curl -s -X POST "${BASE_URL}/api/v2/tables/${TABLE_ID}/records" \
-H "xc-token: ${API_TOKEN}" \
-H "Content-Type: application/json" \
-d "{
\"${TITLE_FIELD}\": \"${TITLE_VALUE}\",
\"${FIELD_NAME}\": ${UPLOAD_RESPONSE}
}")
echo "Create response: $CREATE_RESPONSE"
```
📝 **Instructions**
1. Save the file as `upload-and-insert.sh`
2. Make it executable:
```bash
chmod +x upload-and-insert.sh
```
3. Update the following variables:
* `API_TOKEN`
* `TABLE_ID`
* `FILE_PATH`
* Field names (`file`, `Title`, etc.)
4. Run the script:
```bash
./upload-and-insert.sh
```
### Typescript
```typescript
import axios from 'axios';
import FormData from 'form-data';
import fs from 'fs';
import path from 'path';
const uploadAndInsert = async (): Promise => {
const apiToken = 'YOUR_API_TOKEN'; // Replace with your actual API token
const baseURL = 'https://app.nocodb.com';
const tableID = 'YOUR_TABLE_ID'; // Replace with your actual table ID
const filePath = path.resolve('../uploads/photo.png');
const photoStream = fs.createReadStream(filePath);
const formData = new FormData();
formData.append('file', photoStream);
const uploadHeaders = {
'xc-token': apiToken,
...formData.getHeaders(),
};
try {
const uploadResponse = await axios.post(`${baseURL}/api/v2/storage/upload`, formData, {
headers: uploadHeaders,
});
const uploadedFileData = uploadResponse.data;
const recordResponse = await axios.post(`${baseURL}/api/v2/tables/${tableID}/records`, {
Title: 'New Name',
file: uploadedFileData,
}, {
headers: {
'xc-token': apiToken,
'Content-Type': 'application/json',
},
});
console.log('Record created:', recordResponse.data);
} catch (error) {
console.error('Error occurred:', error);
}
};
// Invoke properly
(async () => {
await uploadAndInsert();
})();
```
📝 **Instructions**
Install required packages:
```bash
npm install axios form-data @types/form-data
```
If using Node.js with TypeScript, also install:
```bash
npm install --save-dev @types/node
```
***
* Make sure your TypeScript `tsconfig.json` includes `"esModuleInterop": true` to support default imports from CommonJS libraries like `axios`, `form-data`, and `fs`.
### Python
```python
import requests
# Configuration
API_TOKEN = "YOUR_API_TOKEN"
BASE_URL = "https://app.nocodb.com"
TABLE_ID = "YOUR_TABLE_ID"
FILE_PATH = "./photo.png"
# Step 1: Upload the file
with open(FILE_PATH, 'rb') as file:
files = {
'file': file
}
headers = {
'xc-token': API_TOKEN
}
print("Uploading file...")
upload_response = requests.post(
f"{BASE_URL}/api/v2/storage/upload",
headers=headers,
files=files
)
if upload_response.status_code != 200:
print("Upload failed:", upload_response.text)
exit(1)
uploaded_file_data = upload_response.json()
print("Upload response:", uploaded_file_data)
# Step 2: Insert a new record with uploaded file
record_payload = {
"Title": "New Name", # adjust field names as needed
"File": uploaded_file_data # must match the name of your attachment field
}
headers = {
'xc-token': API_TOKEN,
'Content-Type': 'application/json'
}
print("Creating record...")
record_response = requests.post(
f"{BASE_URL}/api/v2/tables/{TABLE_ID}/records",
headers=headers,
json=record_payload
)
if record_response.status_code != 200:
print("Record creation failed:", record_response.text)
else:
print("Record created:", record_response.json())
```
📝 **Instructions**
Make sure you have `requests` installed:
```bash
pip install requests
```
### Ruby
```ruby
require 'net/http'
require 'uri'
require 'json'
require 'mime/types'
# Configuration
API_TOKEN = 'YOUR_API_TOKEN'
BASE_URL = 'https://app.nocodb.com'
TABLE_ID = 'YOUR_TABLE_ID'
FILE_PATH = './photo.png'
# Step 1: Upload the file
uri = URI("#{BASE_URL}/api/v2/storage/upload")
file = File.open(FILE_PATH)
mime_type = MIME::Types.type_for(FILE_PATH).first.to_s
request = Net::HTTP::Post::Multipart.new uri.path,
'file' => UploadIO.new(file, mime_type, File.basename(file))
request['xc-token'] = API_TOKEN
puts "Uploading file..."
http = Net::HTTP.new(uri.host, uri.port)
http.use_ssl = true
response = http.request(request)
if response.code.to_i != 200
puts "Upload failed: #{response.body}"
exit(1)
end
uploaded_file_data = JSON.parse(response.body)
puts "Upload response: #{uploaded_file_data}"
# Step 2: Insert a record
uri = URI("#{BASE_URL}/api/v2/tables/#{TABLE_ID}/records")
payload = {
"Title" => "New Name",
"file" => uploaded_file_data
}.to_json
request = Net::HTTP::Post.new(uri)
request['Content-Type'] = 'application/json'
request['xc-token'] = API_TOKEN
request.body = payload
puts "Creating record..."
response = Net::HTTP.start(uri.hostname, uri.port, use_ssl: true) do |http|
http.request(request)
end
if response.code.to_i != 200
puts "Record creation failed: #{response.body}"
else
puts "Record created: #{response.body}"
end
```
📝 **Instructions**
You’ll need the `multipart-post` and `mime-types` gems:
```bash
gem install multipart-post mime-types
```
Add at the top if needed:
```ruby
require 'net/http/post/multipart'
```
### JAVA
```java
import okhttp3.*;
import com.fasterxml.jackson.databind.ObjectMapper;
import java.io.File;
import java.io.IOException;
import java.util.*;
public class NocoDBUploaderOkHttp {
private static final String API_TOKEN = "YOUR_API_TOKEN";
private static final String BASE_URL = "https://app.nocodb.com";
private static final String TABLE_ID = "YOUR_TABLE_ID";
private static final String FILE_PATH = "./photo.png";
public static void main(String[] args) throws IOException {
OkHttpClient client = new OkHttpClient();
ObjectMapper mapper = new ObjectMapper();
// Step 1: Upload file
File file = new File(FILE_PATH);
String mimeType = okhttp3.internal.http.HttpDate.format(new Date()); // fallback if type is unknown
RequestBody fileBody = RequestBody.create(file, MediaType.parse(Files.probeContentType(file.toPath())));
MultipartBody multipartBody = new MultipartBody.Builder()
.setType(MultipartBody.FORM)
.addFormDataPart("file", file.getName(), fileBody)
.build();
Request uploadRequest = new Request.Builder()
.url(BASE_URL + "/api/v2/storage/upload")
.header("xc-token", API_TOKEN)
.post(multipartBody)
.build();
System.out.println("Uploading file...");
try (Response response = client.newCall(uploadRequest).execute()) {
if (!response.isSuccessful()) {
System.err.println("Upload failed: " + response.body().string());
return;
}
String uploadResponseStr = response.body().string();
System.out.println("Upload response: " + uploadResponseStr);
// Step 2: Create record
List
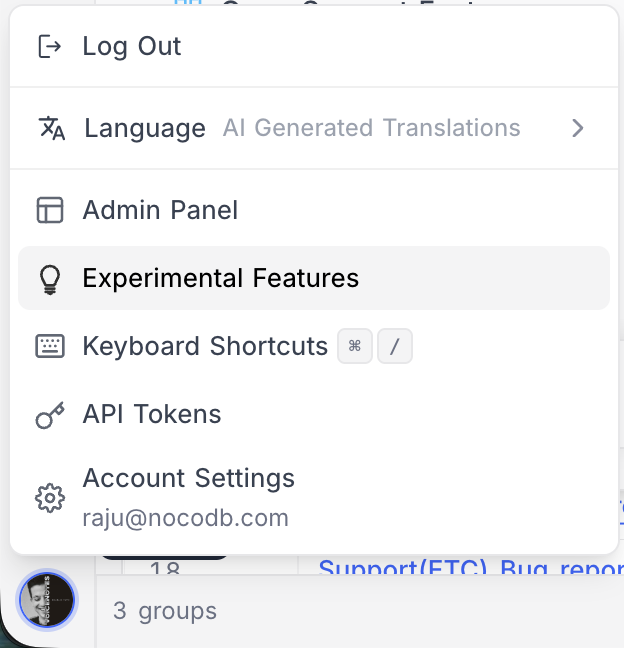 A panel opens listing all available experimental features, each with a toggle to enable or disable it and a brief description of what it does.
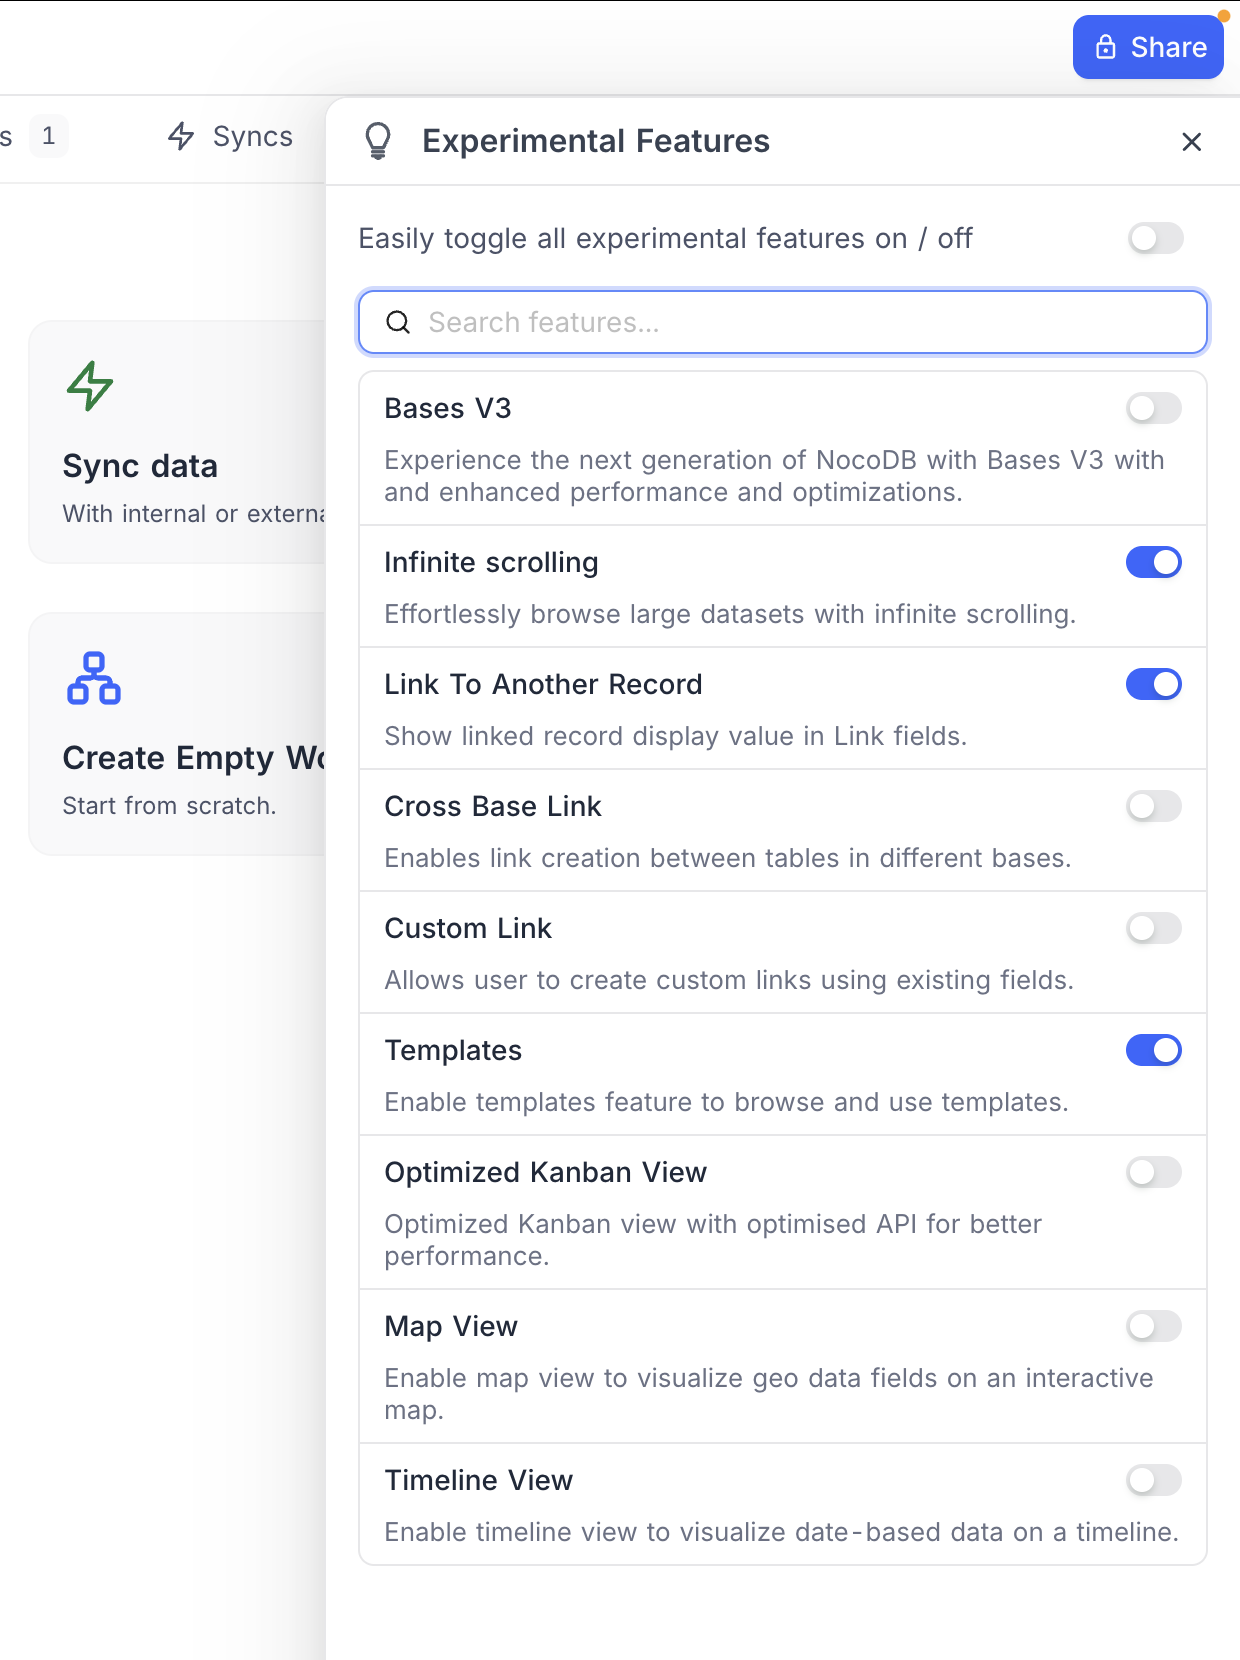 ## Available Experimental Features
| Feature | Description |
| -------------------------- | --------------------------------------------------------------------------------------------------- |
| **Bases V3** | Experience the next generation of NocoDB with Bases V3 with enhanced performance and optimizations. |
| **Infinite Scrolling** | Effortlessly browse large datasets with infinite scrolling. |
| **Link To Another Record** | Show linked record display value in Link fields. |
| **Cross Base Link** | Enables link creation between tables in different bases. |
| **Custom Link** | Allows user to create custom links using existing fields. |
| **Templates** | Enable templates feature to browse and use templates. |
| **Optimized Kanban View** | Optimized Kanban view with optimised API for better performance. |
| **Map View** | Enable map view to visualize geo data fields on an interactive map. |
| **Timeline View** | Enable timeline view to visualize date-based data on a timeline. |
## Available Experimental Features
| Feature | Description |
| -------------------------- | --------------------------------------------------------------------------------------------------- |
| **Bases V3** | Experience the next generation of NocoDB with Bases V3 with enhanced performance and optimizations. |
| **Infinite Scrolling** | Effortlessly browse large datasets with infinite scrolling. |
| **Link To Another Record** | Show linked record display value in Link fields. |
| **Cross Base Link** | Enables link creation between tables in different bases. |
| **Custom Link** | Allows user to create custom links using existing fields. |
| **Templates** | Enable templates feature to browse and use templates. |
| **Optimized Kanban View** | Optimized Kanban view with optimised API for better performance. |
| **Map View** | Enable map view to visualize geo data fields on an interactive map. |
| **Timeline View** | Enable timeline view to visualize date-based data on a timeline. |
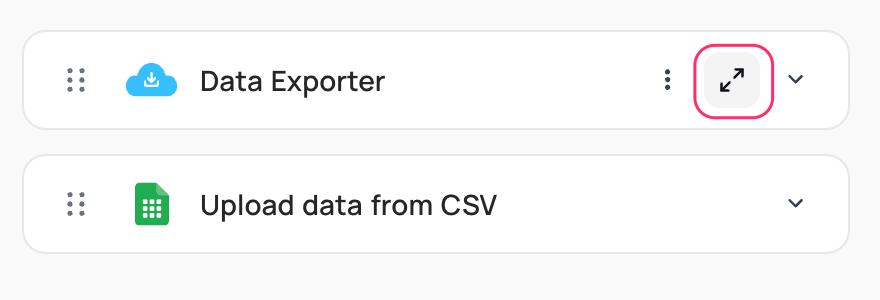 ### 2. Reorder Extensions
Use the `drag-drop` icon to reorder the extensions in the side panel.
### 2. Reorder Extensions
Use the `drag-drop` icon to reorder the extensions in the side panel.
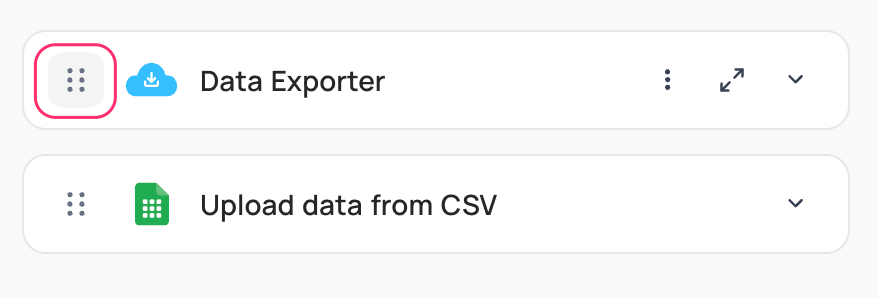 ### 3. Additional Actions
Use the `More` button to perform the following actions:
* Rename extension
* Duplicate extension
* Clear data
* Delete extension
### 3. Additional Actions
Use the `More` button to perform the following actions:
* Rename extension
* Duplicate extension
* Clear data
* Delete extension
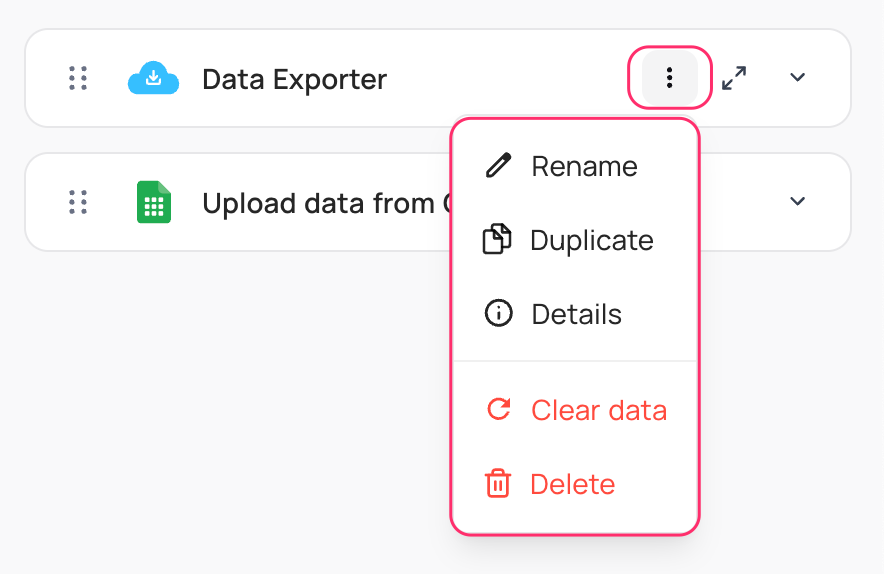 # Org Chart
URL: /docs/product-docs/extensions/org-chart
Display an organization chart based on your data
## Overview
The Org Chart extension in NocoDB allows you to visualize hierarchical data in the form of an organization chart. This extension is particularly useful for displaying relationships within teams, departments, or any other hierarchical structure based on your data.
# Page Designer
URL: /docs/product-docs/extensions/page-designer
Create printable and shareable layouts from your database records
## Overview
# Org Chart
URL: /docs/product-docs/extensions/org-chart
Display an organization chart based on your data
## Overview
The Org Chart extension in NocoDB allows you to visualize hierarchical data in the form of an organization chart. This extension is particularly useful for displaying relationships within teams, departments, or any other hierarchical structure based on your data.
# Page Designer
URL: /docs/product-docs/extensions/page-designer
Create printable and shareable layouts from your database records
## Overview
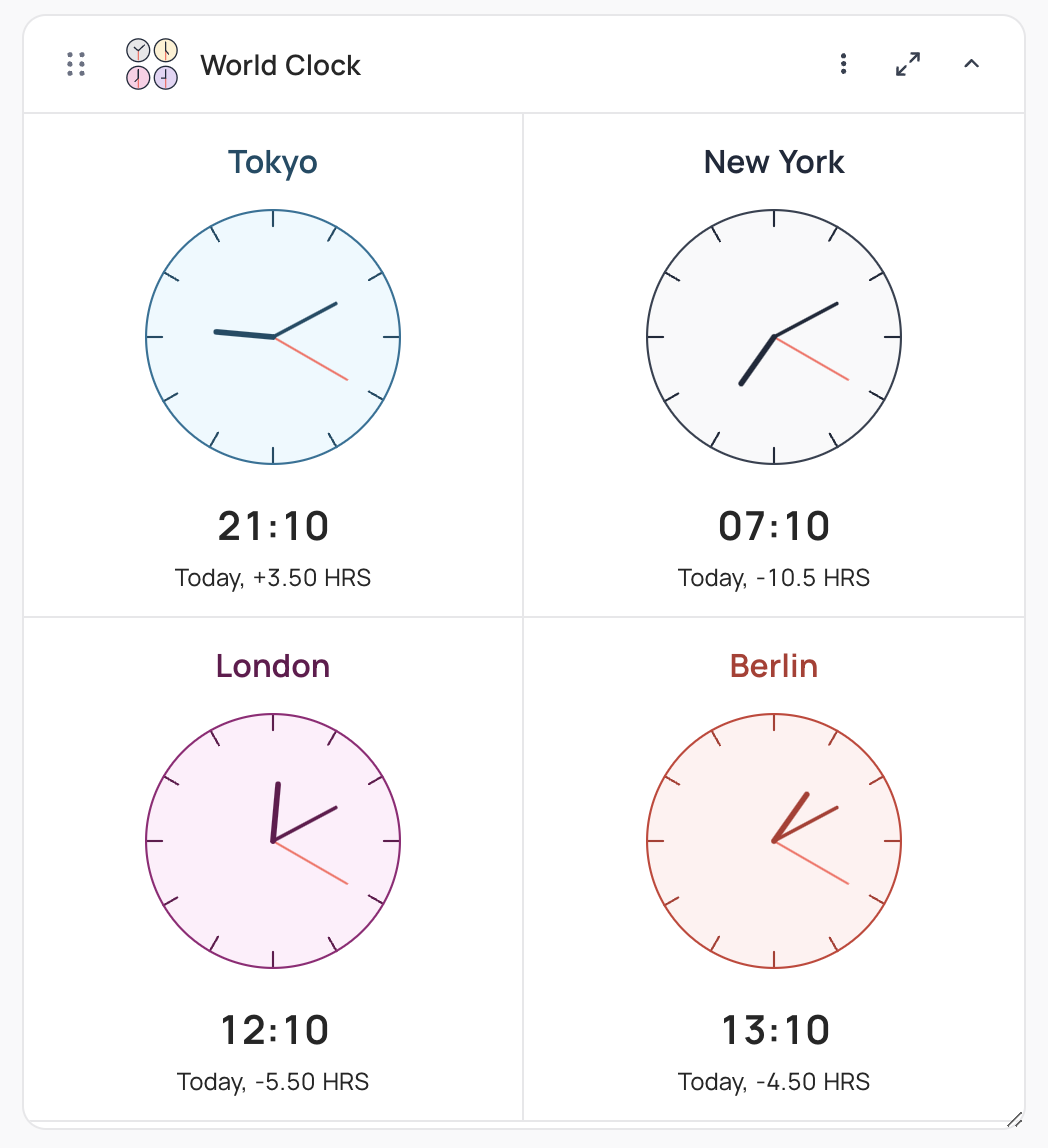
 ### Adding Clock
To add a clock, expand World clock extension, click `+ Add City` and select City from the dropdown available. You can add a maximum of 4 clocks per instance of an extension.
* **Clock Name**: Enter a name for the clock to identify it easily. It defaults to the selected City name.
* **Theme**: Choose one amongst the available themes for the clock display.
### Clock Display Settings
The following are the global settings that will be applied to all the clocks configured.
* **Clock Type**: Choose between **Analog**, **Digital**, or **Both** for the display format.
* **Show Numbers**: For analog clocks, you can additionally configure if hour numbers are to be displayed on the clock dial.
* **Time Format**: Choose between 12H and 24H format for the clock display.
# Actions on field
URL: /docs/product-docs/fields/actions-on-field
This article explains how to perform various actions on a field- like rename, change field type, default, field width, record height, show/hide.
## Fields context menu
Fields context menu can be accessed by clicking on the dropdown icon (🔽) next to the field name.\
### Adding Clock
To add a clock, expand World clock extension, click `+ Add City` and select City from the dropdown available. You can add a maximum of 4 clocks per instance of an extension.
* **Clock Name**: Enter a name for the clock to identify it easily. It defaults to the selected City name.
* **Theme**: Choose one amongst the available themes for the clock display.
### Clock Display Settings
The following are the global settings that will be applied to all the clocks configured.
* **Clock Type**: Choose between **Analog**, **Digital**, or **Both** for the display format.
* **Show Numbers**: For analog clocks, you can additionally configure if hour numbers are to be displayed on the clock dial.
* **Time Format**: Choose between 12H and 24H format for the clock display.
# Actions on field
URL: /docs/product-docs/fields/actions-on-field
This article explains how to perform various actions on a field- like rename, change field type, default, field width, record height, show/hide.
## Fields context menu
Fields context menu can be accessed by clicking on the dropdown icon (🔽) next to the field name.\
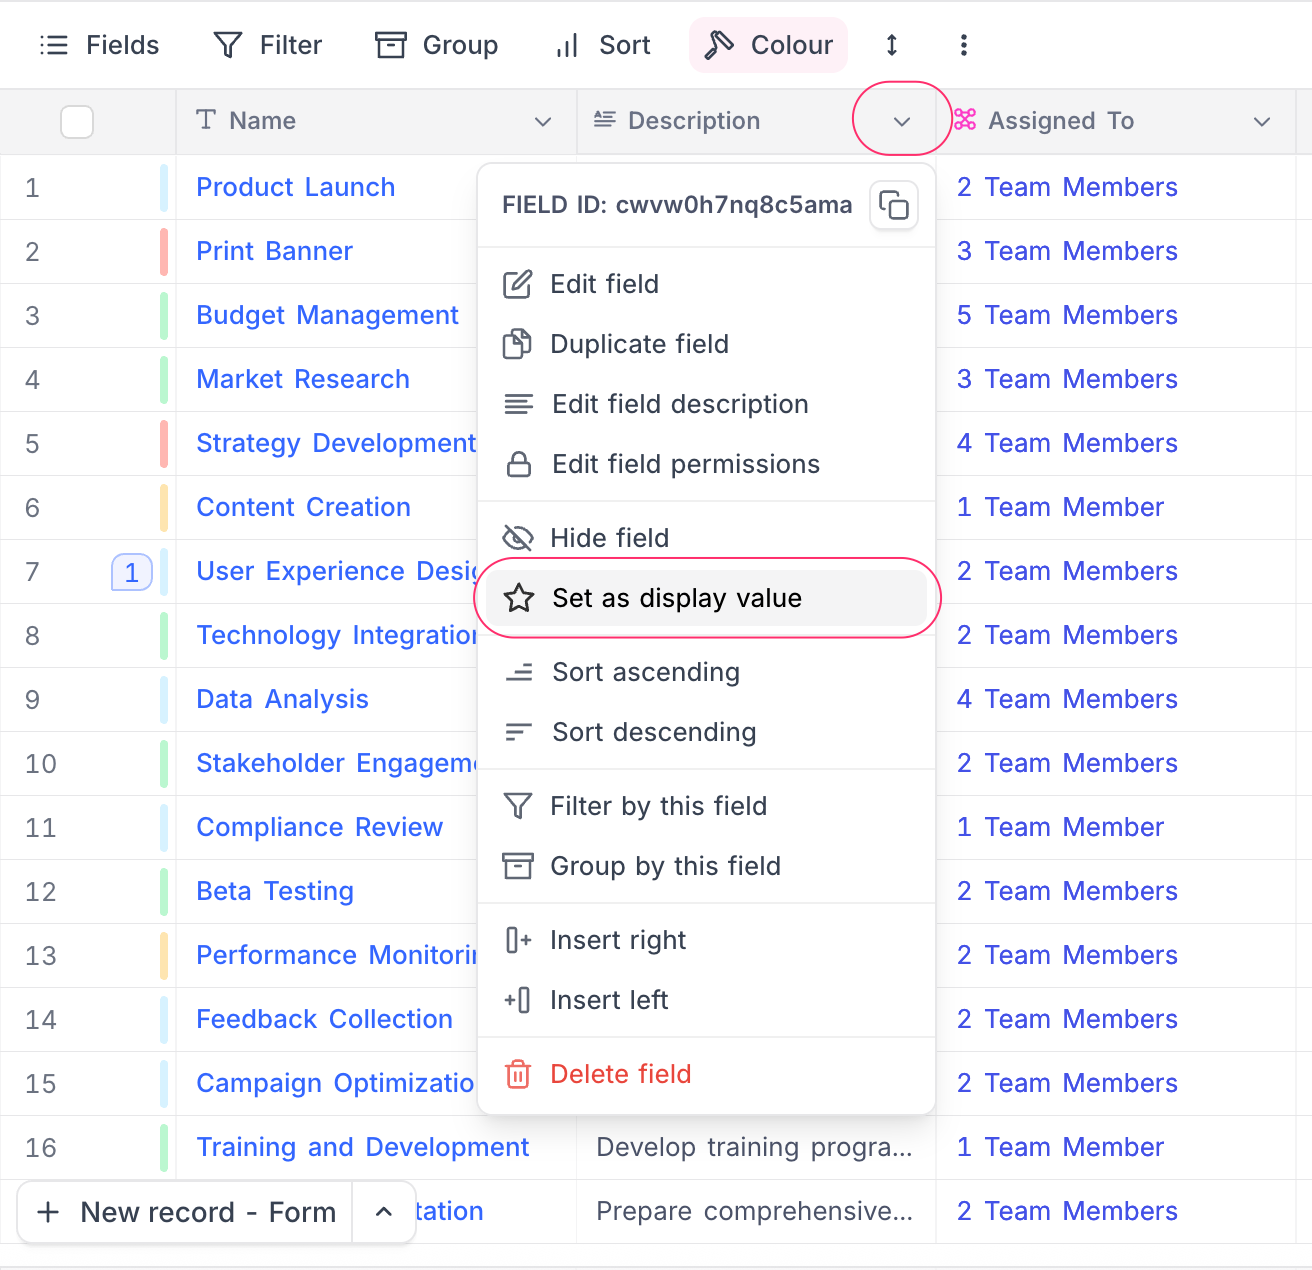
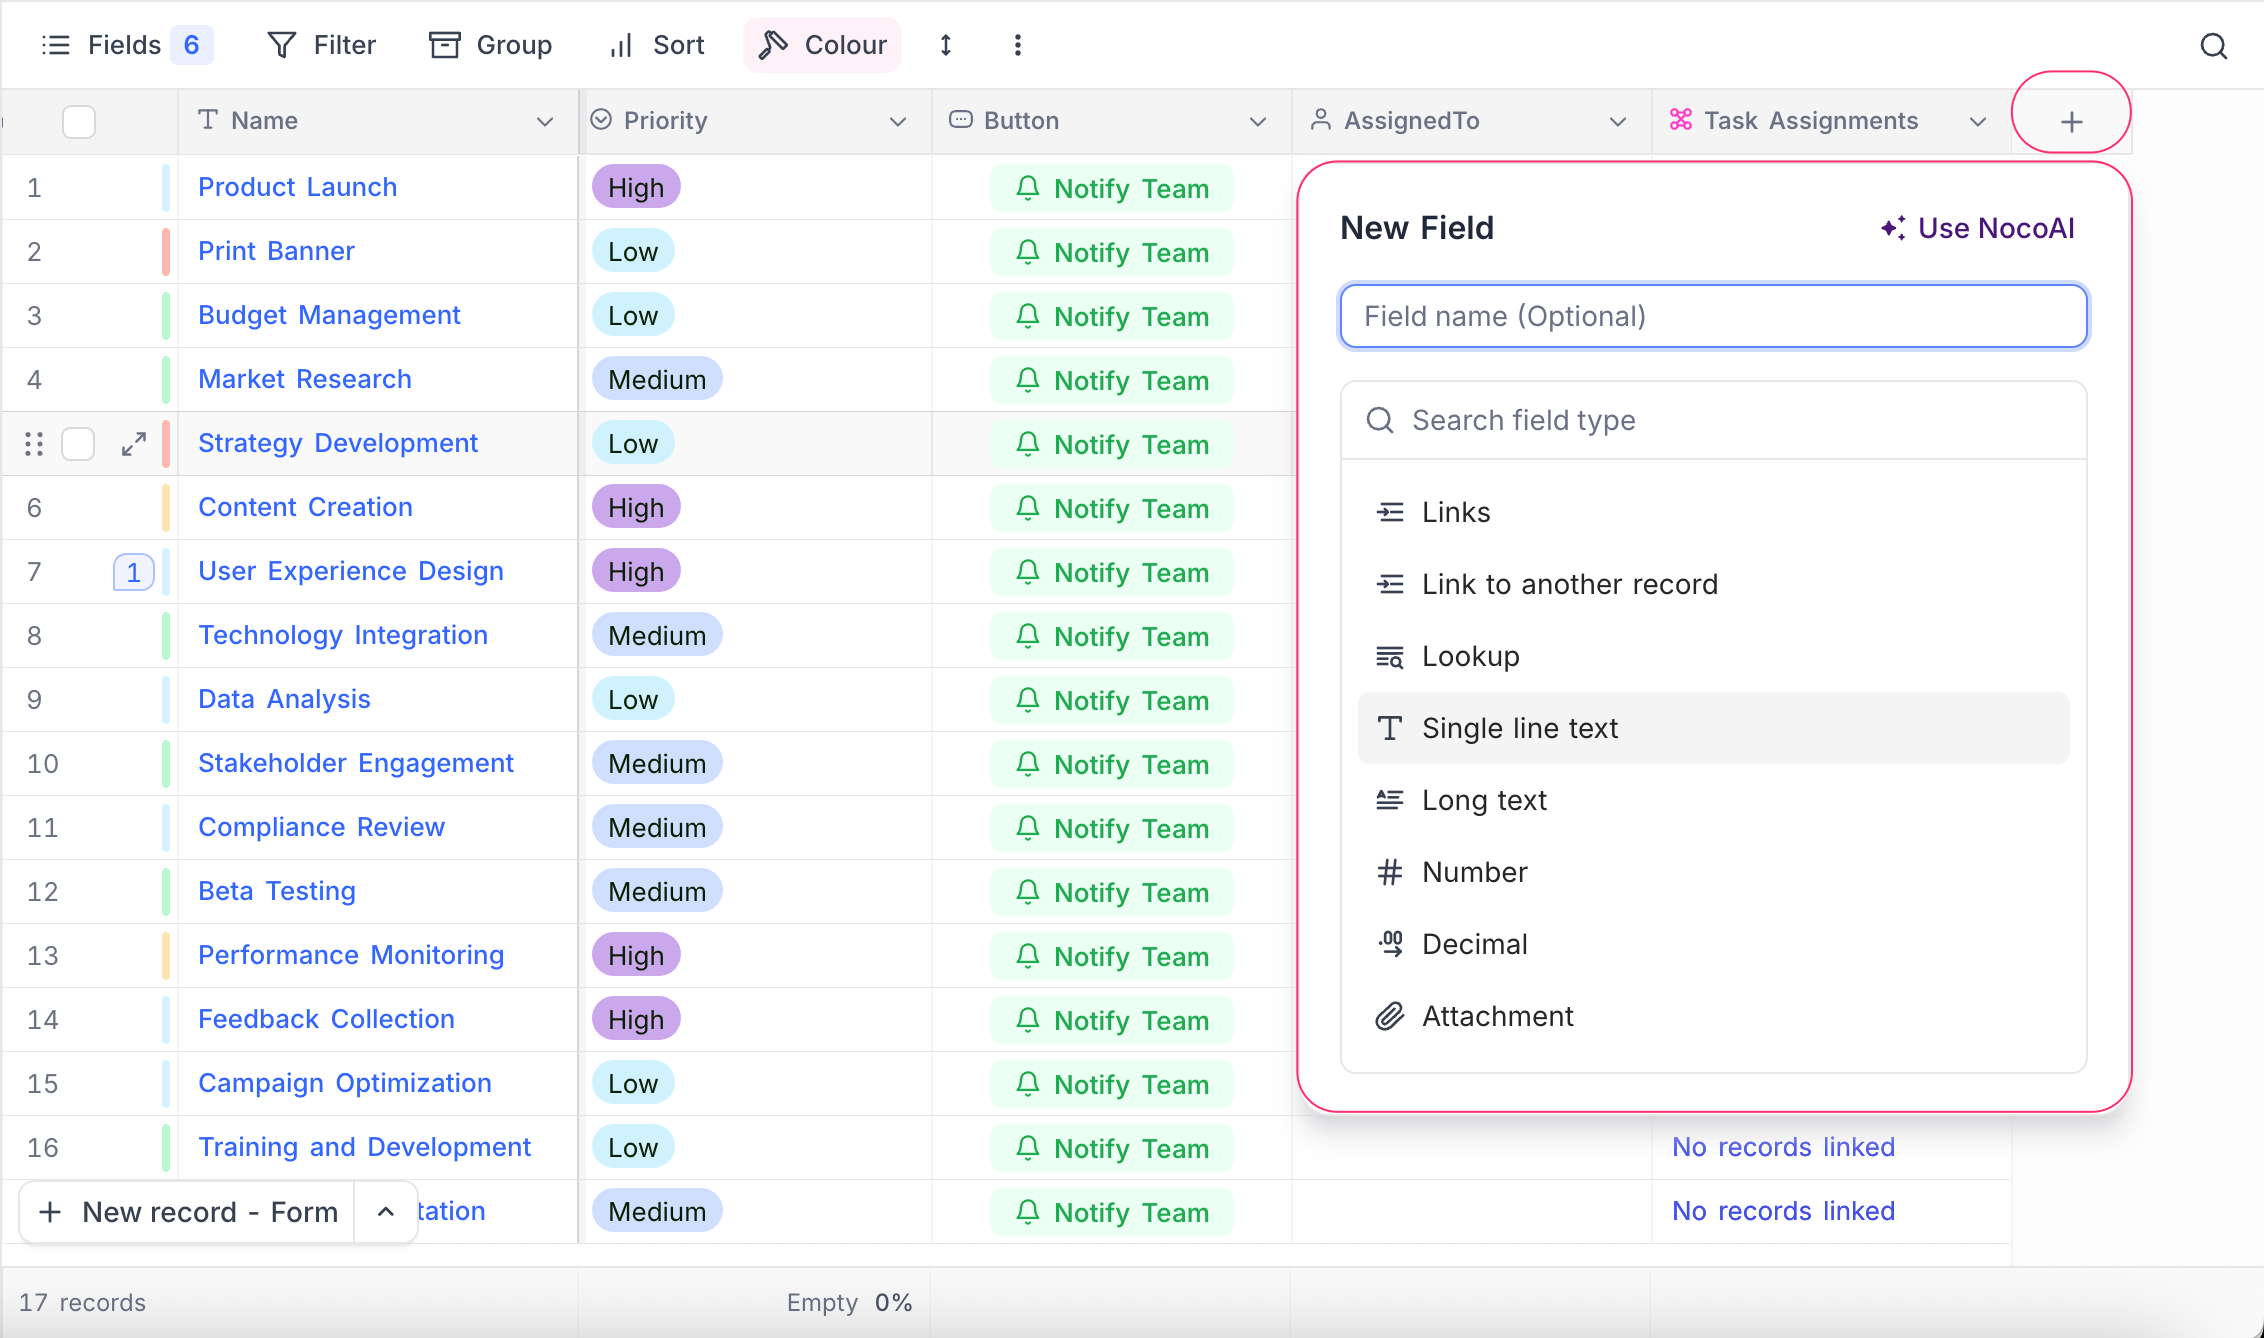
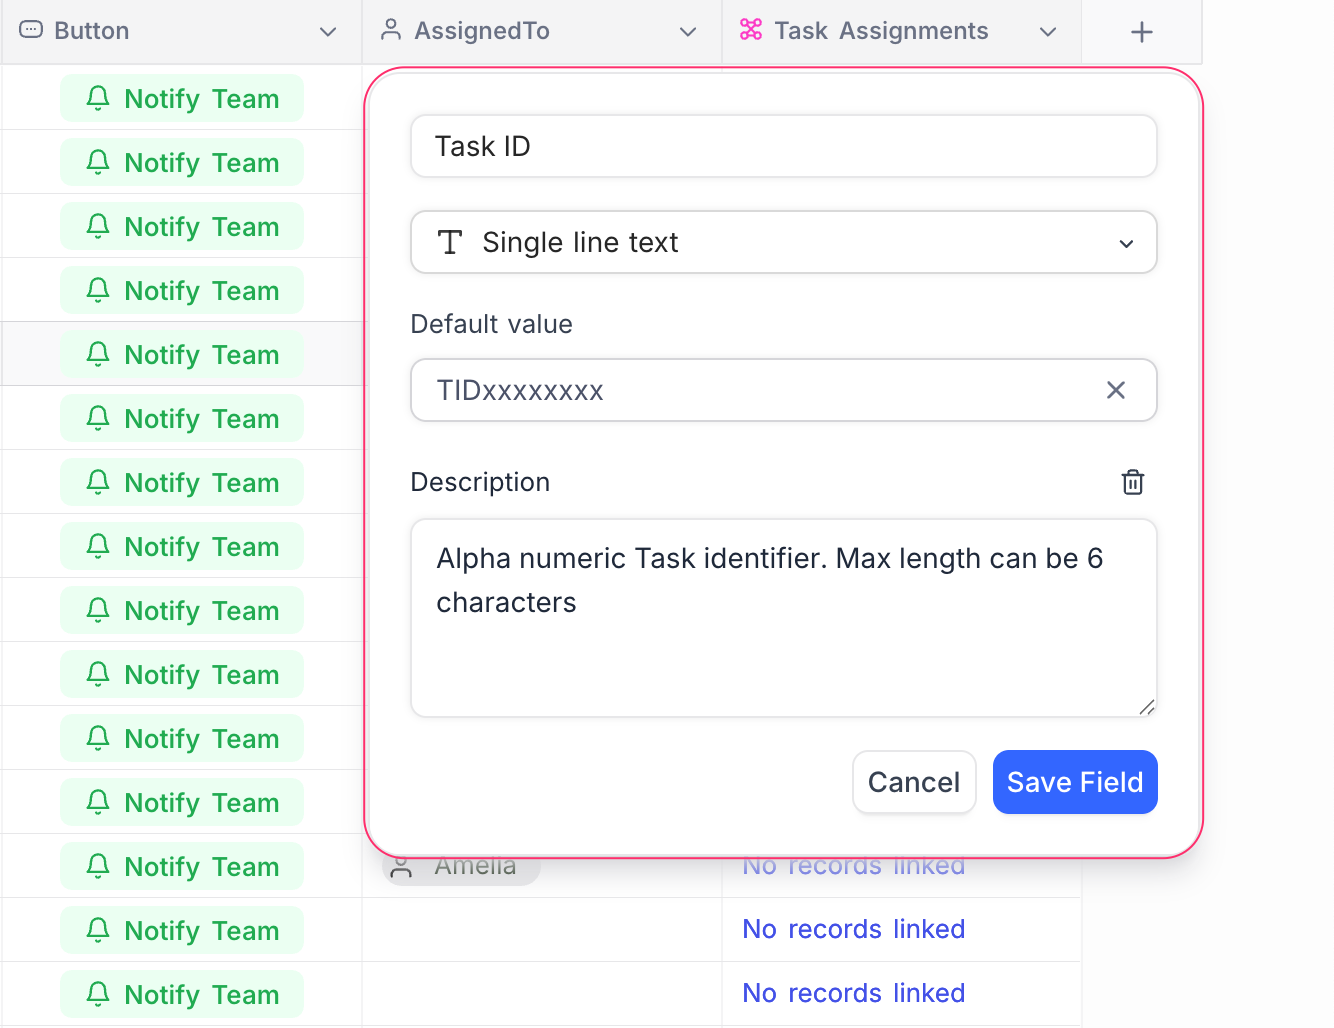
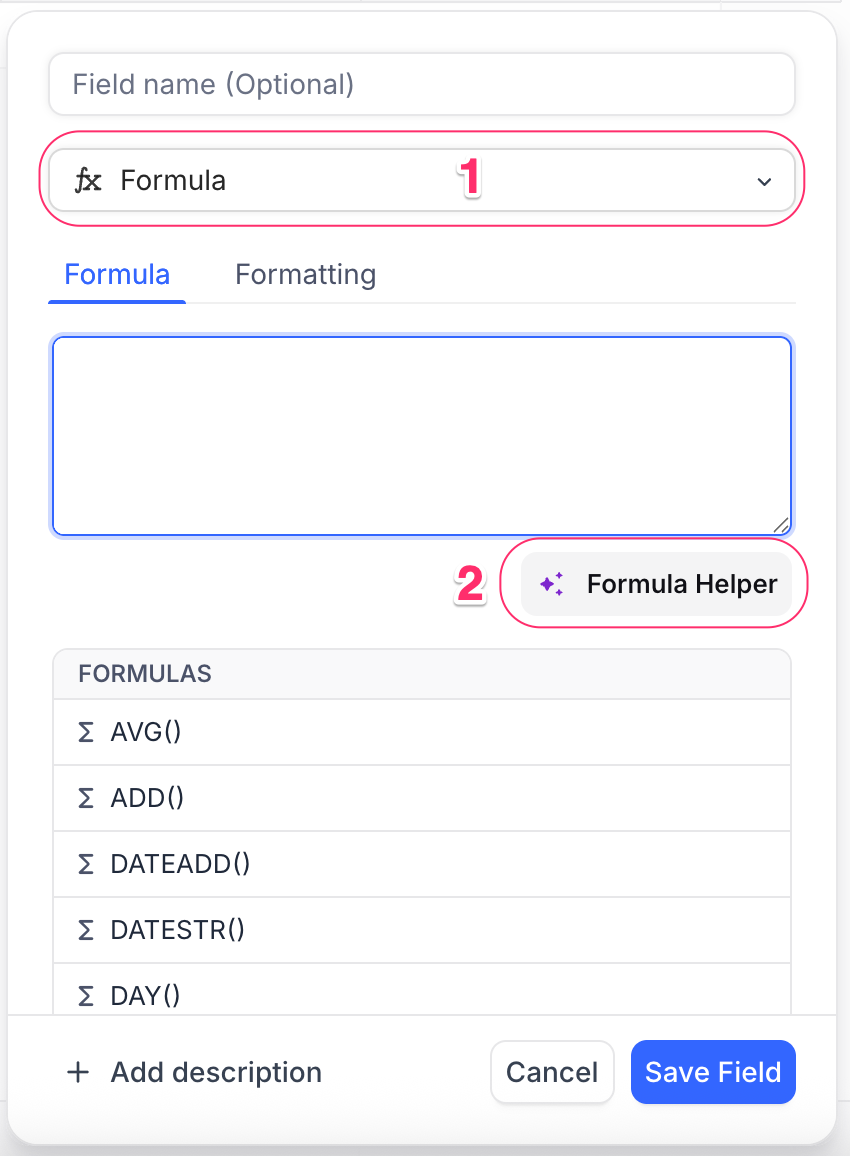
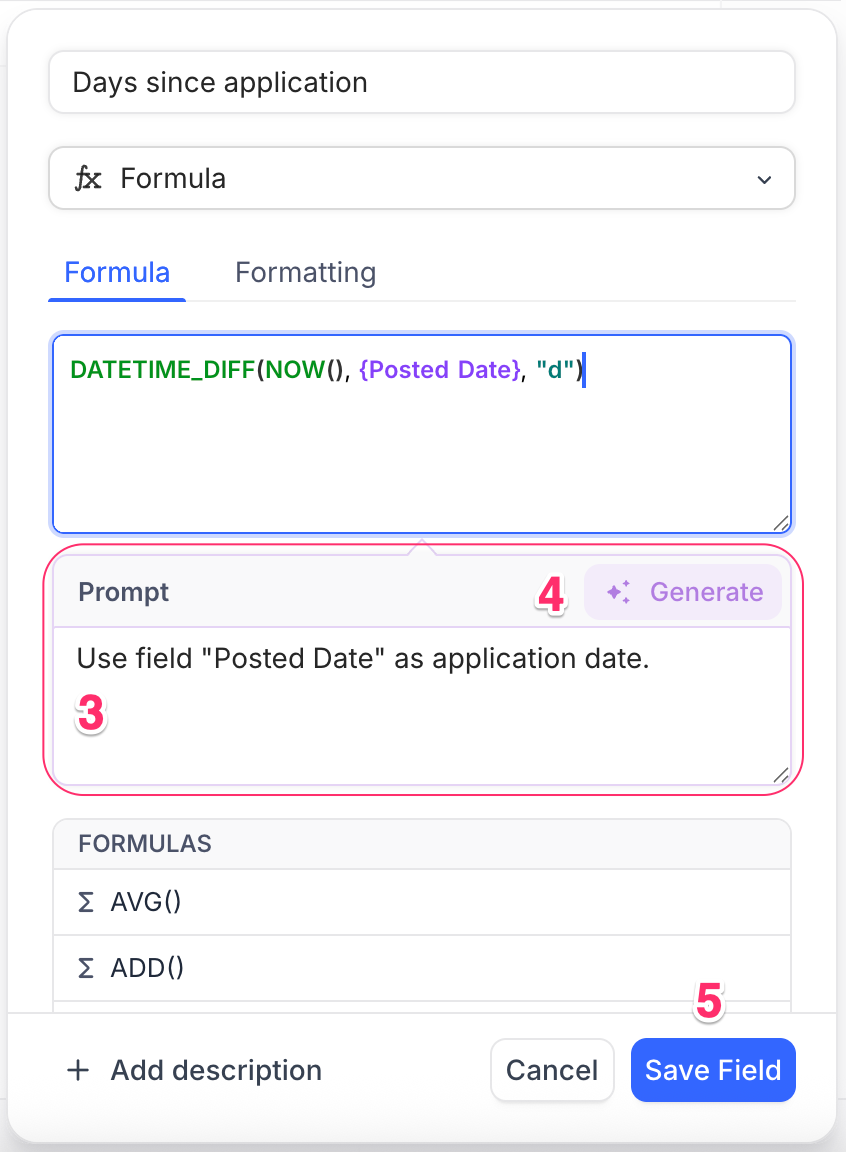
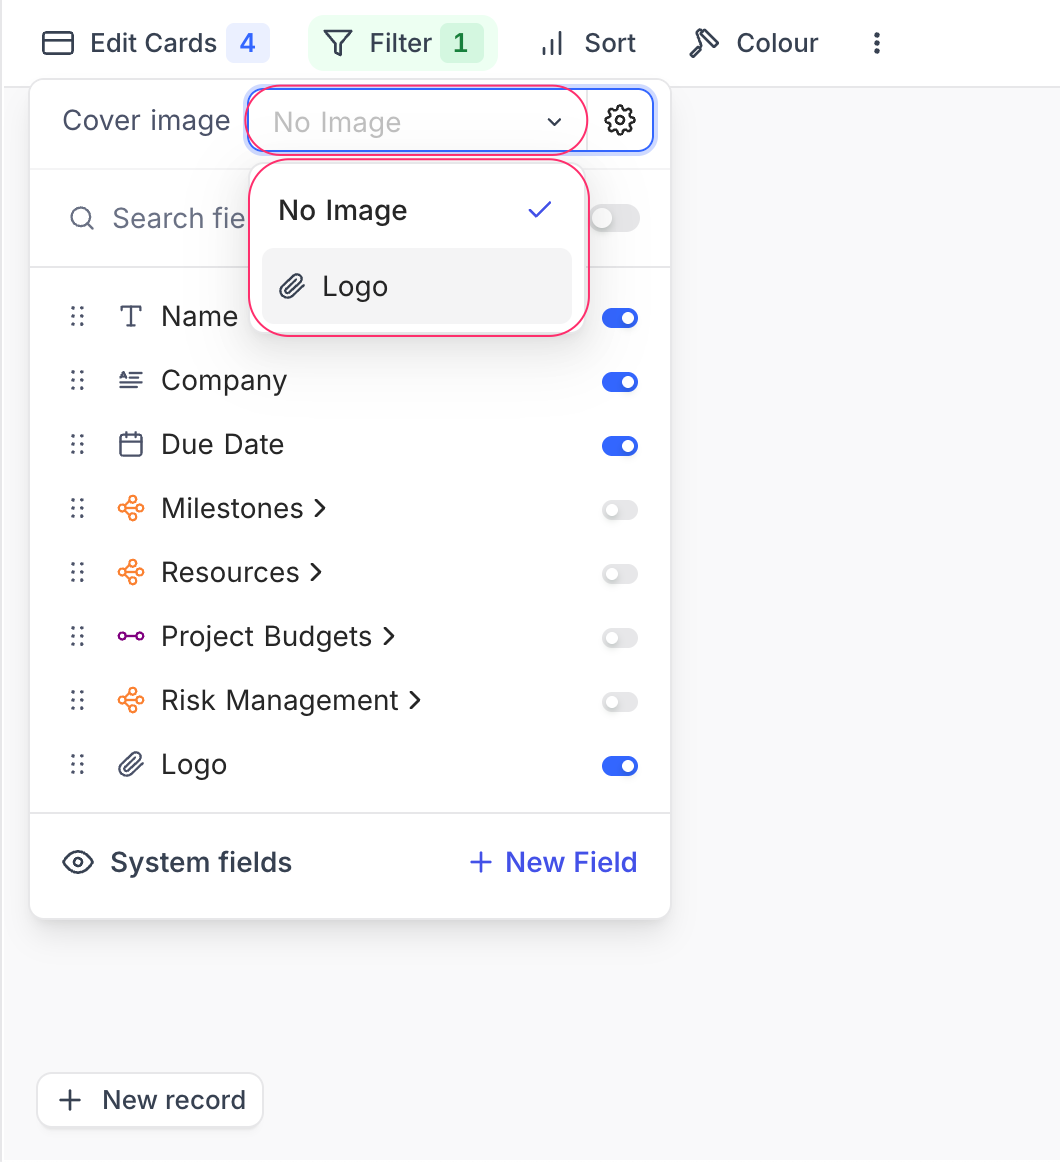
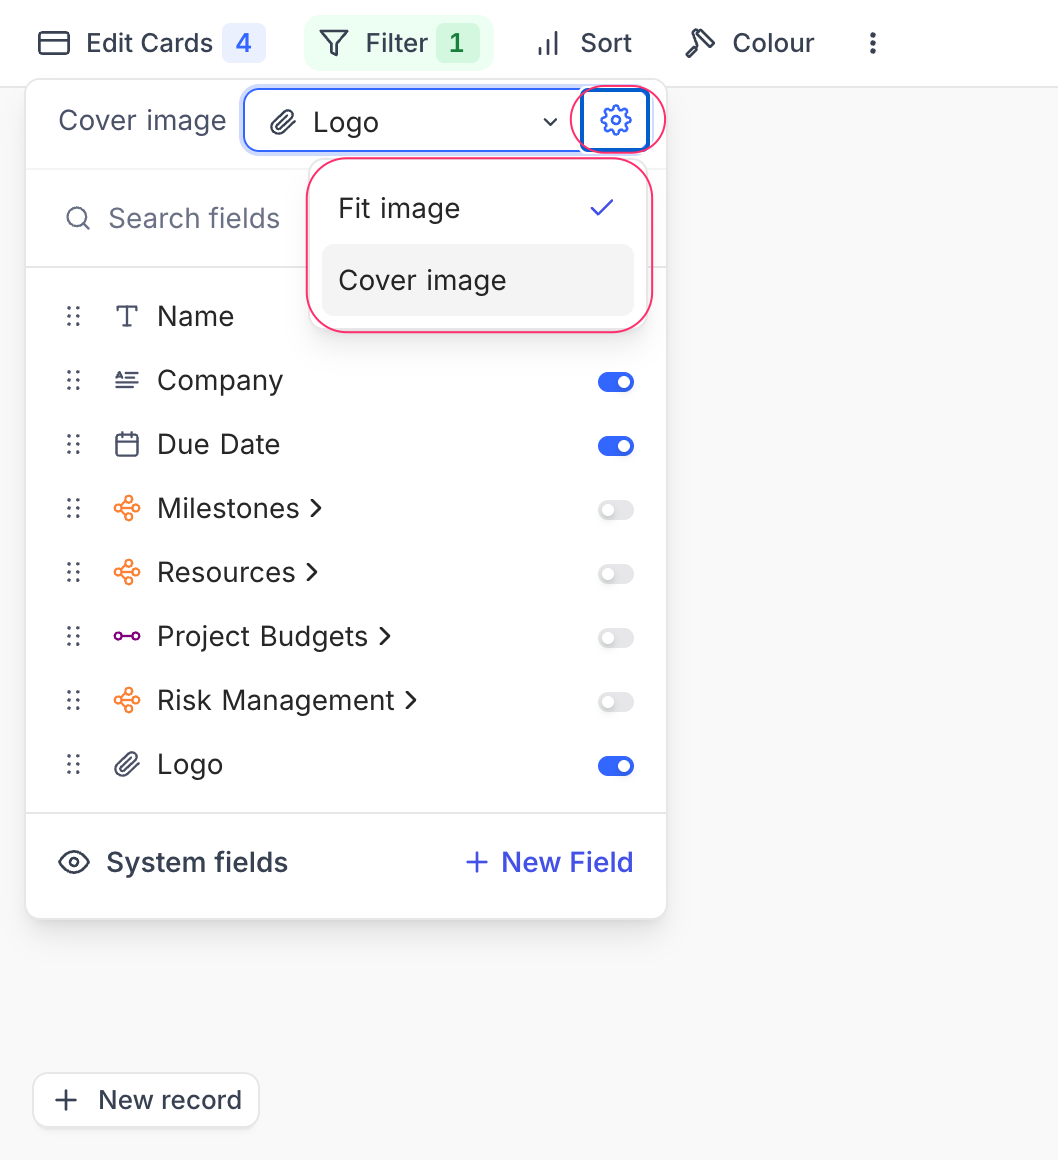
 ## Data Source
* **Table**: Select the table from which you want to pull data for the bar chart.
* **Records**: Choose which records to include:
* **All Records**: Displays all records from the selected table.
* **Records from a view**: Uses records from a specific view, allowing you to apply existing filters and sorts.
* **Specific Records**: Apply custom filters to select only certain records.
## Data Source
* **Table**: Select the table from which you want to pull data for the bar chart.
* **Records**: Choose which records to include:
* **All Records**: Displays all records from the selected table.
* **Records from a view**: Uses records from a specific view, allowing you to apply existing filters and sorts.
* **Specific Records**: Apply custom filters to select only certain records.
 ## Display
### X-axis
* **Field**: Select the field whose values will be shown as categories along the X-axis (e.g., Product, Region, Status).
* **Sort By**: Choose the criteria to sort categories:
* **xAxis Value**: Sorts based on the label values.
* **yAxis Value**: Sorts based on the numeric values plotted.
* **Order**: Select Default, Ascending, or Descending order.
* **Include empty records**: Optionally, include categories that do not have values.
* **Include others**: Toggle to combine small or excess categories into an “Others” group for better readability.
### Y-axis
* **Fields**: Choose the field(s) that determine the bar lengths. You can add multiple fields for comparison.
* **Field Summary**: Displays the **Sum, Average, Min, or Max** of a numeric field.
* **Start at zero**: Ensures the Y-axis always begins at zero, which improves accuracy in comparing bar heights.
## Display
### X-axis
* **Field**: Select the field whose values will be shown as categories along the X-axis (e.g., Product, Region, Status).
* **Sort By**: Choose the criteria to sort categories:
* **xAxis Value**: Sorts based on the label values.
* **yAxis Value**: Sorts based on the numeric values plotted.
* **Order**: Select Default, Ascending, or Descending order.
* **Include empty records**: Optionally, include categories that do not have values.
* **Include others**: Toggle to combine small or excess categories into an “Others” group for better readability.
### Y-axis
* **Fields**: Choose the field(s) that determine the bar lengths. You can add multiple fields for comparison.
* **Field Summary**: Displays the **Sum, Average, Min, or Max** of a numeric field.
* **Start at zero**: Ensures the Y-axis always begins at zero, which improves accuracy in comparing bar heights.
 ## Appearance
Customize the look of the chart to improve readability and alignment with your dashboard:
* **Size**: Choose the chart size (Small, Medium).
* **Show value in chart**: Displays numeric values directly on the bars.
* **Show count in legend**: Adds record counts in the legend alongside category names.
## Appearance
Customize the look of the chart to improve readability and alignment with your dashboard:
* **Size**: Choose the chart size (Small, Medium).
* **Show value in chart**: Displays numeric values directly on the bars.
* **Show count in legend**: Adds record counts in the legend alongside category names.
 # Donut Chart
URL: /docs/product-docs/dashboards/widgets/donut-chart
Configure donut chart widgets to visualize data distribution in your dashboard
The **Donut Chart** widget in NocoDB dashboards is a variant of the pie chart that features a hollow center, allowing for additional information or metrics to be displayed. It is particularly useful for showing how different segments contribute to a whole while providing space for supplementary details.
## Title & Description
* **Title**: Enter a title for the donut chart widget. This will be displayed prominently at the top of the widget.
* **Description**: Optionally, add a description to provide context or details about the data being visualized. This will appear below the title.
# Donut Chart
URL: /docs/product-docs/dashboards/widgets/donut-chart
Configure donut chart widgets to visualize data distribution in your dashboard
The **Donut Chart** widget in NocoDB dashboards is a variant of the pie chart that features a hollow center, allowing for additional information or metrics to be displayed. It is particularly useful for showing how different segments contribute to a whole while providing space for supplementary details.
## Title & Description
* **Title**: Enter a title for the donut chart widget. This will be displayed prominently at the top of the widget.
* **Description**: Optionally, add a description to provide context or details about the data being visualized. This will appear below the title.
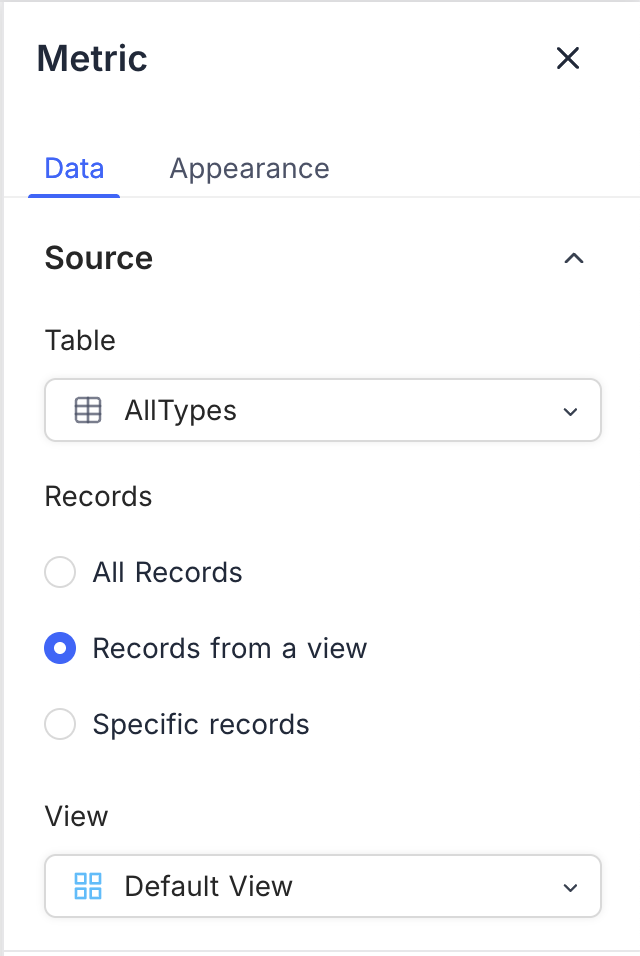
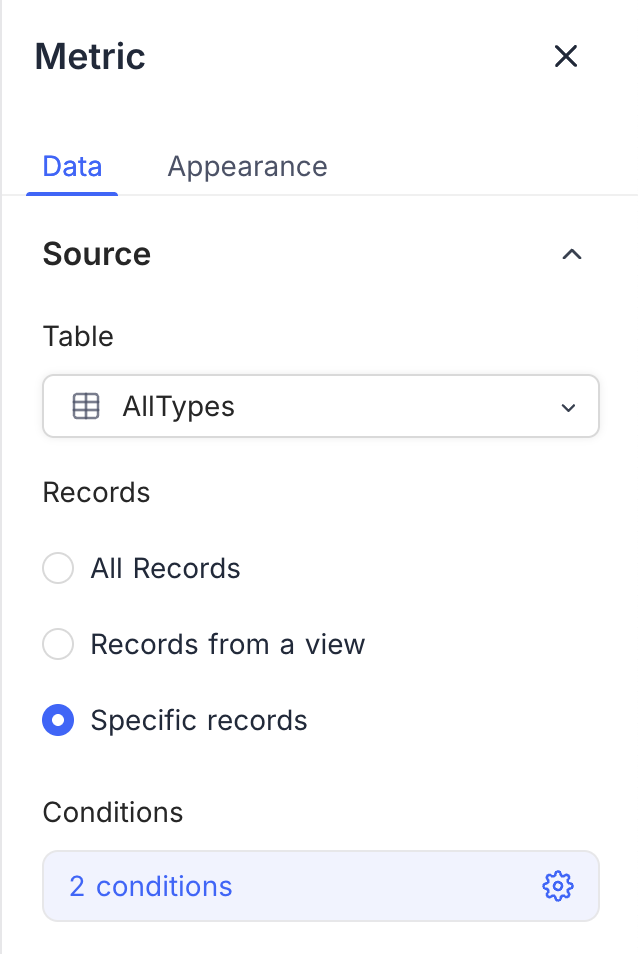
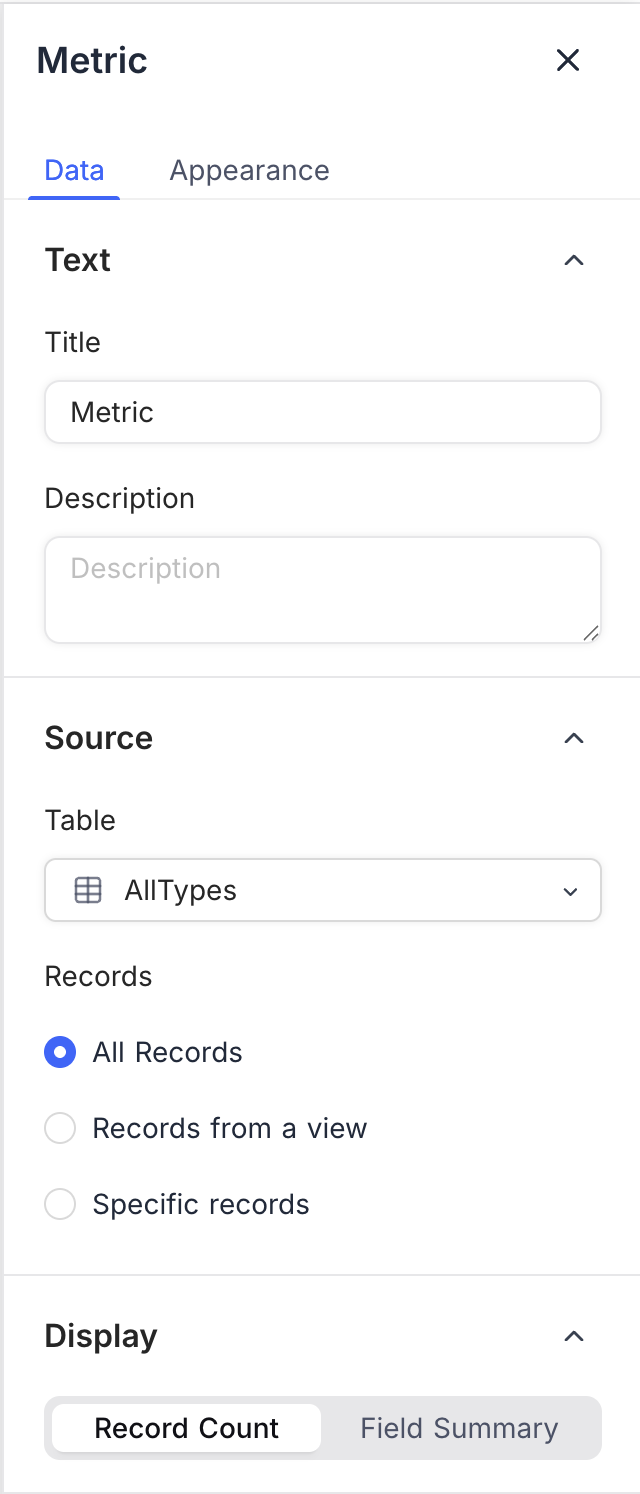
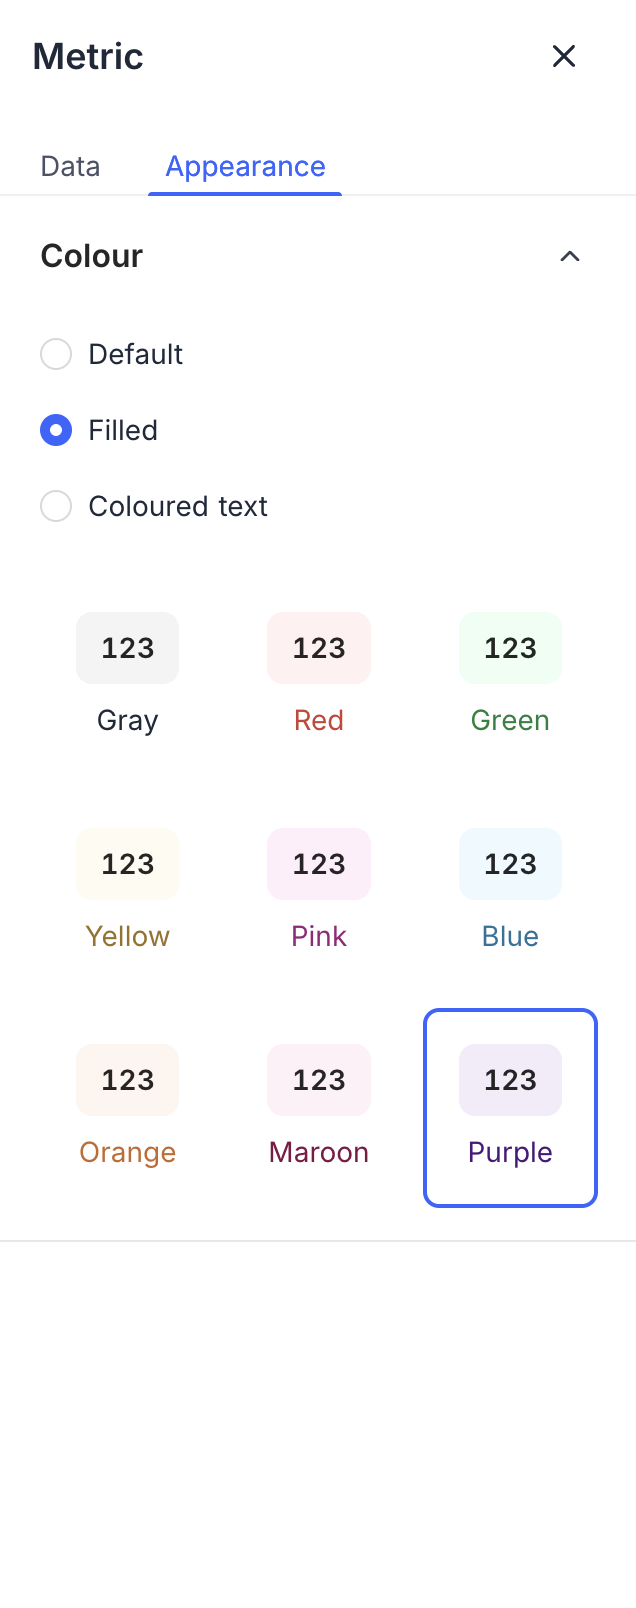
 ## Data Source
* **Table**: Select the table from which you want to pull data for the line chart.
* **Records**: Choose which records to include:
* **All Records**: Displays all records from the selected table.
* **Records from a view**: Uses records from a specific view, allowing you to apply filters and sorts.
* **Specific Records**: Apply custom filters to select only certain records.
## Data Source
* **Table**: Select the table from which you want to pull data for the line chart.
* **Records**: Choose which records to include:
* **All Records**: Displays all records from the selected table.
* **Records from a view**: Uses records from a specific view, allowing you to apply filters and sorts.
* **Specific Records**: Apply custom filters to select only certain records.
 ## Display
### X-axis
* **Field**: Select the field whose values will be shown along the X-axis (e.g., Date, Product, Category).
* **Sort By**: Choose how categories are sorted:
* **xAxis Value**: Sorts based on the label values.
* **yAxis Value**: Sorts based on the numeric values plotted.
* **Order**: Select Default, Ascending, or Descending.
* **Include empty records**: Optionally include categories that have no values.
* **Include others**: Toggle to group smaller categories into an “Others” bucket.
### Y-axis
* **Fields**: Choose the field(s) to plot on the Y-axis. You can add multiple fields to display multiple lines in the chart.
* **Record Count**: Shows the number of records for each category.
* **Field Summary**: Displays the **Sum, Average, Min, or Max** of a numeric field.
* **Start at zero**: Ensures the Y-axis always begins at zero for consistency.
## Display
### X-axis
* **Field**: Select the field whose values will be shown along the X-axis (e.g., Date, Product, Category).
* **Sort By**: Choose how categories are sorted:
* **xAxis Value**: Sorts based on the label values.
* **yAxis Value**: Sorts based on the numeric values plotted.
* **Order**: Select Default, Ascending, or Descending.
* **Include empty records**: Optionally include categories that have no values.
* **Include others**: Toggle to group smaller categories into an “Others” bucket.
### Y-axis
* **Fields**: Choose the field(s) to plot on the Y-axis. You can add multiple fields to display multiple lines in the chart.
* **Record Count**: Shows the number of records for each category.
* **Field Summary**: Displays the **Sum, Average, Min, or Max** of a numeric field.
* **Start at zero**: Ensures the Y-axis always begins at zero for consistency.
 ## Appearance
Customize how the chart is displayed for clarity and readability:
* **Size**: Adjust the chart size (Small, Medium).
* **Legend Orientation**: Choose where to display the legend (Top, Bottom, Left, Right).
* **Show count in legend**: Enable to display record counts in the legend.
* **Plot data points**: Enable to highlight data points on the line.
* **Smooth lines**: Enable to display smoothed curves instead of jagged lines.
## Appearance
Customize how the chart is displayed for clarity and readability:
* **Size**: Adjust the chart size (Small, Medium).
* **Legend Orientation**: Choose where to display the legend (Top, Bottom, Left, Right).
* **Show count in legend**: Enable to display record counts in the legend.
* **Plot data points**: Enable to highlight data points on the line.
* **Smooth lines**: Enable to display smoothed curves instead of jagged lines.
 # Number
URL: /docs/product-docs/dashboards/widgets/number
Configure number widgets to display key metrics in your dashboard
The section here details various configuration options available for the **Number** widget in NocoDB dashboards. This widget is designed to display key performance indicators (KPIs) and metric summaries in a clear, concise format.
## Title & description
* **Title**: Enter a title for the number widget. This will be displayed prominently at the top of the widget.
* **Description**: Optionally, add a description to provide context or details about the metric being displayed. This will appear below the title.
# Number
URL: /docs/product-docs/dashboards/widgets/number
Configure number widgets to display key metrics in your dashboard
The section here details various configuration options available for the **Number** widget in NocoDB dashboards. This widget is designed to display key performance indicators (KPIs) and metric summaries in a clear, concise format.
## Title & description
* **Title**: Enter a title for the number widget. This will be displayed prominently at the top of the widget.
* **Description**: Optionally, add a description to provide context or details about the metric being displayed. This will appear below the title.