# Colouring Records
> Part of the NocoDB documentation (Product docs > Tables > Table Operations > Work with Data). Index of all pages: https://nocodb.com/llms.txt. Any docs page is available as Markdown by adding `.md` to its URL.
URL: https://nocodb.com/docs/product/tables/table-operations/record-colouring
Last updated: 2026-09-25
Learn how to colour records and individual fields in NocoDB.
 In NocoDB, you can apply colours to records in a table to visually distinguish them based on specific criteria. This feature is particularly useful for highlighting important information or categorizing records. Record colouring is available for Grid, Gallery, Kanban & Calendar views.
When using conditions-based colouring, you can choose between two colouring modes:
* **Row colouring** — applies colour to the entire record (available on Plus plan and higher)
* **Cell colouring** — applies colour to a specific field within the record (available on Business plan and higher)
Colouring is applied at view level; hence, configuring colour in one view will not affect the same record in another view.
Create a view that colours rows red when [Due Date] has passed
Create a view that colours rows by [Priority]
Create a view that highlights records where [Status] is [Blocked]
## Add record colour
You can access the record colouring options by clicking the `Colour` button in the toolbar of any table view.
In NocoDB, you can apply colours to records in a table to visually distinguish them based on specific criteria. This feature is particularly useful for highlighting important information or categorizing records. Record colouring is available for Grid, Gallery, Kanban & Calendar views.
When using conditions-based colouring, you can choose between two colouring modes:
* **Row colouring** — applies colour to the entire record (available on Plus plan and higher)
* **Cell colouring** — applies colour to a specific field within the record (available on Business plan and higher)
Colouring is applied at view level; hence, configuring colour in one view will not affect the same record in another view.
Create a view that colours rows red when [Due Date] has passed
Create a view that colours rows by [Priority]
Create a view that highlights records where [Status] is [Blocked]
## Add record colour
You can access the record colouring options by clicking the `Colour` button in the toolbar of any table view.
 You can colour your records based on
1. Single select field
2. Conditions
### Based on single select field
To colour records based on a single select field, follow these steps:
1. Click the `Colour` button in the toolbar.
2. Select the `Using Single select field` option.
3. Choose the single select field you want to use for colouring records from the dropdown menu.
When colouring records using a single select field, each record inherits the colour associated with its selected option in that field. Records without a value in the selected field will not be coloured. This behaviour is predefined and cannot be customized.
You can colour your records based on
1. Single select field
2. Conditions
### Based on single select field
To colour records based on a single select field, follow these steps:
1. Click the `Colour` button in the toolbar.
2. Select the `Using Single select field` option.
3. Choose the single select field you want to use for colouring records from the dropdown menu.
When colouring records using a single select field, each record inherits the colour associated with its selected option in that field. Records without a value in the selected field will not be coloured. This behaviour is predefined and cannot be customized.
 Row colouring by default applies a left border to the records in the table view. You can additionally apply background colour to the records by toggling the `Background colour` option.
 ### Based on conditions
To colour records based on conditions, follow these steps:
1. Click the `Colour` button in the toolbar.
2. Select the `Using Conditions` option.
3. Choose the colour you want to apply from the colour picker.
4. Select the colouring mode — `Row` or `Cell` — from the dropdown next to the colour picker.
5. If you selected `Cell`, choose the target field from the field dropdown that appears.
6. Configure the conditions for colouring as required.
{/* 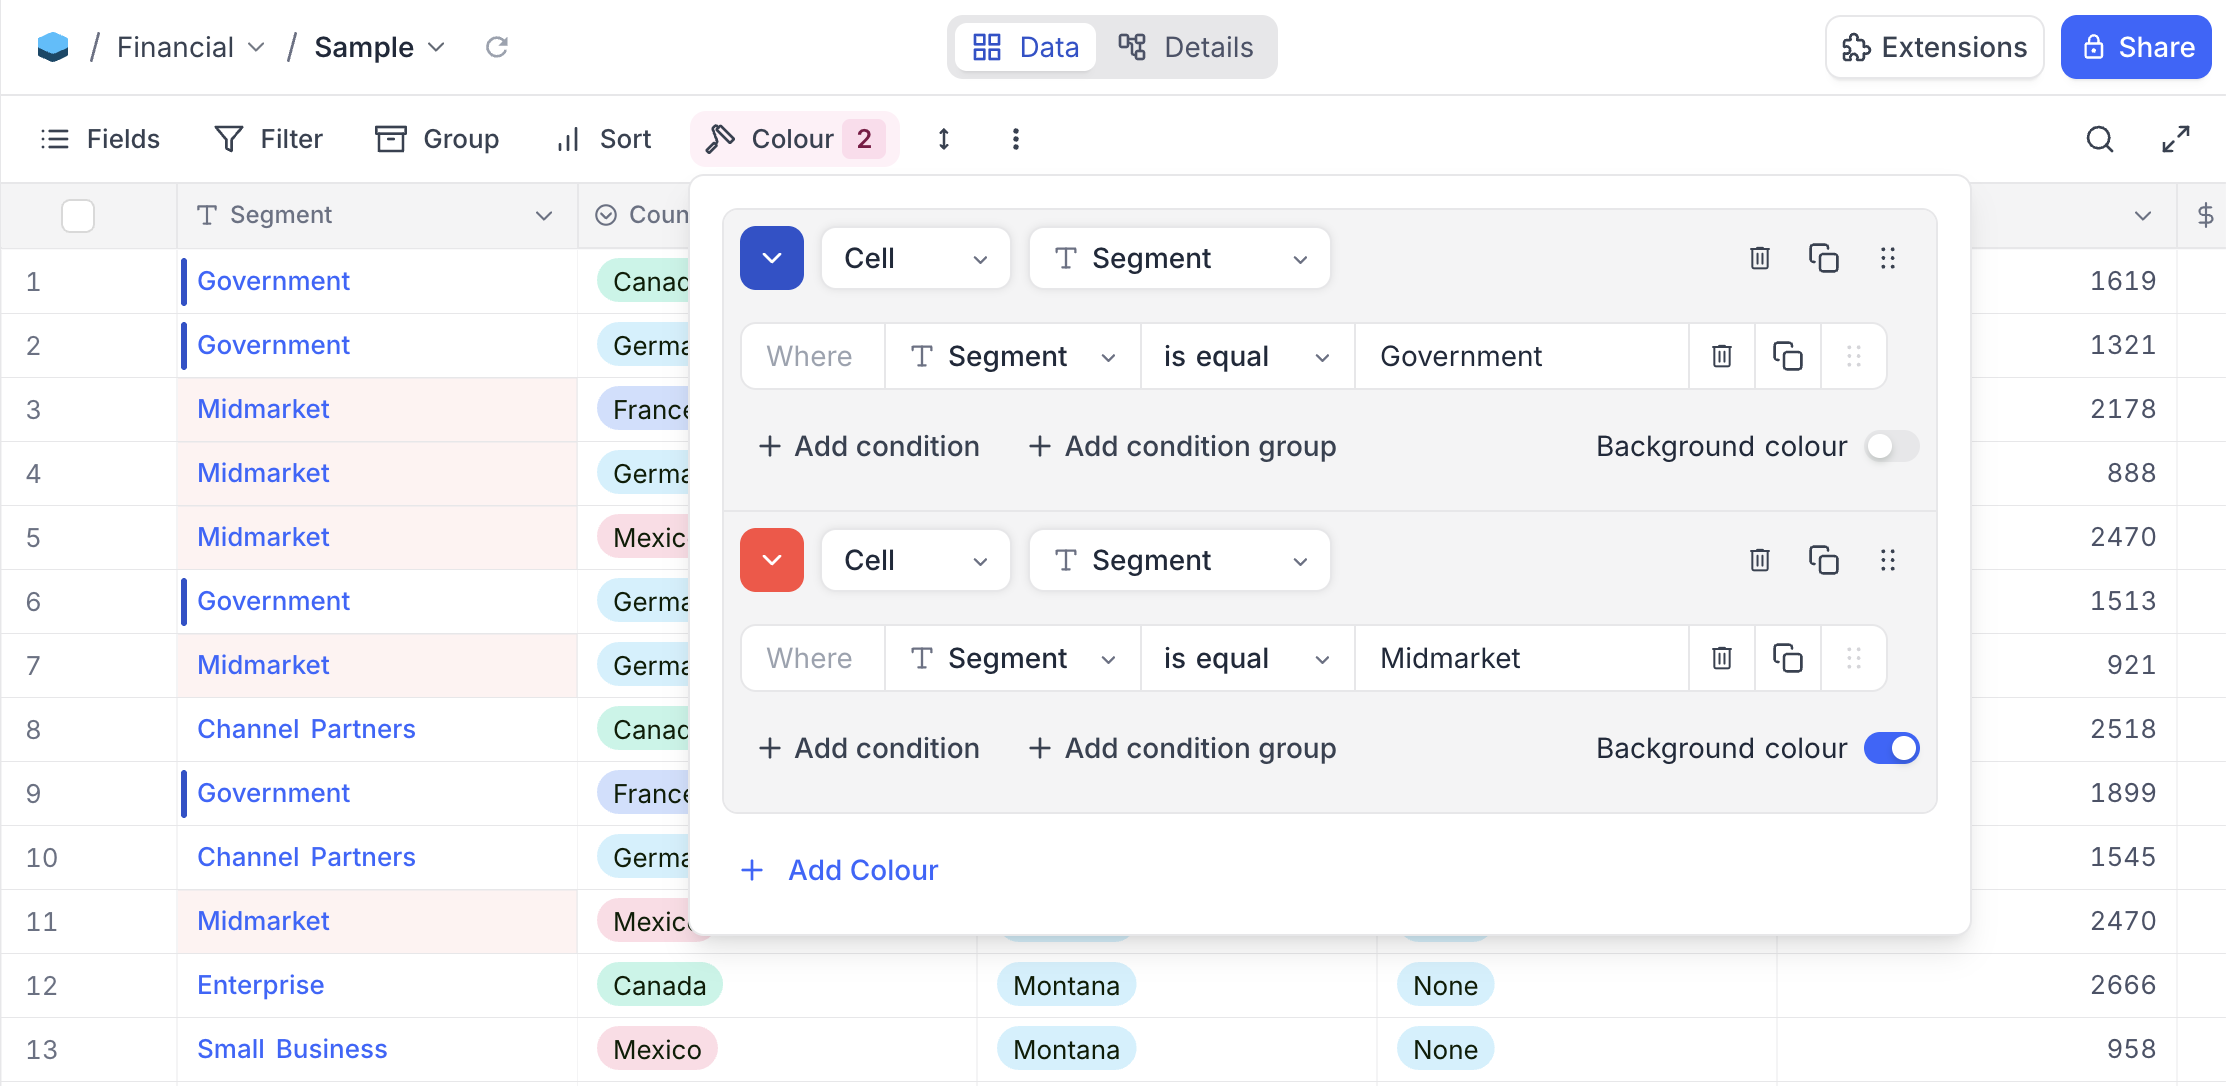 */}
You can add multiple conditions to colour records based on different criteria. The conditions are evaluated in the order they are added, and the **first matching condition will determine the colour** applied to the record or cell.
#### Row colouring
When the colouring mode is set to `Row`, the colour is applied to the entire record. This is the default mode.
Row colouring by default applies a left border to the records in the table view. You can additionally apply background colour to the records by toggling the `Background colour` option.
### Based on conditions
To colour records based on conditions, follow these steps:
1. Click the `Colour` button in the toolbar.
2. Select the `Using Conditions` option.
3. Choose the colour you want to apply from the colour picker.
4. Select the colouring mode — `Row` or `Cell` — from the dropdown next to the colour picker.
5. If you selected `Cell`, choose the target field from the field dropdown that appears.
6. Configure the conditions for colouring as required.
{/*  */}
You can add multiple conditions to colour records based on different criteria. The conditions are evaluated in the order they are added, and the **first matching condition will determine the colour** applied to the record or cell.
#### Row colouring
When the colouring mode is set to `Row`, the colour is applied to the entire record. This is the default mode.
Row colouring by default applies a left border to the records in the table view. You can additionally apply background colour to the records by toggling the `Background colour` option.
 #### Cell colouring
Cell colouring requires the Business plan or higher.
When the colouring mode is set to `Cell`, the colour is applied only to the specific field you select. This is useful when you want to draw attention to a particular field value without colouring the entire row.
To configure cell colouring:
1. Select `Cell` from the colouring mode dropdown next to the colour picker.
2. Choose the target field from the field selector that appears.
3. Configure the conditions and toggle the `Background colour` option as needed.
#### Cell colouring
Cell colouring requires the Business plan or higher.
When the colouring mode is set to `Cell`, the colour is applied only to the specific field you select. This is useful when you want to draw attention to a particular field value without colouring the entire row.
To configure cell colouring:
1. Select `Cell` from the colouring mode dropdown next to the colour picker.
2. Choose the target field from the field selector that appears.
3. Configure the conditions and toggle the `Background colour` option as needed.
 When background colour is enabled, the selected field's cell is highlighted with the chosen colour. When background colour is disabled, a vertical colour indicator bar appears on the left edge of the field.
{/*  */}
{/*  */}
Cell colouring is available only in Grid view.
#### Combining row and cell colouring
You can configure both row and cell colouring conditions within the same view. Each condition can independently be set to either `Row` or `Cell` mode. When both row and cell colouring apply to the same record, the cell colour takes precedence over the row colour for the targeted field, while the remaining fields display the row colour.
{/*  */}
## Modify record colour
* For record colouring based on single select field, you can modify the colour associated with each option in the single select field by using edit-field option.
* For record colouring based on conditions, you can modify the conditions, colouring mode (`Row` or `Cell`), target field, and the associated colours as required from the dropdown menu that appears when you click the `Colour` button in the toolbar.
Note that, it's not possible to have different colour for single select field options in different views. The colour associated with each option in the single select field is consistent across all views where that field is used for colouring records.
## Remove record colour
You can remove the colouring applied to records in a table view by following these steps:
### Single select field case
* Click the `Colour` button in the toolbar.
* Remove conditions one by one by clicking the `delete` button next to each condition.
When background colour is enabled, the selected field's cell is highlighted with the chosen colour. When background colour is disabled, a vertical colour indicator bar appears on the left edge of the field.
{/*  */}
{/*  */}
Cell colouring is available only in Grid view.
#### Combining row and cell colouring
You can configure both row and cell colouring conditions within the same view. Each condition can independently be set to either `Row` or `Cell` mode. When both row and cell colouring apply to the same record, the cell colour takes precedence over the row colour for the targeted field, while the remaining fields display the row colour.
{/*  */}
## Modify record colour
* For record colouring based on single select field, you can modify the colour associated with each option in the single select field by using edit-field option.
* For record colouring based on conditions, you can modify the conditions, colouring mode (`Row` or `Cell`), target field, and the associated colours as required from the dropdown menu that appears when you click the `Colour` button in the toolbar.
Note that, it's not possible to have different colour for single select field options in different views. The colour associated with each option in the single select field is consistent across all views where that field is used for colouring records.
## Remove record colour
You can remove the colouring applied to records in a table view by following these steps:
### Single select field case
* Click the `Colour` button in the toolbar.
* Remove conditions one by one by clicking the `delete` button next to each condition.
 ### Conditions case
* Click the `Colour` button in the toolbar.
* Click "Remove colouring" button from the dropdown.
### Conditions case
* Click the `Colour` button in the toolbar.
* Click "Remove colouring" button from the dropdown.
 ## Availability
* Row colouring is available on **NocoDB Cloud** (Plus plan and above), while cell colouring is available on **NocoDB Cloud** (Business plan and above). Both are available on licensed self-hosted deployments (Business plan and above).
---
## Related pages
- [Hide & Reorder Fields](https://nocodb.com/docs/product/tables/table-operations/field-operations.md): Learn how to hide and reorder fields in NocoDB.
- [Filtering Records](https://nocodb.com/docs/product/tables/table-operations/filter.md): Learn how to filter records in NocoDB.
- [Sorting Records](https://nocodb.com/docs/product/tables/table-operations/sort.md): Learn how to sort records in NocoDB.
- [Grouping Records](https://nocodb.com/docs/product/tables/table-operations/group-by.md): Learn how to group records in NocoDB.
- [Record Height](https://nocodb.com/docs/product/tables/table-operations/row-height.md): Learn how to adjust the height of records in NocoDB.
- [Freeze Fields](https://nocodb.com/docs/product/tables/table-operations/freeze-fields.md): Keep up to three fields pinned in place while scrolling horizontally in Grid view.
- [Search](https://nocodb.com/docs/product/tables/table-operations/search.md): Learn how to search for records in NocoDB.
- [Realtime Presence](https://nocodb.com/docs/product/tables/table-operations/realtime-presence.md): See who else is working in a table, live, with per-collaborator markers in the grid.
## Availability
* Row colouring is available on **NocoDB Cloud** (Plus plan and above), while cell colouring is available on **NocoDB Cloud** (Business plan and above). Both are available on licensed self-hosted deployments (Business plan and above).
---
## Related pages
- [Hide & Reorder Fields](https://nocodb.com/docs/product/tables/table-operations/field-operations.md): Learn how to hide and reorder fields in NocoDB.
- [Filtering Records](https://nocodb.com/docs/product/tables/table-operations/filter.md): Learn how to filter records in NocoDB.
- [Sorting Records](https://nocodb.com/docs/product/tables/table-operations/sort.md): Learn how to sort records in NocoDB.
- [Grouping Records](https://nocodb.com/docs/product/tables/table-operations/group-by.md): Learn how to group records in NocoDB.
- [Record Height](https://nocodb.com/docs/product/tables/table-operations/row-height.md): Learn how to adjust the height of records in NocoDB.
- [Freeze Fields](https://nocodb.com/docs/product/tables/table-operations/freeze-fields.md): Keep up to three fields pinned in place while scrolling horizontally in Grid view.
- [Search](https://nocodb.com/docs/product/tables/table-operations/search.md): Learn how to search for records in NocoDB.
- [Realtime Presence](https://nocodb.com/docs/product/tables/table-operations/realtime-presence.md): See who else is working in a table, live, with per-collaborator markers in the grid.